Page 498 of 601

497 Practical hints
Unlocking/locking in an emergency
Locking the vehicle
If you cannot lock the vehicle with the
SmartKey or KEYLESS-GO*, lock the vehi-
cle carrying out the following steps.
�Close the front passenger door, the
rear right door and the tailgate.
�Open the driver’s door and the rear left
door.
�Press the central locking switch on the
driver’s door (
�page 128).
The locking knobs of the front passen-
ger door and the rear doors move
down.
If the vehicle battery is disconnected or
drained:
�Press down the locking knobs of
the front passenger door and the
rear doors manually.
�Exit the vehicle.
�Close the driver’s door.
�Enter the vehicle through the rear left
door.
�Press down the locking knob of the
driver’s door.
�Exit the vehicle.
�Close the rear left door.
The vehicle is locked.
Fuel filler flap
�Open the tailgate (�page 122).
The fuel filler flap release is located behind
a cover in the right side trim panel of the
cargo compartment.
1Lock
2Cover
!To prevent inadvertent lockout, make sure
to have the SmartKey or SmartKey with
KEYLESS-GO* with you before proceeding with
the next step. The next step will lock the vehicle.
iThis procedure does not arm the anti-theft
alarm system, nor does it lock the fuel filler flap.
��
164.boo Seite 497 Freitag, 30. März 2007 12:54 12
Page 499 of 601
498 Practical hints
Unlocking/locking in an emergency
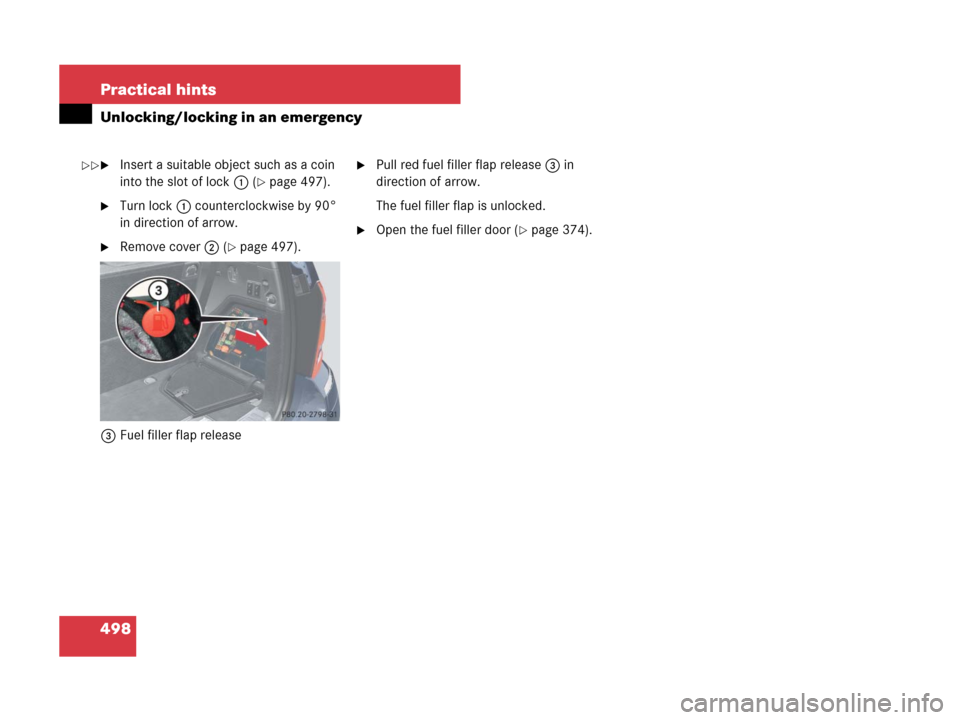
�Insert a suitable object such as a coin
into the slot of lock1 (
�page 497).
�Turn lock1 counterclockwise by 90°
in direction of arrow.
�Remove cover2 (�page 497).
3Fuel filler flap release
�Pull red fuel filler flap release3 in
direction of arrow.
The fuel filler flap is unlocked.
�Open the fuel filler door (�page 374).
��
164.boo Seite 498 Freitag, 30. März 2007 12:54 12
Page 503 of 601

502 Practical hints
Replacing SmartKey batteries
If the batteries in the SmartKey or the
SmartKey with KEYLESS-GO* are dis-
charged, the vehicle can no longer be
locked or unlocked. It is recommended to
have the batteries replaced at an autho-
rized Mercedes-Benz Light Truck Center.
Batteries contain materials that can harm
the environment if disposed of improperly.
Recycling of batteries is the preferred
method of disposal. Many states require
sellers of batteries to accept old batteries
for recycling.Replacement batteries: Lithium, type
CR 2025 or equivalent.
�Remove mechanical key1 from the
SmartKey or SmartKey with
KEYLESS-GO* (
�page 496).1Mechanical key
2Battery compartment
�Insert mechanical key1 into opening.
�Press mechanical key1 in direction of
arrow.
The battery compartment2 is
unlatched.
�Pull battery compartment2 out of the
SmartKey housing.
Warning!G
Keep the batteries out of reach of children.
If a battery is swallowed, seek medical help
immediately.
iWhen inserting the batteries, make sure
they are clean and free of lint.
iWhen replacing batteries, always replace
both batteries.
The required replacement batteries are available
at any Mercedes-Benz Light Truck Center.
164.boo Seite 502 Freitag, 30. März 2007 12:54 12
Page 504 of 601
503 Practical hints
Replacing SmartKey batteries
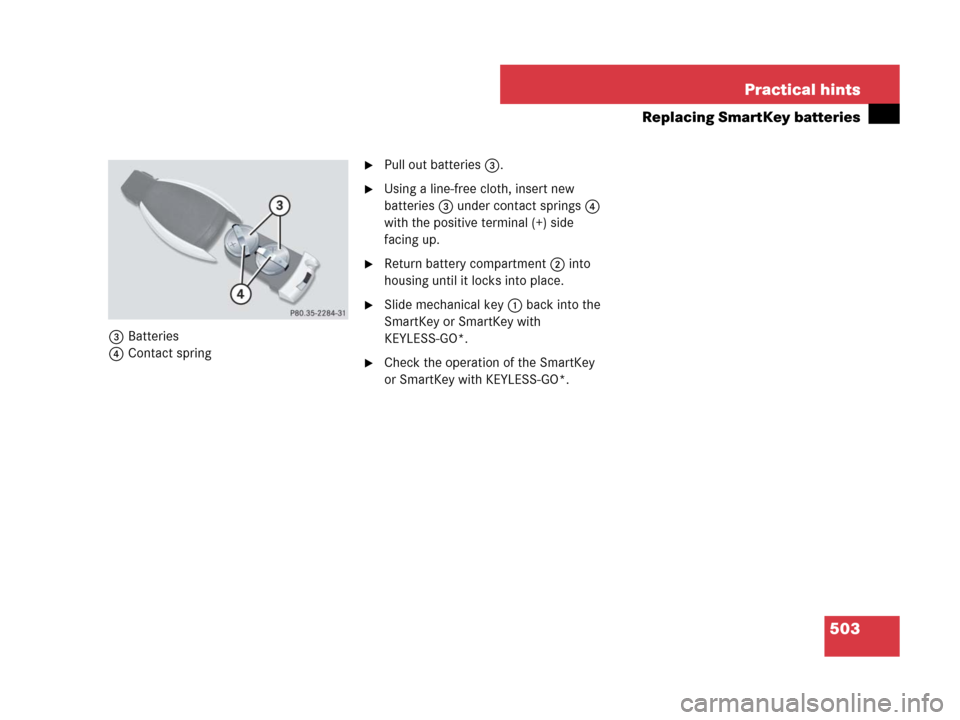
3Batteries
4Contact spring
�Pull out batteries3.
�Using a line-free cloth, insert new
batteries3 under contact springs4
with the positive terminal (+) side
facing up.
�Return battery compartment2 into
housing until it locks into place.
�Slide mechanical key1 back into the
SmartKey or SmartKey with
KEYLESS-GO*.
�Check the operation of the SmartKey
or SmartKey with KEYLESS-GO*.
164.boo Seite 503 Freitag, 30. März 2007 12:54 12
Page 509 of 601
508 Practical hints
Replacing bulbs
�Turn cover1 counterclockwise.
�Remove cover1.
�Turn bulb socket2 counterclockwise.
�Pull bulb socket2 out of the
headlamp housing.
�Pull the low beam bulb out of bulb
socket2.
�Insert the new low beam bulb into bulb
socket2.
�Insert bulb socket2 into the
headlamp housing.
�Turn bulb socket2 clockwise until it
engages.
�Place cover1 on the opening in the
headlamp housing.
�Turn cover1 clockwise until it engag-
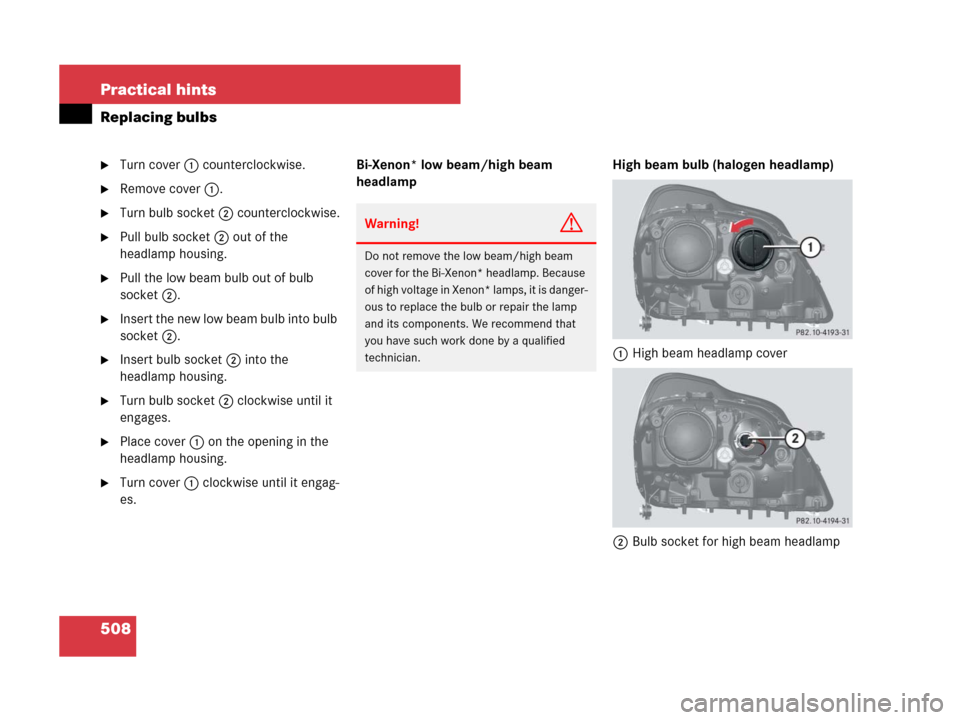
es.Bi-Xenon* low beam/high beam
headlampHigh beam bulb (halogen headlamp)
1High beam headlamp cover
2Bulb socket for high beam headlamp
Warning!G
Do not remove the low beam/high beam
cover for the Bi-Xenon* headlamp. Because
of high voltage in Xenon* lamps, it is danger-
ous to replace the bulb or repair the lamp
and its components. We recommend that
you have such work done by a qualified
technician.
164.boo Seite 508 Freitag, 30. März 2007 12:54 12
Page 510 of 601

509 Practical hints
Replacing bulbs
�Turn cover1 counterclockwise.
�Remove cover1.
�Turn bulb socket2 counterclockwise.
�Pull bulb socket2 out of the
headlamp housing.
�Pull the high beam bulb out of bulb
socket2.
�Insert the new high beam bulb into bulb
socket2.
�Insert bulb socket2 into the
headlamp housing.
�Turn bulb socket2 clockwise until it
engages.
�Place cover1 on the opening in the
headlamp housing.
�Turn cover1 clockwise until it engag-
es.Turn signal lamp bulb
1Bulb socket for turn signal lamp
�Turn bulb socket1 counterclockwise.
�Pull bulb socket1 out of the
headlamp housing.
�Pull the turn signal bulb out of bulb
socket1.
�Insert the new turn signal bulb into bulb
socket1.
�Insert bulb socket1 into the
headlamp housing.
�Turn bulb socket1 clockwise until it
engages.Parking and standing lamp bulb
�Turn bulb socket3 (�page 507)
counterclockwise.
�Pull bulb socket3 out of the
headlamp housing.
�Pull the bulb out of bulb socket3.
�Insert the new bulb into bulb
socket3.
�Insert bulb socket3 into the
headlamp housing.
�Turn bulb socket3 clockwise until it
engages.
164.boo Seite 509 Freitag, 30. März 2007 12:54 12
Page 511 of 601

counterclockwise.
�Pull bulb socket5 out of the
headlamp housing.
�Pull the side marker bulb out of bulb
soc")
510 Practical hints
Replacing bulbs
Side marker lamp bulb
�Turn bulb socket5 (�page 507)
counterclockwise.
�Pull bulb socket5 out of the
headlamp housing.
�Pull the side marker bulb out of bulb
socket5.
�Insert the new side marker bulb into
bulb socket5.
�Insert bulb socket5 into the
headlamp housing.
�Turn bulb socket5 clockwise until it
engages.Front fog lamp bulbs
Removing front fog lamp cover:
1Cover
2Front fog lamp or corner-illuminating
front fog lamp*
�Insert a suitable object (e.g. screwdriv-
er) at point indicated by the arrow and
pry out cover1.
Cover1 is released.
�Swing cover1 outwards and take it
off.
You can now access the front fog lamp.
3Retaining screws
�Turn retaining screws3 counterclock-
wise.
�Remove front fog lamp2 out of the
bumper.
�Pull electrical connector off.
!If not done carefully and properly, damage
to the bumper can result. We therefore recom-
mend that you have this work carried out by an
authorized Mercedes-Benz Light Truck Center.
164.boo Seite 510 Freitag, 30. März 2007 12:54 12
Page 512 of 601

511 Practical hints
Replacing bulbs
4Bulb socket of front fog lamp bulb
�Turn bulb socket4 counterclockwise.
�Pull bulb socket4 out of the housing.
�Pull the front fog lamp bulb out of bulb
socket4.
�Insert the new front fog lamp bulb into
bulb socket4.
�Insert bulb socket4 into the housing.
�Turn bulb socket4 clockwise until it
engages.
�Plug in the electrical connector.
�Insert front fog lamp2 back into
bumper.
�Fasten retaining screws3.
�Reinsert cover1 and press it in until it
engages.
Additional turn signal lamps bulbs
The additional turn signal lamps in the
exterior rear view mirrors have LEDs.
If a malfunction occurs or LEDs fail to func-
tion, the entire turn signal unit must be re-
placed. Have the turn signal unit replaced
by an authorized Mercedes-Benz Light
Truck Center.
Replacing bulbs for rear lamps
Before you start to replace a bulb for a rear
lamp, do the following first:
�Turn the exterior lamp switch to
positionM (
�page 143).
Tail lamp unit
�Open the tailgate (�page 122).
iTo access the bulb socket, you have to
remove the cover in the corresponding side trim
panel of the cargo compartment.
164.boo Seite 511 Freitag, 30. März 2007 12:54 12