Page 300 of 601
 on the
roof rails.
�Make sure clamping claw5 lies flush
agai")
299 Controls in detail
Loading
�Place rear crossbar7 on roof railsa
in such a way that the clamping claws
reach into gaps8 (
�page 298) on the
roof rails.
�Make sure clamping claw5 lies flush
against the inside of roof raila as
shown in the illustration (
�page 298).
If necessary, adjust clamping width of
crossbars (
�page 299).
�Slightly tighten screw4 on both sides
by turning it clockwise.
�On the front and rear crossbars tighten
screws4. Observe a tightening
torque of 4 lb-ft (6 Nm).
�Attach cover caps (�page 298) and
lock them.
�Store key and Allen wrench back into
the storage well (
�page 490).
Adjusting the clamping widths of the
crossbarsThe clamping widths of the crossbars are
factory set for your vehicle. These clamp-
ing widths are solely intended for the des-
ignated positions.
Only install the crossbars at the designat-
ed locations and pay attention to the
stickers3 FRONT and REAR
(
�page 298).
4Screw for clamping claw
5Clamping claw
bScrews for adjusting clamping width
(2 in total for each side)
cCover strip
Warning!G
Have the tightening torque checked after
mounting the crossbars. The screws could
come loose if they are not tightened to a
torque of 4 lb-ft (6 Nm).
Warning!G
Only install the crossbars at the exact loca-
tions designated on the roof rails. The desig-
nated locations for the front crossbars are
between the markings engraved on the in-
side of the roof rails (
�page 298). The des-
ignated locations for the rear crossbars are
between the gaps on the roof rails
(
�page 298).
Otherwise, the crossbars (
�page 298),
mounted accessories and the objects at-
tached to them could come loose from the
vehicle causing an accident, thereby injuring
you and other persons and/or causing dam-
age to property, including damage to your
vehicle.
��
164.boo Seite 299 Freitag, 30. März 2007 12:54 12
Page 301 of 601

300 Controls in detail
Loading
�Pull cover stripc out of groove until
you see screwsb on each end of the
crossbar.
�Turn screwsb on both sides counter-
clockwise approximately 2 rotations.
�Place the crossbar at designated loca-
tions (
�page 298) on roof rails.
�On both sides, make sure the clamping
claws5 lie flush against the roof rails.
If necessary pull out or push in the
clamping claws5.
�Tighten screwsb. Observe a
tightening torque of 4 lb-ft (6 Nm).
The width of the clamping claws is
correctly adjusted.
�Press cover stripc piece by piece into
groove of crossbar.
�Install the crossbars as described
(
�page 298).
Removing the crossbars
1Key
2Cover cap
3Sticker FRONT (or REAR)
4Screw for clamping claw
5Clamping claw
�Unlock cover cap2 with key1.
�Remove cover cap2.
�Turn screws for clamping claws5
counterclockwise until the crossbars
can be lifted from the roof rails.
Shortening the cover strip
The cover strips reduce the wind noise
caused by the crossbars. In order to install
add-on roof equipment, it may be neces-
sary to shorten the cover strips.
cCover strip
�Pull cover stripc out of groove.
Warning!G
Have the tightening torque checked after
mounting the crossbars. The screws could
come loose if they are not tightened to a
torque of 4 lb-ft (6 Nm).
��
164.boo Seite 300 Freitag, 30. März 2007 12:54 12
Page 305 of 601

304 Controls in detail
Loading
Hooks
Two hooks are located on the rear com-
partment trim panels, one on each side.
1Hook
Use the hooks to secure light weight items
only. The maximum permissible weight per
hook is 9lb(4kg).Expanding cargo compartment
You can separately fold the left and right
rear seat backrests to expand the cargo
compartment.
Warning!G
When expanding the cargo compartment,
always fully fold the corresponding seats
and, if so equipped, always use the
cargo net* (
�page 312) when transporting
cargo.
Unless you are transporting cargo, the back-
rests must remain properly locked in the up-
right position.
In an accident, during hard braking or sud-
den maneuvers, loose items will be thrown
around inside the vehicle, and can cause
injury to vehicle occupants unless the items
are securely fastened in the vehicle.
Always use the cargo tie down rings
(
�page 302).
Warning!G
Never drive the vehicle with the tailgate
open. Deadly carbon monoxide (CO) gases
may enter vehicle interior resulting in un-
consciousness and death.
!When the second-row seats are folded for-
ward, the front seats may not be moved to the
rearmost position. Otherwise you could damage
the front and second-row seats.
164.boo Seite 304 Freitag, 30. März 2007 12:54 12
Page 307 of 601

306 Controls in detail
Loading
�Press and hold button2 for each side
until the third-row seats are fully fold-
ed.
If a third-row seat is not engaged properly,
for example, the message
3rd Row Of
Seats – Right Not Locked
appears in the
multifunction display (
�page 155).
�Press and hold button2 again, until
the message disappears.Expanding cargo compartment fully
Folding second-row seats
�Push in the head restraints of the
second-row seats all the way
(
�page 135).
Warning!G
Folded second-row seats are intended to
serve as a cargo compartment expansion in
conjunction with folded third-row seats only.
Do not fold the second-row seats and allow
third-row seat occupants to use folded sec-
ond-row seats as a footrest while driving.
Third-row seat occupants must, like all vehi-
cle occupants, keep both feet on the floor in
front of their seat. Otherwise, occupants
could slide under their seat belt in a colli-
sion. If occupants slide under the belt, it
would apply force at the abdomen or neck.
That could cause serious or even fatal inju-
ries. Do not fold the second-row seats and
allow third-row seat occupants to use folded
second-row seats as a table while driving.
Objects placed on folded second-row seats
may come loose during braking, vehicle ma-
neuvers, or an accident and be thrown
around the vehicle interior. Objects thrown
around the vehicle interior may cause an ac-
cident and/or serious personal injury.
!When the second-row seats are folded for-
ward, the front seats may not be moved to the re-
armost position. Otherwise you could damage
the front and second-row seats.
��
164.boo Seite 306 Freitag, 30. März 2007 12:54 12
Page 308 of 601
307 Controls in detail
Loading
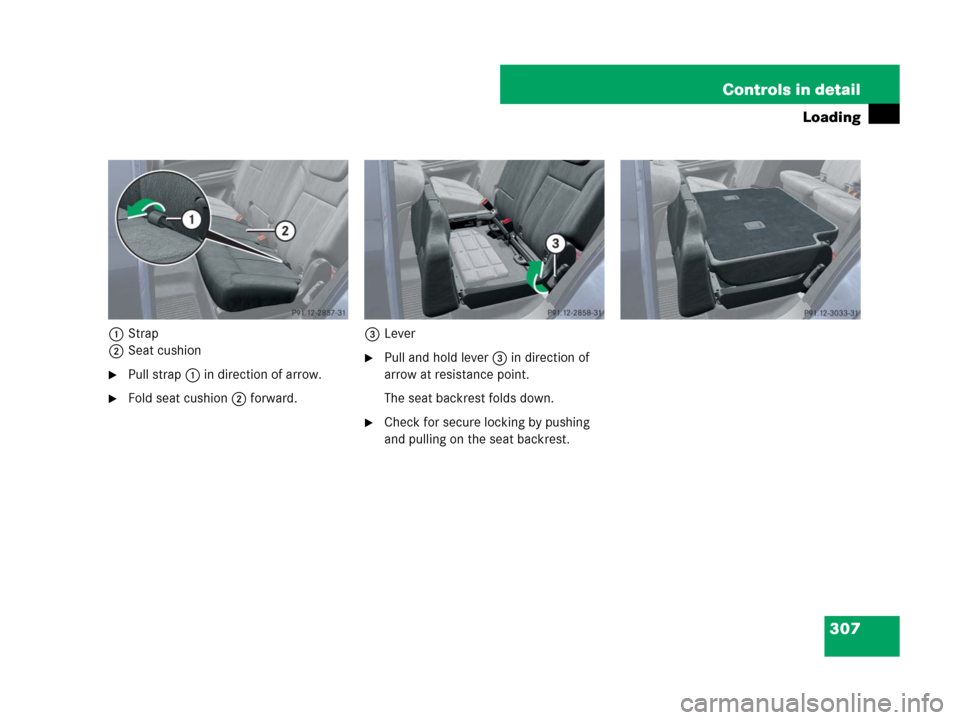
1Strap
2Seat cushion
�Pull strap1 in direction of arrow.
�Fold seat cushion2 forward.3Lever
�Pull and hold lever3 in direction of
arrow at resistance point.
The seat backrest folds down.
�Check for secure locking by pushing
and pulling on the seat backrest.
164.boo Seite 307 Freitag, 30. März 2007 12:54 12
Page 309 of 601

308 Controls in detail
Loading
Folding third-row seats, electrically
There are several ways to fold the third-row
seats.
Two buttons are located on the right side
trim of the third-row seats.
Example, button for the left third-row seat
1Button for returning third-row seats to
upright position
2Button for folding the third-row seatsTwo buttons are located on the
passenger-side in the cargo compartment
Example, button for the right third-row seat
1Button for returning third-row seats to
upright position
2Button for folding the third-row seats
�Push in the head restraints of the
third-row seats all the way
(
�page 135).
�Remove cargo compartment cover
blind (
�page 311).
�Press and hold button2 for each side
until the third-row seats are fully fold-
ed.
The cargo compartment is fully extend-
ed.
If a third-row seat is not engaged properly,
for example, the message
3rd Row Of
Seats – Right Not Locked
appears in the
multifunction display (
�page 155).
�Press and hold button2 again, until
the message disappears.
iUse the left button, indicated byL, to fold
down the left third-row seat.
Use the right button, indicated byR, to fold down
the right third-row seat.
iIt is only possible to fold the third-row seats
down when the rear right door is open.
iIt is only possible to fold the third-row seats
down when the tailgate is open.
164.boo Seite 308 Freitag, 30. März 2007 12:54 12
Page 310 of 601
.
Step 2:
1Seat backrest
2Lever
�Pull and hold lever2 in")
309 Controls in detail
Loading
Returning seats to their original positionStep 1:
�Return third-row seats to its original
position (
�page 308).
Step 2:
1Seat backrest
2Lever
�Pull and hold lever2 in direction of
arrow at resistance point.
�Fold seat backrest1 rearward until it
engages.
�Check for secure locking by pushing
and pulling on seat backrest1.3Seat cushion
�Fold seat cushion3 rearward until it
locks into position.
Warning!G
Make sure all seats are properly locked in
position before driving off. Do not drive with
seats not properly locked.
Never ride in a moving vehicle with the seat
not properly locked as this can be danger-
ous. The seat could move forward and the
seat backrest could fold. You could slide un-
der the seat belt during braking, vehicle ma-
neuvers, or in an accident. If you slide under
it, the belt would apply force at the abdomen
or neck. That could cause serious or even fa-
tal injuries.
The seat backrest and seat belt provide the
best restraint when the wearer is in a nearly
upright position and the belt is properly po-
sitioned on the body.
164.boo Seite 309 Freitag, 30. März 2007 12:54 12
Page 317 of 601
316 Controls in detail
Useful features
Closing CD changer
1CD changer
�Gently push CD changer1 up in
direction of arrow until it engages.
For information on CD changer operation,
see separate COMAND system operating
instructions.Locking and unlocking the glove box
separately
You can lock the glove box separately, e.g.
when the vehicle is in the shop for service.
�Take the mechanical key out of the
SmartKey or SmartKey with
KEYLESS-GO* (
�page 496).
1Unlocking glove box
2Locking glove box
�Insert mechanical key into glove box
lock.
�Turn mechanical key to position2 to
lock the glove box.
�Turn mechanical key to position1 to
unlock the glove box.
iThe glove box can only be locked or
unlocked with the mechanical key (
�page 496).
164.boo Seite 316 Freitag, 30. März 2007 12:54 12