Page 48 of 232
48 Audio
Radio operation
FM- and AM-Bands
�Press g or h.
or
�Push the joystick to gor G.
The radio will tune to the frequency
assigned to the next memory location.
If none has been set by you, the radio
will not change the station.
Via frequency
�Press g or h.
or
�Push the joystick to gor G.
The radio will tune to the next
receivable station (FM, AM) or channel
(WB) of descending/ascending
frequency depending on the direction
of seek.
WB direct channel selection
�Press a number key 1 through 7.Manual tuning (FM, AM)
�Activate the desired wave band
(
�page 46).
�Press g or h longer than 2 sec-
onds.
The function rapidly scans the
frequencies.
�Press g or h repeatedly to
change the frequency step by step.
or
�Push the joystick to H or h.
Each push of the joystick will change
the frequency by one step.
FM Band
The frequency displayed will change in
increments of 0.2 MHz.
AM Band
Tuning will take place in increments of
10 kHz.i
Frequenc. must be activated in the
Audio search function menu,
which appears in the multifunction
display.
Access this menu from the
Settings... menu via the Vehicle
submenu (
�page 33). For additional
information refer to separate Operator’s
Manual instructions.
i
The selected channel is not shown in
the status line.
Page 49 of 232
49 Audio
Radio operation
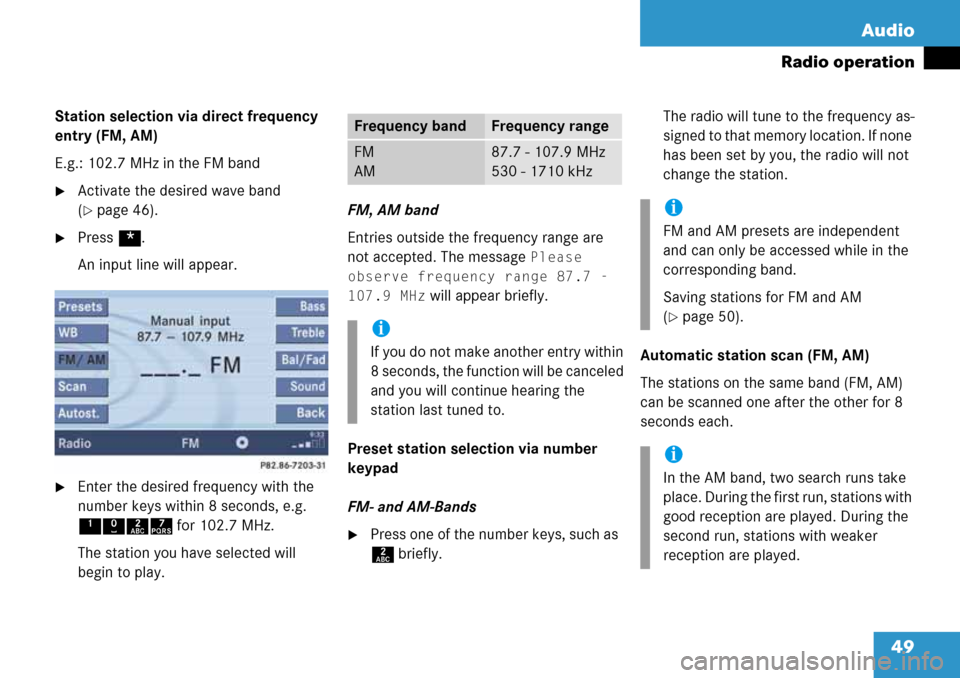
Station selection via direct frequency
entry (FM, AM)
E.g.: 102.7 MHz in the FM band
�Activate the desired wave band
(
�page 46).
�Press *.
An input line will appear.
�Enter the desired frequency with the
number keys within 8 seconds, e.g.
1027 for 102.7 MHz.
The station you have selected will
begin to play.FM, AM band
Entries outside the frequency range are
not accepted. The message
Please
observe frequency range 87.7 -
107.9 MHz
will appear briefly.
Preset station selection via number
keypad
FM- and AM-Bands
�Press one of the number keys, such as
2 briefly.The radio will tune to the frequency as-
signed to that memory location. If none
has been set by you, the radio will not
change the station.
Automatic station scan (FM, AM)
The stations on the same band (FM, AM)
can be scanned one after the other for 8
seconds each.
Frequency bandFrequency range
FM
AM87.7 - 107.9 MHz
530 - 1710 kHz
i
If you do not make another entry within
8 seconds, the function will be canceled
and you will continue hearing the
station last tuned to.
i
FM and AM presets are independent
and can only be accessed while in the
corresponding band.
Saving stations for FM and AM
(
�page 50).
i
In the AM band, two search runs take
place. During the first run, stations with
good reception are played. During the
second run, stations with weaker
reception are played.
Page 50 of 232
50 Audio
Radio operation
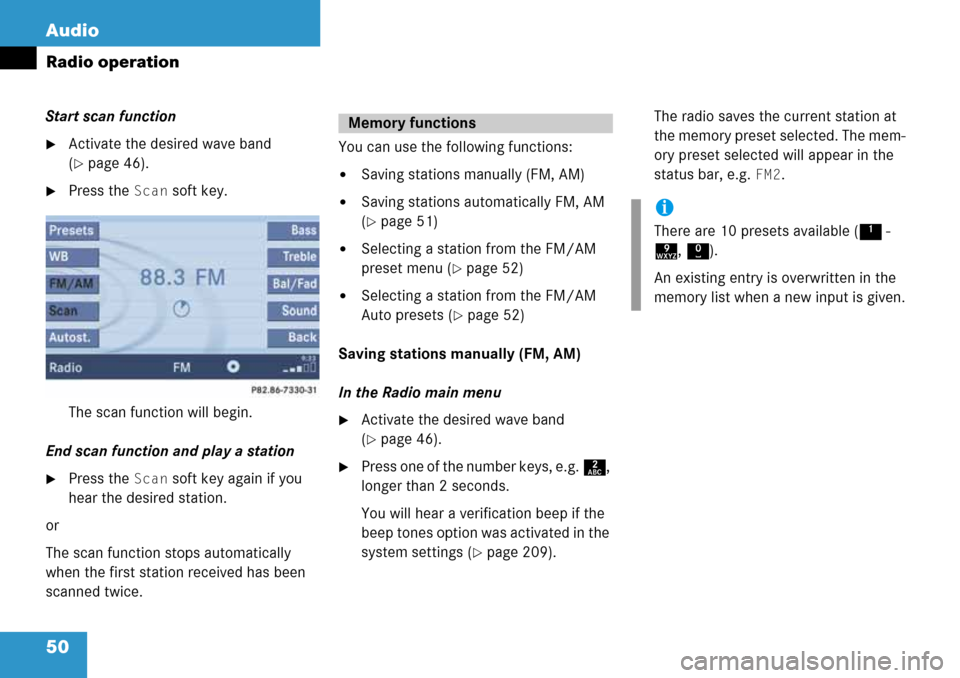
Start scan function
�Activate the desired wave band
(
�page 46).
�Press the Scan soft key.
The scan function will begin.
End scan function and play a station
�Press the Scan soft key again if you
hear the desired station.
or
The scan function stops automatically
when the first station received has been
scanned twice.You can use the following functions:
�Saving stations manually (FM, AM)
�Saving stations automatically FM, AM
(
�page 51)
�Selecting a station from the FM/AM
preset menu (
�page 52)
�Selecting a station from the FM/AM
Auto presets (
�page 52)
Saving stations manually (FM, AM)
In the Radio main menu
�Activate the desired wave band
(
�page 46).
�Press one of the number keys, e.g. 2,
longer than 2 seconds.
You will hear a verification beep if the
beep tones option was activated in the
system settings (
�page 209).The radio saves the current station at
the memory preset selected. The mem-
ory preset selected will appear in the
status bar, e.g.
FM2.
Memory functions
i
There are 10 presets available (1 -
9, 0).
An existing entry is overwritten in the
memory list when a new input is given.
Page 51 of 232
51 Audio
Radio operation
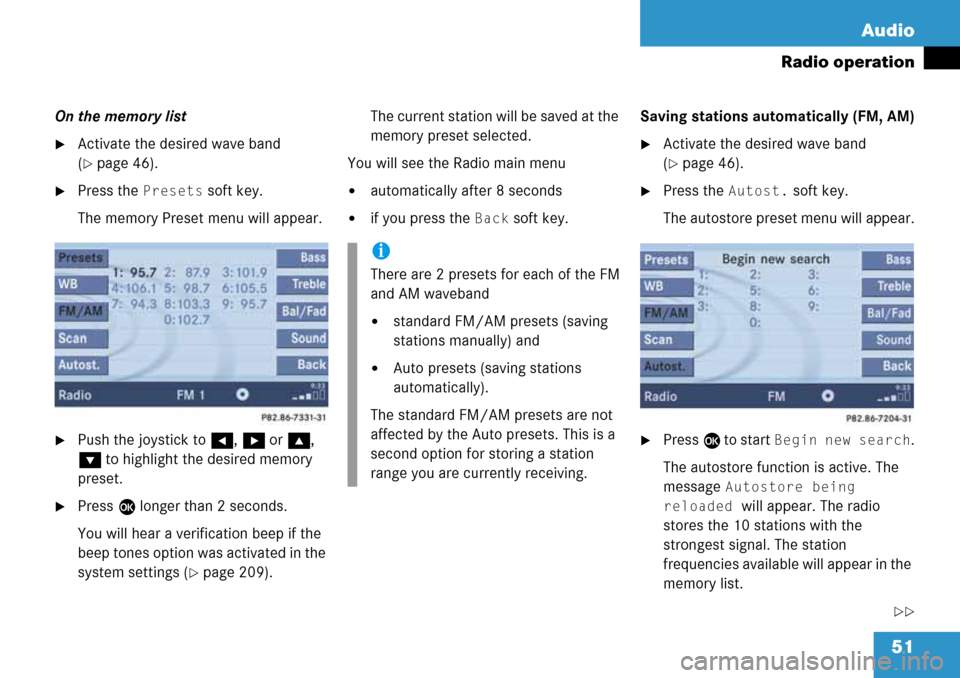
On the memory list
�Activate the desired wave band
(
�page 46).
�Press the Presets soft key.
The memory Preset menu will appear.
�Push the joystick to H, h or g,
G to highlight the desired memory
preset.
�Press E longer than 2 seconds.
You will hear a verification beep if the
beep tones option was activated in the
system settings (
�page 209).The current station will be saved at the
memory preset selected.
You will see the Radio main menu
�automatically after 8 seconds
�if you press the Back soft key.Saving stations automatically (FM, AM)
�Activate the desired wave band
(
�page 46).
�Press the Autost. soft key.
The autostore preset menu will appear.
�Press E to start Begin new search.
The autostore function is active. The
message
Autostore being
reloaded
will appear. The radio
stores the 10 stations with the
strongest signal. The station
frequencies available will appear in the
memory list.
��
i
There are 2 presets for each of the FM
and AM waveband
�standard FM/AM presets (saving
stations manually) and
�Auto presets (saving stations
automatically).
The standard FM/AM presets are not
affected by the Auto presets. This is a
second option for storing a station
range you are currently receiving.
Page 52 of 232

52 Audio
Radio operation
Selecting a station from the preset
menu (FM, AM)
�Activate the FM or AM memory
(
�page 51).
You can use one of the following two ways
to select a station from the FM/AM
presets
�Press the corresponding number key,
e.g. 3, to select the desired station.
or
�Push the joystick to H, h or g,
G to highlight a memory preset in the
FM/AM preset list (
�page 51).
�Press E.
In both cases, you will see the main
radio menu
�automatically after 8 seconds
�if you press the Back soft key.
The Radio main menu indicating the
memory preset number.Selecting a station from the FM/AM
autostore presets
�Activate the FM or AM autostore preset
menu (
�page 51).
You can use one of the following two ways
to select a station from the FM/AM
autostore presets
�Press the corresponding number key,
e.g. 3, to select the desired station.
or
�Push the joystick to H, h or g,
G to highlight a memory position.
�Press E.
In both cases, you will see the main
radio menu
�automatically after 8 seconds
�if you press the Back soft key.
i
There are max. 10 presets available (1
- 9, 0).
The autostore function assigns the
stations to the memory locations in the
order of their reception quality. The
strongest station is available on
preset 1. The number of available
stations depends on the stations
available in the area the vehicle is
operated in.
Page 54 of 232
54 Audio
CD operation
�Avoid touching the CD surface with
your fingers.
�Clean the CD with a dry, lint-free cloth.
Wipe them from the inside to the outer
edge. Never wipe the CD in a circular
motion.
�Do not use rubbing alcohol or solvents
to clean the CDs.
�Do not expose the CDs to heat or direct
sunlight.
�Do not write or put stickers on a CD.Loading a CD into the CD drive
Tips on caring for your CDsLoading/Ejecting a CD
WarningG
In order to avoid distraction which could
lead to an accident, the driver should insert
CDs with the vehicle at a standstill and
operate the audio system only if permitted
by road, weather and traffic conditions.
Bear in mind that at a speed of just 30
m.p.h. (approximately 50 km/h), your car
covers a distance of 44 feet (approximately
14 m) every second.
i
There are two l buttons. One is on
the display unit. The other is located
left of the CD AUDIO slot behind the
display, see next page.
i
The CD drive can accommodate either
audio or MP3 CDs (
�page 71).
Page 57 of 232
57 Audio
CD changer* operation
� CD changer* operation
The CD changer* can play audio or MP3
CDs. When playing MP3 CDs, only the first
99 tracks will be played back in successive
order. After that, playback will begin with
track 1 of the MP3 CD. Folder selection is
not possible.
Multi session CDs include mixed file types
(e.g. MP3 and audio CD) in either succes-
sive or random order on the disc. Audio
tracks will be played back first, followed by
MP3 tracks until 99 tracks are reached.
Refer to additional MP3 information:
�Permissible MP3 CDs (�page 72)
�Permissible file systems (�page 72)
�Permissible MP3 formats (�page 73)
�Permissible bit and scan rates
(
�page 73)
Refer to additional CD information:
�General information on CD operation
(
�page 53)
�Activate the CD changer* main menu
(
�page 63).
or
�Load a CD into the CD changer*
(
�page 58) for M, GL and R-Class or
(
�page 62) for CLK-Class.
Accessing the CD changer*
The CD changer* is located in the glove
box.
�Open the glove box.
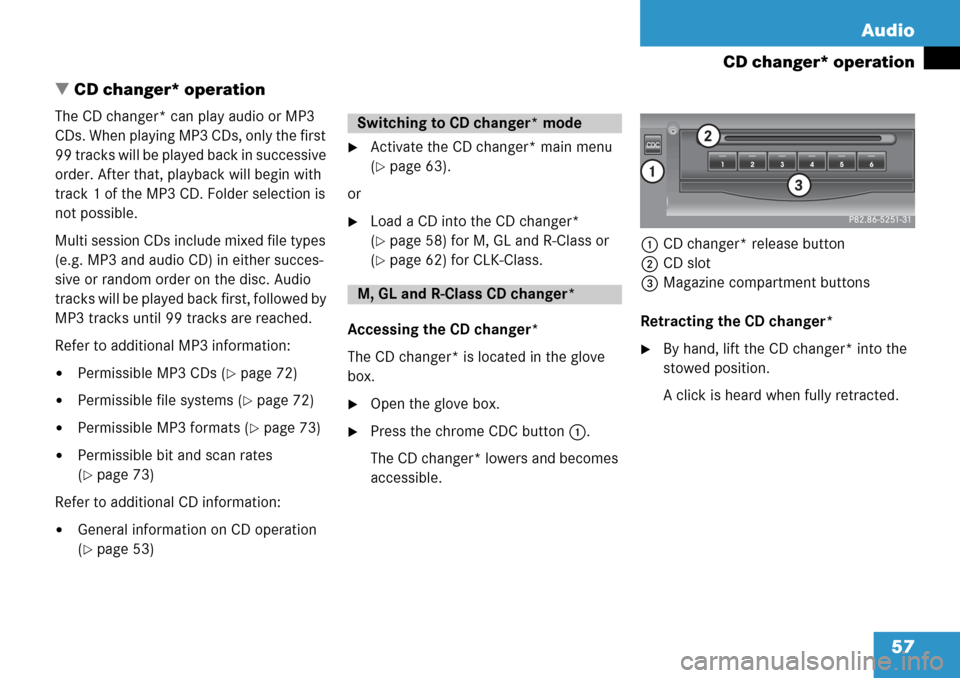
�Press the chrome CDC button 1.
The CD changer* lowers and becomes
accessible.1CD changer* release button
2CD slot
3Magazine compartment buttons
Retracting the CD changer*
�By hand, lift the CD changer* into the
stowed position.
A click is heard when fully retracted.
Switching to CD changer* mode
M, GL and R-Class CD changer*
Page 58 of 232
58 Audio
CD changer* operation
Loading CDsThe CD changer* has a built-in magazine
which can hold up to six CDs. The CD
changer* has six magazine compartment
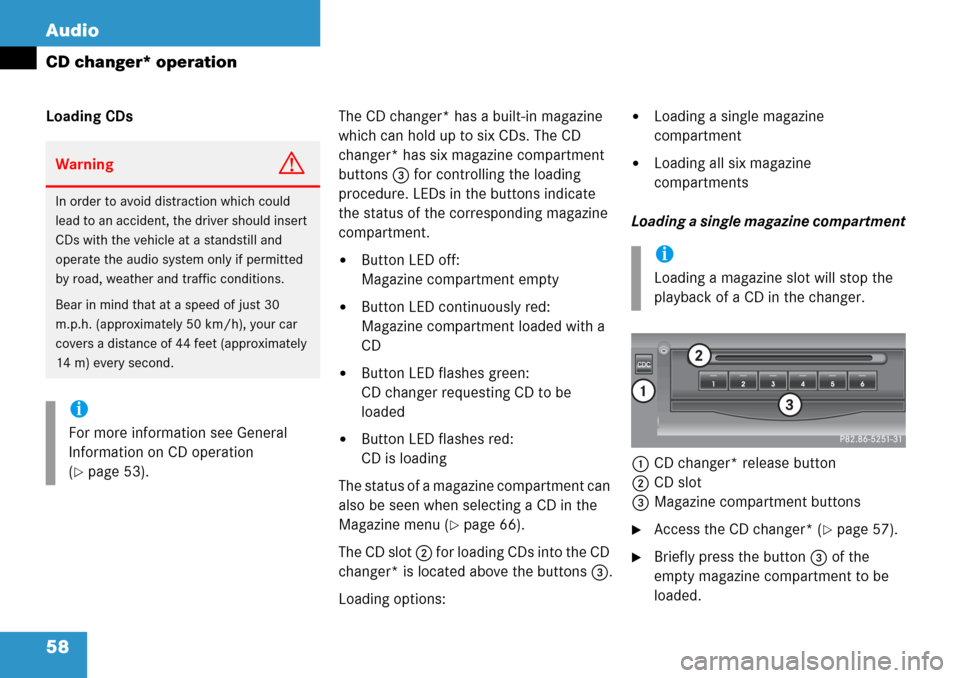
buttons 3 for controlling the loading
procedure. LEDs in the buttons indicate
the status of the corresponding magazine
compartment.
�Button LED off:
Magazine compartment empty
�Button LED continuously red:
Magazine compartment loaded with a
CD
�Button LED flashes green:
CD changer requesting CD to be
loaded
�Button LED flashes red:
CD is loading
The status of a magazine compartment can
also be seen when selecting a CD in the
Magazine menu (
�page 66).
The CD slot 2 for loading CDs into the CD
changer* is located above the buttons 3.
Loading options:
�Loading a single magazine
compartment
�Loading all six magazine
compartments
Loading a single magazine compartment
1CD changer* release button
2CD slot
3Magazine compartment buttons
�Access the CD changer* (�page 57).
�Briefly press the button 3 of the
empty magazine compartment to be
loaded.
WarningG
In order to avoid distraction which could
lead to an accident, the driver should insert
CDs with the vehicle at a standstill and
operate the audio system only if permitted
by road, weather and traffic conditions.
Bear in mind that at a speed of just 30
m.p.h. (approximately 50 km/h), your car
covers a distance of 44 feet (approximately
14 m) every second.
i
For more information see General
Information on CD operation
(
�page 53).
i
Loading a magazine slot will stop the
playback of a CD in the changer.