Page 353 of 457
352 Practical hints
What to do if …
Display symbolDisplay messagePossible cause/consequencePossible solution
.3rd brake
lampThe high mounted brake lamp is malfunc-
tioning. This message will only appear if a
critical number of LEDs have stopped
working.�Contact an authorized Mercedes-Benz
Light Truck Center as soon as
possible.
AUTO-Light
inoperativeThe light sensor is malfunctioning.
The headlamps switch on automatically.�Contact an authoriz ed Mercedes-Benz
Light Truck Center as soon as
possible.
To switch off the headlamps
(U.S. vehicles only):
�In the control system, set lamp
operation to manual mode
(
�page 151).
�Switch off the headlamps using the
exterior lamp switch (
�page 117).
Brake lamp
leftThe left brake lamp is malfunctioning.�Replace the bulb as soon as possible
(
�page 383).
Brake lamp
rightThe right brake lamp is malfunctioning.�Replace the bulb as soon as possible
(
�page 383).
W463.boo Seite 352 Montag, 19 . November 2007 8:41 08
Page 356 of 457

355
Practical hints
What to do if …
Display symbolDisplay messagePossible cause/consequencePossible solution
.Rear
fog lampThe rear fog lamp is malfunctioning. �Replace the bulb as soon as possible
(
�page 384).
Rear
fog lamp
Auxiliary bulb
onA lamp is malfunctioning. A substitute
bulb has been brought into use.�Switch off the rear fog lamp (�page 121).
Reverse
lamp
right
The right backup lamp is malfunction-
ing.�Replace the bulb as soon as possible
(
�page 384).
Switch off
lightsYou have removed the SmartKey from
the starter switch, opened the driver’s
door and left the headlamps on.�Switch off the headlamps using the exterior lamp
switch (
�page 117).
Tail lamp
left
Auxiliary bulb
onThe left tail lamp is malfunctioning.
A substitute bulb has been brought into
use.�Replace the bulb as soon as possible
(
�page 383).
Tail lamp
right
Auxiliary bulb
onThe right tail lamp is malfunctioning.
A substitute bulb has been brought into
use.�Replace the bulb as soon as possible
(
�page 383).
W463.boo Seite 355 Montag, 19
. November 2007 8:41 08
Page 358 of 457

357
Practical hints
What to do if …
Display symbolDisplay messagePossible cause/consequencePossible solution
.Turn signal
in left side
mirrorThe turn signal in the left exterior rear
view mirror is malfunctioning. This
message will only appear if a critical num-
ber of LEDs have stopped working.�Contact an authoriz
ed Mercedes-Benz
Light Truck Center as soon as
possible.
Turn signal
in right side
mirrorThe turn signal in the right exterior rear
view mirror is malfunctioning. This
message will only appear if a critical num-
ber of LEDs have stopped working.�Contact an authoriz ed Mercedes-Benz
Light Truck Center as soon as
possible.
Turn off
lights or
remove keyYou have opened the driver’s door while
the exterior lamp switch is in
position U and the SmartKey is still in
the starter switch.
The parking lamps are still on.�Switch off the headlamps using the
exterior lamp switch (
�page 117).
or
�Remove the SmartKey from the starter
switch.
W463.boo Seite 357 Montag, 19 . November 2007 8:41 08
Page 374 of 457
.
Lowering and raising brush guard
1 Locking and unlocking handle
2 Quick lock
3 Lock
4 End s")
373
Practical hints
Brush guard
� Brush guard
The brush guard is available on G 55 AMG
(U.S vehicles only).
Lowering and raising brush guard
1 Locking and unlocking handle
2 Quick lock
3 Lock
4 End stop joint Lowering
�While holding brush guard firmly, open
quick lock
2 using locking and unlock-
ing handle 1.
�Gently lower brush guard until it
reaches its fully lowered position.
Raising and securing
�Flip up brush guard until it contacts end
stop joint 4.
Quick lock stop pin 2 must engage
the cross slot recess in lock 3.
�Now turn quick lock 2 so that quick
lock makes contact with end stop
joint 4.
�Lock quick lock 2 on both sides of
brush guard using locking and unlock-
ing handle 1.
Warning!G
The brush guard is designed solely to
enhance the appearance of the vehicle and
help protect grille and headlights from minor
mishaps, either on- or off-road. Since the
safety characteristics are limited in the
event of an accident, brush guards are not
intended to prevent inju ry or damage in the
event of an accident. Also check state and
local regulations on installation and use.
Raise and lower brush guard in an open
space with plenty of room.
To help prevent personal injury when open-
ing or closing the brush guard, use extreme
caution not to trap hands or feet.
The brush guard must be in raised and
locked position while driving.
iOnly lower brush guard to clean headlamps
or to replace bulbs.
!Make sure both quick stop pins 2 are
seated fully in lock 3.
W463.boo Seite 373 Montag, 19 . November 2007 8:41 08
Page 376 of 457
375
Practical hints
Replacing bulbs
� Replacing bulbs
Bulbs
Safe vehicle operation depends on proper
exterior lighting and signaling. It is there-
fore essential that all bulbs and lamp
assemblies are in good working order at all
times.
Correct headlamp adju stment is extremely
important. Have headlamps checked and
readjusted at regular intervals and when a
bulb has been replaced. See an authorized
Mercedes-Benz Light Truck Center for
headlamp adjustment.iIf the headlamps or front fog lamps are
fogged up on the inside as a result of high
humidity, driving the vehicle a distance with the
lights on should clear up the fogging.iSubstitute bulbs will be brought into use
when the following lamps malfunction:
�Turn signal lamps
�Tail lamps
�Parking lamps
�Rear fog lamp
Read and observe the messages in the
multifunction display (
�page 352).
W463.boo Seite 375 Montag, 19 . November 2007 8:41 08
Page 377 of 457
376 Practical hints
Replacing bulbs
Front lampsRear lamps
LampType
1Additional turn signal
lampLED
2Locator lighting lampW6W
3Turn signal lamp1156 NA
4Side marker lampT4W
5Bi-Xenon headlamp:
Low and high beam1
1Bi-Xenon headlamp: Low beam and high beam use
the same D1S-35 W lamp. Do not replace the
Bi-Xenon bulbs yourself. Contact an authorized
Mercedes-Benz Light Truck Center.
D1S-35 W
Parking and standing
lampW5W
Blue vision
6Front fog lampH11 (55 W)
LampType
7High mounted brake
lampLED
8Turn signal lampPY 21 W
Brake and tail lampP21/5W
Tail, parking and
standing lampW5W
9Backup lampP21W
aLicense plate lampsC5W
bRear fog lampP21W
cSide marker lampT4W
W463.boo Seite 376 Montag, 19 . November 2007 8:41 08
Page 379 of 457
378 Practical hints
Replacing bulbs
Replacing bulbs for front lamps
Before you start to replace a bulb for a
front lamp, do the following first:
�Turn the exterior lamp switch to
position M (
�page 117). Bi-Xenon headlamp
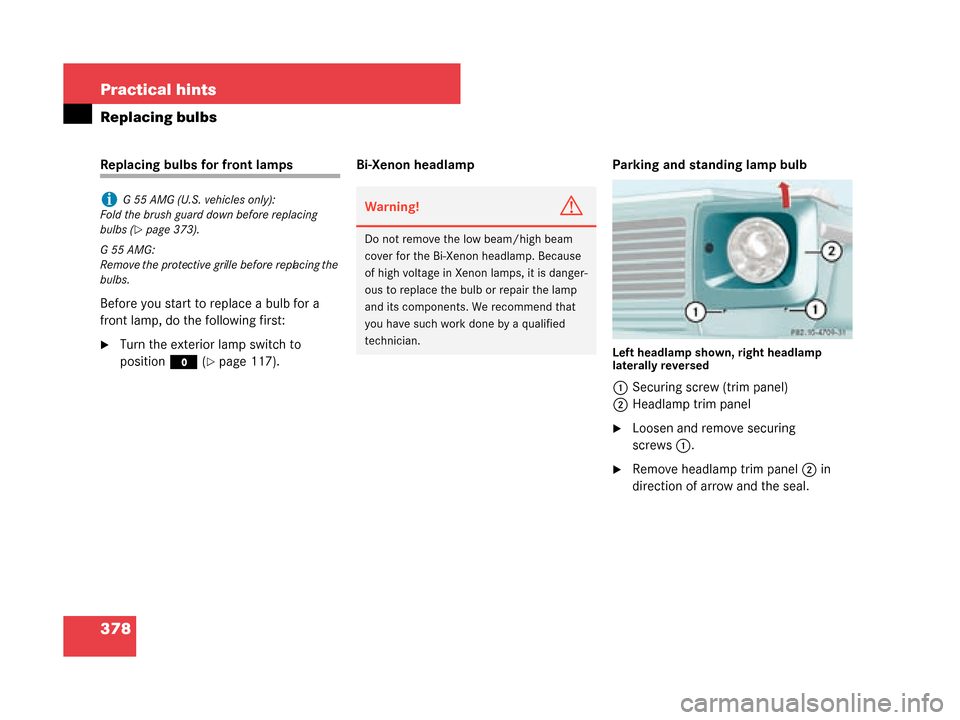
Parking and standing lamp bulbLeft headlamp shown, right headlamp
laterally reversed
1Securing screw (trim panel)
2 Headlamp trim panel
�Loosen and remove securing
screws 1.
�Remove headlamp trim panel 2 in
direction of arrow and the seal.
iG 55 AMG (U.S. vehicles only):
Fold the brush guard down before replacing
bulbs (
�page 373).
G55AMG:
Remove the protective grille before replacing the
bulbs.
Warning!G
Do not remove the low beam/high beam
cover for the Bi-Xenon headlamp. Because
of high voltage in Xeno n lamps, it is danger-
ous to replace the bulb or repair the lamp
and its components. We recommend that
you have such work done by a qualified
technician.
W463.boo Seite 378 Montag, 19 . November 2007 8:41 08
Page 380 of 457
379
Practical hints
Replacing bulbs
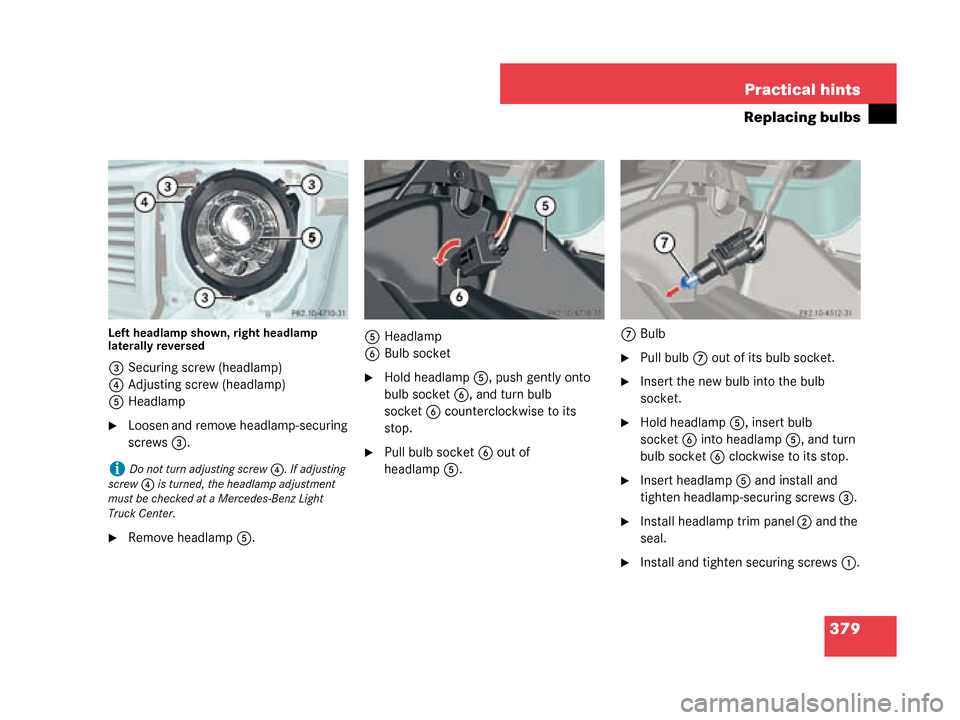
Left headlamp shown, right headlamp
laterally reversed
3
Securing screw (headlamp)
4 Adjusting screw (headlamp)
5 Headlamp
�Loosen and remove headlamp-securing
screws 3.
�Remove headlamp 5. 5
Headlamp
6 Bulb socket
�Hold headlamp 5, push gently onto
bulb socket 6, and turn bulb
socket 6 counterclockwise to its
stop.
�Pull bulb socket 6 out of
headlamp 5. 7
Bulb
�Pull bulb 7 out of its bulb socket.
�Insert the new bulb into the bulb
socket.
�Hold headlamp 5, insert bulb
socket 6 into headlamp 5, and turn
bulb socket 6 clockwise to its stop.
�Insert headlamp 5 and install and
tighten headlamp-securing screws 3.
�Install headlamp trim panel 2 and the
seal.
�Install and tighten securing screws 1.
iDo not turn adjusting screw 4. If adjusting
screw 4 is turned, the headlamp adjustment
must be checked at a Mercedes-Benz Light
Truck Center.
W463.boo Seite 379 Montag, 19 . November 2007 8:41 08