Page 145 of 457

144 Controls in detail
Control system
1MP3 mode
2 Current track
�Press button k orj repeatedly
until the desired track is selected.
NAV menu
The
NAV menu contains the functions
needed to operate your navigation system.
�Press button è orÿ repeatedly
until the message
NAV appears in the
multifunction display.
The message shown in the multifunction
display depends on the status of the navi-
gation system:
�With the navigation system switched
off, the message
NAV off appears in
the multifunction display.
�With the navigation system switched
on but route guidance not activated,
the direction of travel and, if applicable,
the name of the street currently
traveled on appear in the multifunction
display.
�With the navigation system switched
on and route guidance activated, the
direction of travel and maneuver
instructions appear in the multifunc-
tion display.
Please refer to the COMAND system
manual for instructions on how to activate
the route guidance system.
Vehicle status message memory menu
Use the vehicle status message memory
menu to scan malfunction and warning
messages that may be stored in the
system. Such messages appear in the
multifunction display and are based on
conditions or system status the vehicle’s
system has recorded.
The vehicle status message memory menu
only appears, if messages have been
stored.
iLevel of information displayed will vary
depending on the information contained on the
MP3-CD inserted in the single CD drive of the
COMAND system.
To select a MP3-CD from the CD changer
magazine, press a number on the COMAND
system key pad located in the center console.
��
W463.boo Seite 144 Montag, 19 . November 2007 8:41 08
Page 163 of 457
.
Your vehicle’s transmission adapts its g")
162 Controls in detail
Automatic transmission
For more information on driving with an
automatic transmission, see “Automatic
transmission” (
�page 54).
Your vehicle’s transmission adapts its gear
shifting process to your individual driving
style by continually adjusting the shift
points up or down. These shift point adjust-
ments are performed based on current
operating and driving conditions.
If the operating conditions change, the
automatic transmission reacts by
adjusting its shift program.
Gear selector lever
The gear selector lever is located on the
lower part of the center console.
Gearshift pattern for automatic
transmission
P Park position
R Reverse gear
N Neutral position
D Drive position
iDuring the brief warm-up, transmission
upshifting is delayed. This allows the catalytic
converter to heat up more quickly to operating
temperature.
Warning!G
Make sure that absolutely no objects are
obstructing the pedal’s range of movement.
Keep the driver’s footwell clear of all obsta-
cles. If there are any floormats or carpets in
the footwell, make sure that the pedals still
have sufficient clearance.
During sudden driving or braking maneuvers
the objects could get caught between the
pedals. You could then no longer brake or
accelerate. This could lead to accidents and
injury.
W463.boo Seite 162 Montag, 19 . November 2007 8:41 08
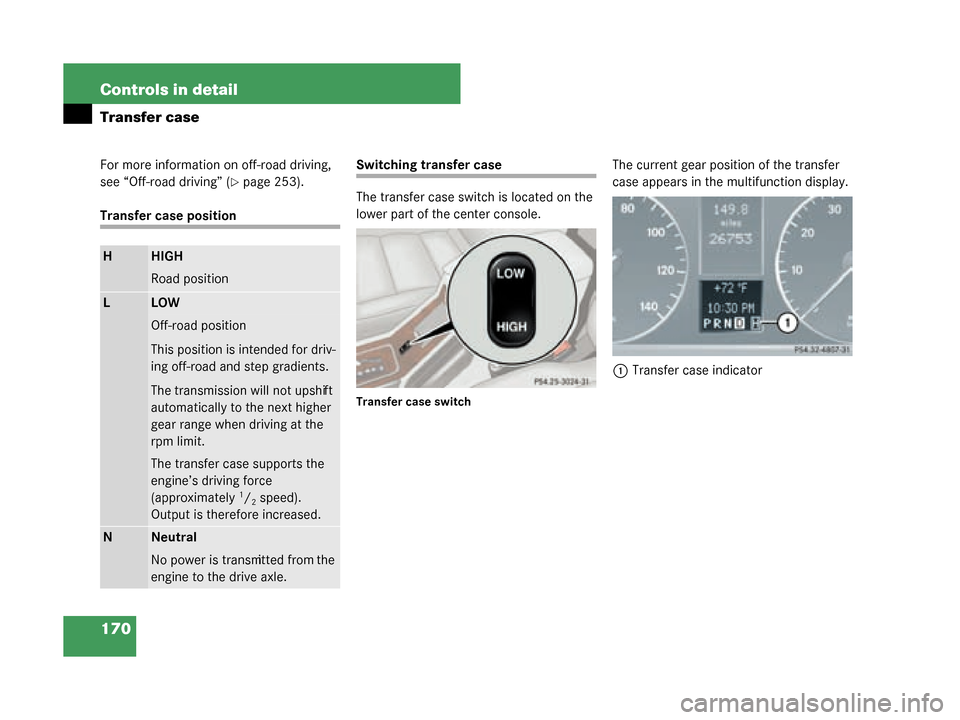
Page 171 of 457
170 Controls in detail
Transfer case
For more information on off-road driving,
see “Off-road driving” (
�page 253).
Transfer case position
Switching transfer case
The transfer case switch is located on the
lower part of the center console.
Transfer case switch
The current gear position of the transfer
case appears in the multifunction display.
1 Transfer case indicator
HHIGH
Road position
LLOW
Off-road position
This position is intended for driv-
ing off-road and step gradients.
The transmission will not upshift
automatically to the next higher
gear range when driving at the
rpm limit.
The transfer case supports the
engine’s driving force
(approximately
1/2 speed).
Output is therefore increased.
NNeutral
No power is transmitted from the
engine to the drive axle.
W463.boo Seite 170 Montag, 19 . November 2007 8:41 08
Page 176 of 457
 differential lock
2 Rear a")
175
Controls in detail
Differential locks
Switching differential locks on and off
The switches are located on the upper part
of the center console.
1 Transfer case (center) differential lock
2 Rear axle differential lock
3 Front differential lock
4 Engagement indicator lamps (yellow)
5 Function indicator lamps (red) Switching differential locks on
Transfer case differential lock
�Press switch
1.
The yellow engagement indicator
lamp 4 for the transfer case
differential lock comes on.
The ESP
® warning lamp v comes
on. When the differential lock engagement
operation has been completed, the red
function indicator lamp
5 comes on.
The message
ABS not available
differential locked
appears in the
multifunction display.
The ESP
® warning lamp v and
the - indicator lamp in the
instrument cluster come on.
Once the transfer case differential lock
is switched on, you can now, if needed,
�switch on rear axle differential
lock 2
or
�switch on rear axle differential
lock 2 and front differential
lock 3.
iThe differential locks can only be switched
on in the sequence 1, 2, 3.
!To avoid damage to the transfer case and
differential locks:
�Engage differential locks only at low speed
(walking speed, not more than 5 mph
[8 km/h]).
�Do not engage differential locks if the driving
wheels are spinning due to lack of traction.
�Do not engage differential locks on paved
roads.
W463.boo Seite 175 Montag, 19 . November 2007 8:41 08
Page 181 of 457

180 Controls in detail
Good visibility
Glare to a side window
�Swing sun visor1 down.
�Disengage sun visor 1 from
mounting 2.
�Pivot sun visor 1 to the side.
�When you do not experience glare
anymore, pivot sun visor 1 to the
windshield.
�Engage sun visor 1 into mounting 2.
�Swing sun visor 1 up.
Windshield defroster
The windshield defroster uses a large
amount of power. To keep battery drain to
a minimum, switch off the windshield
defroster as soon as the windshield is
clear.
The windshield defroster switches off
automatically after 10 minutes.
If you switch on the windshield defroster
for the fourth time in succession, it will
switch off automatically after 5 minutes.
You cannot switch on the windshield
defroster if the outside temperature is
above 10°C (50°F). The windshield defroster switch is located
on the upper part of the center console.
1 Windshield defroster switch
2 Indicator lamp
Switch on the ignition (
�page 39).
!To avoid damage to vanity mirror cover 3,
make sure it is closed before pivoting sun
visor 1 to the side.
Warning!G
Any accumulation of snow and ice should be
removed from the windshi eld before driving.
Visibility could otherwise be impaired,
endangering you and others.
W463.boo Seite 180 Montag, 19 . November 2007 8:41 08
Page 192 of 457

191
Controls in detail
Climate control
Rear passenger compartment
adjustable air vents
The air conditioning for the rear passenger
compartment is contro
lled via the climate
control panel (
�page 183).
The air vents for the rear passenger
compartment are located in the rear
center console.
1Thumbwheel for air volume control for
center air vents
2 Left center air vent, adjustable
3 Right center air vent, adjustable Adjusting air
distribution
�Push the slide for the left center
vent2 or right center air vent 3 to
the left, right, up, or down.
The air flow is directed in the
corresponding direction.
Adjusting air volume
�Turn thumbwheel 1 up.
The air volume is increased.
�Turn thumbwheel 1 down.
The air volume is decreased.iThe temperature at the center air vents 2
and 3 for the rear passenger compartment is
the same as at the dashboard center air vents.
iFor draft-free ventilation, move the sliders
for the center air vents 2 and 3 upward.
W463.boo Seite 191 Montag, 19 . November 2007 8:41 08
Page 221 of 457
220 Controls in detail
Useful features
Cup holder in front passenger footwell1 Cupholder
�Swing cupholder 1 upwards until it
clicks into place. Cup holder in rear
passenger footwell
Rear cup holder
Ashtrays
Your vehicle is equipped with an ashtray
and a cigarette lighter located in the center
console and two ashtrays located in the
rear passenger compartment
(
�page 221).
Ashtray in the center console
1 Ashtray
2 Cigarette lighter (
�page 222)
3 Cover plate
!Fold the cup holder closed before moving
the front passenger seat fully forward.
!Before folding the seat backrest forward
and the rear seat bench down, be sure that all
containers in the rear cup holder are removed.
W463.boo Seite 220 Montag, 19 . November 2007 8:41 08
Page 336 of 457

335
Practical hints
What to do if …
Lamp in center console
ProblemPossible cause/consequenceSuggested solution
56The front passenger front air
bag off indicator lamp comes
on and remains illuminated.A BabySmartTM child seat is installed on
the front passenger seat. Therefore the
passenger front air bag is switched off.
The system is malfunctioning when there
is no BabySmartTM child seat installed on
the front passenger seat.
�Have the system checked at an
authorized Mercedes-Benz Light
Truck Center as soon as possible.
The front passenger front air
bag off indicator lamp does not
come on or does not remain
illuminated with a
BabySmart
TM child seat
properly installed on the front
passenger seat.
The system is malfunctioning.�Make sure there is nothing between
seat cushion and child seat and check
installation of the child seat.
�If the front passenger front air bag off
indicator lamp remains out, have the
system checked at an authorized
Mercedes-Benz Light Truck Center as
soon as possible.
Do not use the BabySmart
TM restraint
to transport children on the front
passenger seat until the system has
been repaired.
W463.boo Seite 335 Montag, 19 . November 2007 8:41 08