Page 382 of 457
381
Practical hints
Replacing bulbs
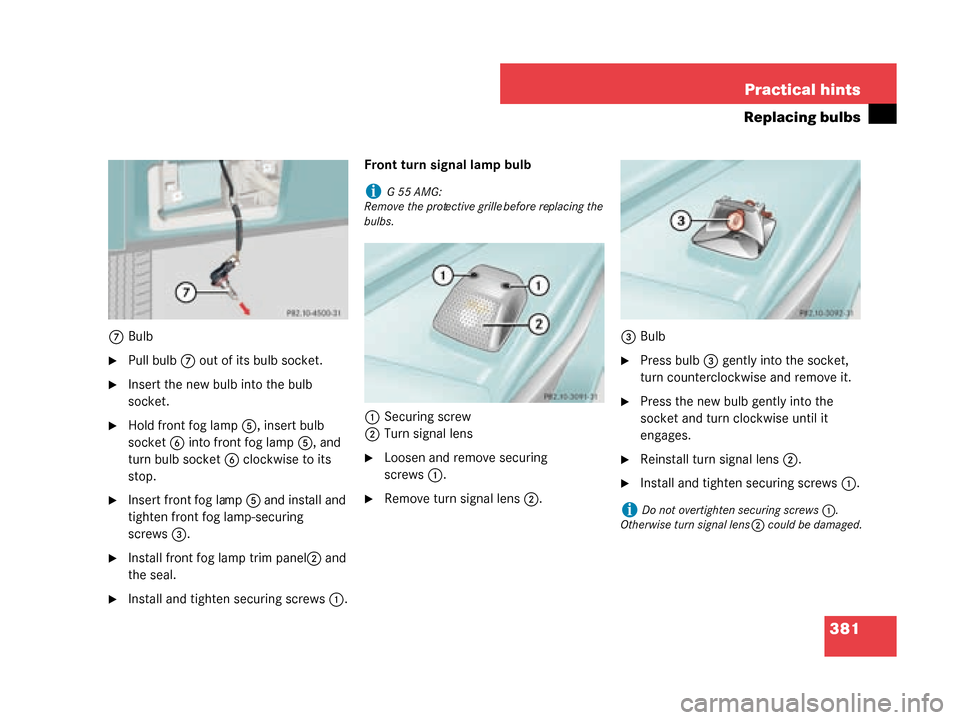
7
Bulb
�Pull bulb 7 out of its bulb socket.
�Insert the new bulb into the bulb
socket.
�Hold front fog lamp 5, insert bulb
socket 6 into front fog lamp 5, and
turn bulb socket 6 clockwise to its
stop.
�Insert front fog lamp 5 and install and
tighten front fog lamp-securing
screws 3.
�Install front fog lamp trim panel 2 and
the seal.
�Install and tight en securing screws 1. Front turn signal lamp bulb
1 Securing screw
2 Turn signal lens
�Loosen and remove securing
screws 1.
�Remove turn signal lens 2. 3
Bulb
�Press bulb 3 gently into the socket,
turn counterclockwise and remove it.
�Press the new bulb gently into the
socket and turn clockwise until it
engages.
�Reinstall turn signal lens 2.
�Install and tighten securing screws 1.
iG55AMG:
Remove the protective grille before replacing the
bulbs.
iDo not overtighten securing screws 1.
Otherwise turn signal lens 2 could be damaged.
W463.boo Seite 381 Montag, 19 . November 2007 8:41 08
Page 383 of 457
382 Practical hints
Replacing bulbs
Side marker lamp bulb
The following description applies to both,
the front and the rear side marker lamps.
Front side marker shown
1Securing screw
2 Side marker lamp housing
�Loosen and remove securing
screws 1.
�Remove side marker lamp housing 2. 2
Side marker lamp housing
3 Dust cover
�Remove dust cover 3.
�Press catch aside and pull out the bulb
socket with the bulb from side marker
lamp housing 2. 4
Bulb
�Press gently onto bulb 4 and turn
counterclockwise out of its bulb
socket.
�Press the new bulb gently into the bulb
socket and turn clockwise until it
engages.
�Insert the bulb socket back into side
marker lamp housing 2.
�Reinstall dust cover 3.
W463.boo Seite 382 Montag, 19 . November 2007 8:41 08
Page 384 of 457

383
Practical hints
Replacing bulbs
�Reinstall side marker lamp housing
2.
�Install and tight en securing screws 1.
Additional turn signal lamps
The additional turn signal lamps in the
exterior rear view mirrors have LEDs.
If a malfunction occurs or LEDs fail to
function, the entire turn signal unit must be
replaced. Have the turn signal unit
replaced at an authorized Mercedes-Benz
Light Truck Center. Locator lighting lamps
The locator lighting lamps in the exterior
rear view mirrors have bulbs.
Have the bulbs replaced at an authorized
Mercedes-Benz Light Truck Center.
Replacing bulbs for rear lamps
Before you start to replace a bulb for a rear
lamp, do the following first:
�Turn the exterior lamp switch to
position
M (
�page 117). Bulbs in tail lamp unit
Left tail lamp lens shown, right tail lamp
lens laterally reversed
1
Securing screw
2 Tail lamp lens
�Loosen and remove securing
screws 1.
�Remove tail lamp lens 2.
iDo not overtighten securing screws 1.
Otherwise side marker lamp housing 2 could
be damaged.
iG55AMG:
Remove the protective grille before replacing the
bulbs.
��
W463.boo Seite 383 Montag, 19 . November 2007 8:41 08
Page 385 of 457

384 Practical hints
Replacing bulbs
Left tail lamp unit shown, right tail lamp
unit laterally reversed
3Turn signal lamp bulb
4 Brake, tail, parking and standing lamp
bulb
5 Tail, parking and standing lamp bulb
�Press gently onto respective
bulb 3,4 , or 5 and turn counter-
clockwise out of its bulb socket.
�Press the new bulb gently into the bulb
socket and turn clockwise until it
engages.
�Reinstall tail lamp lens 2.
�Install and tighten securing screws 1. Rear fog lamp bulb/Backup lamp bulb
The following description applies to both,
the rear fog lamp and the backup lamp.
Rear fog lamp shown
1
Securing screw
2 Lamp lens
�Loosen and remove securing
screws 1.
�Remove lamp lens 2. 3
Bulb
�Press gently onto bulb 3 and turn
counterclockwise out of its bulb
socket.
�Press the new bulb gently into the bulb
socket and turn clockwise until it
engages.
�Reinstall lamp lens 2.
�Install and tight en securing screws 1.
iDo not overtighten securing screws 1.
Otherwise tail lamp lens 2 could be damaged.
iDo not overtighten securing screws 1.
Otherwise lamp lens 2 could be damaged.
��
W463.boo Seite 384 Montag, 19 . November 2007 8:41 08
Page 386 of 457
385
Practical hints
Replacing bulbs
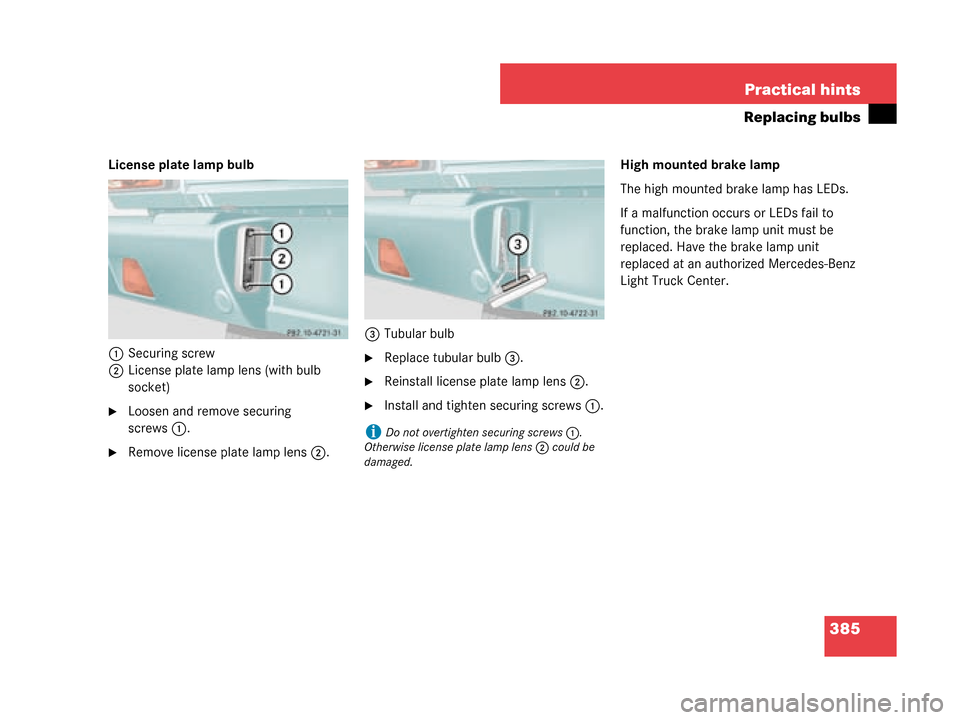
License plate lamp bulb
1 Securing screw
2 License plate lamp lens (with bulb
socket)
�Loosen and remove securing
screws 1.
�Remove license plate lamp lens 2. 3
Tubular bulb
�Replace tubular bulb 3.
�Reinstall license plate lamp lens 2.
�Install and tighten securing screws 1. High mounted brake lamp
The high mounted brake lamp has LEDs.
If a malfunction occu
rs or LEDs fail to
function, the brake lamp unit must be
replaced. Have the brake lamp unit
replaced at an authorized Mercedes-Benz
Light Truck Center.
iDo not overtighten securing screws 1.
Otherwise license plate lamp lens 2 could be
damaged.
W463.boo Seite 385 Montag, 19 . November 2007 8:41 08
Page 431 of 457

430 Index
Air pressure 304
Air pressure see Tire inflation pressure
Air recirculation mode 188Activating 188
Deactivating 189
Air vents, Rear Climate control 191
Air volume Adjusting 186
Alarm Audible 86, 95
Canceling 96, 97
Visual 95
Alarm system Anti-theft 95
Anticorrosion/antifreeze 426
Anti-theft alarm system Arming 96
Canceling alarm 96
Disarming 96
Anti-theft systems 95 Anti-theft alarm system 95
Tow-away alarm 97
Aquaplaning see Hydroplaning Armrest
Storage box in front of 217
Storage compartments below 216
Telephone* tray below 216
Ashtrays 220 In center console 220
In rear passenger compartment 221
Aspect ratio 304
At the gas station 264
ATF (automatic transmission fluid) 273
Audio menu 141 Selecting radio station 141
Audio search function 155
Auto-dimming for rear view mirror 177
Automatic central locking Activating/deactivating (control system) 155
Automatic headlamp mode 118
Automatic locking when driving 106
Automatic operation Interior lighting control 125 Automatic transmission 162
Accelerator position 166
Emergency operation (Limp Home Mode) 169
Fluid level 273
Gear ranges 167
Gear selector lever 162
Gear selector lever position 163, 164
Gear shifting malfunctions 169
Kickdown 166
One-touch gearshifting 168
Shifting procedure 163
Transmission fluid 273
B
BabySmart
TM
Air bag deactivation system 80
Compatible child seats 80
Self-test 81
Backup lamp Message in display 355
Backup lamps Bulbs 376
Replacing bulbs 384
Bar 304
BAS 87, 89
W463.boo Seite 430 Montag, 19 . November 2007 8:41 08
Page 432 of 457
 374
Batteries, SmartKey Check lamp 103
Checking 103
Battery box Fuse box in 406
Battery discharged Jump starting 397
Battery, vehicle 394 Charging 396
Disconne")
431
Index
Batteries
SmartKey (replacing) 374
Batteries, SmartKey Check lamp 103
Checking 103
Battery box Fuse box in 406
Battery discharged Jump starting 397
Battery, vehicle 394 Charging 396
Disconnecting 396
Messages in display 342–343
Reconnecting 396
Reinstalling 396
Removing 396
Bead 304
Block heater (Canada only) 310
Blocking rear door window operation 85
B-pillar 410
Brake fluid 266, 423 Message in display 344
Brake lamp bulbs, left and right 376
Brake lamp, high mounted 376
Brake lamps Messages in display 352 Brake pads
Message in display 345
Brakes 246 Warning lamp 326–327
Break-in period 244
Brush guard 373 Lowering 373
Raising and securing 373
Bulbs, replacing Additional turn signals 376
Backup lamps 376, 384
Brake lamps 376, 384
Front fog lamps 376, 380
Front lamps 376
Front turn signal lamps 376, 381
High beam lamps 376
High mounted brake lamp 376
License plate lamps 376, 385
Locator lighting lamps 376
Low beam lamps 376
Parking lamps 376, 378 Rear fog lamp 376, 384
Rear lamps 376
Rear turn signal lamps 376
Side marker lamps 376, 382
Standing lamps 376, 378
Tail lamp assemblies 376
Tail lamp unit 383
C
Call priority, Tele Aid 235
Calling up Maintenance service indicator display 313
Range (distance to empty) 158
Capacities Fuels, coolants, lubricants, etc. 420
Cargo area see Cargo compartment
Cargo compartment Expanding 206
Tailgate 105
Tie-down rings 209
Cargo compartment cover blind 214 Installing 214
Removing 214
Rolling out 214
Rolling up 214
Cargo compartment lamps 127
W463.boo Seite 431 Montag, 19 . November 2007 8:41 08
Page 437 of 457

436 Index
F
Fastening the seat belts 48
Fine adjustmentCruise control 199
First aid kit 364
Flat tire 388 Lifting the vehicle 389
Lowering the vehicle 392
Mounting the spare wheel 389
Spare wheel 366
Floormats 224
Fog lamp, rear 121, 376
Fog lamps Corner-illuminating front fog lamps 122
Fog lamps, front 121
4-ETS 87, 90
Front air bags 73
Front axle differential lock Switching on 176
Front fog lamps Messages in display 353
Replacing bulbs 376, 380
Front lamps Replacing bulbs 376, 378
Switching on 117 Front passenger front air bag off indicator
lamp 80, 335
Front seat head restraints Installing 109
Removing 108
Front towing eye 402
Front turn signal lamp Replacing bulbs 381
Fuel 265 Additives 425
Gasoline additives 425
Message in display 363
Premium unleaded gasoline 265, 422, 424
Refueling 264
Requirements 424
Reserve warning 27
Technical data 420
Fuel additives 425
Fuel consumption statistics Since last reset 158
Since start 157 Fuel filler cap
Message in display 351
Fuel filler flap 264 Locking 264
Opening 370
Unlocking 264
Fuel requirements 424
Fuel reserve tank Message in display 351
Fuel reserve warning lamp 331
Fuel tank Capacity 422
Filler flap 264
Fuels, coolants, lubricants, etc. Capacities 420
Functions (control system) 135, 137, 139
Fuse box 404, 405, 406
Fuses 403 Fuse box in battery box 406
Fuse box in front passenger footwell 404
Fuse box in middle tunnel 405
Main fuse box in passenger compartment 404
W463.boo Seite 436 Montag, 19 . November 2007 8:41 08