Page 4 of 192

Contents
Switching on . . . . . . . . . . . . . . . . . . 78
Changing the program category . . . 79
Selecting a station . . . . . . . . . . . . . 79
Memory functions . . . . . . . . . . . . . . 80
Displaying information . . . . . . . . . . 82
Displaying service information . . . . 82
Station list updates . . . . . . . . . . . . . 82
Sound settings . . . . . . . . . . . . . . . . 82
Telephone*. . . . . . . . . . . . . . . . . . . . . 83
Important notes . . . . . . . . . . . . . . . . . . 84
Telephone operation. . . . . . . . . . . . . . . 88 Switching telephone operation on . 88
Switching telephone operation off . 88
Emergency call “911” . . . . . . . . . . . 89
Entering codes . . . . . . . . . . . . . . . . 91
Switching to telephone operation . 92
Incoming call. . . . . . . . . . . . . . . . . . 94
Outgoing calls . . . . . . . . . . . . . . . . . 95
Active call . . . . . . . . . . . . . . . . . . . . 99
Phone book . . . . . . . . . . . . . . . . . . 101
Navigation . . . . . . . . . . . . . . . . . . . . . 103
Important notes . . . . . . . . . . . . . . . . . 104 Navigation DVD. . . . . . . . . . . . . . . 105
Route guidance after the vehicle
has been transported . . . . . . . . . . 106
Trip interruption during route
guidance . . . . . . . . . . . . . . . . . . . . 107
Navigation main menu . . . . . . . . . . . . 108 Activating the Navigation main
menu . . . . . . . . . . . . . . . . . . . . . . 108
Setting the routing mode . . . . . . . 110
Saving current location . . . . . . . . . 111
Destination input . . . . . . . . . . . . . . . . 112 Activating the Enter street menu . 112
Selecting the state/province . . . . 113
Entering destination address . . . . 114
Selecting home address . . . . . . . . 125
Displaying the compass screen . . 126
Route guidance. . . . . . . . . . . . . . . . . . 129 Starting route guidance . . . . . . . . 129
Route calculation . . . . . . . . . . . . . 129
Recalculating an existing route . . . 129
Voice instructions . . . . . . . . . . . . . 130
Navigation displays . . . . . . . . . . . . 131
Partially digitized areas/unverified
roads . . . . . . . . . . . . . . . . . . . . . . . 134
Arriving at destination. . . . . . . . . . 139
Cancelling route guidance . . . . . . 139 During route guidance . . . . . . . . . . . . 140
Displaying the soft keys . . . . . . . . 140
Info menu . . . . . . . . . . . . . . . . . . . 141
Selecting a detour . . . . . . . . . . . . . 142
Stopover function . . . . . . . . . . . . . 144
Saving the current location . . . . . . 147
Defining route guidance displays . 147
Last destinations and destination
memory . . . . . . . . . . . . . . . . . . . . . . . 153 Last destinations memory. . . . . . . 153
Destination memory . . . . . . . . . . . 154
POIs (Points of Interest) . . . . . . . . . . . 157 Entering POIs . . . . . . . . . . . . . . . . 157
Selecting a POI on the map. . . . . . 160
Entering a POI by phone number . 161
Today’s plan . . . . . . . . . . . . . . . . . . . . 163 Adding a destination to today’s
plan . . . . . . . . . . . . . . . . . . . . . . . . 163
Software Updates . . . . . . . . . . . . . . . . 166
System . . . . . . . . . . . . . . . . . . . . . . . . 169
System settings . . . . . . . . . . . . . . . . . 170 Activating the System menu . . . . 170
Setting the time . . . . . . . . . . . . . . 170
Selecting the language . . . . . . . . . 171
Page 8 of 192

8 Introduction
Symbols
� Symbols
You will find the following symbols in these
operating instructions:
* The asterisk identifies optional
equipment. Since not all models
have the same standard equip-
ment, your COMAND system equip-
ment may deviate from some
descriptions and illustrations.� This symbol points to in-
structions for you to follow.
A number of these symbols
appearing in succession in-
dicates a multiple-step pro-
cedure.
The continuation symbol marks an interrupted proce-
dure which will be continued
on the next page.
(
�page 9) This symbol tells you where to look for further infor-
mation on this subject.
-> This symbol is used in the glossary. It indicates that
the term immediately follo-
wing the symbol is also exp-
lained in the glossary.
Display Messages, menu items or
soft key names appearing in
the COMAND color display
are printed in the type
shown here.
WarningG
Warning notices draw yo ur attention to ha-
zards that may endanger your health or life,
or the health or life of others.
!
Highlights hazards that may result in
damage to your COMAND.
i
Helpful hints or further information you
may find useful.
��
Page 13 of 192
13 At a glance
Radio operating elements
FunctionPage
1Audio menu42
2Soft keys
(multifunction keys)
3Color display with Radio
main menu44
41 - 0, *
Station selection
Saving stations manually
Selecting a station from
the preset memory
45
48
50
5Push the joystick to
H,h,g,G
Function selection
g and G
e.g.
Automatic seek tuning
H and h
e.g. Manual tuning
Press E to confirm
46
46
FunctionPage
6J
Muting
43
7Volume control35
8e Switching on and off34
9d and D
Automatic seek tuning
Manual tuning
46
46
Page 15 of 192
15 At a glance
Single CD operating elements
FunctionPage
1Audio menu42
2Soft keys
(multifunction keys)
3Color screen with single
CD main menu
The status bar indicates
CD status information
57
57
41 - 0, *
Track select
60
5Push the joystick to
g and G
Track select
Press E to confirm
60
FunctionPage
6l
Ejecting/loading a CD into
the CD drive
i
There are two l
buttons. One is on the
display unit. The other is
located left of the CD
AUDIO slot behind the
display.
52
7J
Muting
62
8Volume control35
9e Switching on and off34
ad and D
Track select
Fast forward/reverse
60
62
Page 17 of 192
17 At a glance
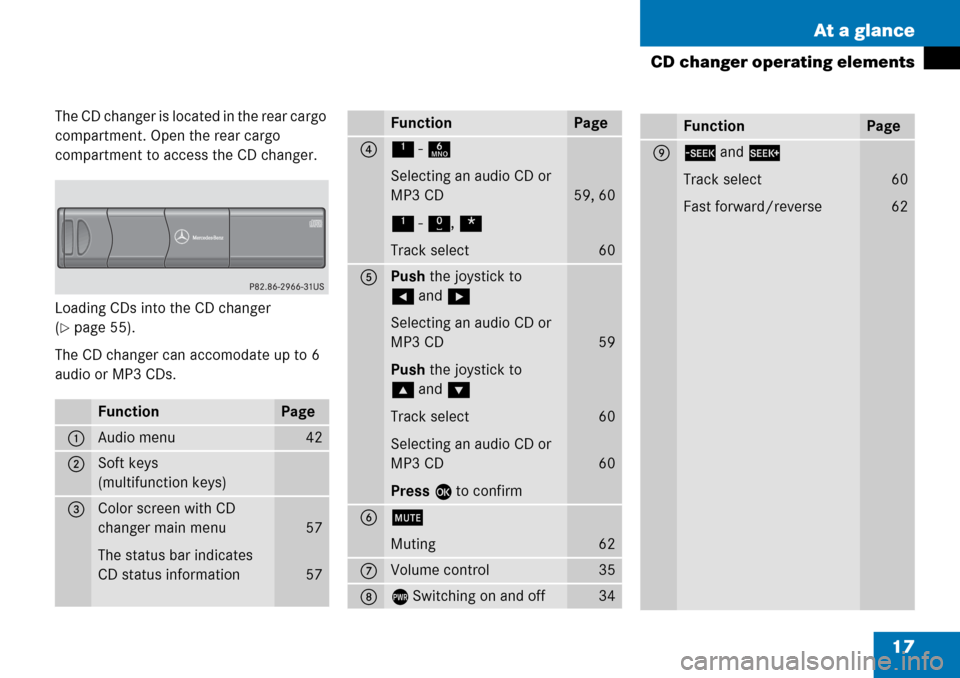
CD changer operating elements
The CD changer is located in the rear cargo
compartment. Open the rear cargo
compartment to access the CD changer.
Loading CDs into the CD changer
(
�page 55).
The CD changer can accomodate up to 6
audio or MP3 CDs.
FunctionPage
1Audio menu42
2Soft keys
(multifunction keys)
3Color screen with CD
changer main menu
The status bar indicates
CD status information
57
57
41 - 6
Selecting an audio CD or
MP3 CD
1 - 0, *
Track select
59, 60
60
5Push the joystick to
H and h
Selecting an audio CD or
MP3 CD
Push the joystick to
g and G
Track select
Selecting an audio CD or
MP3 CD
Press E to confirm
59
60
60
6J
Muting
62
7Volume control35
8e Switching on and off34
FunctionPageFunctionPage
9d and D
Track select
Fast forward/reverse
60
62
Page 19 of 192
19 At a glance
MP3 CD operating elements
FunctionPage
1Audio menu42
2Soft keys
(multifunction keys)
3Color screen with MP3
main menu
The status bar indicates
MP3 CD status
information
68
41 - 0, *
Track select
72
5Push the joystick to
H and h
Selecting a folder
Push the joystick to
g and G
Track select or
Activating playback mode
Selecting a folder
Press E to confirm
69
71
74
70
6l
Ejecting/loading a MP3
CD into the CD drive
i
There are two l
buttons. One is on the
display unit. The other is
located left of the CD
AUDIO slot behind the
display.
52
7J
Muting
73
8Volume control35
9e Switching on and off34
ad and D
Fast forward/reverse
73
FunctionPage
Page 21 of 192
21 At a glance
Satellite radio operating elements
FunctionPage
1Satellite radio main menu
Switching satellite
operation on and off78
78
2Soft keys
(multifunction keys)
3Color screen with Satellite
radio main menu
78
41 - 0, *
Station selection via direct
channel entry
Saving stations manually
80
80
5Push the joystick to
H,h,g,G
Selecting a category,
selecting a station
Press E to confirm
6J
Muting
78
FunctionPage
7Volume control35
8e Switching on and off34
9d and D
Previous or next channel
79
Page 23 of 192
23 At a glance
Telephone* operating elements
FunctionPage
1a
Telephone menu
Switching telephone
operation on and off
92
88
2Soft keys
(multifunction keys)
3Color screen with
Telephone menu
41 - 0, # and *
Entering the unlock code
Entering a telephone
number
Subsequent dialing
Speed-dialing
Quick-dialing
91
95
96
98
99
FunctionPage
5Push the joystick to
H,h,g,G
Function selection
Press E to confirm
6k
Accepting a call
Making a call
Redialing
94
95
96
7K
Rejecting or ending a call
94
8Volume control35
9e Switching on and off34

3Color display with Radio
main menu44
41 - 0, *
Station selection
Saving stations manually
Selecting")

3Color screen with single
CD main menu
The status bar indicates
CD status information
57
57
41")

3Color screen with MP3
main menu
The status bar indicates
MP3 CD status
information
68
41 - 0, *")

3Color screen with Satellite
r")

3Color screen with
Telephone menu
41 - 0, #")