2008 MERCEDES-BENZ E-CLASS SALOON key
[x] Cancel search: keyPage 103 of 401

Lights
100
X
To switch on: turn the light switch to
M orU.
The dipped-beam headlamps, side lamps
and licence plate lamp are switched on
when the engine is running.
i When you turn the light switch to any
position other than MorU, the cor-
responding light goes on.
Automatic headlamp mode The side lamps, dipped-beam headlamps and
licence plate lamp are switched on or off
automatically, depending on the brightness of
the ambient light. G
Risk of accident
When the light switch is set to U, the
lights are not switched on automatically in
foggy conditions. This could endanger you
and others. Therefore, turn the light switch
to B in darkness and fog.
Automatic headlamp mode is only a driving
aid. You are responsible for the vehicle
lighting at all times. G
Risk of accident
When it is dark or foggy, turn the light
switch from UtoB in good time. You
could otherwise cause an accident if the
headlamps were to switch off temporarily.
X To switch on: turn the light switch to
U.
The side lamps are switched on and off
automatically when the key is in position
1 in the ignition lock.
The dipped-beam headlamps, side lamps
and licence plate lamp are switched on
automatically when the engine is running.
When the dipped-beam headlamps are
switched on, the green dipped-beam indi-
cator lamp in the instrument cluster lights
up.
Front foglamps/Rear foglamp G
Risk of accident
If you suspect that driving conditions will be
foggy, turn the light switch to Bbefore
you start your journey. Otherwise, your
vehicle may not be visible and you could
therefore endanger yourself and others. G
Risk of accident
When it is dark or foggy, turn the light
switch from UtoB in good time. You
could otherwise cause an accident if the
headlamps were to switch off temporarily.
When the light switch is set to Uyou can-
not switch on the front or rear foglamps.
X Make sure that the key is in position 2in
the ignition lock.
X To switch on the front foglamps: turn the
light switch to the BorC position.
X Pull the light switch out to the first stop.
The ¥ green indicator lamp next to the
light switch lights up.
X To switch on the rear foglamp: turn the
light switch to BorC.
X Pull the light switch out to the second
detent.
The † yellow indicator lamp next to the
light switch lights up.
X To switch off the front foglamps/rear
foglamps: push in the light switch to the
stop.
The corresponding indicator lamp goes out. Controls
211_AKB; 2; 5, en-GB
mkalafa,
Version: 2.9.4 2008-02-29T16:57:07+01:00 - Seite 100Dateiname: 6515_3416_02_buchblock.pdf; preflight
Page 104 of 401

Lights
101Combination switch (turn signals,
main-beam headlamps and headlamp
flasher)
Turn signal Combination switch
1
Right-hand turn signal
2 Left-hand turn signal
X To switch on: press the combination
switch in the direction of arrow 1or2.
The corresponding turn signal indicator
lamp K orL in the instrument clus-
ter flashes.
i If you only wish to indicate a minor change
of direction, press the combination switch briefly in the appropriate direction. The cor-
responding turn signal flashes three times.
Main-beam headlamps/headlamp flas-
her Combination switch
1
Main-beam headlamp
2 Headlamp flasher Main-beam headlamp
X
Make sure that the key is in position 2of
the ignition lock or that the engine is run-
ning.
X Turn the light switch to BorU 16
.
X To switch on: press the combination
switch in the direction of arrow 1.
The main-beam indicator lamp Ain the
instrument cluster lights up.
X To switch off: move the combination
switch back to its normal position.
The main-beam indicator lamp Ain the
instrument cluster goes out.
Headlamp flasher
X To switch on: briefly pull the combination
switch in the direction of arrow 2.
16 In the Uposition, the main-beam headlamps are only switched on when it is dark. Controls
211_AKB; 2; 5, en-GB
mkalafa,
Version: 2.9.4 2008-02-29T16:57:07+01:00 - Seite 101 ZDateiname: 6515_3416_02_buchblock.pdf; preflight
Page 108 of 401

Windscreen wipers
105
Automatic function
X
To switch on/off: press the¡button.
The interior lighting switches on if it is dark
when you:
R unlock the vehicle
R open a door
R remove the key from the ignition lock
The interior lighting switches off after a delay.
You can set the delayed switch-off using the
on-board computer.
i If the door is left open, the interior lighting
goes out after approximately five minutes.
Manual control
Front interior lighting
X To switch on/off: press theðbutton.
Rear-compartment interior lighting
X To switch on/off: press the¦button.
Front reading lamps
X To switch on/off: press theXbutton. Rear-compartment overhead control
panel
Rear-compartment overhead control panel
1 X To switch the left-hand reading lamp
on/off
2 X To switch the right-hand reading
lamp on/off
Rear-compartment reading lamps
X To switch on/off: press theXbutton. Windscreen wipers
Switching the windscreen wipers on/
off
Combination switch
1
To switch on the windscreen wipers
2 Single wipe/to wipe the windscreen using
washer fluid
Settings: M
Windscreen wipers off
U
Intermittent wipe, low
(rain sensor set to low sensitivity)
V
Intermittent wipe, high
(rain sensor set to high sensitivity) Controls
211_AKB; 2; 5, en-GB
mkalafa,
Version: 2.9.4
2008-02-29T16:57:07+01:00 - Seite 105 ZDateiname: 6515_3416_02_buchblock.pdf; preflight
Page 109 of 401

Windscreen wipers
106 u
Continuous wipe, slow
t
Continuous wipe, fast
!
If the windscreen becomes dirty in dry
weather conditions, the windscreen wipers
may be activated inadvertently. This could
then damage the windscreen wiper blades
or scratch the windscreen.
For this reason, you should always switch
off the windscreen wipers in dry weather.
X Make sure that the key is in position 1or
2 in the ignition lock.
The various wiper settings can be selected
as follows:
Single wipe X
Briefly press the combination switch to the
pressure point in the direction of arrow
2.
Wiping with washer fluid X
Press the combination switch beyond the
pressure point in the direction of arrow
2. Intermittent wipe/rain sensor X
Depending on the intensity of the rain, turn
the combination switch in the direction of
arrow 1to position UorV.
The rain sensor is activated. The appropri-
ate wiping frequency is set automatically
according to the intensity of the rain.
Continuous wipe X
Depending on the intensity of the rain, turn
the combination switch in the direction of
arrow 1to position uort.
Switching off the windscreen wipers X
Turn the combination switch to position
M. Rear window wiper (Estate)
Combination switch
1
Switch
% To wipe with washer fluid
& To switch on intermittent wiping
( To switch off intermittent wiping
) To wipe with washer fluid
Intermittent wipe X
Make sure that the key is in position 1in
the ignition lock.
X To switch on: turn switch1to position
&.
X To switch off: turn switch1to position
(. Controls
211_AKB; 2; 5, en-GB
mkalafa,
Version: 2.9.4 2008-02-29T16:57:07+01:00 - Seite 106Dateiname: 6515_3416_02_buchblock.pdf; preflight
Page 110 of 401

Side windows
107
Wiping with washer fluid X
Make sure that the key is in position 1in
the ignition lock.
X Turn switch 1to position %or posi-
tion )and hold it there until the rear
window has been cleaned.
The rear window is wiped for a further five
seconds after the switch is released. Side windows
Opening/closing the side windows
G
Risk of injury
Make sure that nobody can become trap-
ped between the side window and the door
frame as a side window is opened. Do not
touch or lean against the side window dur-
ing the opening procedure. You could
become trapped between the side window
and the door frame as the window moves
down. If danger threatens, release the
switch or pull the switch upwards to close
the side window again. G
Risk of injury
Make sure that nobody can become trap-
ped as you close a side window. If danger
threatens, release the switch or press the
switch a second time to open the side win-
dow again. G
Risk of injury
Never leave children unsupervised in the
vehicle. Always take the key with you when
leaving the vehicle, even if you only leave it
for a short time. G
Risk of injury
Do not leave children unsupervised in the
vehicle, even if they are secured in a child
restraint system. The children could:
R be seriously or even fatally injured on
parts of the vehicle
R be seriously or even fatally injured by
prolonged exposure to extremely high or
extremely low temperatures
If children open a door, they could:
R seriously or even fatally injure other peo-
ple
R get out of the vehicle, thereby injuring
themselves or be seriously or even fatally
injured by a passing vehicle
Activate the child-proof locks if children are
travelling in the vehicle. They could other-
wise open doors or windows while the vehi-
cle is in motion and thereby injure them-
selves or others.
i It is also possible to open and close the
side windows from the outside using the
"Summer opening" (Y page 109) and "con-
venience closing" (Y page 109) features
respectively. Controls
211_AKB; 2; 5, en-GB
mkalafa,
Version: 2.9.4
2008-02-29T16:57:07+01:00 - Seite 107 ZDateiname: 6515_3416_02_buchblock.pdf; preflight
Page 111 of 401

Side windows
108
i
You can disable the controls for the rear
side windows from the driver's seat
(Y page 47).
i If PRE-SAFE ®
has been activated, the side
windows close automatically, leaving a
small gap.
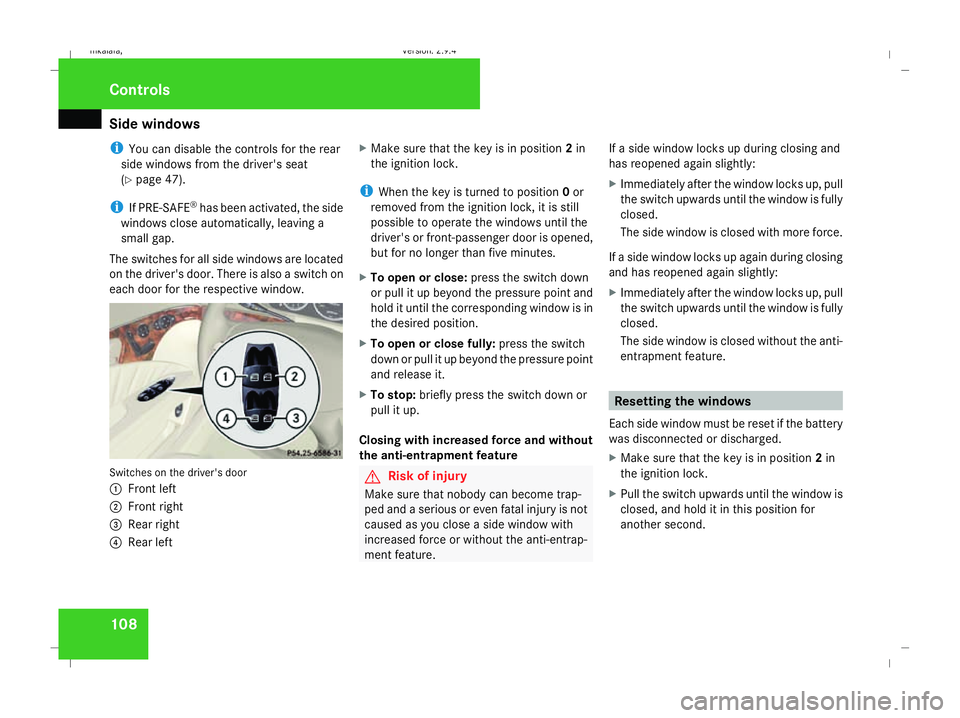
The switches for all side windows are located
on the driver's door. There is also a switch on
each door for the respective window. Switches on the driver's door
1
Front left
2 Front right
3 Rear right
4 Rear left X
Make sure that the key is in position 2in
the ignition lock.
i When the key is turned to position 0or
removed from the ignition lock, it is still
possible to operate the windows until the
driver's or front-passenger door is opened,
but for no longer than five minutes.
X To open or close: press the switch down
or pull it up beyond the pressure point and
hold it until the corresponding window is in
the desired position.
X To open or close fully: press the switch
down or pull it up beyond the pressure point
and release it.
X To stop: briefly press the switch down or
pull it up.
Closing with increased force and without
the anti-entrapment feature G
Risk of injury
Make sure that nobody can become trap-
ped and a serious or even fatal injury is not
caused as you close a side window with
increased force or without the anti-entrap-
ment feature. If a side window locks up during closing and
has reopened again slightly:
X
Immediately after the window locks up, pull
the switch upwards until the window is fully
closed.
The side window is closed with more force.
If a side window locks up again during closing
and has reopened again slightly:
X Immediately after the window locks up, pull
the switch upwards until the window is fully
closed.
The side window is closed without the anti-
entrapment feature. Resetting the windows
Each side window must be reset if the battery
was disconnected or discharged.
X Make sure that the key is in position 2in
the ignition lock.
X Pull the switch upwards until the window is
closed, and hold it in this position for
another second. Controls
211_AKB; 2; 5, en-GB
mkalafa,
Version: 2.9.4 2008-02-29T16:57:07+01:00 - Seite 108Dateiname: 6515_3416_02_buchblock.pdf; preflight
Page 112 of 401

Side windows
109Summer opening
You can ventilate the vehicle before a journey.
To do this, you can use the key to simultane-
ously:
R open the side windows
R open the sliding/tilting sunroof* or the
panorama sliding sunroof* and the roller
sunblinds*
R switch on the seat ventilation*
i The "Summer opening" feature can only
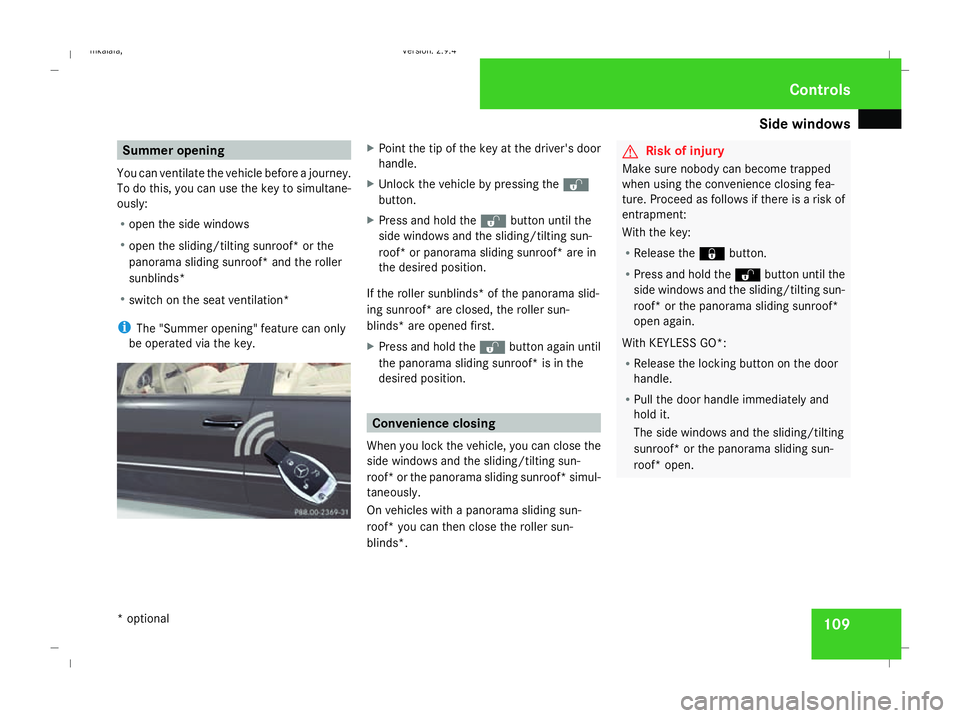
be operated via the key. X
Point the tip of the key at the driver's door
handle.
X Unlock the vehicle by pressing the k
button.
X Press and hold the kbutton until the
side windows and the sliding/tilting sun-
roof* or panorama sliding sunroof* are in
the desired position.
If the roller sunblinds* of the panorama slid-
ing sunroof* are closed, the roller sun-
blinds* are opened first.
X Press and hold the kbutton again until
the panorama sliding sunroof* is in the
desired position. Convenience closing
When you lock the vehicle, you can close the
side windows and the sliding/tilting sun-
roof* or the panorama sliding sunroof* simul-
taneously.
On vehicles with a panorama sliding sun-
roof* you can then close the roller sun-
blinds*. G
Risk of injury
Make sure nobody can become trapped
when using the convenience closing fea-
ture. Proceed as follows if there is a risk of
entrapment:
With the key:
R Release the jbutton.
R Press and hold the kbutton until the
side windows and the sliding/tilting sun-
roof* or the panorama sliding sunroof*
open again.
With KEYLESS GO*:
R Release the locking button on the door
handle.
R Pull the door handle immediately and
hold it.
The side windows and the sliding/tilting
sunroof* or the panorama sliding sun-
roof* open. Controls
* optional
211_AKB; 2; 5, en-GB
mkalafa,
Version: 2.9.4
2008-02-29T16:57:07+01:00 - Seite 109 ZDateiname: 6515_3416_02_buchblock.pdf; preflight
Page 113 of 401

Driving and pa
rking 110
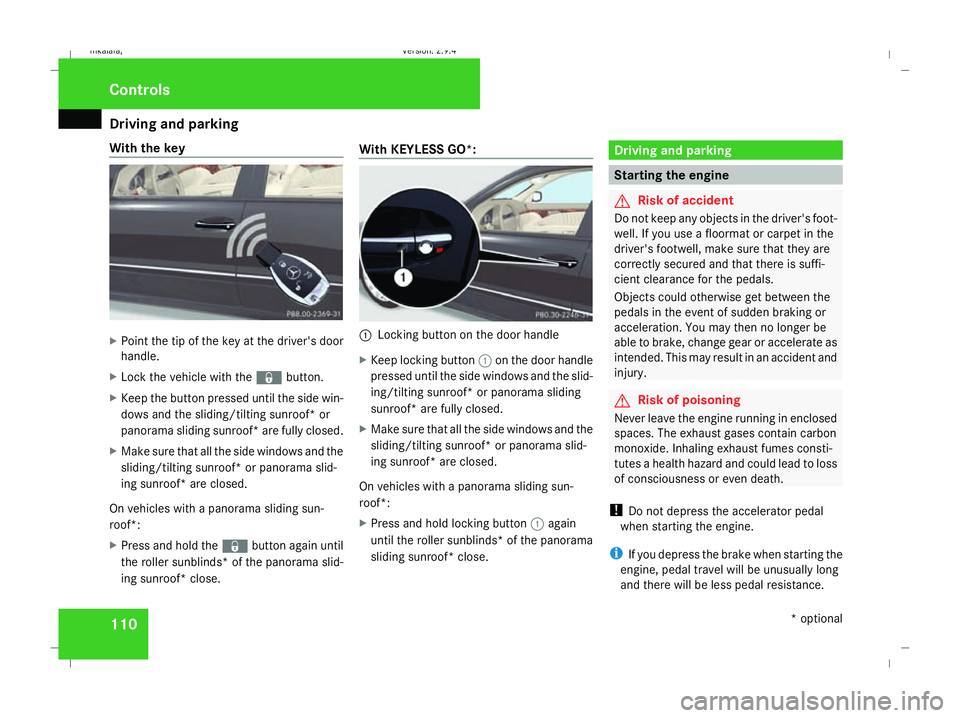
With the key
X
Point the tip of the key at the driver's door
handle.
X Lock the vehicle with the jbutton.
X Keep the button pressed until the side win-
dows and the sliding/tilting sunroof* or
panorama sliding sunroof* are fully closed.
X Make sure that all the side windows and the
sliding/tilting sunroof* or panorama slid-
ing sunroof* are closed.
On vehicles with a panorama sliding sun-
roof*:
X Press and hold the jbutton again until
the roller sunblinds* of the panorama slid-
ing sunroof* close. With KE
YLESS GO*: 1
Locking button on the door handle
X Keep locking button 1on the door handle
pressed until the side windows and the slid-
ing/tilting sunroof* or panorama sliding
sunroof* are fully closed.
X Make sure that all the side windows and the
sliding/tilting sunroof* or panorama slid-
ing sunroof* are closed.
On vehicles with a panorama sliding sun-
roof*:
X Press and hold locking button 1again
until the roller sunblinds* of the panorama
sliding sunroof* close. Driving and parking
Starting the engine
G
Risk of accident
Do not keep any objects in the driver's foot-
well. If you use a floormat or carpet in the
driver's footwell, make sure that they are
correctly secured and that there is suffi-
cient clearance for the pedals.
Objects could otherwise get between the
pedals in the event of sudden braking or
acceleration. You may then no longer be
able to brake, change gear or accelerate as
intended. This may result in an accident and
injury. G
Risk of poisoning
Never leave the engine running in enclosed
spaces. The exhaust gases contain carbon
monoxide. Inhaling exhaust fumes consti-
tutes a health hazard and could lead to loss
of consciousness or even death.
! Do not depress the accelerator pedal
when starting the engine.
i If you depress the brake when starting the
engine, pedal travel will be unusually long
and there will be less pedal resistance. Cont
rols
* optional
211_AKB; 2; 5, en-GB
mkalafa
,V ersion: 2.9.4
2008-02-29T16:57:07+01:00 - Seite 110 Dateiname: 6515_3416_02_buchblock.pdf; preflight