2008 MERCEDES-BENZ E-CLASS SALOON parking brake
[x] Cancel search: parking brakePage 162 of 401

Driving sys
tems 1591
Sensors in the front bumper
Range of the sensors The sensors must be free of dirt, ice and
slush, otherwise they may not function cor-
rectly. Clean the sensors regularly, taking
care not to scratch or damage them. Side view: Saloon shown as an example
Top view: Saloon shown as an exampleFront sensors Centre Approximately 100 cm
Corners Approximately 60 cm
Rear sensors
Centre Approximately 120 cm
Corners Approximately 80 cm
!
Pay particular attention to objects above
or below the sensors when parking, such
as flower pots or trailer towbars. Parktronic
does not detect such objects when they are
in the immediate vicinity of the vehicle. You
could damage the vehicle or the objects.
Ultrasonic sources such as an automatic
car wash, a lorry's compressed-air brakes
or a pneumatic drill could cause Parktronic
to malfunction.
Minimum distance Centre Approximately 20 cm
Corners Approximately 15 cm Controls
211_AKB; 2; 5, en-GB
mkalafa
, Version: 2.9.4 2008-02-29T16:57:07+01:00 - Seite 159 ZDateiname: 6515_3416_02_buchblock.pdf; preflight
Page 268 of 401

Display
messages 265Display messages Possible cause/consequence Possible solution
HOLD cannot be activa-
ted See Owner's
Manual A condition for activating HOLD has not
been met. Check the conditions for activating HOLD
(Y
page 155).
X Close the bonnet.
X Close the driver's door.
X Start the engine.
X Release the parking brake.
X Switch off all consumers that are not required.
HOLD can be reactivated as soon as the on-
board voltage is sufficient. HOLD inoperative See
Owner's Manual A malfunction has occurred. X
Visit a qualified specialist workshop. Cruise control
and SPEEDTRONIC inoperative Speedtronic and cruise control or Dis-
tronic* are not operational. X
Visit a qualified specialist workshop. SRS Restraint system
malfunction Con-
sult workshop G
Risk of injury
The restraint systems are faulty. X
Visit a qualified specialist workshop immedi-
ately. Cruise control - - - A condition for activating cruise control
has not been met. X
Activate ESP ®
(Y page 60)
X If conditions permit, drive faster than
30 km/h and store the speed (Y page 143). Practical advi
ce
* optional
211_AKB; 2; 5, en-GB
mkalafa,
Version: 2.9.4 2008-02-29T16:57:07+01:00 - Seite 265 ZDateiname: 6515_3416_02_buchblock.pdf; preflight
Page 273 of 401
Display
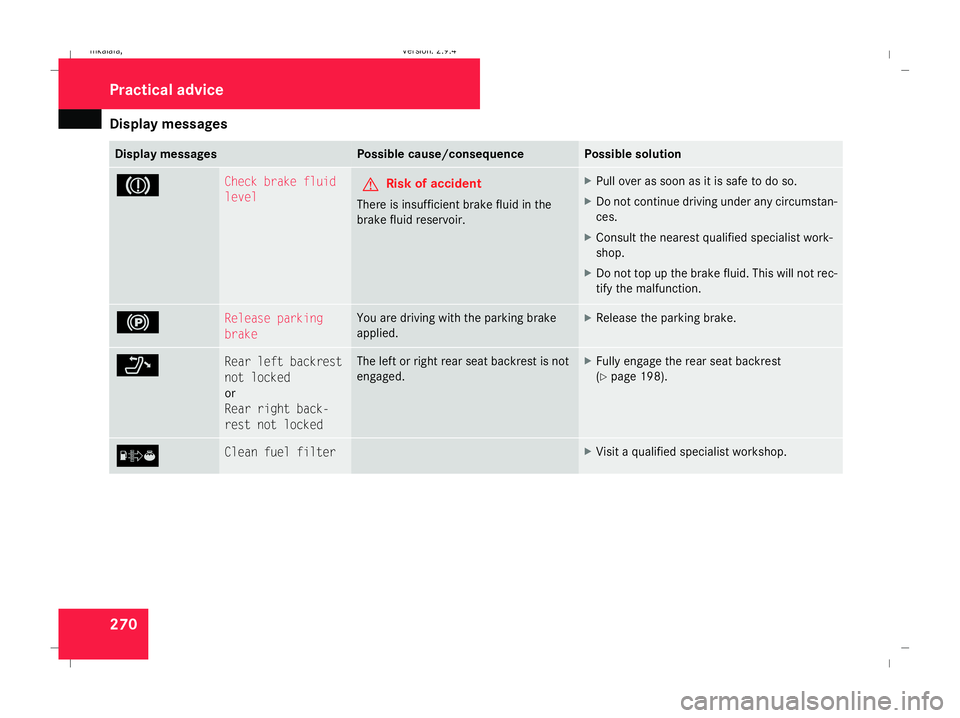
messages 270 Display messages Possible cause/consequence Possible solution
3 Check brake fluid
level
G
Risk of accident
There is insufficient brake fluid in the
brake fluid reservoir. X
Pull over as soon as it is safe to do so.
X Do not continue driving under any circumstan-
ces.
X Consult the nearest qualified specialist work-
shop.
X Do not top up the brake fluid. This will not rec-
tify the malfunction. ! Release parking
brake You are driving with the parking brake
applied. X
Release the parking brake. ? Rear left backrest
not locked
or
Rear right back-
rest not locked The left or right rear seat backrest is not
engaged. X
Fully engage the rear seat backrest
(Y page 198). [ Clean fuel filter X
Visit a qualified specialist workshop. Practical advi
ce
211_AKB; 2; 5, en-GB
mkalafa,
Version: 2.9.4 2008-02-29T16:57:07+01:00 - Seite 270Dateiname: 6515_3416_02_buchblock.pdf; preflight
Page 289 of 401
Troubleshooting
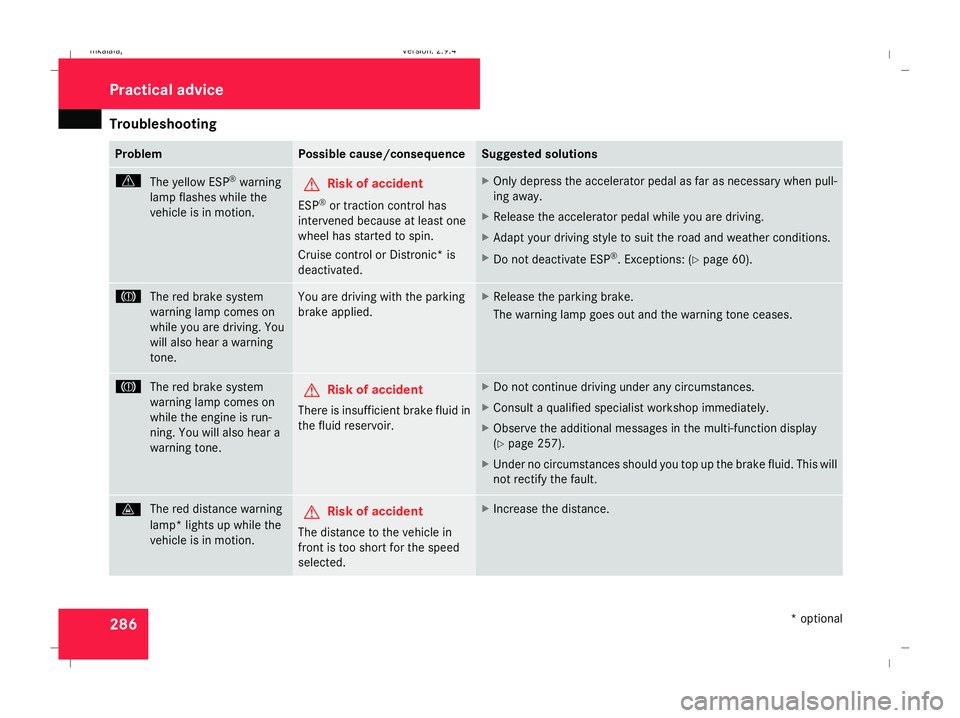
286 Problem Possible cause/consequence Suggested solutions
v
The yellow ESP ®
warning
lamp flashes while the
vehicle is in motion. G
Risk of accident
ESP ®
or traction control has
intervened because at least one
wheel has started to spin.
Cruise control or Distronic* is
deactivated. X
Only depress the accelerator pedal as far as necessary when pull-
ing away.
X Release the accelerator pedal while you are driving.
X Adapt your driving style to suit the road and weather conditions.
X Do not deactivate ESP ®
. Exceptions: (Y page 60). 3
The red brake system
warning lamp comes on
while you are driving. You
will also hear a warning
tone. You are driving with the parking
brake applied. X
Release the parking brake.
The warning lamp goes out and the warning tone ceases. 3
The red brake system
warning lamp comes on
while the engine is run-
ning. You will also hear a
warning tone. G
Risk of accident
There is insufficient brake fluid in
the fluid reservoir. X
Do not continue driving under any circumstances.
X Consult a qualified specialist workshop immediately.
X Observe the additional messages in the multi-function display
(Y page 257).
X Under no circumstances should you top up the brake fluid. This will
not rectify the fault. l
The red distance warning
lamp* lights up while the
vehicle is in motion. G
Risk of accident
The distance to the vehicle in
front is too short for the speed
selected. X
Increase the distance. Practical advice
* optional
211_AKB; 2; 5, en-GB
mkalafa
,V ersion: 2.9.4
2008-02-29T16:57:07+01:00 - Seite 286 Dateiname: 6515_3416_02_buchblock.pdf; preflight
Page 295 of 401
Troubleshooting
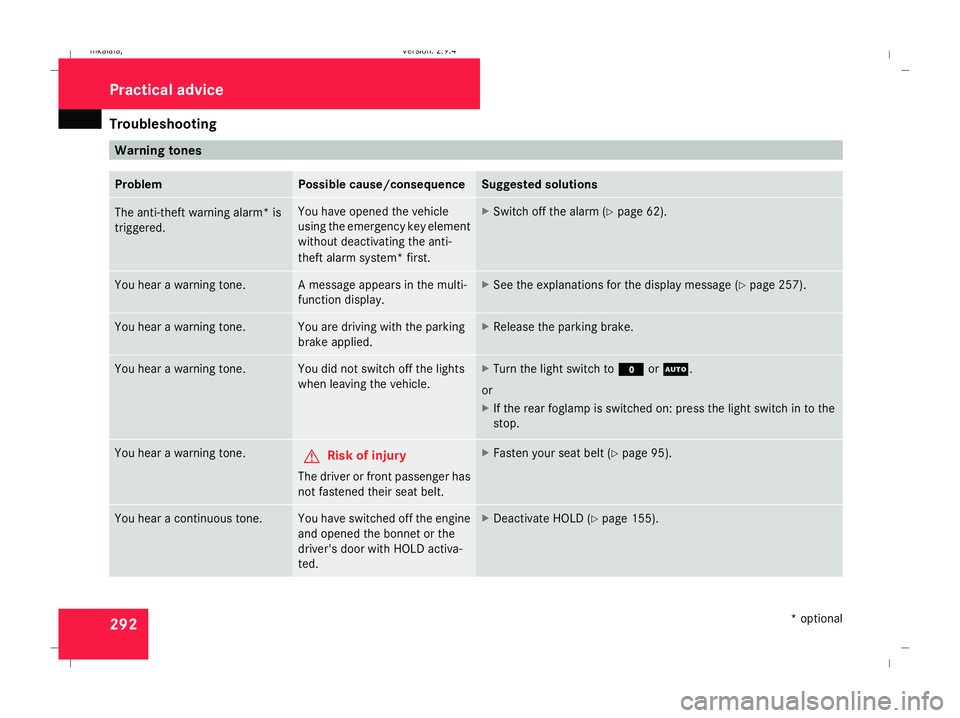
292 Warning tones
Problem Possible cause/consequence Suggested solutions
The anti-theft warning alarm* is
triggered. You have opened the vehicle
using the emergency key element
without deactivating the anti-
theft alarm system* first. X
Switch off the alarm (Y page 62).You hear a warning tone. A message appears in the multi-
function display. X
See the explanations for the display message (Y page 257).You hear a warning tone. You are driving with the parking
brake applied. X
Release the parking brake. You hear a warning tone. You did not switch off the lights
when leaving the vehicle. X
Turn the light switch to MorU.
or
X If the rear foglamp is switched on: press the light switch in to the
stop. You hear a warning tone.
G
Risk of injury
The driver or front passenger has
not fastened their seat belt. X
Fasten your seat belt (Y page 95).You hear a continuous tone. You have switched off the engine
and opened the bonnet or the
driver's door with HOLD activa-
ted. X
Deactivate HOLD (Y page 155). Practical advice
* optional
211_AKB; 2; 5, en-GB
mkalafa
,V ersion: 2.9.4
2008-02-29T16:57:07+01:00 - Seite 292 Dateiname: 6515_3416_02_buchblock.pdf; preflight
Page 320 of 401
Flat tyre
317
X
Remove the key from the ignition lock.
X Fold the wiper arm away from the rear win-
dow until it engages.
X Turn wiper blade 1at a right angle to wiper
arm.
X Press tab 2and push wiper blade 1off
the retainer in the direction of arrow 4.
X Remove wiper blade 1.
Fitting X
Insert the new wiper blade into retainer
3 in the opposite direction to arrow 4
until tab 2engages.
X Make sure that wiper blade 1is seated
correctly.
X Turn wiper blade 1parallel to the wiper
arm.
X Fold the wiper arm back onto the rear win-
dow. Flat tyre
Your vehicle may be equipped with:
R a TIREFIT kit (Y page 255)
R a "Minispare" emergency spare
wheel* (Y page 255)
R a collapsible emergency spare
wheel* (Y page 255)
R a spare wheel* (Y page 255)
R the MOExtended run-flat sys-
tem* (Y page 328) Preparing the vehicle
i Vehicle preparation is not necessary on
vehicles with MOE tyres*.
X Stop your vehicle as far away from traffic
as possible on solid, non-slippery, level
ground.
X Switch on the hazard warning lamps.
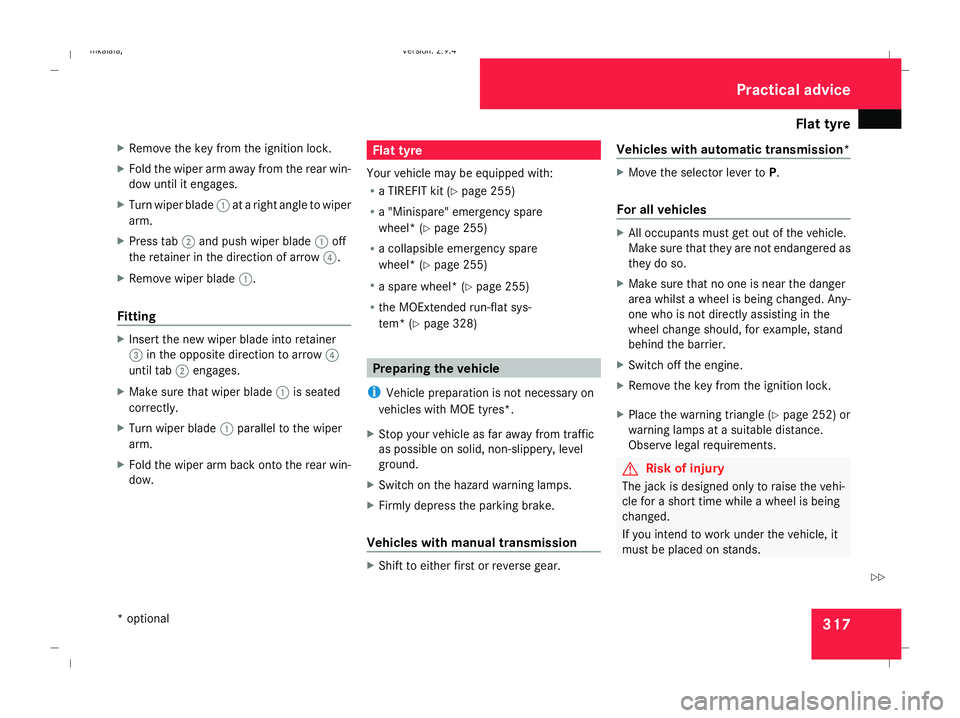
X Firmly depress the parking brake.
Vehicles with manual transmission X
Shift to either first or reverse gear. Vehicles with automatic transmission* X
Move the selector lever to P.
For all vehicles X
All occupants must get out of the vehicle.
Make sure that they are not endangered as
they do so.
X Make sure that no one is near the danger
area whilst a wheel is being changed. Any-
one who is not directly assisting in the
wheel change should, for example, stand
behind the barrier.
X Switch off the engine.
X Remove the key from the ignition lock.
X Place the warning triangle ( Ypage 252) or
warning lamps at a suitable distance.
Observe legal requirements. G
Risk of injury
The jack is designed only to raise the vehi-
cle for a short time while a wheel is being
changed.
If you intend to work under the vehicle, it
must be placed on stands. Practical advice
* optional
211_AKB; 2; 5, en-GB
mkalafa,
Version: 2.9.4
2008-02-29T16:57:07+01:00 - Seite 317 ZDateiname: 6515_3416_02_buchblock.pdf; preflight
Page 334 of 401
Battery
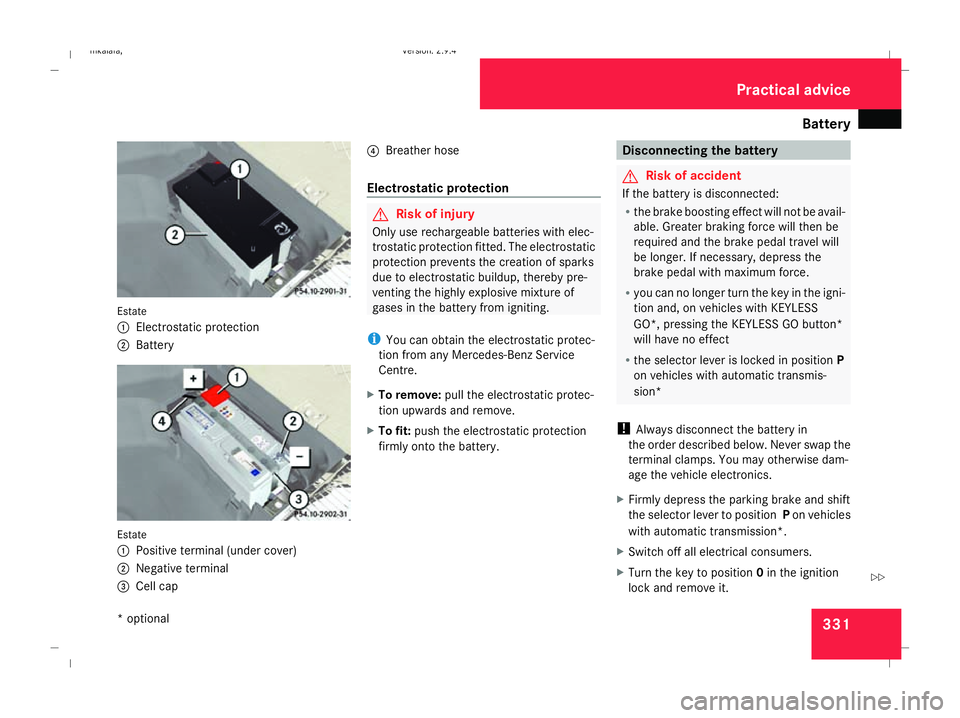
331Estate
1 Electrostatic protection
2 Battery Estate
1 Positive terminal (under cover)
2 Negative terminal
3 Cell cap 4
Breather hose
Electrostatic protection G
Risk of injury
Only use rechargeable batteries with elec-
trostatic protection fitted. The electrostatic
protection prevents the creation of sparks
due to electrostatic buildup, thereby pre-
venting the highly explosive mixture of
gases in the battery from igniting.
i You can obtain the electrostatic protec-
tion from any Mercedes-Benz Service
Centre.
X To remove: pull the electrostatic protec-
tion upwards and remove.
X To fit: push the electrostatic protection
firmly onto the battery. Disconnecting the battery
G
Risk of accident
If the battery is disconnected:
R the brake boosting effect will not be avail-
able. Greater braking force will then be
required and the brake pedal travel will
be longer. If necessary, depress the
brake pedal with maximum force.
R you can no longer turn the key in the igni-
tion and, on vehicles with KEYLESS
GO*, pressing the KEYLESS GO button*
will have no effect
R the selector lever is locked in position P
on vehicles with automatic transmis-
sion*
! Always disconnect the battery in
the order described below. Never swap the
terminal clamps. You may otherwise dam-
age the vehicle electronics.
X Firmly depress the parking brake and shift
the selector lever to position Pon vehicles
with automatic transmission*.
X Switch off all electrical consumers.
X Turn the key to position 0in the ignition
lock and remove it. Practical advice
* optional
211_AKB; 2; 5, en-GB
mkalafa
, Version: 2.9.4 2008-02-29T16:57:07+01:00 - Seite 331 ZDateiname: 6515_3416_02_buchblock.pdf; preflight
Page 337 of 401

Jump-starting
334 G
Risk of injury
There is a risk of acid burns when jump-
starting a vehicle due to the gases which
escape from the battery. Do not lean over
the battery while the engine is being jump-
started. G
Risk of explosion
Gases escaping from the battery during
jump-starting may cause minor explosions.
Avoid creating sparks. Keep naked flames
away from the battery, and do not smoke.
Comply with safety precautions and take
protective measures when handling batter-
ies. You will find these under “Battery” in
the index.
X Make sure that the two vehicles do not
touch.
X Depress the parking brake.
X Manual transmission: engage neutral.
X Automatic transmission*: move the
selector lever to P.
X All vehicles: switch off all electrical con-
sumers. Saloon
1
Negative terminal on your vehicle
2 Positive terminal on your vehicle
3 Positive terminal of donor battery
4 Negative terminal of donor battery
X If your vehicle is being jump-started by
another vehicle, allow the other vehicle's
engine to idle.
X Connect positive terminal 2on your vehi-
cle to positive terminal 3of the donor
battery using the jump lead, beginning with
your own battery.
X Connect negative terminal 4of the donor
battery to negative terminal 1of your
vehicle's battery using the jump lead, con- necting the jump lead to the donor battery
first.
X Start the engine.
X When the engine is running, switch on a few
electrical consumers, e.g. the blower. Do
not switch on the lights.
X First disconnect the jump lead from nega-
tive terminals 1and 4, then from positive
terminals 2and 3each time beginning
with your vehicle's battery.
X Have the battery checked at a qualified
specialist workshop, e.g. a Mercedes-Benz
Service Centre. Practical advice
* optional
211_AKB; 2; 5, en-GB
mkalafa,
Version: 2.9.4
2008-02-29T16:57:07+01:00 - Seite 334 Dateiname: 6515_3416_02_buchblock.pdf; preflight