2008 MERCEDES-BENZ E-CLASS ESTATE bonnet
[x] Cancel search: bonnetPage 174 of 401
Air conditioning
171
4-zone Thermotronic*: the temperature for
each of the four air-conditioning zones can be
set individually. You can set the temperature
separately for the driver's and front-
passenger sides as well as for the left and
right sides of the rear compartment.
Setting the temperature in the front
compartment using 2-zone Thermatic X
Make sure that the key is in position 2in
the ignition lock.
X To increase/reduce: turn thumbwheels
1 and 7clockwise or anti-clockwise
(Y page 164). Only change the temperature
setting in small increments. Start at 22 †.
Setting the temperature in the front
compartment via 4-zone
Thermotronic* X
Make sure that the key is in position 2in
the ignition lock.
X To increase/reduce: press the$or
% button. Only change the temperature
setting in small increments. Start at 22 †.
The set temperature is shown in the 4-zone
Thermotronic* display. Setting the temperature in the rear
compartment via 4-zone
Thermotronic* X
Make sure that the key is in position 2in
the ignition lock.
X Press the ™button.
The 4-zone Thermotronic* display switches
to the rear-compartment air-conditioning
settings.
X To increase/reduce: press the$or
% button. Only change the temperature
setting in small increments. Start at 22 †.
The set temperature is shown in the 4-zone
Thermotronic* display. The 4-zone
Thermotronic* display changes back to the
standard display about five seconds after a
button is pressed.
i You can also return to the standard dis-
play by pressing the ™button again. Setting the rear-compartment temper-
ature via the rear-compartment air con-
ditioning* X
Make sure that the key is in position 2in
the ignition lock.
X To increase/reduce: press the$or
% button. Only change the temperature
setting in small increments. Start at 22 †. Adjusting the air vents
G
Risk of injury
Very hot or very cold air can flow from the
air vents. This could cause burns or frost-
bite to bare skin in the immediate vicinity
of the vents. Keep bare skin away from
these air outlets. If necessary, direct the
airflow away to a different area of the vehi-
cle interior.
Please observe the following notes to ensure
that the air can flow freely through the air
vents:
R Keep the air inlet between the windscreen
and the bonnet free of deposits, such as ice Cont
rols
* optional
211_AKB; 2; 5, en-GB
mkalafa ,V ersion: 2.9.4
2008-02-29T16:57:07+01:00 - Seite 171 ZDateiname: 6515_3416_02_buchblock.pdf; preflight
Page 225 of 401

Engine compartment
222 Engine compartment
Bonnet
G
Risk of accident
Do not pull the release lever while the vehi-
cle is in motion. If you do so, the bonnet
may open up and block your view.
Opening G
Risk of injury
There is a risk of injury if the bonnet is open,
even if the engine is not running.
Some engine components can become
very hot.
To avoid the risk of burns, only touch those
components described in the Owner’s Man-
ual and observe the relevant safety notes. G
Risk of injury
The radiator fan between the radiator and
the engine can start automatically, even if
the key has been removed from the ignition
lock. For this reason you must not reach
into the turning area of the fan. You can
otherwise be injured. Vehicles with a petrol engine:
the electronic ignition system uses high
voltage. For this reason you must never
touch components of the ignition system
(ignition coil, ignition cable, spark plug con-
nector or test socket) when:
R the engine is running
R the engine is being started
R the ignition is switched on and the engine
is being cranked by hand
Vehicles with a diesel engine:
the electronic injection control uses high
voltage. Therefore, never touch fuel injec-
tion system components when:
R the engine is running
R the engine is being started
R the ignition is switched on
X Make sure that the windscreen wipers are
switched off. G
Risk of injury
The windscreen wipers and wiper linkage
could be set in motion.
When the bonnet is open, you or others
could be injured by the wiper rods. Make sure that the windscreen wipers are
switched off and that the key has been
pulled out of the ignition lock before open-
ing the bonnet.
The bonnet release lever is located in the
driver's footwell. 1
Bonnet release lever
X Pull release lever 1.
The bonnet is released.
! Make sure that the windscreen wipers
are not folded out away from the wind-
screen. You can otherwise damage the
windscreen wipers or the bonnet. Operation
211_AKB; 2; 5, en-GB
mkalafa,
Version: 2.9.4 2008-02-29T16:57:07+01:00 - Seite 222Dateiname: 6515_3416_02_buchblock.pdf; preflight
Page 226 of 401
Engine compartment
223
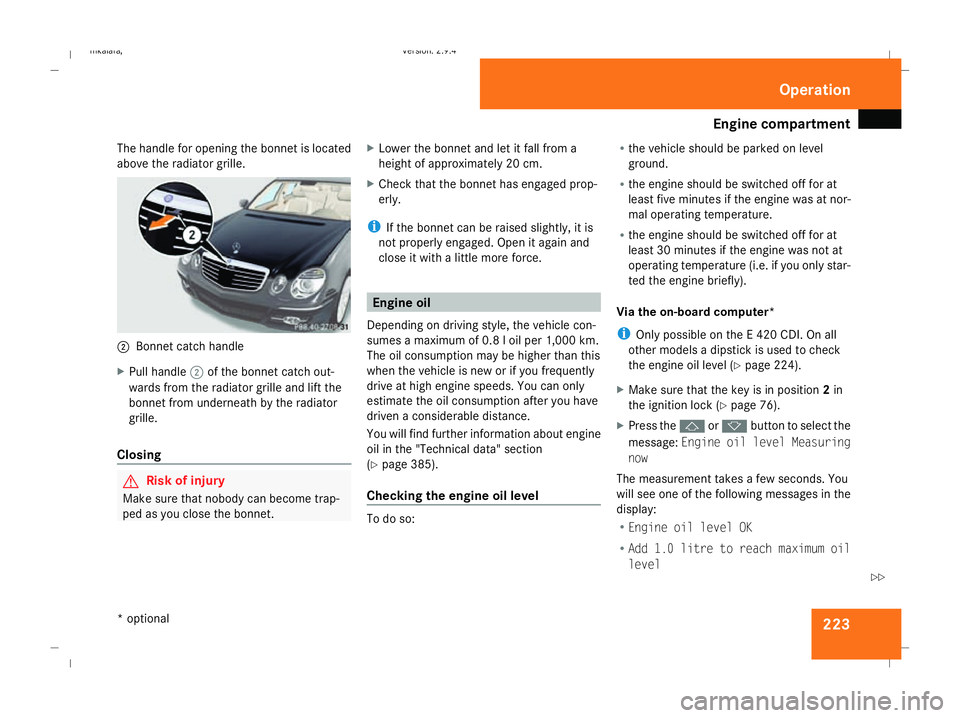
The handle for opening the bonnet is located
above the radiator grille. 2
Bonnet catch handle
X Pull handle 2of the bonnet catch out-
wards from the radiator grille and lift the
bonnet from underneath by the radiator
grille.
Closing G
Risk of injury
Make sure that nobody can become trap-
ped as you close the bonnet. X
Lower the bonnet and let it fall from a
height of approximately 20 cm.
X Check that the bonnet has engaged prop-
erly.
i If the bonnet can be raised slightly, it is
not properly engaged. Open it again and
close it with a little more force. Engine oil
Depending on driving style, the vehicle con-
sumes a maximum of 0.8 l oil per 1,000 km.
The oil consumption may be higher than this
when the vehicle is new or if you frequently
drive at high engine speeds. You can only
estimate the oil consumption after you have
driven a considerable distance.
You will find further information about engine
oil in the "Technical data" section
(Y page 385).
Checking the engine oil level To do so:R
the vehicle should be parked on level
ground.
R the engine should be switched off for at
least five minutes if the engine was at nor-
mal operating temperature.
R the engine should be switched off for at
least 30 minutes if the engine was not at
operating temperature (i.e. if you only star-
ted the engine briefly).
Via the on-board computer*
i Only possible on the E 420 CDI. On all
other models a dipstick is used to check
the engine oil level (Y page 224).
X Make sure that the key is in position 2in
the ignition lock (Y page 76).
X Press the jork button to select the
message: Engine oil level Measuring
now
The measurement takes a few seconds. You
will see one of the following messages in the
display:
R Engine oil level OK
R Add 1.0 litre to reach maximum oil
level Operation
* optional
211_AKB; 2; 5, en-GB
mkalafa,
Version: 2.9.4 2008-02-29T16:57:07+01:00 - Seite 223 ZDateiname: 6515_3416_02_buchblock.pdf; preflight
Page 249 of 401
Care
246R
battery
R connectors
R lights
R seals
Damaged seals or electrical components
can lead to failures or leaks.
Cleaning the wiper blades and the out-
side of the windscreen G
Risk of injury
Turn the key to position 0in the ignition
lock before cleaning the windscreen or the
wiper blades. There is otherwise a risk of
the windscreen wipers being set in motion
and causing injury.
X Turn the key to position 1in the ignition
lock (Y page 76).
X Set the windscreen wipers to position
u on the combination switch
(Y page 105).
X Turn the key to position 0or remove it when
the wiper arms are vertical (Y page 76).!
Only fold the wiper arms away from the
windscreen when they are in a vertical posi-
tion, otherwise you will damage the bonnet.
X Fold the wiper arms away from the wind-
screen until you feel them engage.
X Clean the windscreen and the wiper blades.
X Fold the windscreen wipers back again
before the ignition is switched on.
! Do not clean the wiper blades too often,
otherwise the rubber may become porous,
resulting in wiper noise.
Cleaning the windows !
Do not use dry cloths, abrasive products,
solvents or cleaning agents containing sol-
vents to clean the inside of the windows.
Clean the insides of the windows with a
damp cloth or commercially-available glass
cleaner. Avoid touching the inside of the
rear windscreen and the side windows with
hard objects, e.g. ice scrapers or rings. You
could otherwise cause damage to the win-
dows, rear window heating or aerial on the
rear window. i
Anti-glare film retrofitted to the insides of
the windows could interfere with radio or
mobile phone reception, especially if it is
conductive or metal-coated film. Informa-
tion about anti-glare film can be obtained
from any Mercedes-Benz Service Centre.
Cleaning the headlamps X
Clean the headlamp lenses with a wet
sponge.
! Only use washer fluid which is suitable
for plastic lenses. Unsuitable washer fluid
could damage the plastic lenses of the
headlamps.
Do not use the following:
R dry cloths
R abrasive cleaning agents
R solvents
R cleaning agents containing solvent
You could otherwise scratch or damage the
surface of the lenses. Operation
211_AKB; 2; 5, en-GB
mkalafa,
Version: 2.9.4 2008-02-29T16:57:07+01:00 - Seite 246Dateiname: 6515_3416_02_buchblock.pdf; preflight
Page 264 of 401
Display
messages 261Display messages Possible cause/consequence Possible solution
P Selector lever in
park position You have switched off the engine with the
KEYLESS GO button* and opened the driv-
er's door.
or
With HOLD activated, you have either:
R
opened the driver’s door and released
the seat belt or
R switched off the engine or
R opened the bonnet
The horn may also sound at regular inter-
vals. The horn becomes louder if you
attempt to lock the vehicle.
The engine cannot be started. X
Move the selector lever to P.
The engine can be started again. P Selector lever in
park position You have tried to switch off the engine
with the KEYLESS GO button* while the
selector lever is in position
Ror D. X
Move the selector lever to P.Please shift to P or N You have attempted to start the engine
while the selector lever is not in position
P
or N. X
Move the selector lever to Por N. Practical advi
ce
* optional
211_AKB; 2; 5, en-GB
mkalafa,
Version: 2.9.4 2008-02-29T16:57:07+01:00 - Seite 261 ZDateiname: 6515_3416_02_buchblock.pdf; preflight
Page 268 of 401
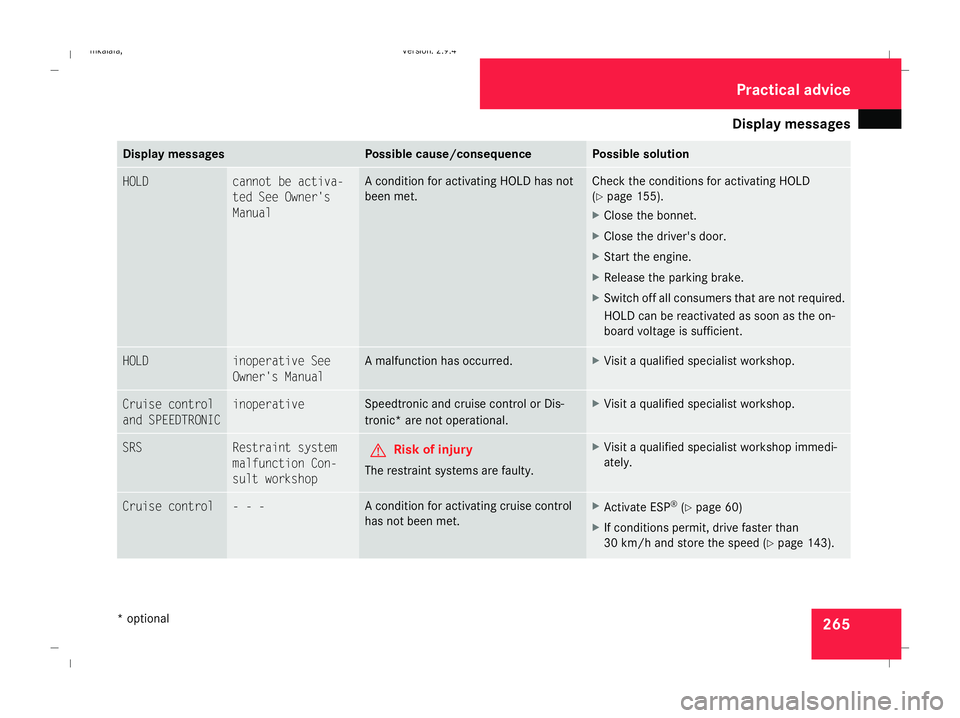
Display
messages 265Display messages Possible cause/consequence Possible solution
HOLD cannot be activa-
ted See Owner's
Manual A condition for activating HOLD has not
been met. Check the conditions for activating HOLD
(Y
page 155).
X Close the bonnet.
X Close the driver's door.
X Start the engine.
X Release the parking brake.
X Switch off all consumers that are not required.
HOLD can be reactivated as soon as the on-
board voltage is sufficient. HOLD inoperative See
Owner's Manual A malfunction has occurred. X
Visit a qualified specialist workshop. Cruise control
and SPEEDTRONIC inoperative Speedtronic and cruise control or Dis-
tronic* are not operational. X
Visit a qualified specialist workshop. SRS Restraint system
malfunction Con-
sult workshop G
Risk of injury
The restraint systems are faulty. X
Visit a qualified specialist workshop immedi-
ately. Cruise control - - - A condition for activating cruise control
has not been met. X
Activate ESP ®
(Y page 60)
X If conditions permit, drive faster than
30 km/h and store the speed (Y page 143). Practical advi
ce
* optional
211_AKB; 2; 5, en-GB
mkalafa,
Version: 2.9.4 2008-02-29T16:57:07+01:00 - Seite 265 ZDateiname: 6515_3416_02_buchblock.pdf; preflight
Page 270 of 401
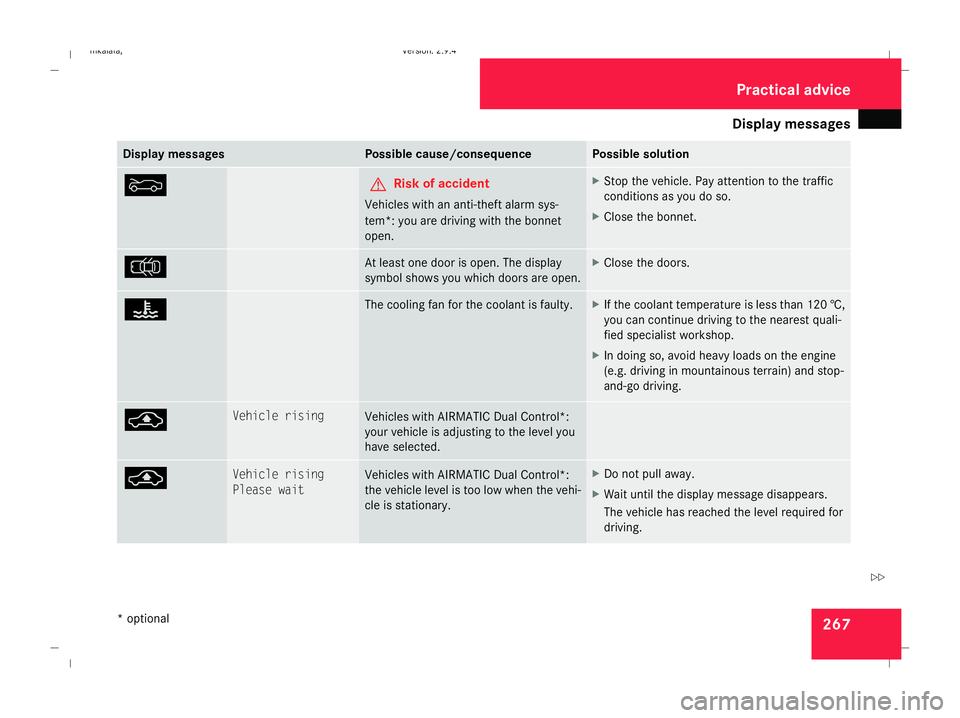
Display
messages 267Display messages Possible cause/consequence Possible solution
Y G
Risk of accident
Vehicles with an anti-theft alarm sys-
tem*: you are driving with the bonnet
open. X
Stop the vehicle. Pay attention to the traffic
conditions as you do so.
X Close the bonnet. V At least one door is open. The display
symbol shows you which doors are open. X
Close the doors. D The cooling fan for the coolant is faulty. X
If the coolant temperature is less than 120 †,
you can continue driving to the nearest quali-
fied specialist workshop.
X In doing so, avoid heavy loads on the engine
(e.g. driving in mountainous terrain) and stop-
and-go driving. @ Vehicle rising
Vehicles with AIRMATIC Dual Control*:
your vehicle is adjusting to the level you
have selected.
@ Vehicle rising
Please wait Vehicles with AIRMATIC Dual Control*:
the vehicle level is too low when the vehi-
cle is stationary. X
Do not pull away.
X Wait until the display message disappears.
The vehicle has reached the level required for
driving. Practical advi
ce
* optional
211_AKB; 2; 5, en-GB
mkalafa,
Version: 2.9.4 2008-02-29T16:57:07+01:00 - Seite 267 ZDateiname: 6515_3416_02_buchblock.pdf; preflight
Page 272 of 401
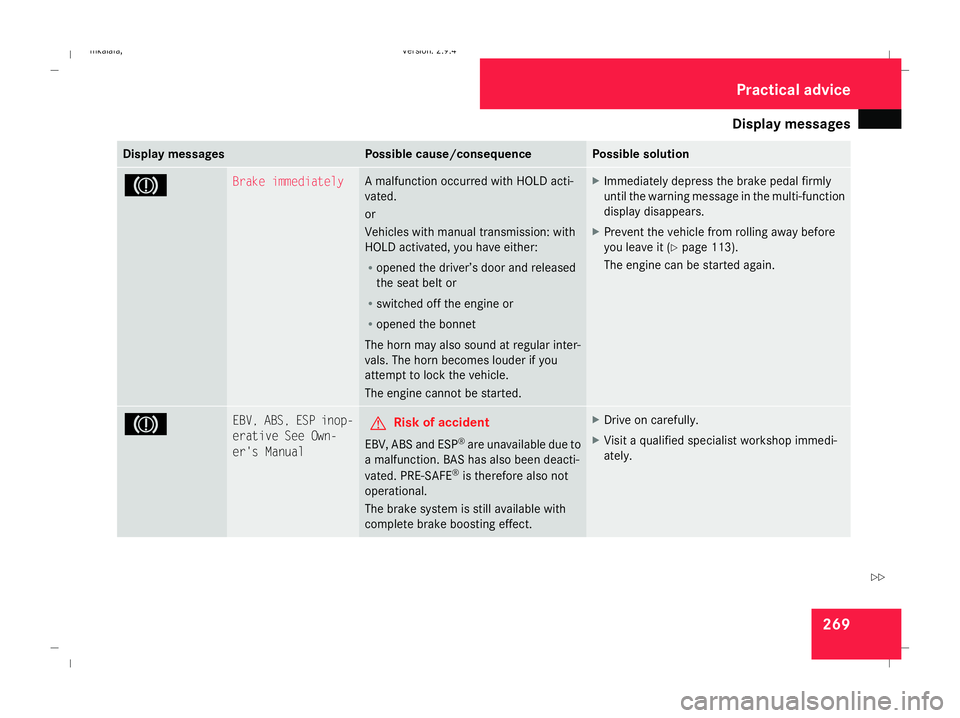
Display
messages 269Display messages Possible cause/consequence Possible solution
3 Brake immediately A malfunction occurred with HOLD acti-
vated.
or
Vehicles with manual transmission: with
HOLD activated, you have either:
R
opened the driver’s door and released
the seat belt or
R switched off the engine or
R opened the bonnet
The horn may also sound at regular inter-
vals. The horn becomes louder if you
attempt to lock the vehicle.
The engine cannot be started. X
Immediately depress the brake pedal firmly
until the warning message in the multi-function
display disappears.
X Prevent the vehicle from rolling away before
you leave it (Y page 113).
The engine can be started again. 3 EBV, ABS, ESP inop-
erative See Own-
er's Manual G
Risk of accident
EBV, ABS and ESP ®
are unavailable due to
a malfunction. BAS has also been deacti-
vated. PRE-SAFE ®
is therefore also not
operational.
The brake system is still available with
complete brake boosting effect. X
Drive on carefully.
X Visit a qualified specialist workshop immedi-
ately. Practical advi
ce
211_AKB; 2; 5, en-GB
mkalafa,
Version: 2.9.4 2008-02-29T16:57:07+01:00 - Seite 269 ZDateiname: 6515_3416_02_buchblock.pdf; preflight