Page 144 of 481
143 Controls in detail
Control system
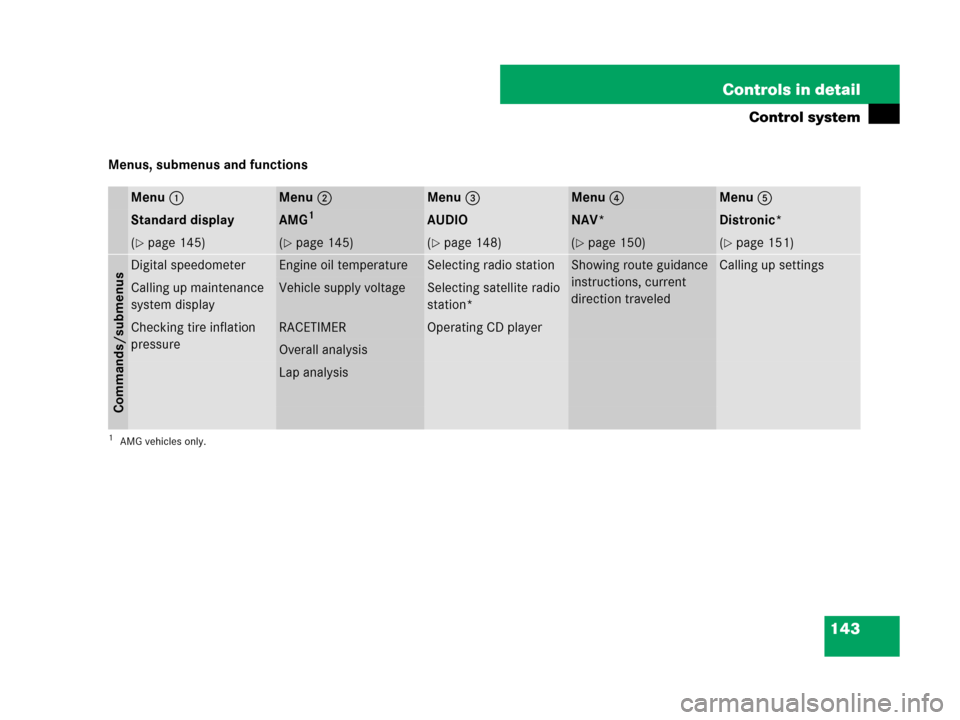
Menus, submenus and functions
Menu1Menu2Menu3Menu4Menu5
Standard displayAMG1
1AMG vehicles only.
AUDIONAV*Distronic*
(�page 145)(�page 145)(�page 148)(�page 150)(�page 151)
Commands/submenus
Digital speedometerEngine oil temperatureSelecting radio stationShowing route guidance
instructions, current
direction traveledCalling up settings
Calling up maintenance
system displayVehicle supply voltageSelecting satellite radio
station*
Checking tire inflation
pressureRACETIMEROperating CD player
Overall analysis
Lap analysis
Page 146 of 481

145 Controls in detail
Control system
Standard display menu
�Press buttonk orj repeatedly
to select the functions in the standard
display menu.
The following functions are available:
Display digital speedometer
�Press buttonk orj repeatedly
until the digital speedometer appears
in the multifunction display.
AMG menu
The main screen of the AMG menu shows
you the gear currently engaged as well as
the engine oil temperature.
�Press buttonè orÿ repeatedly
until the AMG menu appears in the mul-
tifunction display.
1Gear indicator
2Engine oil temperatureUse buttonsk orj to select the
following functions in the AMG menu:
FunctionPage
Calling up digital speedometer145
Calling up maintenance display330
Checking tire inflation pressure303
iThis function is only available in AMG vehi-
cles.
iThe engine oil temperature flashes if the en-
gine oil temperature has not yet reached 80°C.
During this time, avoid driving at full engine
speed.
FunctionPage
Vehicle supply voltage146
RACETIMER146
Overall analysis148
Lap analysis148
iIf the engine reaches the overspeed range in
the manual shift program, the menu will be
shown in red. In addition, you will see
UP next to
gear indicator1 as a reminder to upshift.
Page 147 of 481

146 Controls in detail
Control system
Vehicle supply voltage
�Press buttonè orÿ repeatedly
until the AMG menu appears in the mul-
tifunction display.
�Press buttonj repeatedly until the
vehicle supply voltage appears in the
multifunction display.
1Gear indicator
2Vehicle supply voltageRACETIMER
The RACETIMER allows you to time and
save driving stretches in hours, minutes
and seconds.
�Press button è or ÿ repeatedly
until the AMG menu appears in the mul-
tifunction display.
�Press button j repeatedly until the
RACETIMER appears in the multifunc-
tion display.1Gear indicator
2RACETIMER
3Lap
Starting the RACETIMER�Press button æ.
The timer starts.
Warning!G
The RACETIMER feature is only for use on
roads and in conditions where high speed
driving is permitted. Racing on public roads
is prohibited under all circumstances and
the driver is and must always remain re-
sponsible for following posted speed limits.
iYou can start the RACETIMER when the
engine is running or the starter switch is in
position2 (
�page 38).
iWhile the RACETIMER is being displayed,
you cannot adjust the volume using
buttonsæ or ç.
Page 148 of 481

147 Controls in detail
Control system
Displaying intermediate time
�Press button ç while the timer is
running.
The intermediate time is shown for
5 seconds.
Stopping the RACETIMER
�Press button æ.
The timer stops.
Saving lap time and starting a new lap
�Press button ç while the timer is
running.
The intermediate time will be shown for
5 seconds.
�Press button ç within the next
5 seconds.
The intermediate time shown will be
saved as a lap time.
The RACETIMER begins timing the new
lap. The new lap begins to be timed as
soon as the intermediate time is called
up.
1Gear indicator
2RACETIMER
3Best lap time
4Lap numberResetting current lap
�Press button æ while the timer is
running.
The timer stops.
�Press button ç.
The lap time is reset to “0”.
Deleting all laps
�Press button æ while the timer is
running.
The timer stops.
�Press the reset button twice
(
�page 26).
�Press button æ.
The timer starts. The saved laps are de-
leted.
iWhen you stop the vehicle and turn the
Smartkey to position 1 (
�page 38) or, in vehi-
cles with KEYLESS-GO*, turn off the engine and
do not open the driver’s door, the RACETIMER
stops timing. Timing is resumed when you
switch the ignition back on (
�page 38) or
restart the engine (
�page 51) and then press
buttonæ.
iYou can save up to nine laps.
iIt is not possible to delete a single saved lap.
iWhen you switch off the engine, the
RACETIMER will be reset to “0” after
30 seconds. All laps are deleted.
Page 161 of 481

160 Controls in detail
Control system
With daytime running lamp mode activated
and the exterior lamp switch in
positionM orU, the low beam
headlamps are switched on when the
engine is running.
In low ambient light conditions the follow-
ing lamps will switch on additionally:
�Parking lamps
�Tail lamps
�License plate lamps
�Side marker lamps
For more information on the daytime
running lamp mode, see “Lighting”
(
�page 126).Setting locator lighting
With the locator lighting feature activated
and the exterior lamp switch in
positionU, the following lamps will
switch on during darkness when the vehi-
cle is unlocked with the SmartKey or
KEYLESS-GO*:
�Parking lamps
�Tail lamps
�License plate lamps
�Side marker lamps
�Front fog lamps
The locator lighting switches off when the
driver’s door is opened.
If you do not open a door after unlocking
the vehicle with the SmartKey, the lamps
will switch off automatically after approxi-
mately 40 seconds.
�Move the selection marker with
buttonæ orç to the
Lighting
submenu.
�Press buttonj ork repeatedly
until the message
Surround Light.
Function
appears in the multifunction
display.
The selection marker is on the current
setting.
�Press buttonæ orç to switch
the locator lighting function
On or Off.
�Turn the exterior lamp switch to
positionU when exiting the vehicle.
The locator lighting feature is activat-
ed.
iFor safety reasons, resetting the Lighting
submenu to factory settings while driving
(
�page 153) will not deactivate the daytime
running lamp mode.
The following message appears in the multifunc-
tion display:
Cannot be completely reset
to factory settings while driving.
��
Page 162 of 481

161 Controls in detail
Control system
Setting ambient lighting
Use this function to adjust the brightness
of the ambient lighting.
�Move the selection marker with
buttonæ orç to the
Lighting
submenu.
�Press buttonj ork repeatedly
until the message
Ambient Light Lev-
el
appears in the multifunction dis-
play.
The selection marker is on the current
setting.
�Press buttonæ orç to select
the desired brightness of the ambient
lighting.
The setting
1 represents the darkest
level and setting
5 the brightest level.The ambient light is switched off at
setting
0.
Setting night security illumination
(Headlamps delayed shut-off feature)
Use this function to set whether you would
like the exterior lamps to remain on for
15 seconds during darkness after exiting
the vehicle and closing all doors.
With the delayed shut-off feature activated
and the exterior lamp switch in
positionU before the engine is turned
off, the following lamps will switch on
when the engine is turned off.
�Parking lamps
�Tail lamps
�License plate lamps
�Side marker lamps
�Front fog lamps
If after turning off the engine you do not
open a door or do not close an opened
door, the lamps will automatically switch
off after 60 seconds.
�Move the selection marker with
buttonæ orç to the
Lighting
submenu.
�Press buttonj ork repeatedly
until the message
Headlamps Delayed
Shut-off
appears in the multifunction
display.
The selection marker is on the current
setting.
�Press buttonæ orç to switch
the headlamps delayed shut-off feature
On or Off.
�Turn the exterior lamp switch to
positionU before turning off the
engine.
The headlamps delayed shut-off fea-
ture is activated.
Page 166 of 481

165 Controls in detail
Control system
Fuel consumption statistics since start
�Press buttonÿ orè repeatedly
until the first function of the trip com-
puter menu appears.
�Press buttonj ork repeatedly
until the message
From Start appears
in the multifunction display.
1Distance driven since start
2Time elapsed since start
3Average speed since start
4Average fuel consumption since start
Fuel consumption since last reset
�Press buttonÿ orè repeatedly
until the first function of the trip com-
puter menu appears.
�Press buttonj ork repeatedly
until the message
From Reset appears
in the multifunction display.
1Distance driven since last reset
2Time elapsed since last reset
3Average speed since last reset
4Average fuel consumption since last
resetResetting fuel consumption statistics�Press buttonÿ orè repeatedly
until the first function of the trip com-
puter menu appears.
�Press buttonj ork repeatedly
until the reading that you want to reset
in the multifunction display appears.
�Press and hold the reset button
(
�page 136) until the value is reset
to
0.
iAll statistics stored since the last engine
start will be reset approximately 4 hours after
the SmartKey in the starter switch is turned to
position0 or removed from the starter switch.
Resetting will not occur if you turn the SmartKey
back to position1 or2 within this time period.
Page 167 of 481

166 Controls in detail
Control system
Distance to empty
�Press buttonÿ orè repeatedly
until the first function of the trip com-
puter menu appears.
�Press buttonj ork repeatedly
until the message
Range: appears in
the multifunction display.
The calculated remaining driving range
based on the current fuel tank level ap-
pears in the multifunction display.
TEL* menu
You can use the functions in the
Tel menu
to operate your telephone, provided it is
connected to a hands-free system and
switched on.
�Switch on the telephone and COMAND.
�Press buttonÿ orè on the
steering wheel repeatedly until the
Tel
menu appears in the multifunction dis-
play.iIf only very little fuel is left in the tank, a ve-
hicle at the fuel pump is shown instead of the
range.
Warning!G
A driver’s attention to the road must always
be his/her primary focus when driving. For
your safety and the safety of others, we rec-
ommend that you pull over to a safe location
and stop before placing or taking a tele-
phone call. If you choose to use the tele-
phone while driving, please use the
hands-free device and only use the tele-
phone when weather, road and traffic condi-
tions permit.
Some jurisdictions prohibit the driver from
using a cellular telephone while driving a
vehicle.
Bear in mind that at a speed of just 30 mph
(approximately 50 km/h), your vehicle is
covering a distance of 44 feet (approximate-
ly 14 m) every second.
Never operate radio transmitters equipped
with a built-in or attached antenna (i.e. with-
out being connected to an external antenna)
from inside the vehicle while the engine is
running. Doing so could lead to a malfunc-
tion of the vehicle’s electronic system, pos-
sibly resulting in an accident and/or
personal injury.