2008 MERCEDES-BENZ CLS COUPE ECU
[x] Cancel search: ECUPage 177 of 329
Loading and stowing
174 Skibag*
G
Risk of injury
The skibag is designed to carry up to four
pairs of skis. Do not use the skibag to carry
any other type of load.
The skibag must always be secured when
laden. Otherwise, injuries could be caused
by it in the event of an accident.
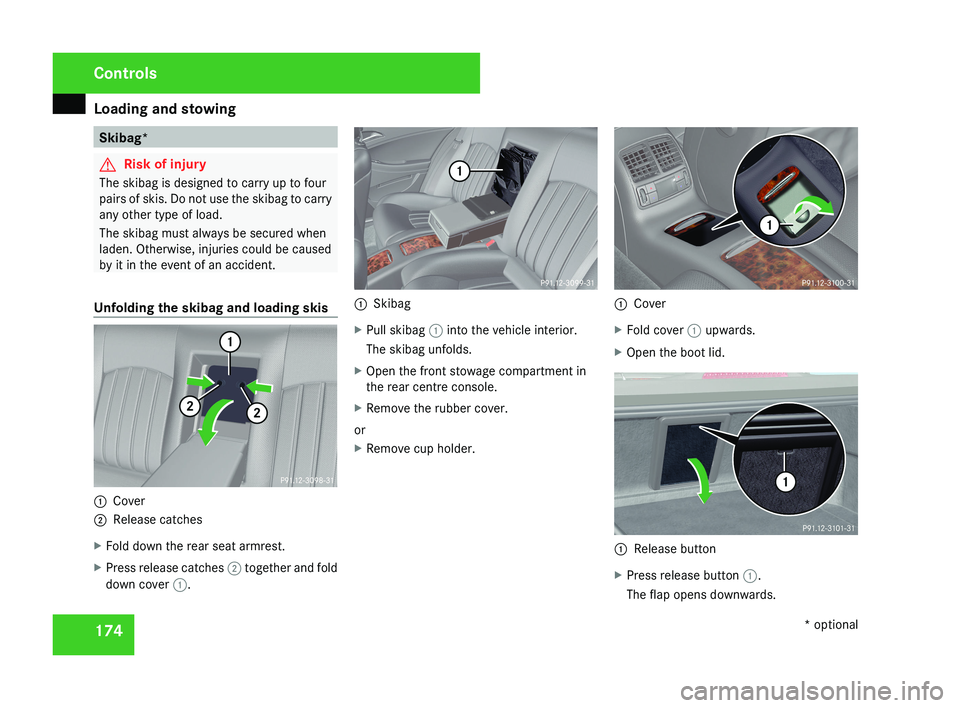
Unfolding the skibag and loading skis 1
Cover
2 Release catches
X Fold down the rear seat armrest.
X Press release catches 2 together and fold
down cover 1. 1
Skibag
X Pull skibag 1 into the vehicle interior.
The skibag unfolds.
X Open the front stowage compartment in
the rear centre console.
X Remove the rubber cover.
or
X Remove cup holder. 1
Cover
X Fold cover 1 upwards.
X Open the boot lid. 1
Release button
X Press release button 1.
The flap opens downwards. Controls
* optional
219_AKB; 2; 4, en-GB
mkalafa,
2007-11-13T09:28:36+01:00 - Seite 174
Page 178 of 329
Loading and stowing
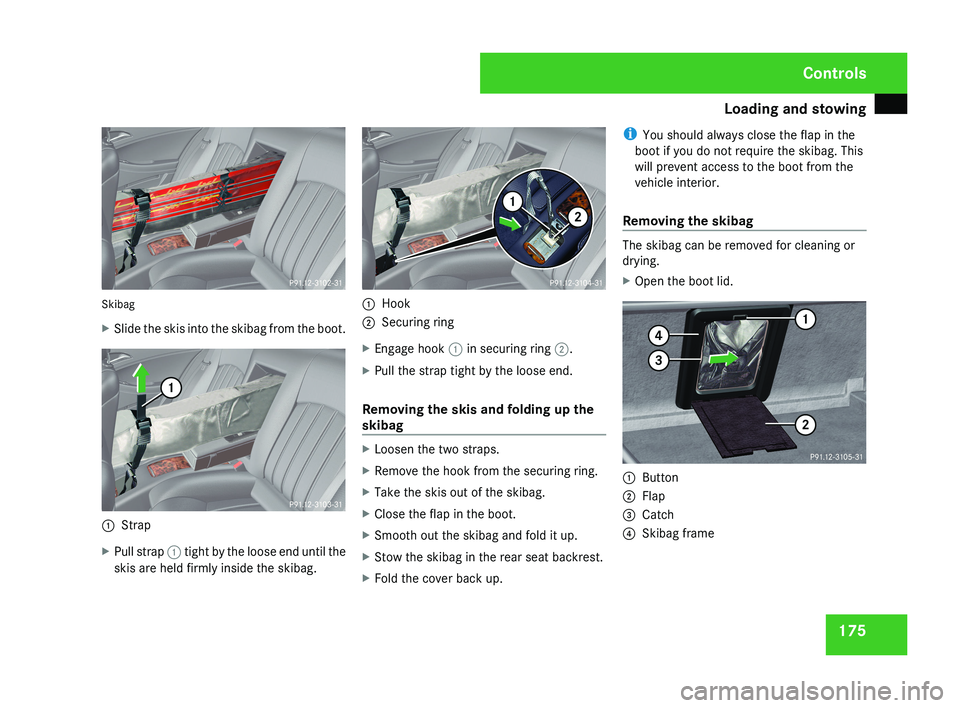
175Skibag
X
Slide the skis into the skibag from the boot.
1 Strap
X Pull strap 1 tight by the loose end until the
skis are held firmly inside the skibag.
1 Hook
2 Securing ring
X Engage hook 1 in securing ring 2.
X Pull the strap tight by the loose end.
Removing the skis and folding up the
skibag
X Loosen the two straps.
X Remove the hook from the securing ring.
X Take the skis out of the skibag.
X Close the flap in the boot.
X Smooth out the skibag and fold it up.
X Stow the skibag in the rear seat backrest.
X Fold the cover back up. i
You should always close the flap in the
boot if you do not require the skibag. This
will prevent access to the boot from the
vehicle interior.
Removing the skibag
The skibag can be removed for cleaning or
drying.
X Open the boot lid.
1 Button
2 Flap
3 Catch
4 Skibag frame
Controls
219_AKB; 2; 4, en-GB
mkalafa,
2007-11-13T09:28:36+01:00 - Seite 175
Page 179 of 329
Loading and stowing
176
X
Press button 1.
Flap 2 folds down.
X Press catch 3 in and pull out frame 4
containing the skibag. G
Risk of poisoning
When the skibag has been removed, always
drive with the boot lid closed. Exhaust
fumes could otherwise enter the vehicle
interior. Luggage net in the front-passenger
footwell
G
Risk of injury
Only place lightweight items in the luggage
net. Do not use it to transport heavy, bulky,
sharp-edged or fragile objects. In the event
of an accident, the luggage net will not
secure the transported goods. Loading guidelines
G
Risk of injury
Secure and position the load as described
in the loading guidelines.
Even if you follow all the loading guidelines,
the load will increase the risk of injury in the
event of an accident. G
Risk of poisoning
Keep the boot lid closed while the vehicle
is in operation. Otherwise, exhaust fumes
could enter the vehicle interior and poison
you.
The handling characteristics of a laden vehi-
cle are dependent on the distribution of the
load within the vehicle. You should therefore
load your vehicle as shown in the illustrations.
Observe the following notes when transport-
ing a load:
R When transporting a load, never exceed the
maximum permissible gross vehicle weight
or the permissible axle loads for the vehicle
(including occupants).
R Position heavy loads as far forwards and as
low in the boot as possible.
R The load must not protrude above the
upper edge of the backrests. R
Always place the load against the front or
rear seat backrests.
R Secure the load with sufficiently strong and
wear-resistant load restraints. Pad sharp
edges for protection.
i Load restraints are available at any quali-
fied specialist workshop, e.g. a Mercedes-
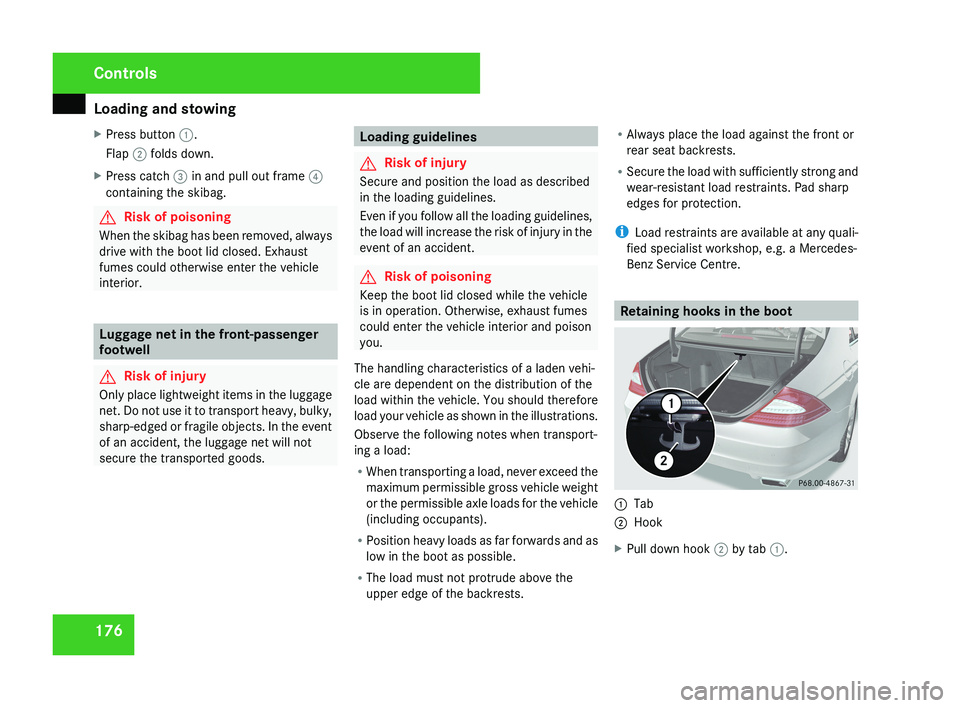
Benz Service Centre. Retaining hooks in the boot1
Tab
2 Hook
X Pull down hook 2 by tab 1.
Controls
219_AKB; 2; 4, en-GB
mkalafa,
2007-11-13T09:28:36+01:00 - Seite 176
Page 180 of 329
Loading and stowing
177Stowage compartments
G
Risk of injury
The stowage compartments must be closed
when items are stored in them. Luggage
nets are not designed to secure heavy
items of luggage.
You or other vehicle occupants could be
injured by objects being thrown around if
you:
R brake sharply
R change direction suddenly
R have an accident
Sharp-edged and fragile objects must not
be carried in the luggage net.
Do not carry hard objects in the ruffled
pockets. Objects must not protrude over
the top of the ruffled pockets.
i You will find an overview of the stowage
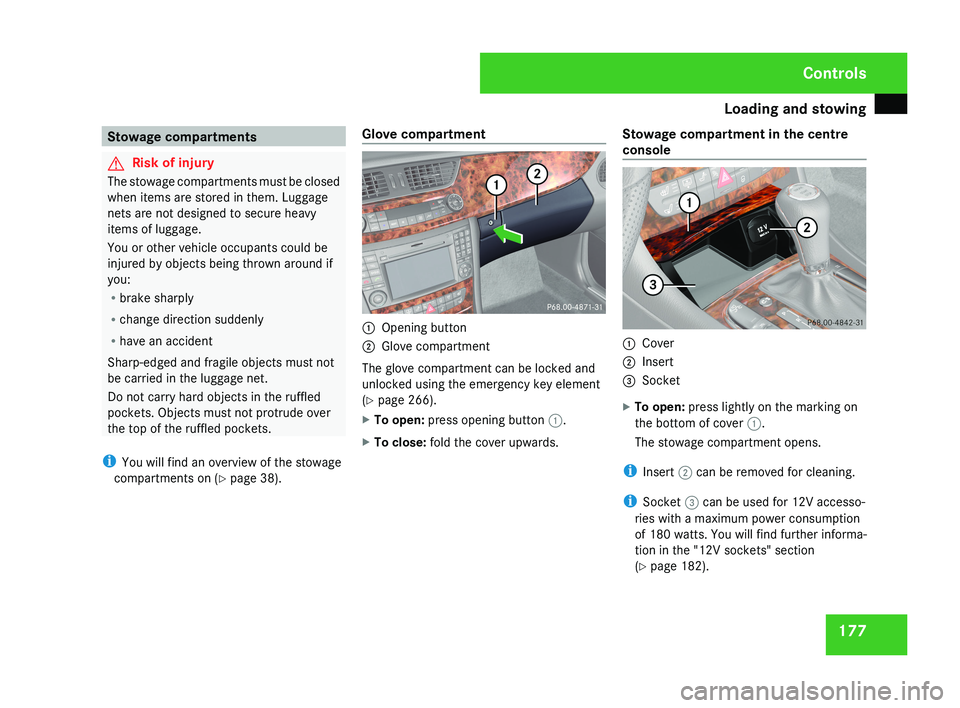
compartments on (Y page 38). Glove compartment 1
Opening button
2 Glove compartment
The glove compartment can be locked and
unlocked using the emergency key element
(Y page 266).
X To open: press opening button 1.
X To close: fold the cover upwards. Stowage compartment in the centre
console 1
Cover
2 Insert
3 Socket
X To open: press lightly on the marking on
the bottom of cover 1.
The stowage compartment opens.
i Insert 2 can be removed for cleaning.
i Socket 3 can be used for 12V accesso-
ries with a maximum power consumption
of 180 watts. You will find further informa-
tion in the "12V sockets" section
(Y page 182). Controls
219_AKB; 2; 4, en-GB
mkalafa,
2007-11-13T09:28:36+01:00 - Seite 177
Page 190 of 329
Features
187
tion for at least 20 seconds before trying
another position.
X Keep the transmitter button on the garage
door's
remote control depressed until indi-
cator lamp 1 starts to flash rapidly.
The programming was successful if indica-
tor lamp 1 flashes rapidly.
X Release the transmitter buttons on the
garage
door's remote control and the inte-
grated remote control.
If indicator lamp 1 goes out after approxi-
mately 20 seconds and did not flash rapidly
before this:
X Release the transmitter buttons on the
integrated and portable remote controls.
X Repeat the programming procedure. At the
same time change the distance between
the garage door's remote control and the
transmitter
buttons in the rear-view mirror.
i If the garage door system works with a
rolling code, after programming you must
synchronise the remote control integrated
in
the rear-view mirror with the garage door
system receiver.
You will find further information in the
garage door opening system's operating instructions, e.g. the sections on “Synchro-
nising the transmitter” or “Registering a
new
transmitter”. You can also call the hot-
line mentioned above.
Opening or closing the garage door Once programmed, the integrated remote
control
will assume the function of the garage
door system's remote control. Please read
the operating instructions for the garage door
system.
X Turn the key to position 2 in the ignition
lock.
X Press the transmitter button on the rear-
view mirror that you have programmed to
operate the garage door.
Garage door system with fixed code: indi-
cator lamp 1 lights up continuously.
Garage
door system with rolling code: indi-
cator lamp 1 flashes briefly and then lights
up for approximately two seconds. This is
repeated for up to 20 seconds.
i The transmitter will transmit a signal for
as long as the transmitter button is being
pressed. The transmission will be halted
after a maximum of 20 seconds and indi- cator lamp 1 will flash. Press the trans-
mitter button again if necessary.
Clearing the remote control memory X
Turn the key to position 2 in the ignition
lock.
X Press and hold transmitter buttons 2 and
4
for approximately 20 seconds until indi-
cator lamp 1 flashes rapidly.
The memory is cleared.
i You
should clear the remote control mem-
ory before selling the vehicle. Floormat* on the driver's side
G
Risk of accident
Make sure that there is sufficient clearance
around the pedals when floormats are
used, and that the floormats are properly
secured.
The
floormats must be secured at all times
using retainers and studs.
Before you drive off, make sure that the
floormats are secure and rectify if neces-
sary. A floormat which is not properly Controls
* optional
219_AKB; 2; 4, en-GB
mkalafa,
2007-11-13T09:28:36+01:00 - Seite 187 Z
Page 191 of 329
Features
188 secured can slip and thereby interfere with
the movement of the pedals.
Do not place floormats on top of one
another.1
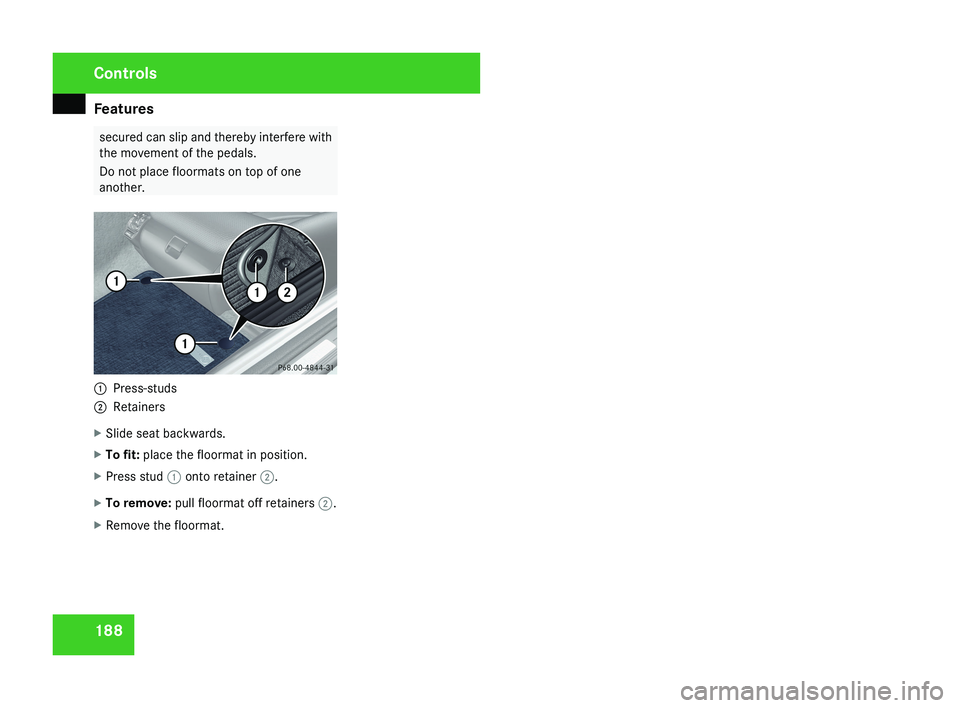
Press-studs
2 Retainers
X Slide seat backwards.
X To fit: place the floormat in position.
X Press stud 1 onto retainer 2.
X To remove: pull floormat off retainers 2.
X Remove the floormat.
Controls
219_AKB; 2; 4, en-GB
mkalafa,
2007-11-13T09:28:36+01:00 - Seite 188
Page 221 of 329
Where will I find...?
218
Vehicles with "Minispare" emergency
spare wheel*/collapsible emergency
spare wheel* or a spare wheel
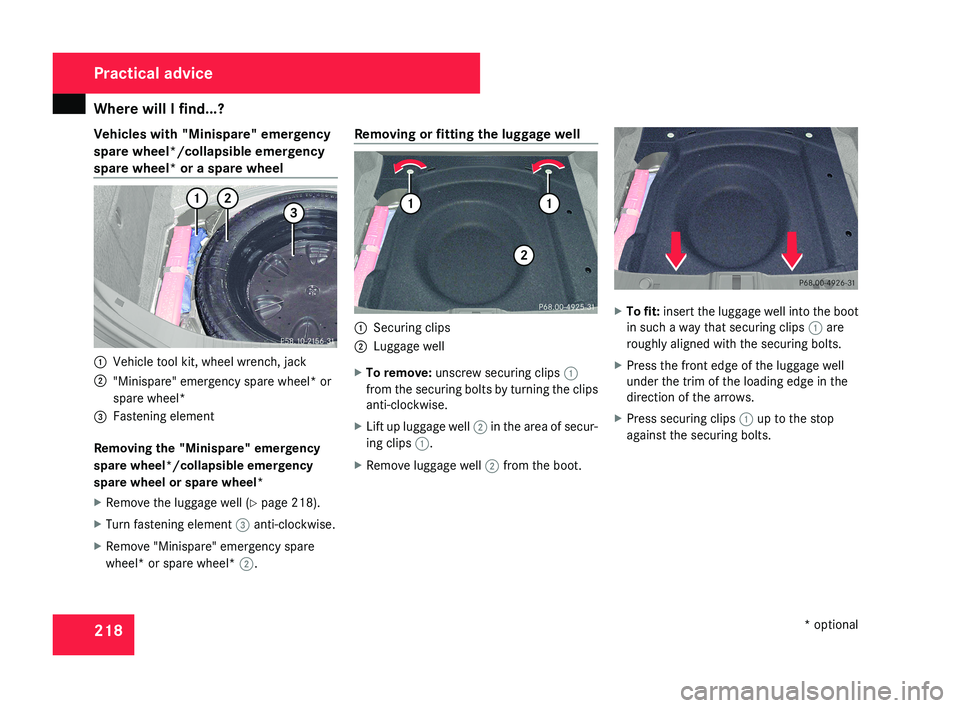
1
Vehicle tool kit, wheel wrench, jack
2 "Minispare" emergency spare wheel* or
spare wheel*
3 Fastening element
Removing the "Minispare" emergency
spare wheel*/collapsible emergency
spare wheel or spare wheel*
X Remove the luggage well (Y page 218).
X Turn fastening element 3 anti-clockwise.
X Remove "Minispare" emergency spare
wheel* or spare wheel* 2.Removing or fitting the luggage well
1
Securing clips
2 Luggage well
X To remove: unscrew securing clips 1
from the securing bolts by turning the clips
anti-clockwise.
X Lift up luggage well 2 in the area of secur-
ing clips 1.
X Remove luggage well 2 from the boot. X
To fit: insert the luggage well into the boot
in such a way that securing clips 1 are
roughly aligned with the securing bolts.
X Press the front edge of the luggage well
under the trim of the loading edge in the
direction of the arrows.
X Press securing clips 1 up to the stop
against the securing bolts. Practical advice
* optional
219_AKB; 2; 4, en-GB
mkalafa,
2007-11-13T09:28:36+01:00 - Seite 218
Page 286 of 329
Flat tyre
283required. Mercedes-Benz recommends
that you use a Mercedes-Benz Service
Centre for this purpose. In particular, work
relevant to safety or on safety-related sys-
tems must be carried out at a qualified
specialist workshop.
Preparing the vehicle X
Prepare the vehicle as described
(Y page 276).
X Place the wheels in the straight-ahead posi-
tion.
X Take the following from the stowage well
beneath the boot floor:
R
the "Minispare"/collapsible emergency
spare wheel* or the spare wheel*
R the vehicle tool kit
R the wheel chock
R the jack
X Secure the vehicle to prevent it from rolling
away.
On level ground: place chocks or similar
under the front and rear of the wheel that
is diagonally opposite the wheel you wish
to change. X
On downhill gradients: place chocks or
similar under both wheels of the other axle.
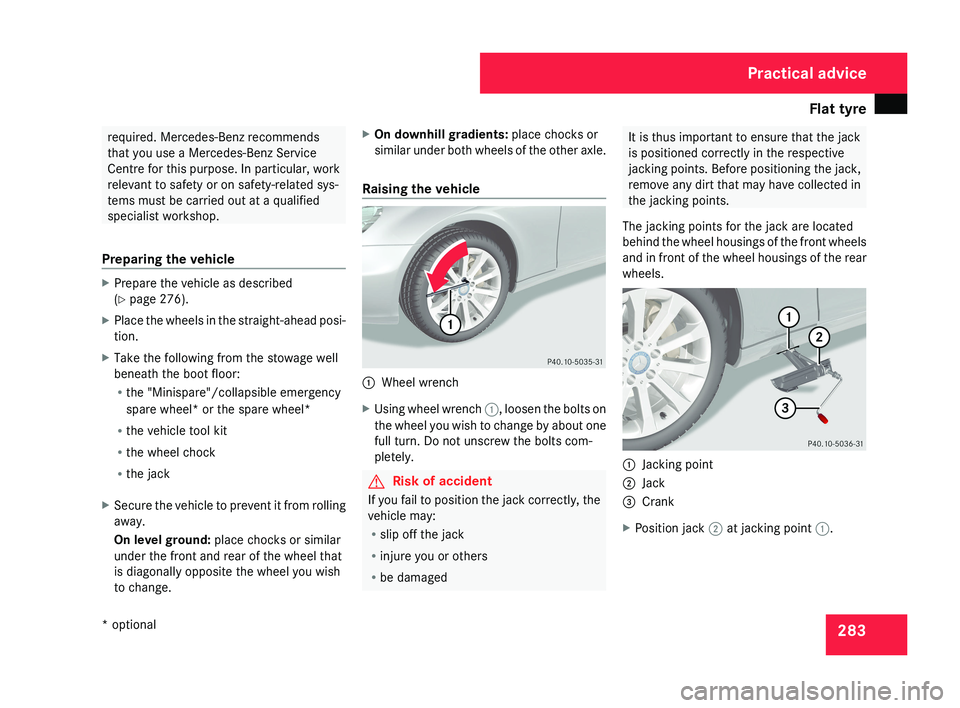
Raising the vehicle 1
Wheel wrench
X Using wheel wrench 1, loosen the bolts on
the wheel you wish to change by about one
full turn. Do not unscrew the bolts com-
pletely. G
Risk of accident
If you fail to position the jack correctly, the
vehicle may:
R slip off the jack
R injure you or others
R be damaged It is thus important to ensure that the jack
is positioned correctly in the respective
jacking points. Before positioning the jack,
remove any dirt that may have collected in
the jacking points.
The jacking points for the jack are located
behind the wheel housings of the front wheels
and in front of the wheel housings of the rear
wheels. 1
Jacking point
2 Jack
3 Crank
X Position jack 2 at jacking point 1. Practical advice
* optional
219_AKB; 2; 4, en-GB
mkalafa,
2007-11-13T09:28:36+01:00 - Seite 283