2008 MERCEDES-BENZ CLS COUPE service indicator
[x] Cancel search: service indicatorPage 6 of 329
31, 2, 3 ...
7G–TRONIC . . . . . . . . . . . . . . . . . . . . . 106 A
ABS (Anti-lock Braking System)
. . . . . 57
Display message . . . . . . . . . . 221, 231
Warning lamp . . . . . . . . . . . . . . . . . 244
Acceleration
Technical data . . . . . . . . . . . . . . . . 303
Accident
Notes . . . . . . . . . . . . . . . . . . . . . . . 252
Active Service System
see ASSYST PLUS
ADAPTIVE BRAKE . . . . . . . . . . . . . . . . . 60
Adaptive brake lamps . . . . . . . . . . . . . 58
Adaptive damping system see ADS
ADS . . . . . . . . . . . . . . . . . . . . . . . . . . . 147
Airbag Activation . . . . . . . . . . . . . . . . . . . . . 43
Control unit . . . . . . . . . . . . . . . . . . . 43
Driver's . . . . . . . . . . . . . . . . . . . . . . . 46
Front . . . . . . . . . . . . . . . . . . . . . . . . 46
Front passenger . . . . . . . . . . . . . . . . 46
PASSENGER AIRBAG OFF warning
lamp . . . . . . . . . . . . . . . . . . . . . . . 242
Sidebags . . . . . . . . . . . . . . . . . . . . . 47
System . . . . . . . . . . . . . . . . . . . . . . . 45
Windowbags . . . . . . . . . . . . . . . . . . . 48 Air cleaner
Display message
. . . . . . . . . . . . . . 236
Air conditioning
2-zone Thermatic . . . . . . . . . . . . . . 153
4-zone Thermotronic . . . . . . . . . . . 155
Activating/deactivating air-recir-
culation mode . . . . . . . . . . . . . . . . 164
Activating/deactivating auxiliary
heating/ventilation . . . . . . . . . . . . 165
Air-recirculation mode with con-
venience opening/closing feature . 165
Auxiliary heating/ventilation . . . . . 166
Controlling automatically . . . . . . . . 159
Cooling with air dehumidification . . 158
Demisting the windscreen . . . . . . . 163
Malfunction indicator lamp . . . . . . 242
Misted up windows . . . . . . . . . . . . 164
Rear compartment . . . . . . . . . . . . . 158
Rear window heating . . . . . . . . . . . 164
Setting the air distribution . . . . . . . 162
Setting the airflow . . . . . . . . . . . . . 163
Setting the air vents . . . . . . . . . . . . 160
Setting the temperature . . . . . . . . . 159
Setting the temperature (rear
compartment) . . . . . . . . . . . . . . . . 160
see Climate control
Air-conditioning
Activating/deactivating . . . . . . . . . 158
Airmatic DC (Dual Control) . . . . . . . . 146
Air pump, electric . . . . . . . . . . . . . . . 217 Ambient lighting
Setting (on-board computer) . . . . . 126
Antifreeze concentration . . . . . . . . . 317
Anti-lock braking system see ABS
Anti-theft alarm system
see ATA
Anti-theft systems . . . . . . . . . . . . . . . . 61
Ashtray . . . . . . . . . . . . . . . . . . . . . . . . 181
ASSYST PLUS . . . . . . . . . . . . . . . . . . . 209
ATA (anti-theft alarm system) . . . . . . 61
Switching off the alarm . . . . . . . . . . 61
Audible warning signal . . . . . . . . . . . 251
AUTO lights Display message . . . . . . . . . . . . . . 233
Automatic car wash . . . . . . . . . . . . . 211
Automatic transmission
Changing gear yourself . . . . . . . . . 105
Display in the speedometer . . . . . . 105
Display message . . . . . . . . . . . . . . 223
Driving tips . . . . . . . . . . . . . . . . . . . 107
Emergency running mode . . . . . . . 257
Malfunction . . . . . . . . . . . . . . . . . . 257
One-touch gearshifting . . . . . . . . . 105
Program selector button . . . . . . . . 106
Releasing the parking lock man-
ually . . . . . . . . . . . . . . . . . . . . . . . . 268
Selector lever positions . . . . . . . . . 104
Shift ranges . . . . . . . . . . . . . . . . . . 106 Index
219_AKB; 2; 4, en-GB
mkalafa,
2007-11-13T09:28:36+01:00 - Seite 3
Page 14 of 329
11
Rain sensor
Windscreen wipers . . . . . . . . . . . . . . 98
Range (on-board computer) . . . . . . . 130
R button
see Reset button
Rear foglamp
Display message . . . . . . . . . . . . . . 235
Rear-view mirror
Adjusting . . . . . . . . . . . . . . . . . . . . . 83
Anti-dazzle (manual) . . . . . . . . . . . . . 83
Anti-dazzle mode (automatic) . . . . . 85
Rear window
Cleaning . . . . . . . . . . . . . . . . . . . . . 212
Rear window blind . . . . . . . . . . . . . . . 180
Rear window heating Malfunction indicator lamp . . . . . . 242
Refuelling . . . . . . . . . . . . . . . . . . . . . . 190
Remote control Auxiliary heating . . . . . . . . . . . . . . 167
Changing the batteries (auxiliary
heating) . . . . . . . . . . . . . . . . . . . . . 270
Garage door opener . . . . . . . . . . . . 186
Programming (garage door
opener) . . . . . . . . . . . . . . . . . . . . . . 186
Replacing the wiper blades . . . . . . . 275
Reserve Display message . . . . . . . . . . . . . . 240
Reserve fuel . . . . . . . . . . . . . . . . . . . . 311
Display message . . . . . . . . . . . . . . 240 Fuel tank . . . . . . . . . . . . . . . . . . . . 311
Warning lamp . . . . . . . . . . . . . . . . . 250
Reset button . . . . . . . . . . . . . . . . . . . 110
Restraint system
Airbags . . . . . . . . . . . . . . . . . . . . . . . 45
Display message . . . . . . . . . . . . . . 227
Restraint systems
For children . . . . . . . . . . . . . . . . . . . 49
Retaining hooks (boot) . . . . . . . . . . . 176
Rev counter . . . . . . . . . . . . . . . . . . . . 111
Reverse gear Engaging (automatic transmission) 105
Reversing lamp
Display message . . . . . . . . . . . . . . 236
Roller sunblind
Rear window . . . . . . . . . . . . . . . . . 180
Roof load, maximum . . . . . . . . . . . . . 310
Roof rack . . . . . . . . . . . . . . . . . . . . . . 173
Run-on time (mobile phone) . . . . . . . 184 S
Seat Adjusting
. . . . . . . . . . . . . . . . . . 75, 77
Correct driver's seat position . . . . . . 90
Storing settings . . . . . . . . . . . . . . . . 86
Seat belt
Adjusting the height . . . . . . . . . . . . . 90
Fastening . . . . . . . . . . . . . . . . . . . . . 88
Warning lamp . . . . . . . . . . . . . . 89, 249 Seat heating
. . . . . . . . . . . . . . . . . . . . . 80
Seat ventilation . . . . . . . . . . . . . . . . . . 80
Malfunction indicator lamp . . . . . . 241
Selector lever
Display message . . . . . . . . . . . . . . 223
Positions . . . . . . . . . . . . . . . . . . . . 105
Service
Display message . . . . . . . . . . . . . . 209
Service display
see ASSYST PLUS
Service indicator
see ASSYST PLUS
Service products . . . . . . . . . . . . . . . . 311
Brake fluid . . . . . . . . . . . . . . . . . . . 317
Coolant . . . . . . . . . . . . . . . . . . . . . 316
Windscreen washer fluid . . . . . . . . 317
Settings
Calling up a stored setting . . . . . . . . 87
Factory (key) . . . . . . . . . . . . . . . 66, 67
Factory (KEYLESS GO) . . . . . . . . . . . 68
Factory (on-board computer) . . . . . 121
Shift ranges
Automatic transmission . . . . . . . . . 106
Display in the speedometer . . . . . . 105
Sidebags . . . . . . . . . . . . . . . . . . . . . . . . 47
Side window Fault . . . . . . . . . . . . . . . . . . . . . . . . 260
Opening/closing . . . . . . . . . . . . . . . 98
Resetting . . . . . . . . . . . . . . . . . . . . 100 Index
219_AKB; 2; 4, en-GB
mkalafa,
2007-11-13T09:28:36+01:00 - Seite 11
Page 54 of 329
Occupant safety
51G
Risk of injury
If the front-passenger front airbag is not
disabled:
R a child secured in a child restraint system
on the front-passenger seat can be seri-
ously and even fatally injured by the
front-passenger airbag deploying. This is
especially likely if the child is in the imme-
diate vicinity of the front-passenger front
airbag when it is deployed.
R a child must never be secured on the
front-passenger seat in a rearward-facing
child restraint system. Only secure a
rearward-facing child restraint system on
a suitable rear seat.
R always move the front-passenger seat to
the rearmost position if you secure a
child in a forward-facing child restraint
system on the front-passenger seat.
The front-passenger front airbag is not dis-
abled:
R on vehicles without automatic child seat
recognition in the front-passenger seat*
R on vehicles with automatic child seat rec-
ognition on the front-passenger seat* if there is no child restraint system with
automatic child seat recognition fitted to
the front-passenger seat.
R on vehicles with automatic child seat rec-
ognition on the front-passenger seat*, if
the 5 PASSENGER AIRBAG OFF warn-
ing lamp is not lit.
To draw attention to this danger, there is an
appropriate warning sticker on the dash-
board as well as on both sides of the sun
visor on the front-passenger side.
Information about recommended child
restraint systems is available at any
Mercedes-Benz Service Centre.
Automatic child seat recognition on the
front-passenger seat*
If your vehicle does not have automatic child
seat recognition on the front-passenger seat,
this is indicated by a special sticker.
The sticker is affixed to the side of the dash-
board on the front-passenger side. It is visible
when you open the front-passenger door.
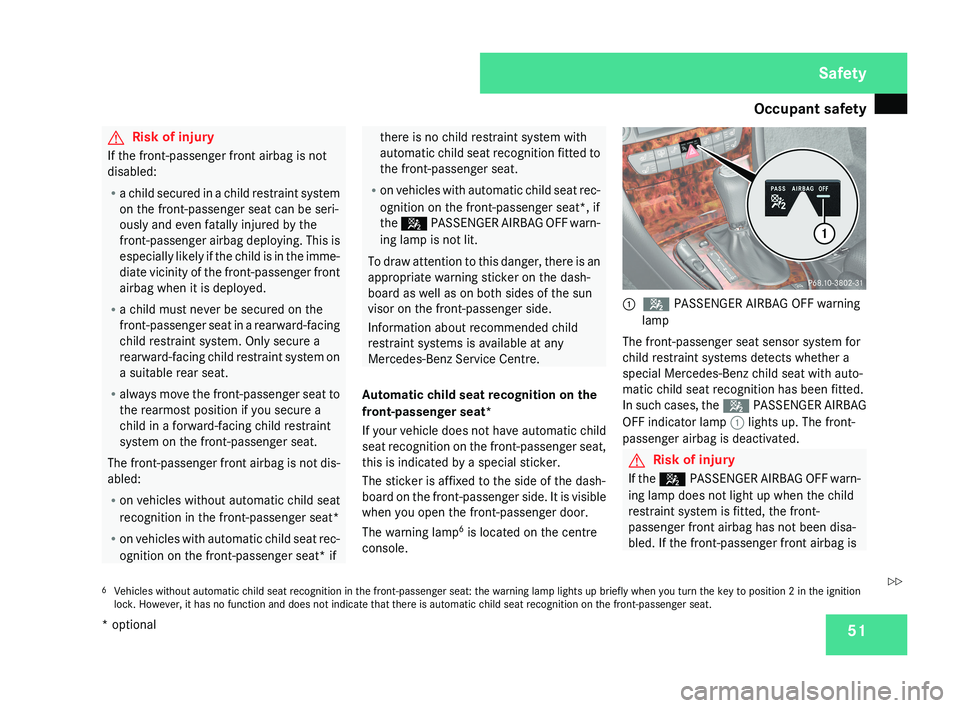
The warning lamp 6
is located on the centre
console.1 5 PASSENGER AIRBAG OFF warning
lamp
The front-passenger seat sensor system for
child restraint systems detects whether a
special Mercedes-Benz child seat with auto-
matic child seat recognition has been fitted.
In such cases, the 5 PASSENGER AIRBAG
OFF indicator lamp 1 lights up. The front-
passenger airbag is deactivated.
G Risk of injury
If the 5 PASSENGER AIRBAG OFF warn-
ing lamp does not light up when the child
restraint system is fitted, the front-
passenger front airbag has not been disa-
bled. If the front-passenger front airbag is
6 Vehicles without automatic child seat recognition in the front-passenger seat: the warning lamp lights up briefly when you turn the key to position 2 in the ignition
lock. However, it has no function and does not indicate that there is automatic child seat recognition on the front-passenger seat.
Safety
* optional
219_AKB; 2; 4, en-GB
mkalafa,
2007-11-13T09:28:36+01:00 - Seite 51
Z
Page 112 of 329
Instrument cluster
109
When the AMG display is switched on, the
display
colour changes to red and UP appears
next to the gear indicator, instructing you to
shift up.
Downshifting G
Risk of accident
Do not change down for additional engine
braking on a slippery road surface. This
could cause the drive wheels to lose their
grip and the vehicle could skid.
X Briefly press the selector lever to the left
towards D-
or
X Pull the left-hand paddle on the steering
wheel
(Y page 107).
The automatic transmission shifts down to
the next gear.
i For maximum acceleration, pull the left-
hand gearshift paddle until the transmis-
sion selects the optimum gear depending
on the speed. Kickdown
i
It is not possible to use kickdown in the
manual gearshift program M on vehicles
with AMG engines.
You can also use kickdown for maximum
acceleration in manual gearshift program M.
X Depress the accelerator pedal beyond the
pressure point.
The transmission shifts to a lower gear
depending on the engine speed.
i It is not possible to shift gears using the
steering wheel gearshift paddles during
kickdown. Instrument cluster
Points to remember
You
will find a full overview of the instrument
cluster in the "At a glance" section
(Y page 26). G
Risk of accident
No further messages can be displayed if
there is a malfunction in the instrument
cluster and/or the multi-function display.
This
means that you will not see information
about the driving situation, such as the
speed, outside temperature, warning/indi-
cator lamps, display messages or system
failures. The vehicle's handling character-
istics may be affected. Adjust your driving
style and speed accordingly.
Immediately consult a qualified specialist
workshop which has the necessary special-
ist knowledge and tools to carry out the
work required. Mercedes-Benz recom-
mends that you use a Mercedes-Benz
Service Centre for this purpose. In particu-
lar, work relevant to safety or on safety-
related systems must be carried out at a
qualified specialist workshop. Controls
219_AKB; 2; 4, en-GB
mkalafa,
2007-11-13T09:28:36+01:00 - Seite 109
Page 119 of 329
On-board computer
116
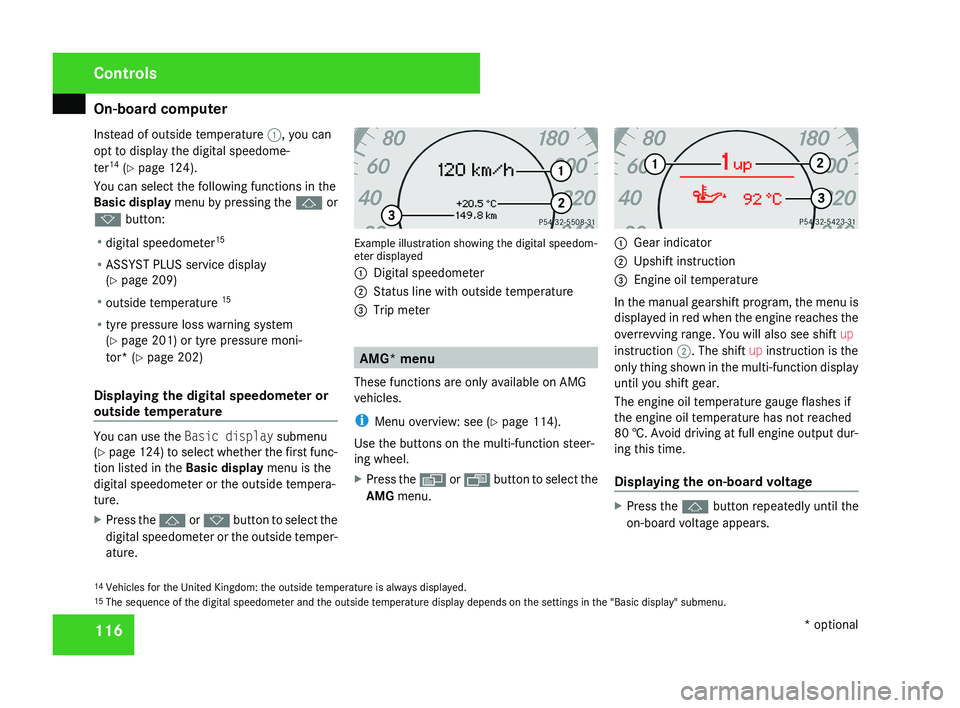
Instead of outside temperature
1, you can
opt to display the digital speedome-
ter 14
(Y page 124).
You can select the following functions in the
Basic display menu by pressing the j or
k button:
R digital speedometer 15
R ASSYST PLUS service display
(Y page 209)
R outside temperature 15
R tyre pressure loss warning system
(Y page 201) or tyre pressure moni-
tor* (Y page 202)
Displaying the digital speedometer or
outside temperature You can use the
Basic display submenu
(Y page 124) to select whether the first func-
tion listed in the Basic display menu is the
digital speedometer or the outside tempera-
ture.
X Press the j or k button to select the
digital speedometer or the outside temper-
ature. Example illustration showing the digital speedom-
eter displayed
1
Digital speedometer
2 Status line with outside temperature
3 Trip meter AMG* menu
These functions are only available on AMG
vehicles.
i Menu overview: see ( Y page 114).
Use the buttons on the multi-function steer-
ing wheel.
X Press the è or · button to select the
AMG menu. 1
Gear indicator
2 Upshift instruction
3 Engine oil temperature
In the manual gearshift program, the menu is
displayed in red when the engine reaches the
overrevving range. You will also see shift up
instruction 2. The shift up instruction is the
only thing shown in the multi-function display
until you shift gear.
The engine oil temperature gauge flashes if
the engine oil temperature has not reached
80 †. Avoid driving at full engine output dur-
ing this time.
Displaying the on-board voltage X
Press the j button repeatedly until the
on-board voltage appears.
14 Vehicles for the United Kingdom: the outside temperature is always displayed.
15 The sequence of the digital speedometer and the outside temperature display depends on the settings in the "Basic display" submenu. Controls
* optional
219_AKB; 2; 4, en-GB
mkalafa,
2007-11-13T09:28:36+01:00 - Seite 116
Page 170 of 329
Air conditioning
167
Activating the auxiliary heating/ventila-
tion
If the key is in position 1 or 2:
X
Press and hold button 1 for at least two
seconds.
The red or blue indicator lamp in the button
lights up.
If the key is removed or in position 0:
X Briefly press button 1.
The red or blue indicator lamp in the button
lights up.
Deactivating the auxiliary heating/venti-
lation
X Briefly press button 1.
The red or blue indicator lamp in the button
goes out.
Remote control
Your vehicle comes with one remote control.
You may use two additional remote controls
for your vehicle. For further information, con-
sult a qualified specialist workshop, e.g. a
Mercedes-Benz Service Centre. The remote control has a maximum range of
approximately 300 metres. This range may be
reduced by:
R
sources of radio interference
R solid objects between the remote control
and the vehicle
R the remote control being in an unfavoura-
ble position in relation to the vehicle
R transmitting from an enclosed space
i The optimum range can be achieved if you
hold the remote control vertically, pointing
upwards when you press one of the but-
tons.
i A battery symbol appears in the display
when the batteries in the remote control
are low. Replace the remote control bat-
teries (Y page 270).
i More information about the auxiliary
heating can be found in the "Practical
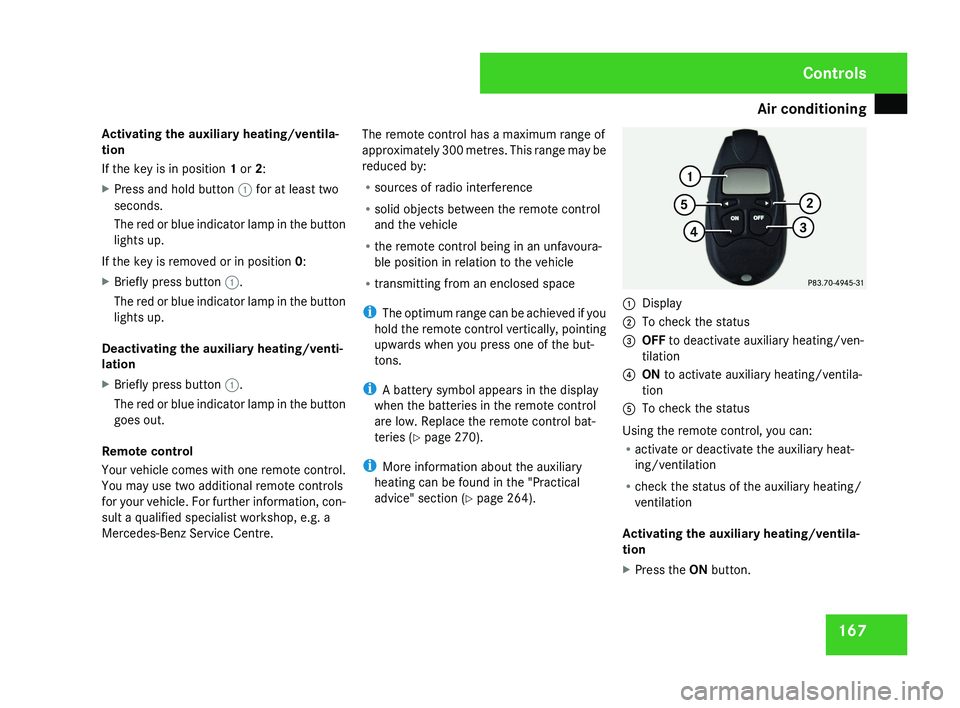
advice" section ( Y page 264).1
Display
2 To check the status
3 OFF to deactivate auxiliary heating/ven-
tilation
4 ON to activate auxiliary heating/ventila-
tion
5 To check the status
Using the remote control, you can:
R activate or deactivate the auxiliary heat-
ing/ventilation
R check the status of the auxiliary heating/
ventilation
Activating the auxiliary heating/ventila-
tion
X Press the ON button.
Controls
219_AKB; 2; 4, en-GB
mkalafa,
2007-11-13T09:28:36+01:00 - Seite 167
Page 189 of 329
Features
186 Garage door opener*
The remote control integrated in the rear-view
mirror allows you to operate up to three dif-
ferent door and gate systems.
i The garage door opener is only available
for certain countries. Observe the legal
requirements in all countries concerned.
The HomeLink ®
garage door opener is
compatible with most European garage and
gate opener drives. More information on
HomeLink ®
and/or compatible products is
available from:
R any Mercedes-Benz Service Centre
R the HomeLink ®
hotline
(0) 08000 466 354 65 (free of charge) or
+49 (0) 6839 907-277 (at a charge)
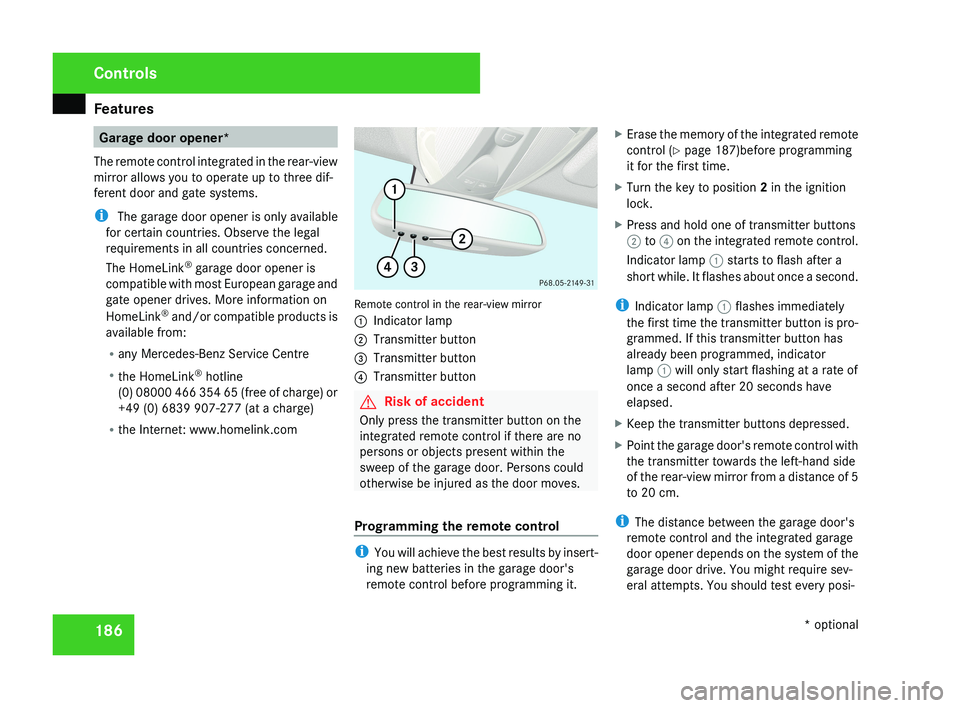
R the Internet: www.homelink.comRemote control in the rear-view mirror
1 Indicator lamp
2 Transmitter button
3 Transmitter button
4 Transmitter button
G Risk of accident
Only press the transmitter button on the
integrated remote control if there are no
persons or objects present within the
sweep of the garage door. Persons could
otherwise be injured as the door moves.
Programming the remote control
i You will achieve the best results by insert-
ing new batteries in the garage door's
remote control before programming it. X
Erase the memory of the integrated remote
control ( Y page 187)before programming
it for the first time.
X Turn the key to position 2 in the ignition
lock.
X Press and hold one of transmitter buttons
2 to 4 on the integrated remote control.
Indicator lamp 1 starts to flash after a
short while. It flashes about once a second.
i Indicator lamp 1 flashes immediately
the first time the transmitter button is pro-
grammed. If this transmitter button has
already been programmed, indicator
lamp 1 will only start flashing at a rate of
once a second after 20 seconds have
elapsed.
X Keep the transmitter buttons depressed.
X Point the garage door's remote control with
the transmitter towards the left-hand side
of the rear-view mirror from a distance of 5
to 20 cm.
i The distance between the garage door's
remote control and the integrated garage
door opener depends on the system of the
garage door drive. You might require sev-
eral attempts. You should test every posi-
Controls
* optional
219_AKB; 2; 4, en-GB
mkalafa,
2007-11-13T09:28:36+01:00 - Seite 186
Page 212 of 329
Service
209Service
Active Service System PLUS
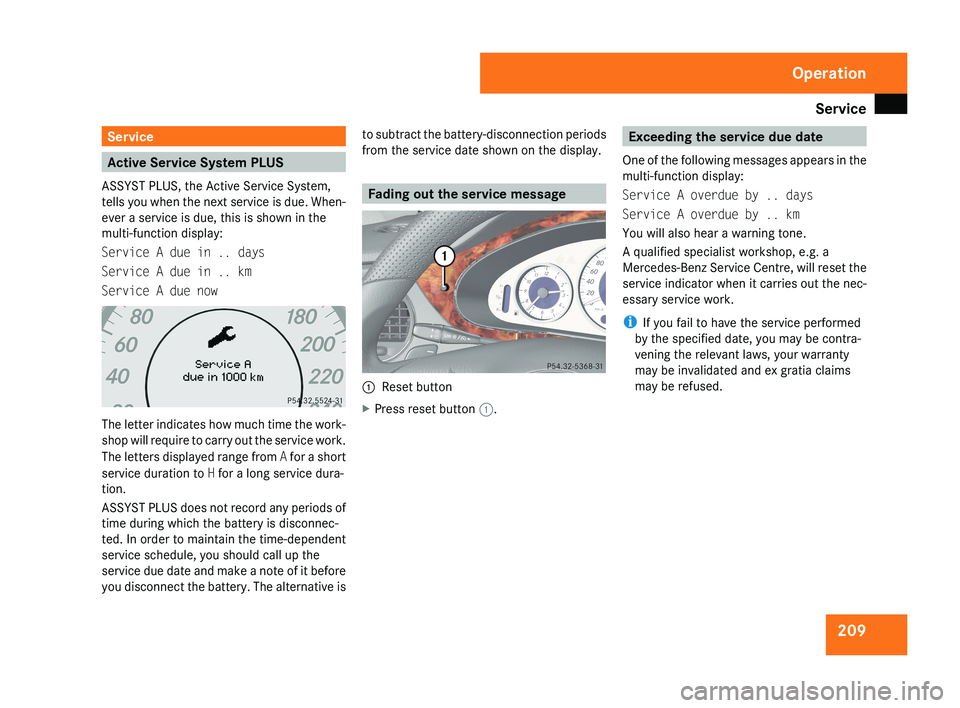
ASSYST PLUS, the Active Service System,
tells you when the next service is due. When-
ever a service is due, this is shown in the
multi-function display:
Service A due in .. days
Service A due in .. km
Service A due nowThe letter indicates how much time the work-
shop will require to carry out the service work.
The letters displayed range from A for a short
service duration to H for a long service dura-
tion.
ASSYST PLUS does not record any periods of
time during which the battery is disconnec-
ted. In order to maintain the time-dependent
service schedule, you should call up the
service due date and make a note of it before
you disconnect the battery. The alternative is to subtract the battery-disconnection periods
from the service date shown on the display.
Fading out the service message
1
Reset button
X Press reset button 1.
Exceeding the service due date
One of the following messages appears in the
multi-function display:
Service A overdue by .. days
Service A overdue by .. km
You will also hear a warning tone.
A qualified specialist workshop, e.g. a
Mercedes-Benz Service Centre, will reset the
service indicator when it carries out the nec-
essary service work.
i If you fail to have the service performed
by the specified date, you may be contra-
vening the relevant laws, your warranty
may be invalidated and ex gratia claims
may be refused.
Operation
219_AKB; 2; 4, en-GB
mkalafa,
2007-11-13T09:28:36+01:00 - Seite 209