Page 512 of 769
511 Controls in detail
Loading and storing
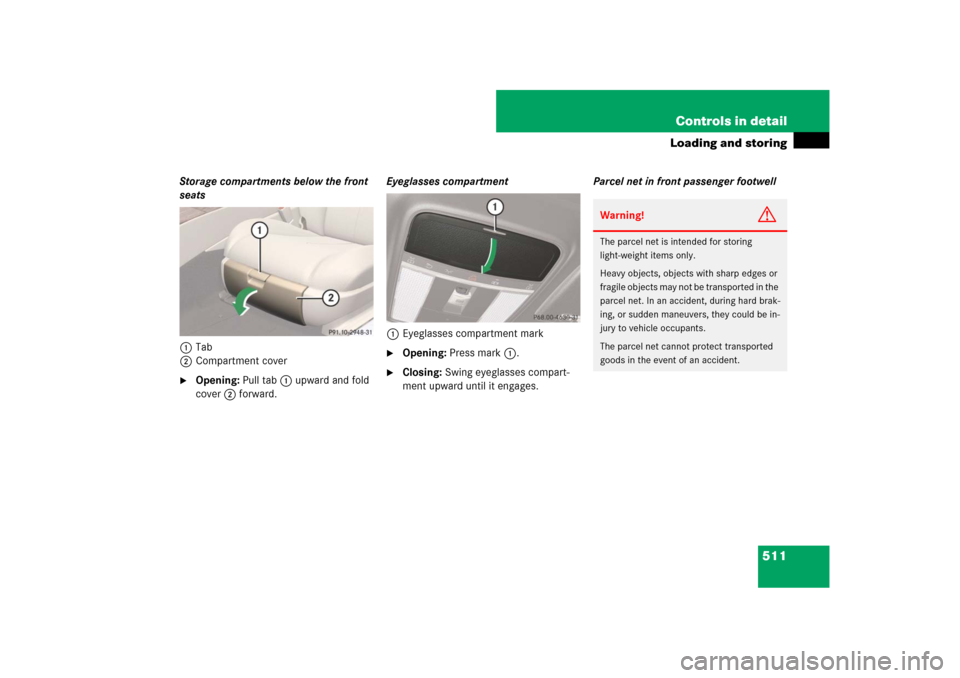
Storage compartments below the front
seats
1Tab
2Compartment cover�
Opening: Pull tab1 upward and fold
cover2 forward.Eyeglasses compartment
1Eyeglasses compartment mark
�
Opening: Press mark1.
�
Closing: Swing eyeglasses compart-
ment upward until it engages.Parcel net in front passenger footwell
Warning!
G
The parcel net is intended for storing
light-weight items only.
Heavy objects, objects with sharp edges or
fragile objects may not be transported in the
parcel net. In an accident, during hard brak-
ing, or sudden maneuvers, they could be in-
jury to vehicle occupants.
The parcel net cannot protect transported
goods in the event of an accident.
Page 513 of 769
512 Controls in detailLoading and storingA small convenience parcel net is located
in the front passenger footwell. It is for
small and light items, such as road maps,
mail, etc.Storage compartments in rear
passenger compartment
Armrest with integrated storage
compartment
1Release catch
�
Opening: Pull release catch1 and
swing the cover upward.Storage compartment between rear
seats
1Handle
�
Opening: Pull handle1 backward in
the direction of arrow.
!
Before storing the armrest in the backrest,
close the storage compartment cover.
!
Do not sit on or lean your body weight
against the armrest when it is folded down, as
you could otherwise damage it.
Page 514 of 769

513 Controls in detail
Loading and storing
Rear storage box
1Handle
2Cover�
Fold down rear center armrest.
�
Pull handle1 upward in the direction
of arrow.
�
Swing down cover2.
Cup holders
Cup holder in front center console
1Mark
2Handle
�
Opening: Press mark1 on the front.
�
Closing: Fold cover in until it engages.
!
Do not sit on or lean your body weight
against the armrest when it is folded down, as
you could otherwise damage it.
Warning!
G
In order to help prevent spilling liquids on
vehicle occupants and/or vehicle equip-
ment, only use containers that fit into the
cup holder. Use lids on open containers and
do not fill containers to a height where the
contents, especially hot liquids, could spill
during braking, vehicle maneuvers, or in an
accident. Liquids spilled on vehicle occu-
pants may cause serious personal injury.
Liquids spilled on vehicle equipment may
cause damage not covered by the
Mercedes-Benz Limited Warranty.
When not in use, keep the cup holders
closed. An open cup holder may cause injury
to you or others when contacted during
braking, vehicle maneuvers, or in an acci-
dent.
Keep in mind that objects placed in the cup
holder may come loose during braking, vehi-
cle maneuvers, or in an accident and be
thrown around in the vehicle interior.
Objects thrown around in the vehicle interi-
or may cause an accident and/or serious
personal injury.
��
Page 515 of 769
514 Controls in detailLoading and storing�
Removing: Pull cup holder out by pull-
ing silver handle2 u p w a r d i n d i r e c t i o n
of arrow.
�
Inserting: Press downward until it en-
gages. While doing so, make sure that
the word “Front” is in the proper instal-
lation position.Cup holder in rear
1Compartment mark
�
Opening: Press mark1 on the front.
Trunk
Storage spaces under trunk floor
1Storage space
2Handle
3Trunk floor cover�
Lift up trunk floor cover3 and engage
the cover handle2 in upper edge of
trunk.
i
You can remove the cup holder to clean it.
Only clean it using clear, lukewarm water.
��
Page 526 of 769

525 Controls in detail
Useful features
Initiating an emergency call manually
1SOS button
2Cover�
Briefly press button on cover2 to
open.
Cover 2 will open.
�
Press SOS button1 (for longer than
2 seconds).
The indicator lamp in SOS button1
will flash until the emergency call is
concluded.
�
Wait for a voice connection to the
Response Center.
�
Close cover2 after the emergency
call is concluded.Roadside Assistance button• and
Information button¡
The Roadside Assistance button• and
the Information button¡ are located in
the storage compartment below the front
armrest (
�page 510).
1Information button¡
2Roadside Assistance button•
Warning!
G
If you feel at any way in jeopardy when in the
vehicle (e.g. smoke or fire in the vehicle, ve-
hicle in a dangerous road location), please
do not wait for voice contact after you have
pressed the emergency button. Carefully
leave the vehicle and move to a safe loca-
tion. The Response Center will automatically
contact local emergency officials with the
vehicle’s approximate location if they
receive an automatic SOS signal and cannot
make voice contact with the vehicle
occupants.
Page 631 of 769

630 Practical hintsWhat to do if …?Display
Possible cause/consequence
Possible solution
Front Passenger
Airbag Enabled
See Oper. Manual
Front passenger front air bag is
activated while driving even
though a child, small individual,
or object below the system’s
weight threshold is on the front
passenger seat, or the front pas-
senger seat is empty. Objects
on the seat or forces acting on
the seat may make the system
sense supplemental weight.
Stop the vehicle in a safe location as soon as possible and check the front
passenger seat for the following:�
Engage the electronic parking brake (
�page 412).
�
Switch off the ignition (
�page 365).
�
Remove child and child restraint from front passenger seat and properly
secure the child in rear seat employing the child restraint if necessary.
�
Remove any other items from on and around the front passenger seat and
make sure the storage bag on the back of the front passenger seat is emp-
ty.
�
Make sure that no objects which apply forces to the seat are present (e.g.
objects such as books, briefcases etc. lodged behind or around the seat,
head restraints pushing against roof etc.). The system may recognize such
forces as supplemental weight and sense that an occupant on the front
passenger seat is of a greater weight than actually present.
�
Keep the seat unoccupied, close the passenger door and switch on the ig-
nition (
�page 365).
Monitor the 59indicator lamp right of the instrument cluster
(
�page 51) and the multifunction display in the instrument cluster
(�page 282) for the following:
(Continued on next page)
Page 682 of 769

681 Practical hints
Where will I find ...?
�Where will I find ...?
First aid kit
The first aid kit is located in the storage
compartment under the front passenger
seat.
1Tab
2Cover
�
Pull tab1 upward.
�
Fold the covering forward in the direc-
tion of arrow.
�
Remove the first aid kit.
Vehicle jack, vehicle tool kit, luggage
bowl, Minispare wheel
The vehicle jack, Minispare wheel, the ve-
hicle tools, and the luggage bowl are
stored in the compartment underneath the
trunk floor.�
Lift up trunk floor cover and engage
trunk floor handle in upper edge of
trunk.
You can now remove the tools and ac-
cessories.The vehicle tool kit includes:
�
Towing eye bolt
�
Wheel wrench
�
Alignment bolt
�
Pair of gloves
�
Fuse chart
�
Collapsible wheel chock
The spare wheel bolts are fixed at the
Minispare wheel.
!
Always keep the storage compartment un-
der the front passenger seat closed while the ve-
hicle is in motion.
i
Check expiration dates and contents for
completeness at least once a year and replace
missing/expired items.
!
To prevent damage, always disengage trunk
floor handle from trunk lid and lower trunk floor
before closing the trunk.
Page 683 of 769

682 Practical hintsWhere will I find ...?Vehicle jack
Storage position�
Remove vehicle jack from its
compartment.
�
Turn crank handle in direction of arrow
as far as it will go.
Operational position�
Turn crank handle clockwise.
Before storing the vehicle jack in its
compartment:
�
It should be fully collapsed.
�
The handle must be folded in (storage
position).
Warning!
G
The jack is designed exclusively for jacking
up the vehicle at the jack take-up brackets
built into both sides of the vehicle. To help
avoid personal injury, use the jack only to lift
the vehicle during a wheel change. Never
get beneath the vehicle while it is supported
by the jack. Keep hands and feet away from
the area under the lifted vehicle. Always
firmly engage the electronic parking brake
and block wheels before raising vehicle with
jack.
Do not disengage electronic parking brake
while the vehicle is raised. Be certain that
the jack is always vertical (plumb line) when
in use, especially on hills. Always try to use
the jack on level surface. Make sure the jack
arm is fully seated in the jack take-up brack-
et. Always lower the vehicle onto sufficient
capacity jackstands before working under
the vehicle.