Page 158 of 769
157 Control systems
COMAND telephone*
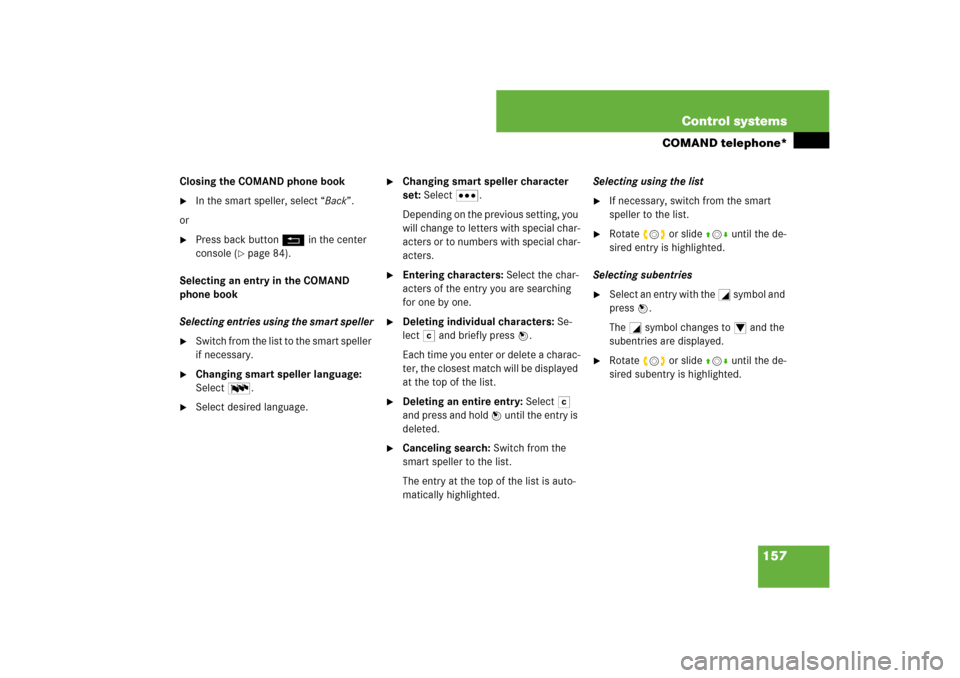
Closing the COMAND phone book�
In the smart speller, select “Back”.
or
�
Press back button L in the center
console (
�page 84).
Selecting an entry in the COMAND
phone book
Selecting entries using the smart speller
�
Switch from the list to the smart speller
if necessary.
�
Changing smart speller language:
Select !.
�
Select desired language.
�
Changing smart speller character
set: Select #.
Depending on the previous setting, you
will change to letters with special char-
acters or to numbers with special char-
acters.
�
Entering characters: Select the char-
acters of the entry you are searching
for one by one.
�
Deleting individual characters: Se-
lect ) and briefly press n.
Each time you enter or delete a charac-
ter, the closest match will be displayed
at the top of the list.
�
Deleting an entire entry: Select )
and press and hold n until the entry is
deleted.
�
Canceling search: Switch from the
smart speller to the list.
The entry at the top of the list is auto-
matically highlighted.Selecting using the list
�
If necessary, switch from the smart
speller to the list.
�
Rotate ymz or slide qmr until the de-
sired entry is highlighted.
Selecting subentries
�
Select an entry with the + symbol and
press n.
The + symbol changes to / and the
subentries are displayed.
�
Rotate ymz or slide qmr until the de-
sired subentry is highlighted.
Page 159 of 769
158 Control systemsCOMAND telephone*Displaying details of an entry
COMAND can also show a shortened entry
in its entirety. For entries featuring suben-
tries, the detailed view is only available for
the subentries and not for the main entry.�
Select entry (
�page 157).
�
Select “Options” � “Details”.
The detailed view appears.
�
Closing detailed view: Slide qmr or
omp or press n or back button L
in the center console (
�page 84).Starting to dial the number of an entry
�
Select entry (
�page 157).
�
Press n.
or
�
Press s on the telephone keypad.
A list appears if the entry contains sub-
entries.�
Select desired subentry.
�
Press n again.
or
�
Press s on the telephone key-
pad.Assigning a New Entry in the Address
Book
�
Select “Options” � “New Entry” in the
COMAND phone book list.
�
Selecting a number category:
Select a category, e.g. “Home”.
�
Selecting a telephone category:
Select a category, e.g. “Land Line”.
�
Confirming selection: Select “Save”.
The input menu appears with the data
fields.
i
This function is used to create a new entry in
the address book and to enter the data (first
name, last name and telephone number) manu-
ally.
Page 160 of 769
![MERCEDES-BENZ CL-Class 2008 C216 Comand Manual 159 Control systems
COMAND telephone*
1Data field
2Input mark (cursor)
3Input characters�
Changing data field: Slide qmr re-
peatedly until desired data field is high-
lighted.
or
�
Select [ or ] rep MERCEDES-BENZ CL-Class 2008 C216 Comand Manual 159 Control systems
COMAND telephone*
1Data field
2Input mark (cursor)
3Input characters�
Changing data field: Slide qmr re-
peatedly until desired data field is high-
lighted.
or
�
Select [ or ] rep](/manual-img/4/3500/w960_3500-159.png)
159 Control systems
COMAND telephone*
1Data field
2Input mark (cursor)
3Input characters�
Changing data field: Slide qmr re-
peatedly until desired data field is high-
lighted.
or
�
Select [ or ] repeatedly until de-
sired data field is highlighted.
�
Entering data into a field: Select all
characters one by one from the input
characters line 3.
�
Toggling upper and lower case for
the input characters: Select & or
(.
�
Changing language for the input
characters: Select !.
�
Select desired language.
�
Changing character set for the input
characters: Select #.
Depending on the previous setting, you
will change to letters with special char-
acters or to numbers with special char-
acters.
�
Displaying special characters as in-
put characters: Select ! � “Sym-
bols”.
�
Returning input characters to nor-
mal characters: Select ! � the
desired language.
�
Moving cursor in the data field:
SelectY or Z.
�
Deleting individual characters:
Select) and briefly press n.
The character to the left of the cursor is
deleted.
�
Deleting an entire entry: Select )
and press and hold n until the entry is
deleted.
�
Saving an entry: Select ?.
�
Canceling an entry: Select “Back”.
If one of the data fields contains data, a
prompt will appear asking whether you
want to save the entry.�
Select “Yes” or “No”.
The entry will either be saved or
not, depending on your selection.
Page 165 of 769
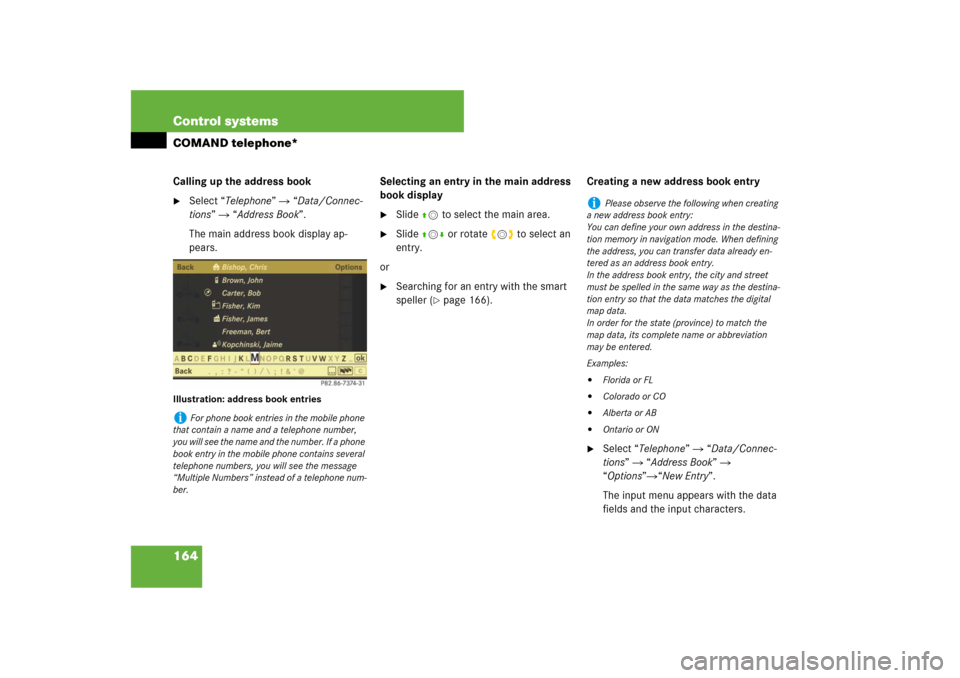
164 Control systemsCOMAND telephone*Calling up the address book�
Select “Telephone” � “Data/Connec-
tions” � “Address Book”.
The main address book display ap-
pears.
Illustration: address book entries
Selecting an entry in the main address
book display�
Slide qm to select the main area.
�
Slide qmr or rotate ymz to select an
entry.
or
�
Searching for an entry with the smart
speller (
�page 166).Creating a new address book entry
�
Select “Telephone” � “Data/Connec-
tions” � “Address Book” �
“Options”�“New Entry”.
The input menu appears with the data
fields and the input characters.
i
For phone book entries in the mobile phone
that contain a name and a telephone number,
you will see the name and the number. If a phone
book entry in the mobile phone contains several
telephone numbers, you will see the message
“Multiple Numbers” instead of a telephone num-
ber.
i
Please observe the following when creating
a new address book entry:
You can define your own address in the destina-
tion memory in navigation mode. When defining
the address, you can transfer data already en-
tered as an address book entry.
In the address book entry, the city and street
must be spelled in the same way as the destina-
tion entry so that the data matches the digital
map data.
In order for the state (province) to match the
map data, its complete name or abbreviation
may be entered.
Examples:
�
Florida or FL
�
Colorado or CO
�
Alberta or AB
�
Ontario or ON
Page 166 of 769
165 Control systems
COMAND telephone*
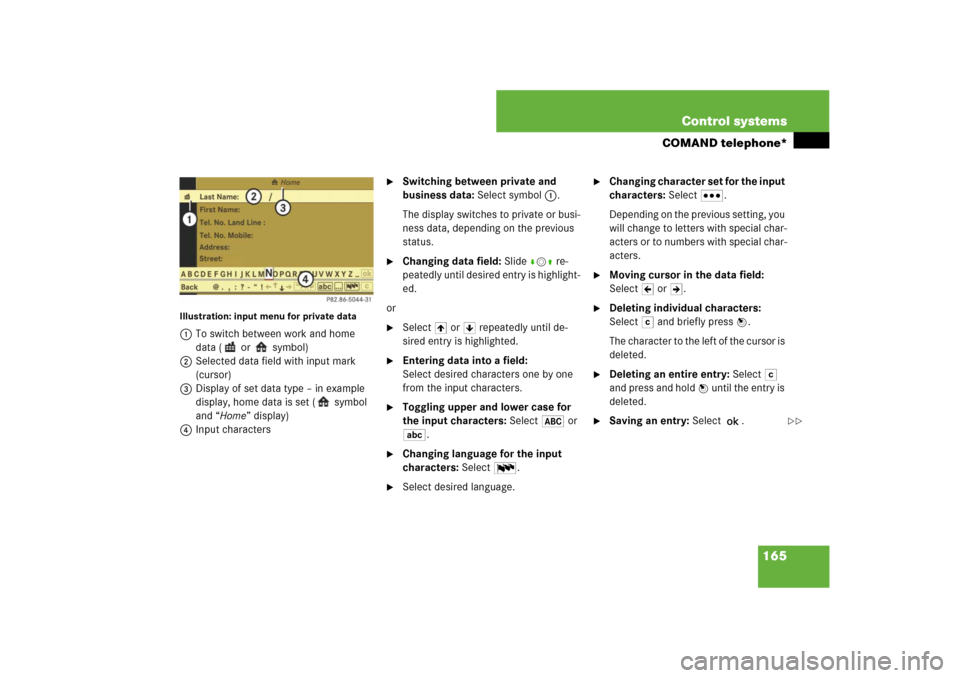
Illustration: input menu for private data1To switch between work and home
data ( or symbol)
2Selected data field with input mark
(cursor)
3Display of set data type – in example
display, home data is set ( symbol
and “Home” display)
4Input characters
�
Switching between private and
business data: Select symbol 1.
The display switches to private or busi-
ness data, depending on the previous
status.
�
Changing data field: Slide rmq re-
peatedly until desired entry is highlight-
ed.
or
�
Select [ or ] repeatedly until de-
sired entry is highlighted.
�
Entering data into a field:
Select desired characters one by one
from the input characters.
�
Toggling upper and lower case for
the input characters: Select& or
(.
�
Changing language for the input
characters: Select!.
�
Select desired language.
�
Changing character set for the input
characters: Select#.
Depending on the previous setting, you
will change to letters with special char-
acters or to numbers with special char-
acters.
�
Moving cursor in the data field:
SelectY or Z.
�
Deleting individual characters:
Select) and briefly press n.
The character to the left of the cursor is
deleted.
�
Deleting an entire entry: Select)
and press and hold n until the entry is
deleted.
�
Saving an entry: Select?.
��
Page 167 of 769
166 Control systemsCOMAND telephone*�
Canceling an entry: Select “Back”.
If one of the data fields contains new
data, a prompt will appear asking
whether you want to save the entry.�
Select “Yes” or “No”.
The entry will either be saved or
not, depending on your selection.Searching for an address book entry
�
Select “Telephone” � “Data/Connec-
tions” � “Address Book”.
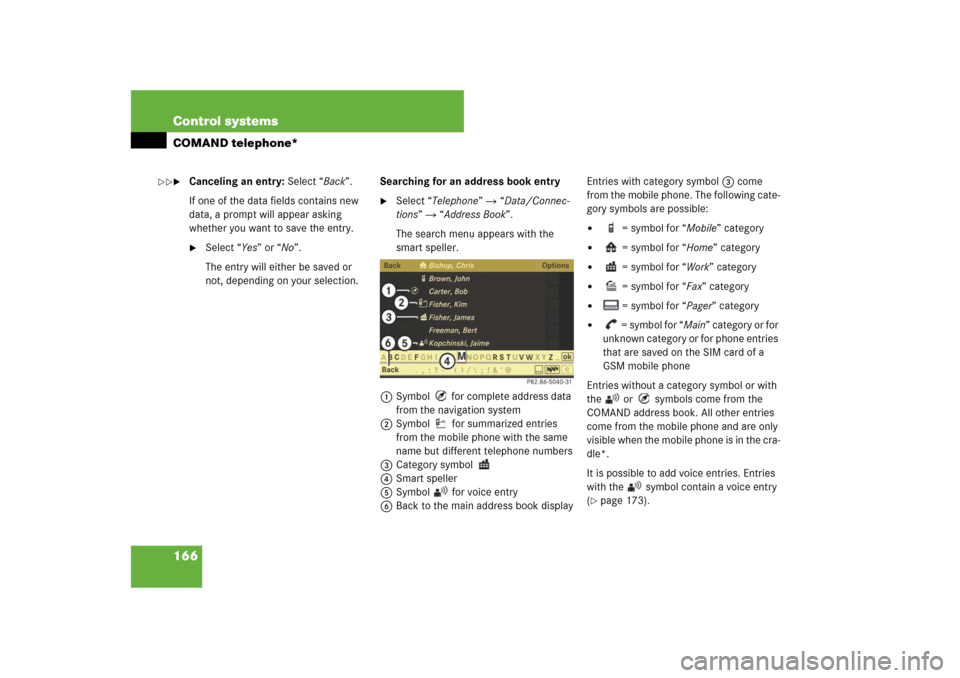
The search menu appears with the
smart speller.
1Symbol for complete address data
from the navigation system
2Symbol for summarized entries
from the mobile phone with the same
name but different telephone numbers
3Category symbol
4Smart speller
5Symbol for voice entry
6Back to the main address book displayEntries with category symbol 3 come
from the mobile phone. The following cate-
gory symbols are possible:
�
= symbol for “Mobile” category
�
= symbol for “Home” category
�
= symbol for “Work” category
�
= symbol for “Fax” category
�
= symbol for “Pager” category
�
= symbol for “Main” category or for
unknown category or for phone entries
that are saved on the SIM card of a
GSM mobile phone
Entries without a category symbol or with
the or symbols come from the
COMAND address book. All other entries
come from the mobile phone and are only
visible when the mobile phone is in the cra-
dle*.
It is possible to add voice entries. Entries
with the symbol contain a voice entry
(
�page 173).
��
Page 168 of 769
167 Control systems
COMAND telephone*
Entries with the symbol contain com-
plete, navigable address data from the nav-
igation system that correspond to digital
map data. It is possible to quickly start
route guidance to these types of entry
(�page 172).
Switching from the smart speller to the
list
�
Slide mq repeatedly or press n until
the smart speller is hidden.
or
�
Select ?.
Switching from the list to the smart
speller
�
Select “Back” from the list.Searching via the smart speller
�
Switch from the list to the smart speller
if necessary.
�
Changing smart speller language:
Select!.
�
Select desired language.
�
Changing smart speller character
set: Select#.
Depending on the previous setting, you
will change to letters with special char-
acters or to numbers with special char-
acters.
�
Entering characters: Select the char-
acters one by one of the entry you are
searching for.
�
Deleting individual characters:
Select) and briefly press n.
Each time you enter or delete a charac-
ter, the closest match will be displayed
at the top of the list.
�
Deleting an entire entry: Select)
and press and hold n until the entry is
deleted.
�
Canceling search: Switch from the
smart speller to the list (
�page 167).
The entry at the top of the list is auto-
matically highlighted.
�
Going back to main address book
display: If necessary, switch from the
list to the smart speller (
�page 167)
and select “Back” in the smart speller.
Searching via the list
�
If necessary, switch from the smart
speller to the list (
�page 167).
�
Rotate ymz or slide qmr until desired
entry is highlighted on the list.
Page 169 of 769
168 Control systemsCOMAND telephone*Displaying a complete address book
entry
Searching for the desired entry�
Search for an address book entry
(�page 166).
or
�
Select an address book entry in the
main address book menu
(�page 164).
�
Press n.
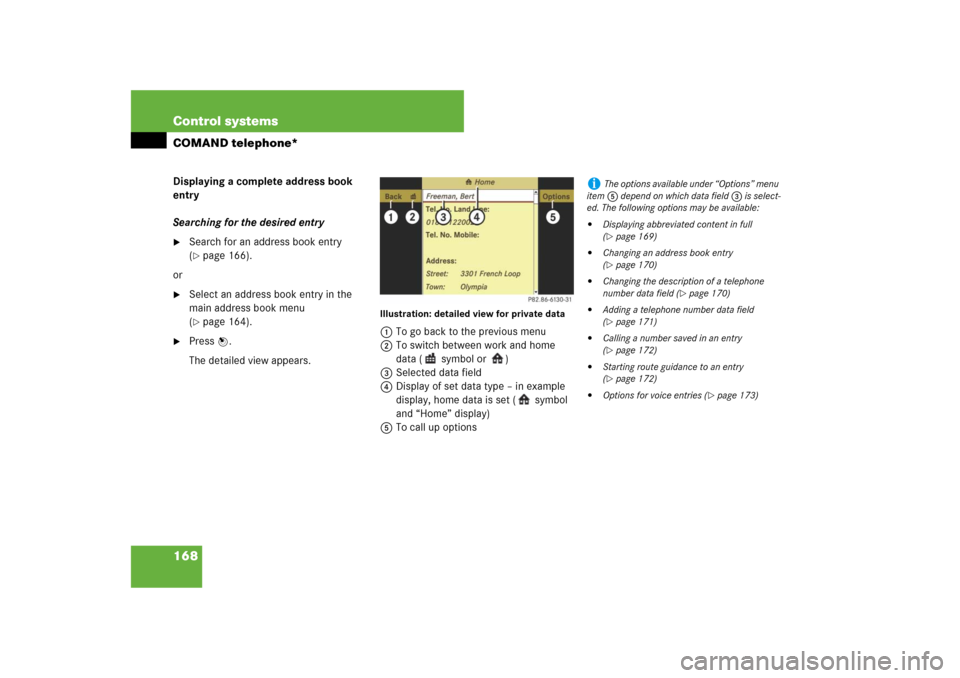
The detailed view appears.
Illustration: detailed view for private data1To go back to the previous menu
2To switch between work and home
data ( symbol or )
3Selected data field
4Display of set data type – in example
display, home data is set ( symbol
and “Home” display)
5To call up options
i
The options available under “Options” menu
item 5 depend on which data field 3 is select-
ed. The following options may be available:
�
Displaying abbreviated content in full
(�page 169)
�
Changing an address book entry
(�page 170)
�
Changing the description of a telephone
number data field (
�page 170)
�
Adding a telephone number data field
(�page 171)
�
Calling a number saved in an entry
(�page 172)
�
Starting route guidance to an entry
(�page 172)
�
Options for voice entries (
�page 173)