Page 285 of 769
284 Control systemsInstrument cluster control systemMenus
Trip (
�page 286)
Navi (
�page 287)
Audio (
�page 289)
AMG
1 (�page 291)
1CL 63 AMG and CL 65 AMG only.Commands/submenusStandard display
Showing route guidance in-
structions, current direction
traveled
Selecting radio station
Gear currently engaged
Engine oil temperature
Vehicle supply voltage
Fuel consumption statistics since start
Selecting satellite radio
channel
RACETIMER
Fuel consumption statistics since last
reset
Operating DVD changer/
audio CD/ audio DVD/MP3
Overall analysis
Resetting fuel consumption statistics
Operating Video DVD
Lap analysis
Distance to emptyDigital speedometer
Page 287 of 769

286 Control systemsInstrument cluster control systemTrip menu
In the “Trip” menu, you can show an addi-
tional display for the speedometer and call
up or reset your vehicle’s statistical data.
Standard display
In the standard display, the trip odometer
and main odometer are shown in the
multifunction display.�
Press ( or & to select the “Trip”
menu.
1Main odometer
2Trip odometerFuel consumption statistics since start
�
Press ( or & to select the “Trip”
menu.
�
Press % to select “From Start”.
1Distance driven since start
2Time elapsed since start
3Average speed since start
4Average fuel consumption since startFuel consumption statistics since last
reset
�
Press ( or & to select the “Trip”
menu.
�
Press % or $ to select “Since
Reset”.
1Distance driven since last reset
2Time elapsed since last reset
3Average fuel consumption since last re-
set
4Average speed since last reset
i
The menu overview can be found on
(
�page 284).
i
All values that are based on the last start are
reset when you turn off the vehicle’s engine for
more than four hours (
�page 415).
i
If you turn the SmartKey to position1 or2
again during this time, the values will not be re-
set. After 9 999 hours or 99 999 miles (kilome-
ters), the fuel consumption statistics after start
are automatically reset.
i
After 9 999 hours or 99 999 miles (kilome-
ters), the fuel consumption statistics since last
reset are automatically reset.
Page 288 of 769

287 Control systems
Instrument cluster control system
Resetting fuel consumption statistics�
Press ( or & to select the “Trip”
menu.
�
Press % or $ to select the func-
tion you wish to reset.
�
Press #.
Illustration: Reset trip odometer�
Press % to select “Yes” and confirm
with #.Distance to empty
�
Press ( or & to select the “Trip”
menu.
�
Press % or $ to select “Range”.
The calculated remaining driving range
based on the current fuel tank level ap-
pears in the multifunction display.
Digital speedometer
�
Press ( or & to select the “Trip”
menu.
�
Press % or $ to select the digital
speedometer.
1Digital speedometer
Navi menu
The display in the “Navi” menu depends on
whether route guidance is active or not.�
Press ( or & to select the “Navi”
menu.
Route guidance not active
The multifunction display shows the direc-
tion of travel and the name of the street
you are currently driving on, if known by
the navigation system.
1Direction of travel
2Street you are currently driving on
i
If only very little fuel is left in the tank, a fuel
pump is shown instead of the range.
i
The menu overview can be found on
(
�page 284).
Page 290 of 769

289 Control systems
Instrument cluster control system
�
“Calculating Route”
COMAND is calculating a route. After-
ward, COMAND starts route guidance.
�
“Off Map”
The vehicle’s location is outside of the
digital map’s range. The vehicle is in an
off-map position (
�page 238).
�
“Off Mapped Road”
The vehicle is either on a road that has
not been digitized (
�page 238) or on
the side of a road, e.g. in a parking
space.
�
“No Route”
COMAND cannot calculate a route to
the selected destination.
�
“Direction of Dest.”
The vehicle has gone off the map dur-
ing route guidance (
�page 238).
Audio menu
The functions in the “Audio” menu operate
the audio equipment which you currently
have turned on.
If no audio equipment is currently turned
on, the message: “Audio OFF” is shown in
the multifunction display.
Selecting radio station�
Turn on COMAND and select “Radio”
(�page 98).
�
Press ( or & to select the
“Audio” menu.
�
Selecting a preset station: Briefly
press % or $.
�
Selecting a station using the search
function: Press and hold %
or$.1Station frequency
2Waveband
�
Press æ or ç to adjust the vol-
ume.
i
The menu overview can be found on
(
�page 284).
i
You can only change the frequency band
and save new stations using COMAND
(
�page 98).
Page 294 of 769
293 Control systems
Instrument cluster control system
Resetting current lap�
Press buttonæ while the timer is
running.
The timer stops.
�
Press buttonç.
The lap time is reset to “0”.
Deleting all laps
�
Press buttonæ while the timer is
running.
The timer stops.
�
Press buttonç for at least
3 seconds.
�
Press buttonæ to start timer again.
The saved laps are deleted.
or
�
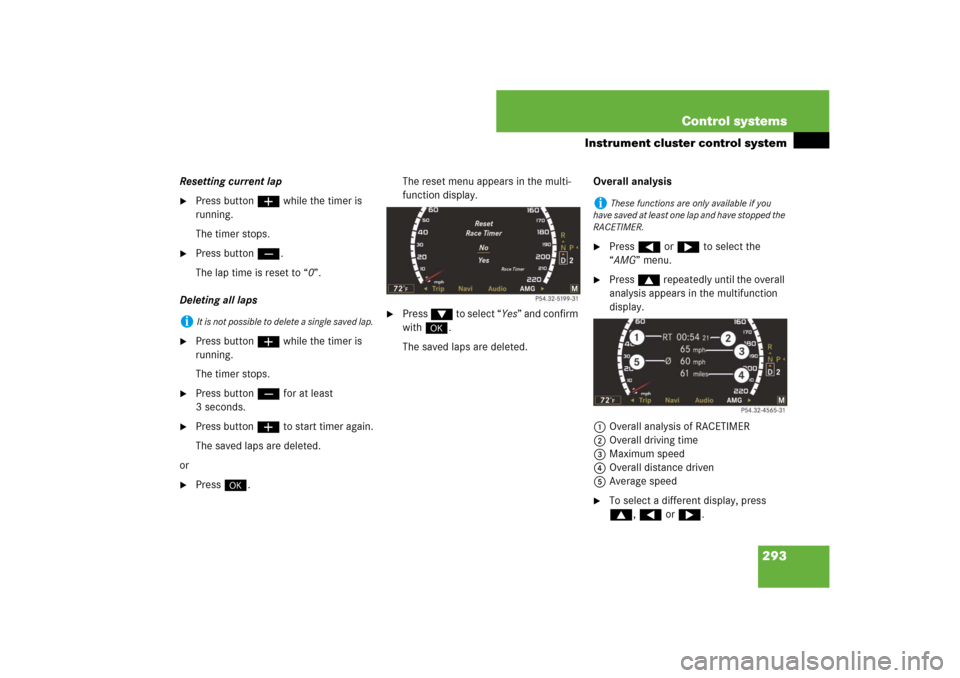
Press #.The reset menu appears in the multi-
function display.
�
Press % to select “Yes” and confirm
with #.
The saved laps are deleted.Overall analysis
�
Press ( or & to select the
“AMG” menu.
�
Press $ repeatedly until the overall
analysis appears in the multifunction
display.
1Overall analysis of RACETIMER
2Overall driving time
3Maximum speed
4Overall distance driven
5Average speed
�
To select a different display, press
$, ( or &.
i
It is not possible to delete a single saved lap.
i
These functions are only available if you
have saved at least one lap and have stopped the
RACETIMER.
Page 351 of 769

350 Control systemsVoice Control individualizationThe individualization is used to adapt the
Voice Control System to your own voice
and to therefore improve speech recogni-
tion. This does not affect the speech rec-
ognition of other users.Individualization consists of two stages:
�
Digits
�
Commands
You can activate individualization in the
COMAND system settings (
�page 257).
A dialog and screen displays will guide you
through the individualization process.
The system can be reset to the factory set-
tings at any time.
i
The individualization can only be performed
when the vehicle is stationary.
If you drive off, the individualization will be can-
celed.
After starting the session, the system will guide
you through the individualization by means of
acoustic instructions.
i
You may wish to complete only a portion of
the individualization process.
Completing the digits portion alone may result in
an improved recognition rate.
Individualization can be exited at any time. The
data trained, however, will only be retained if a
given individualization portion is completed and
the data is stored when prompted to do so by the
system.
Page 364 of 769

363 Controls in detail
Locking and unlocking
Power closing assist for doors and trunk lid
It is not necessary to slam the door or
trunk lid closed. An electrical power-assist-
ed mechanism draws doors and trunk lid
closed quietly and automatically once door
and trunk lid has been latched. When the
electrical power-assisted mechanism has
stopped, doors and/or trunk can be
re-opened.
�
Power closing assist for doors: Press
the doors gently past the initial engage
position into the lock.
The doors close automatically.
�
Power closing assist for trunk lid:
Press the trunk lid gently into its lock.
The trunk closes automatically.For more information on closing the trunk
lid, see “Closing trunk” (
�page 501).
Automatic central locking
The doors and the trunk automatically lock
when the ignition is switched on and the
wheels are turning at vehicle speeds of ap-
proximately 9 mph (15 km/h) or more. The
locking knobs in the doors move down.
You can open a locked door from the in-
side. Open door only when conditions are
safe to do so.
You can deactivate the automatic locking
using the COMAND system (
�page 263).
Warning!
G
To prevent possible personal injury, always
keep hands and fingers away from the door
or trunk lid opening when closing a door or
the trunk. Be especially careful when small
children are around.
In case of danger, pull the inside or outside
door handle, or pull the trunk lid handle.
To prevent personal injury, never actuate
the closing assist mechanism by tampering
with the door or trunk lid latch.
Warning!
G
Only drive with the doors closed. Otherwise,
one or more of the doors could open while
the vehicle is in motion, putting you and/or
others at risk.Warning!
G
Make sure the trunk is closed when the en-
gine is running and while driving. Among
other dangers, deadly carbon monoxide
(CO) gases may enter the vehicle interior re-
sulting in unconsciousness and death.
i
The doors are designed to unlock automati-
cally after an accident if the force of the impact
exceeds a preset threshold. The vehicle locks au-
tomatically when the ignition is switched on and
the wheels are turning at vehicle speeds of ap-
proximately 9 mph (15 km/h) or more. You
could therefore lock yourself out when the vehi-
cle
�
is pushed or towed
�
is on a test stand
Page 396 of 769
.
�
Push the combination switch")
395 Controls in detail
Lighting
High beamCombination switch1High beam
2High beam flasher�
High beam headlamps: Turn the exte-
rior lamp switch to positionB
(�page 391).
�
Push the combination switch in the di-
rection of arrow1.
The high beam indicatorA in the in-
strument cluster comes on
(�page 30).
�
High beam flasher: Pull the combina-
tion switch briefly in the direction of
arrow2.
Headlamp cleaning system
With the engine running the headlamps will
automatically be cleaned with a high-pres-
sure water jet when you have�
switched on the headlamps
and
�
the windshield wipers have wiped the
windshield with washer fluid five times
When you switch off the ignition the
counter resets.
For information on filling up the washer
reservoir, see “Windshield washer system
and headlamp cleaning system”
(
�page 560).
Corner-illuminating lamps
The corner-illuminating lamps improve illu-
mination of the area in the direction into
which you are turning.
The corner-illuminating lamps will operate
with the engine running and with:�
the exterior lamp switch in
positionB or* (
�page 391)
or
�
the daytime running lamp mode acti-
vated (
�page 393).
i
The corner-illuminating lamps will only come
on in low ambient lighting conditions.
i
If you are driving faster than 43 mph
(70 km/h), the corner-illuminating function is
not available.