Page 330 of 509

329 Operation
Engine compartment
Coolant level
The engine coolant is a mixture of water
and anticorrosion/antifreeze. To check
the coolant level, the vehicle must be
parked on level ground and the engine
must be cool.
The coolant expansion tank is located on
the passenger side of the engine compart-
ment.
1Cap
2Coolant expansion tank
3Fluid level bridge�Using a rag, turn cap1 slowly approx-
imately a half-turn counterclockwise to
release any excess pressure.
�Continue turning the cap1 counter-
clockwise and remove it.
The coolant level is correct if the level
�for cold coolant: reaches the white
marking (plastic bridge)3 inside the
coolant expansion tank2
�for warm coolant: is approximately
0.6 in (1.5 cm) higher
�Add coolant as required.
�Replace and tighten cap1.
For more information on coolant, see the
“Technical data” section (
�page 484).
Warning!G
In order to avoid potentially serious burns:
�Use extreme caution when opening the
hood if there are any signs of steam or
coolant leaking from the cooling system,
or if the coolant temperature gauge indi-
cates that the coolant is overheated.
�Do not remove pressure cap on coolant
reservoir if coolant temperature is
above 158°F (70°C). Allow engine to
cool down before removing cap. The
coolant reservoir contains hot fluid and
is under pressure.
�Using a rag, slowly open the cap approx-
imately a half-turn to relieve excess
pressure. If opened immediately, scald-
ing hot fluid and steam will be blown out
under pressure.
�Do not spill antifreeze on hot engine
parts. Antifreeze contains ethylene gly-
col which may burn if it comes into con-
tact with hot engine parts.
Page 421 of 509
420 Practical hints
Where will I find ...?
First aid kit
Depending on the equipment configura-
tion, the first-aid kit will be located either in
the open storage department in the trunk
or behind the cover panel on the left-hand
side of the trunk.
1Rotary handle
2Cover
�Opening: Turn the handle1 counter-
clockwise.
�Fold the cover2 downward.
�Remove the first aid kit.Vehicle jack, vehicle tool kit, luggage
bowl, Minispare wheel
The vehicle jack, Minispare wheel, vehicle
tool kit, and the luggage bowl are stored in
the compartment underneath the trunk
floor.
Vehicle tool kit
The vehicle tool kit includes:
�One towing eye bolt
�One wheel wrench
�Collapsible wheel chock
�One pair of gloves
iCheck expiration dates and contents for
completeness at least once a year and replace
missing/expired items.
Page 423 of 509
422 Practical hints
Where will I find ...?
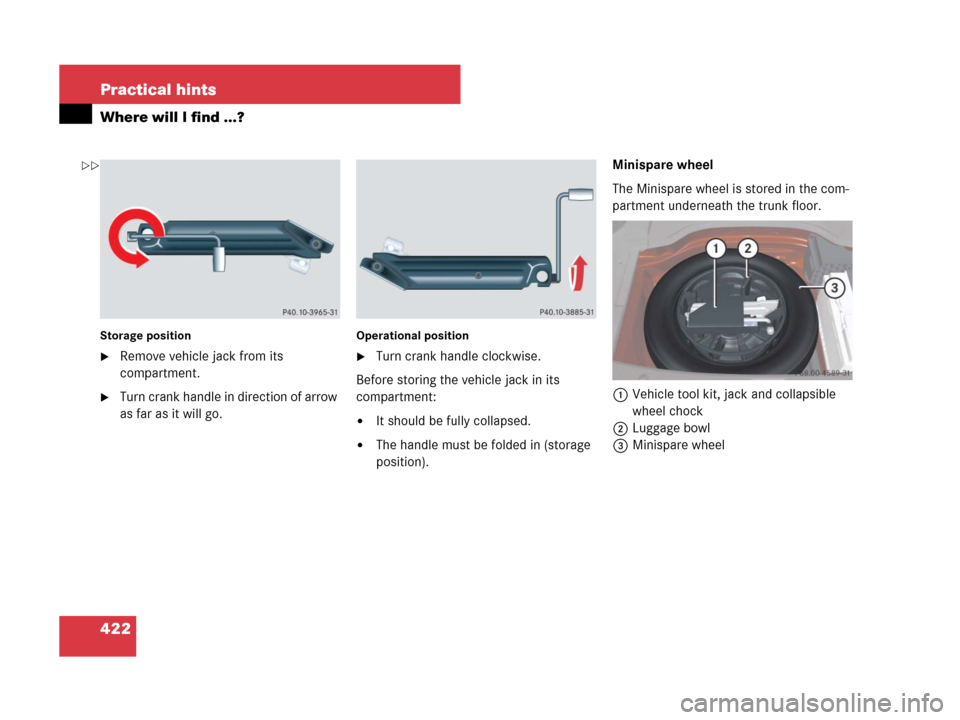
Storage position
�Remove vehicle jack from its
compartment.
�Turn crank handle in direction of arrow
as far as it will go.
Operational position
�Turn crank handle clockwise.
Before storing the vehicle jack in its
compartment:
�It should be fully collapsed.
�The handle must be folded in (storage
position).Minispare wheel
The Minispare wheel is stored in the com-
partment underneath the trunk floor.
1Vehicle tool kit, jack and collapsible
wheel chock
2Luggage bowl
3Minispare wheel
��
Page 424 of 509
423 Practical hints
Where will I find ...?
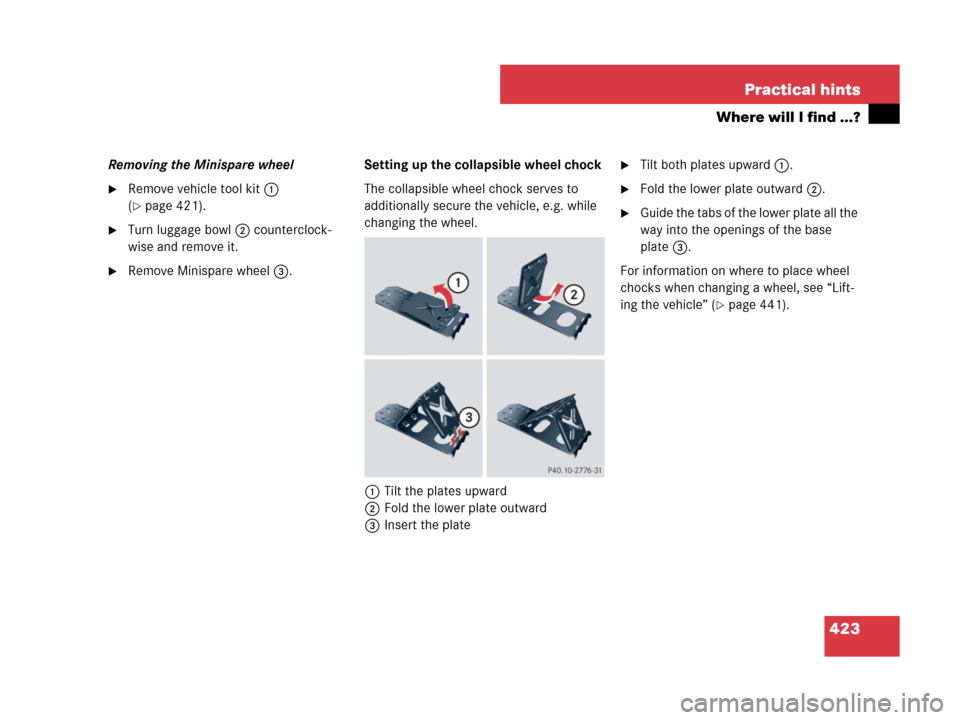
Removing the Minispare wheel
�Remove vehicle tool kit1
(
�page 421).
�Turn luggage bowl2 counterclock-
wise and remove it.
�Remove Minispare wheel3.Setting up the collapsible wheel chock
The collapsible wheel chock serves to
additionally secure the vehicle, e.g. while
changing the wheel.
1Tilt the plates upward
2Fold the lower plate outward
3Insert the plate
�Tilt both plates upward1.
�Fold the lower plate outward2.
�Guide the tabs of the lower plate all the
way into the openings of the base
plate3.
For information on where to place wheel
chocks when changing a wheel, see “Lift-
ing the vehicle” (
�page 441).
Page 425 of 509
424 Practical hints
Unlocking/locking in an emergency
Unlocking the vehicle
If you cannot unlock the vehicle with the
SmartKey or KEYLESS-GO* (Canada only),
unlock the driver’s door and the trunk us-
ing the mechanical key. Removing the mechanical key
1Mechanical key locking tab
2Mechanical key
�Move locking tab1 in the direction of
arrow.
�Slide mechanical key2 out of the
housing.Unlocking the driver’s door
�Insert mechanical key2 into the driv-
er’s door lock until it stops.
�Turn mechanical key2 counterclock-
wise to position 1.
The locking knob moves up, the driver’s
door is unlocked.
�Pull the door handle to open the driv-
er’s door.
iUnlocking the vehicle with the mechanical
key and opening the driver’s door or the trunk
with the mechanical key will trigger the anti-theft
alarm system (
�page 66).
To cancel the alarm, insert the SmartKey or
SmartKey with KEYLESS-GO* (Canada only) in
the starter switch.
1Unlocking
2Mechanical key
Page 426 of 509
 is required to open the trunk lid.
�Insert the mechanical key2 into the
trunk")
425 Practical hints
Unlocking/locking in an emergency
Unlocking the trunk
A minimum height clearance of 5.9 ft
(1.90 m) is required to open the trunk lid.
�Insert the mechanical key2 into the
trunk lid lock until it stops.
�Turn mechanical key2 all the way
counterclockwise to position 2.
The trunk opens.
�Turn the mechanical key2 back and
remove it from the trunk lid lock.
Locking the vehicle
If you cannot lock the vehicle with the
SmartKey or KEYLESS-GO* (Canada only),
do the following:
�Close the front passenger door, the
rear doors and the trunk.
�Open the driver’s door.
�Press the central locking switch on the
driver’s door (
�page 81).
The locking knobs of the front passen-
ger door and the rear doors move
down.
If the vehicle battery is disconnected or
drained:
�Press down the locking knobs of
the front passenger door and the
rear doors manually.
�Exit the vehicle.
�Close the driver’s door.
�Use the mechanical key2 to lock the
vehicle from the outside via the driver's
door. Turn the mechanical key2 to
position1.
�The locking knob of the driver’s door
moves down. The vehicle is locked.
�Check whether the doors and the trunk
are locked.
�If necessary, lock the trunk with the
mechanical key2 (
�page 272).
1Unlocking in an emergency
2Mechanical key
!The trunk lid swings open upwards automat-
ically. Always make sure there is sufficient over-
head clearance.
1Locking
2Mechanical key
��
Page 434 of 509

433 Practical hints
Replacing bulbs
Front lamps halogen-type
1Bulb socket for turn signal lamp bulb
2Housing cover for parking and standing
lamp
3Housing cover for parking and standing
lamp
4Housing cover for high beam headlamp
5Housing cover for low beam headlamp6Bulb socket for parking and standing
lamp bulb
7Bulb holder of high beam bulb
8Bulb holder of low beam bulb
Low beam bulb
�Turn housing cover5 counterclock-
wise and remove it.
�Pull electric plug off the bulb.
�Remove wire clip from bulb holder8
by pushing down and release from ar-
restor hook.
�Pull the bulb at its socket out of bulb
holder8.
�Insert the new bulb so that its socket
locates in the recess of bulb holder8
and is level to it.
�Fold wire clip back and press it down
on bulb holder8 to engage it in the ar-
restor hook.
�Connect electric plug on the bulb.
�Align housing cover5 and turn it
clockwise.
High beam bulb
�Turn housing cover4 counterclock-
wise and remove it.
�Turn bulb holder7 with the bulb coun-
terclockwise and remove it.
�Pull the bulb at its socket out of bulb
holder7.
�Insert the new bulb so that its socket
locates in the recess of bulb holder7
and is level to it.
�Reinsert bulb holder7 with the bulb in
the lamp and turn clockwise.
��
Page 435 of 509

434 Practical hints
Replacing bulbs
�Align housing cover4 and turn it
clockwise.
Front turn signal lamp bulb
1Mark
2Handle
3Bulb socket
�Turn bulb socket3 with handle2
counterclockwise and remove it.
�Press gently onto the bulb and turn
counterclockwise out of bulb
socket3.
�Press the new bulb gently into bulb
socket3 and turn clockwise until it
engages.
�Place bulb socket3 back into the
lamp. Handle2 must be in a horizon-
tal line and mark1 is on the upper
part.
�Turn bulb socket3 clockwise until it
engage.
Parking and standing lamp bulb
�Turn housing cover2 or3 counter-
clockwise and remove it.
�Pull out bulb socket6 with the bulb.
�Pull the bulb out of the bulb socket6.
�Press the new bulb into bulb socket6.
�Press bulb socket6 back into the
lamp.
�Align housing cover2 or3 and turn
it clockwise.Front lamps Bi-Xenon*-type
Warning!G
Do not remove the cover5 for the Bi-Xe-
non* headlamp. Because of high voltage in
Xenon lamps, it is dangerous to replace the
bulb or repair the lamp and its components.
We recommend that you have such work
done by a qualified technician.
��

,
unlock the driver’s door and the trunk")