Page 420 of 509
419 Practical hints
What to do if …?
Display Possible cause/consequencePossible solution
ÊYou are driving with the trunk open.�Close the trunk (�page 270).
WCheck
Washer FluidThe water level has dropped to approx.
1.1 US qts (1.0 l).�Add washer fluid (�page 330).
Page 421 of 509
420 Practical hints
Where will I find ...?
First aid kit
Depending on the equipment configura-
tion, the first-aid kit will be located either in
the open storage department in the trunk
or behind the cover panel on the left-hand
side of the trunk.
1Rotary handle
2Cover
�Opening: Turn the handle1 counter-
clockwise.
�Fold the cover2 downward.
�Remove the first aid kit.Vehicle jack, vehicle tool kit, luggage
bowl, Minispare wheel
The vehicle jack, Minispare wheel, vehicle
tool kit, and the luggage bowl are stored in
the compartment underneath the trunk
floor.
Vehicle tool kit
The vehicle tool kit includes:
�One towing eye bolt
�One wheel wrench
�Collapsible wheel chock
�One pair of gloves
iCheck expiration dates and contents for
completeness at least once a year and replace
missing/expired items.
Page 422 of 509

421 Practical hints
Where will I find ...?
1Tab
2Removing
3Vehicle tool kit, jack and collapsible
wheel chock
4 Opening
5Tab
6Luggage bowl
�Removing: Lift up trunk floor cover
and engage trunk floor handle in upper
edge of trunk.
�Pull tab1 in direction of arrow2 and
lift up vehicle tool kit3.
You can now remove the vehicle tool
kit3 from luggage bowl6.
�Opening: Pull tab5 in direction of
arrow4 and open the vehicle tool kit
cover.
You can now remove the tools and
accessories from vehicle tool kit3.
�Closing: Store the tools and
accessories in vehicle tool kit3.
�Press the vehicle tool kit cover down
until it engage.
�Installing: Slide the vehicle tool kit3
into the recess in luggage bowl6.
�Press vehicle tool kit3 down until
tab1 engage in luggage bowl6.
�Disengage trunk floor handle from up-
per edge of trunk and lower trunk floor.Vehicle jack
!To prevent damage, always disengage trunk
floor handle from trunk lid and lower trunk floor
before closing the trunk.
Warning!G
The jack is designed exclusively for jacking
up the vehicle at the jack take-up brackets
built into both sides of the vehicle. To help
avoid personal injury, use the jack only to lift
the vehicle during a wheel change. Never
get beneath the vehicle while it is supported
by the jack. Keep hands and feet away from
the area under the lifted vehicle. Always
firmly depress the parking brake and block
wheels before raising vehicle with jack.
Do not release the parking brake while the
vehicle is raised. Be certain that the jack is
always vertical (plumb line) when in use,
especially on hills. Always try to use the jack
on level surface. Make sure the jack arm is
fully seated in the jack take-up bracket.
Always lower the vehicle onto sufficient
capacity jackstands before working under
the vehicle.
��
Page 425 of 509
424 Practical hints
Unlocking/locking in an emergency
Unlocking the vehicle
If you cannot unlock the vehicle with the
SmartKey or KEYLESS-GO* (Canada only),
unlock the driver’s door and the trunk us-
ing the mechanical key. Removing the mechanical key
1Mechanical key locking tab
2Mechanical key
�Move locking tab1 in the direction of
arrow.
�Slide mechanical key2 out of the
housing.Unlocking the driver’s door
�Insert mechanical key2 into the driv-
er’s door lock until it stops.
�Turn mechanical key2 counterclock-
wise to position 1.
The locking knob moves up, the driver’s
door is unlocked.
�Pull the door handle to open the driv-
er’s door.
iUnlocking the vehicle with the mechanical
key and opening the driver’s door or the trunk
with the mechanical key will trigger the anti-theft
alarm system (
�page 66).
To cancel the alarm, insert the SmartKey or
SmartKey with KEYLESS-GO* (Canada only) in
the starter switch.
1Unlocking
2Mechanical key
Page 426 of 509
 is required to open the trunk lid.
�Insert the mechanical key2 into the
trunk")
425 Practical hints
Unlocking/locking in an emergency
Unlocking the trunk
A minimum height clearance of 5.9 ft
(1.90 m) is required to open the trunk lid.
�Insert the mechanical key2 into the
trunk lid lock until it stops.
�Turn mechanical key2 all the way
counterclockwise to position 2.
The trunk opens.
�Turn the mechanical key2 back and
remove it from the trunk lid lock.
Locking the vehicle
If you cannot lock the vehicle with the
SmartKey or KEYLESS-GO* (Canada only),
do the following:
�Close the front passenger door, the
rear doors and the trunk.
�Open the driver’s door.
�Press the central locking switch on the
driver’s door (
�page 81).
The locking knobs of the front passen-
ger door and the rear doors move
down.
If the vehicle battery is disconnected or
drained:
�Press down the locking knobs of
the front passenger door and the
rear doors manually.
�Exit the vehicle.
�Close the driver’s door.
�Use the mechanical key2 to lock the
vehicle from the outside via the driver's
door. Turn the mechanical key2 to
position1.
�The locking knob of the driver’s door
moves down. The vehicle is locked.
�Check whether the doors and the trunk
are locked.
�If necessary, lock the trunk with the
mechanical key2 (
�page 272).
1Unlocking in an emergency
2Mechanical key
!The trunk lid swings open upwards automat-
ically. Always make sure there is sufficient over-
head clearance.
1Locking
2Mechanical key
��
Page 427 of 509
426 Practical hints
Unlocking/locking in an emergency
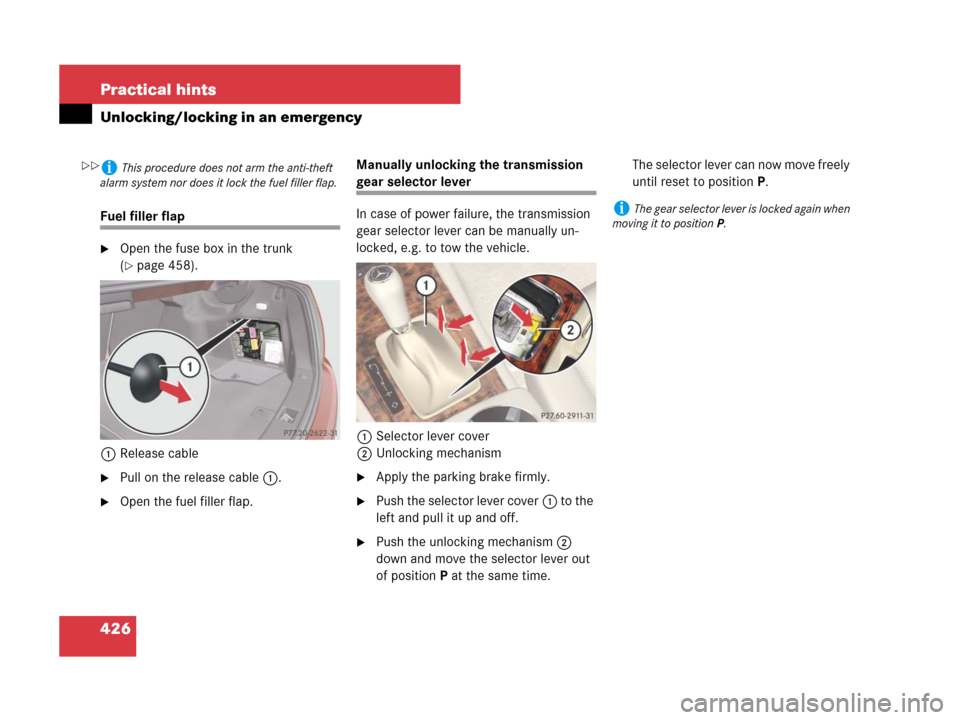
Fuel filler flap
�Open the fuse box in the trunk
(
�page 458).
1Release cable
�Pull on the release cable1.
�Open the fuel filler flap.Manually unlocking the transmission
gear selector lever
In case of power failure, the transmission
gear selector lever can be manually un-
locked, e.g. to tow the vehicle.
1Selector lever cover
2Unlocking mechanism
�Apply the parking brake firmly.
�Push the selector lever cover1 to the
left and pull it up and off.
�Push the unlocking mechanism2
down and move the selector lever out
of positionP at the same time.The selector lever can now move freely
until reset to positionP.
iThis procedure does not arm the anti-theft
alarm system nor does it lock the fuel filler flap.
iThe gear selector lever is locked again when
moving it to positionP.
��
Page 438 of 509

437 Practical hints
Replacing bulbs
Tail lamp unit
�Open trunk lid.
�For driver side: Lift up the bottom and
pull out the trim panel covering the
driver side rear light.
�For passenger side: Open the fuse box
in the trunk (
�page 458).
1Tabs
2Connector
�Disconnect electrical connector2.
�Pull tabs1 in direction of arrows.
�Remove the bulb carrier.1Side marker lamp
2Rear fog lamp (driver’s side)/Side
marker lamp
3Backup lamp
4Brake lamp/tail lamp
5Parking and standing lamp, brake
lamp/tail lamp
6Turn signal lamp
�Press gently onto the respective bulb
and turn counterclockwise out of its
bulb socket.
Side marker lamp1: Turn the bulb
socket on backside of tail lamp unit
counterclockwise and removes side
marker lamp1 with bulb socket
�Press the new bulb gently into its bulb
socket and turn clockwise until it
engages.
Side marker lamp1: Turn the new
bulb with socket on backside of tail
lamp unit clockwise until it engages.
�Reinstall the bulb carrier.
Let tabs1 (
�page 437) engage.
�Connect the electrical connector2
(
�page 437) until it engage.
�Reinstall trim panel.
License plate lamp
Since replacing the license plate lamp
bulbs is a technically highly demanding
process, we recommend you have the li-
cense plate lamp bulbs replaced at an au-
thorized Mercedes-Benz Center.
Page 457 of 509
 and
systems secured by that fuse will stop op-")
456 Practical hints
Fuses
The electrical fuses in your vehicle serve to
switch off malfunctioning power circuits.
If a fuse is blown, the component(s) and
systems secured by that fuse will stop op-
erating.If a newly inserted fuse blows again, have
the cause determined and rectified at an
authorized Mercedes-Benz Center.
A fuse chart explains the fuse allocation
and fuse amperages. It is located in the
main fuse box in the passenger compart-
ment (
�page 457).
The electrical fuses are located in different
fuse boxes:
�Fuse box in passenger compartment
(
�page 457)
�Fuse box in engine compartment
(
�page 457)
�Fuse box in trunk (�page 458)Before replacing fuses:
�Depress the parking brake
(
�page 134).
�Make sure the manual transmission is
in Neutral (
�page 136), automatic
transmission* is set to P (
�page 140).
The gear position indicator in the ta-
chometer display should be on P.
�Turn off all electrical consumers.
�Turn off the engine (�page 134).
�Remove the SmartKey from the starter
switch.
Vehicles with KEYLESS-GO*
(Canada only):
�Open the driver’s door.
Warning!G
Only use fuses approved by Mercedes-Benz
with the specified amperage for the system
in question and do not attempt to repair or
bridge a blown fuse. Using other than ap-
proved fuses or using repaired or bridged
fuses may cause an overload leading to a
fire, and/or cause damage to electrical
components and/or systems. Have the
cause determined and remedied at an au-
thorized Mercedes-Benz Center.
iA blown fuse must be replaced by an appro-
priate spare fuse (recognizable by its color or the
fuse rating given on the fuse) of the amperage
recommended in the fuse chart.
Any Mercedes-Benz Center will be glad to advise
you on this subject.
!Switch off the vehicle’s internal electrical
functions (
�page 448) when you are working on
the fuses.
iIn case of a blown fuse contact Roadside
Assistance or an authorized Mercedes-Benz
Center.


,
unlock the driver’s door and the trunk")