Page 271 of 509

270 Controls in detail
Trunk
Closing trunk Closing trunk from outside manually
1Handles
�Lower trunk lid by pulling firmly on
handles1 or2.
�Close the trunk with hands placed flat
on the trunk lid.
iDo not place the SmartKey in the open
trunk. You may lock yourself out.
iIf the vehicle was previously centrally
locked, the trunk will lock automatically after
closing it. All turn signal lamps flash three times
and an acoustic signal sounds three times to
confirm locking.
Vehicles with KEYLESS-GO* (Canada only): To
prevent a possible inadvertent lockout, the trunk
will open automatically if a SmartKey with
KEYLESS-GO* (Canada only) is recognized
inside the vehicle or in the trunk.
The vehicle is only locked when the turn signals
flash three times and an acoustic signal sounds
three times. If you are carrying a second
SmartKey with KEYLESS-GO* (Canada only) with
you, you can still lock the vehicle.
Warning!G
To prevent possible personal injury, always
keep hands and fingers away from the trunk
lid opening when closing the trunk. Be espe-
cially careful when small children are
around.
When leaving the vehicle, always remove the
SmartKey or SmartKey with KEYLESS-GO*
(Canada only) from the starter switch, take
it with you, and lock the vehicle. Do not
leave children unattended in the vehicle, or
with access to an unlocked vehicle. A child’s
unsupervised access to a vehicle could re-
sult in an accident and/or serious personal
injury.
Page 272 of 509
271 Controls in detail
Trunk
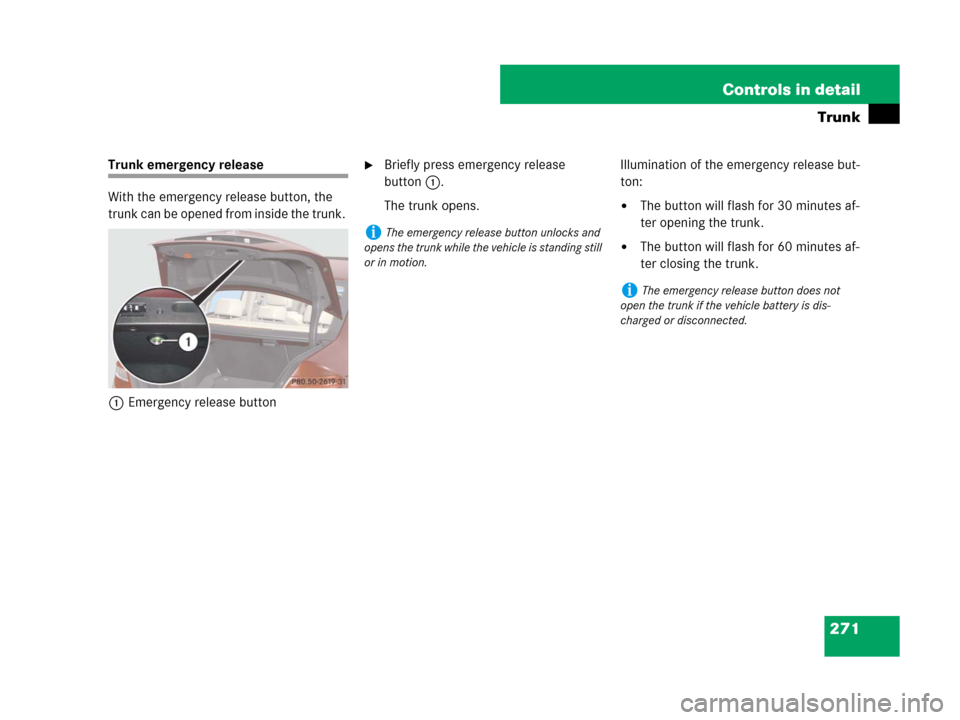
Trunk emergency release
With the emergency release button, the
trunk can be opened from inside the trunk.
1Emergency release button�Briefly press emergency release
button1.
The trunk opens.Illumination of the emergency release but-
ton:
�The button will flash for 30 minutes af-
ter opening the trunk.
�The button will flash for 60 minutes af-
ter closing the trunk.iThe emergency release button unlocks and
opens the trunk while the vehicle is standing still
or in motion.
iThe emergency release button does not
open the trunk if the vehicle battery is dis-
charged or disconnected.
Page 273 of 509
272 Controls in detail
Trunk
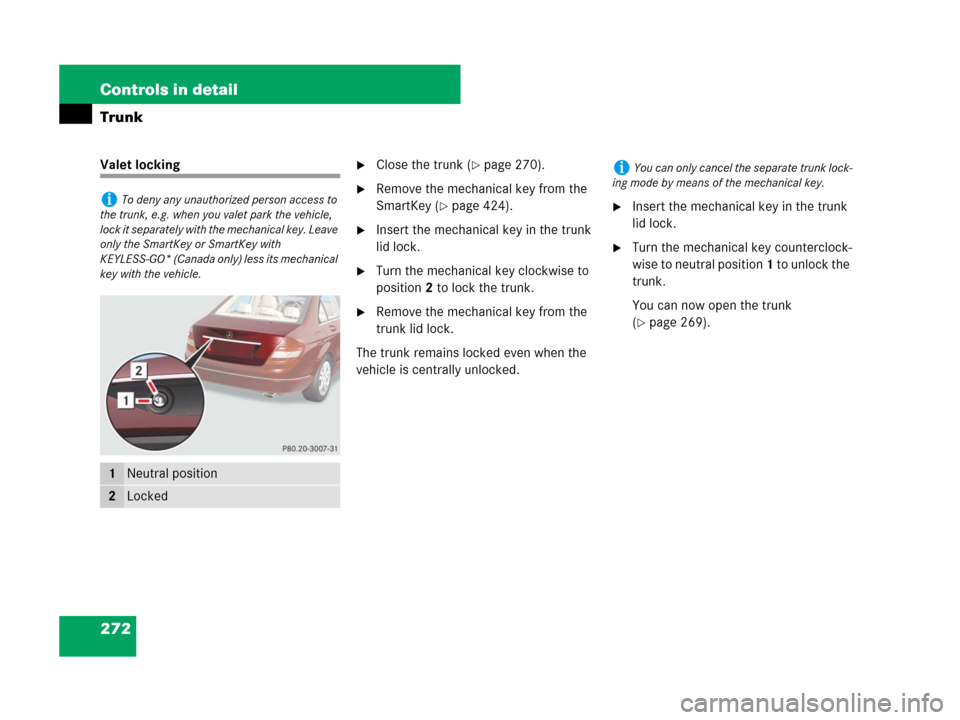
Valet locking�Close the trunk (�page 270).
�Remove the mechanical key from the
SmartKey (
�page 424).
�Insert the mechanical key in the trunk
lid lock.
�Turn the mechanical key clockwise to
position 2 to lock the trunk.
�Remove the mechanical key from the
trunk lid lock.
The trunk remains locked even when the
vehicle is centrally unlocked.
�Insert the mechanical key in the trunk
lid lock.
�Turn the mechanical key counterclock-
wise to neutral position 1 to unlock the
trunk.
You can now open the trunk
(
�page 269).
iTo deny any unauthorized person access to
the trunk, e.g. when you valet park the vehicle,
lock it separately with the mechanical key. Leave
only the SmartKey or SmartKey with
KEYLESS-GO* (Canada only) less its mechanical
key with the vehicle.
1Neutral position
2Locked
iYou can only cancel the separate trunk lock-
ing mode by means of the mechanical key.
Page 281 of 509

280 Controls in detail
Loading and storing
Roof rack*
1Covers�Flip the covers1 upward in direction
of arrow.
Vehicles with panorama roof with
tilt/sliding panel*: Open the cover 1
carefully in the opposite direction to
that indicated by the arrow.
�Only attach the roof-rack system to the
anchorage points under the covers.
Observe manufacturer’s instructions
for installation.
Warning!G
Only use roof racks approved by
Mercedes-Benz for your vehicle model to
avoid damage to the vehicle.
Follow the manufacturer’s installation
instructions. Otherwise, an improperly
attached roof rack system or its load could
become detached from the vehicle.
Do not exceed the maximum roof load of
220 lb (100 kg).
Take into consideration that when the roof
rack is loaded, the handling characteristics
are different from those when operating the
vehicles without the roof rack loaded.
!Load the roof rack in such a way that the ve-
hicle cannot be damaged while driving.
Make sure
�you can fully raise tilt/sliding sunroof or the
panorama roof with tilt/sliding panel*
�you can fully open the trunk
Page 282 of 509
281 Controls in detail
Loading and storing
Split rear bench seat*
To expand the cargo area, you can fold
down the left and right rear seat backrests.
The two sections can be folded down
separately.Folding the backrest forward
The release handles1 is located in the
trunk.
1Release handle
�Open the trunk.
�Pull on left and/or right release
handle1.
�Fully retract the head restraints
(
�page 89).
�If necessary, pull the driver's and/or
front-passenger seat forward.2Rear seat backrests
�Fold rear seat backrests2 forward.
Warning!G
When expanding the luggage compartment,
always fold the seat cushions fully forward.
Unless you are transporting cargo, the back-
rests must remain properly locked in the up-
right position.
In an accident, during hard braking or sud-
den maneuvers, loose items will be thrown
around inside the vehicle, and cause injury
to vehicle occupants unless the items are
securely fastened in the vehicle.
Page 284 of 509

283 Controls in detail
Loading and storing
Always place items being carried against
front or rear seat backrests, and fasten
them as securely as possible.
The heaviest portion of the cargo should al-
ways be kept as low as possible since it in-
fluences the handling characteristics of
the vehicle.Storage compartments
Warning!G
Always fasten items being carried as secure-
ly as possible using cargo tie-down hooks
and fastening materials appropriate for the
weight and size of the load.
In an accident, during hard braking or sud-
den maneuvers, loose items will be thrown
around inside the vehicle and can cause in-
jury to vehicle occupants unless the items
are securely fastened in the vehicle.
To help avoid personal injury during a colli-
sion or sudden maneuver, exercise care
when transporting cargo. Put luggage or car-
go in the trunk if possible.
Do not pile luggage or cargo higher than the
seat backs. Do not place anything on the
rear-window shelf.
Never drive vehicle with trunk open. Deadly
carbon monoxide (CO) gases may enter ve-
hicle interior resulting in unconsciousness
and death.
iThe trunk is the preferred place to carry ob-
jects.
The enlarged cargo area should only be used for
items which do not fit in the trunk alone.
Warning!G
To help avoid personal injury during a colli-
sion or sudden maneuver, exercise care
when storing objects in the vehicle. Put lug-
gage or cargo in the trunk if possible. Do not
pile luggage or cargo higher than the seat
backs.
Parcel nets cannot secure hard or heavy ob-
jects.
Keep compartment lids closed. This will help
to prevent stored objects from being thrown
about and injuring vehicle occupants during
�braking
�vehicle maneuvers or
�an accident.
iAn overview of the storage compartments
can be found on (
�page 22).
Page 289 of 509
288 Controls in detail
Loading and storing
�Closing: Open the armrest storage
compartment.
�Swing cup holder2 backward until it
engaged.
Trunk
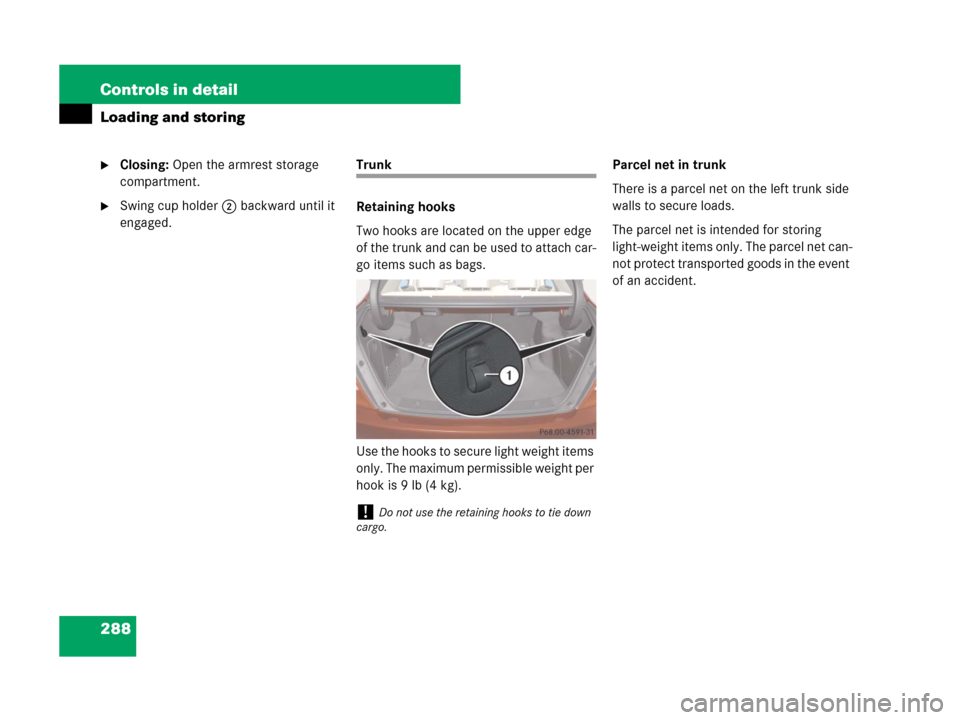
Retaining hooks
Two hooks are located on the upper edge
of the trunk and can be used to attach car-
go items such as bags.
Use the hooks to secure light weight items
only. The maximum permissible weight per
hook is 9 lb (4 kg).Parcel net in trunk
There is a parcel net on the left trunk side
walls to secure loads.
The parcel net is intended for storing
light-weight items only. The parcel net can-
not protect transported goods in the event
of an accident.
!Do not use the retaining hooks to tie down
cargo.
Page 319 of 509
.
Standing waterPassenger compartment
Driving abroad
Abroad, there is an extensive
Mer")
318 Operation
Driving instructions
For more information on winter driving, see
“Winter driving” (
�page 360).
Standing waterPassenger compartment
Driving abroad
Abroad, there is an extensive
Mercedes-Benz service network at your
disposal. If you plan to drive into areas
which are not listed in the index of your
Mercedes-Benz Center directory, you
should request pertinent information from
an authorized Mercedes-Benz Center.
Warning!G
If the vehicle becomes stuck in snow, make
sure that snow is kept clear of the exhaust
pipe and from around the vehicle while the
engine is running. Otherwise, deadly carbon
monoxide (CO) gases may enter vehicle in-
terior resulting in unconsciousness and
death.
To assure sufficient fresh air ventilation,
open a window slightly on the side of the ve-
hicle not facing the wind.
Warning!G
The outside temperature indicator is not de-
signed to serve as an ice-warning device and
is therefore unsuitable for that purpose. In-
dicated temperatures just above the freez-
ing point do not guarantee that the road
surface is free of ice.
!Do not drive through flooded areas or water
of unknown depth. Before driving through water,
determine its depth. Never accelerate before
driving into water. The bow wave could force wa-
ter into the engine and auxiliary equipment, thus
damaging them.
If you must drive through standing water, drive
slowly to prevent water from entering the pas-
senger compartment or the engine compart-
ment. Water in these areas could cause damage
to electrical components or wiring of the engine
or transmission, or could result in water being in-
gested by the engine through the air intake caus-
ing severe internal engine damage. Any such
damage is not covered by the Mercedes-Benz
Limited Warranty.
Warning!G
Always fasten items being carried as secure-
ly as possible.
In an accident, during hard braking or sud-
den maneuvers, loose items will be thrown
around inside the vehicle, and cause injury
to vehicle occupants unless the items are
securely fastened in the vehicle.
The trunk is the preferred place to carry
objects.