Page 167 of 509

166 Controls in detail
Control system
Resetting all settings
You can reset most of the functions of the
submenus to the factory settings.
�Press ( or & to select the
Settings menu.
�Press % or $ to select the
Factory settings function.
�Press #.
The menu
Reset to factory settings
No/Yes
appears in the multifunction
display.
�Press % or $ to select Yes or No.
Select
Yes if you want to reset to facto-
ry settings.
�Press # to confirm.
The confirmation message appears in
the multifunction display.
The functions of the submenus will re-
set to factory settings.
Submenus in the Settings menu
�Press ( or & to select the Set-
tings
menu.
�Press % or $ to select a sub-
menu.The submenus are arranged by hierarchy.
Scroll down with%, scroll up
with$.
With the selection marker on the desired
submenu, use the# to access the indi-
vidual functions within that submenu.
Once within the submenu, you can use
the$ to move to the next function or
the% to move to the previous function
within that submenu.
The table below shows what settings can
be changed within the various submenus.
Detailed instructions on making individual
settings can be found on the following
pages.
iFor safety reasons, the following function
are not reset while driving:
�the Headlamp mode function in the Light-
ing
submenu
Page 173 of 509

172 Controls in detail
Control system
Depending on the previous status, the
daytime running lamps feature will be
Enabled orDisabled.
With
Daytime Running Lamps mode En-
abled
selected and the exterior lamp
switch at position M or *, the low
beam headlamps are switched on when
the engine is running.
In low ambient light conditions the follow-
ing lamps will switch on additionally:
�Parking lamps
�Tail lamps
�License plate lamps
�Side marker lamps
also illuminates the instrument cluster.
For more information on the daytime run-
ning lamp mode (
�page 110).Setting locator lighting
�Press % or $ to select the
Lights submenu.
�Press #.
�Press % or $ to select the Sur-
round Lighting
feature.
�Press #.
The current setting
Enabled
or
Disabled is shown.
�Press # again if you would like to
change the current status.
Depending on the previous status, the
locator lighting feature will be
Enabled
or
Disabled.
With the locator lighting feature activated
and the exterior lamp switch in
positionU, the following lamps will
switch on during darkness when the vehi-
cle is unlocked with the SmartKey:
�Parking lamps
�Tail lamps
�License plate lamps
�Side marker lamps
�Front fog lamps
also illuminates the instrument cluster.
iIf you turn the exterior lamp switch to anoth-
er position, the corresponding lamp(s) will
switch on.
iMake sure the light switch is set toB
or* when you switch off the daytime running
lamps while driving at night.
iFor safety reasons, resetting the Lights
submenu to factory settings (
�page 165) while
driving will not deactivate the daytime running
lamp mode.
The following message appears in the
multifunction display:
Lighting - Cannot be completely reset
to factory settings while driving.
��
Page 186 of 509
185 Controls in detail
Audio system
Menu
The illustration below shows the structure
of the modes and their menus.Each mode has a basic menu. In the menu
line of the basic menu display are several
menu items listed.Each menu item in turn has several sub-
menu items.
ButtonMode/Basic menuMenuPage
bRadioRadio (FM/AM)194
Weather Band194
Sat Radio*200
Presets198
Sound189
éDiscCD/MP3208
Track list/folder list219
CD changer*214
Sound189
hTelephone*Telephone*222
Name233
Call lists236
êSystemSystem192
Language193
Page 193 of 509

192 Controls in detail
Audio system
SYS menu
SYS settings menu overviewDisplay settings
You can adapt the brightness of the audio
display to the prevailing light conditions.
Setting the display design
�ê � System � Display.
�Select Brightness, Day Mode, Night
Mode
or Automatic.Bluetooth
® settings
General information about Bluetooth
®
Bluetooth® technology is the standard for
short-range wireless technologies, suitable
for transmitting voice and data. It is possi-
ble to connect Bluetooth
® devices wire-
lessly. Bluetooth® can be used to
exchange vCards or make calls using a
hands-free device.
Bluetooth
® technology uses the freely
available ISM (Industrial Scientific Medi-
cal) wireless network that works at
2.45 GHz. Ranges of up to ten meters are
possible with Bluetooth
®.
MenuPage
System
Display
Brightness
Day Mode
Night Mode
Automatic
192
Activate Bluetooth®192
Reset 193
Language193
iWhen you select Brightness, a scale ap-
pears on which you can set the brightness
manually.
In the
Automatic setting, the audio system an-
alyzes the automatic vehicle light sensor and
switches between the display designs automati-
cally.
Page 194 of 509

193 Controls in detail
Audio system
Activate or deactivate Bluetooth®
�ê � System � Activate Blue-
tooth
.
You have activated or deactivated
Bluetooth
®. A checkmark appears
when Bluetooth® is activated.Reset
�ê � System � Reset.
A prompt appears asking whether you
really want to reset.
�Select Yes or No.
If you select
Yes another prompt will
appear asking whether you really want
to reset.
�Select Yes or No.
If you select
Yes, the audio system will
be reset and restarted.Setting the system language
�ê � Language.
The language list appears. A dot R in
front of an entry indicates the current
setting.
�To change the setting: Slidermq or
rotateymz and select desired lan-
guage.
�To save setting: Press n.
The setting is stored and the menu is
exited.
�To exit menu without saving: Press
button í or slideomp.
iYou can reset the audio system back to its
factory settings.
In this case, all personal data (e.g. address book
entries), among other things, are deleted.
We recommend that you reset the values, for
example, before selling your vehicle.
��
Page 196 of 509
195 Controls in detail
Audio system
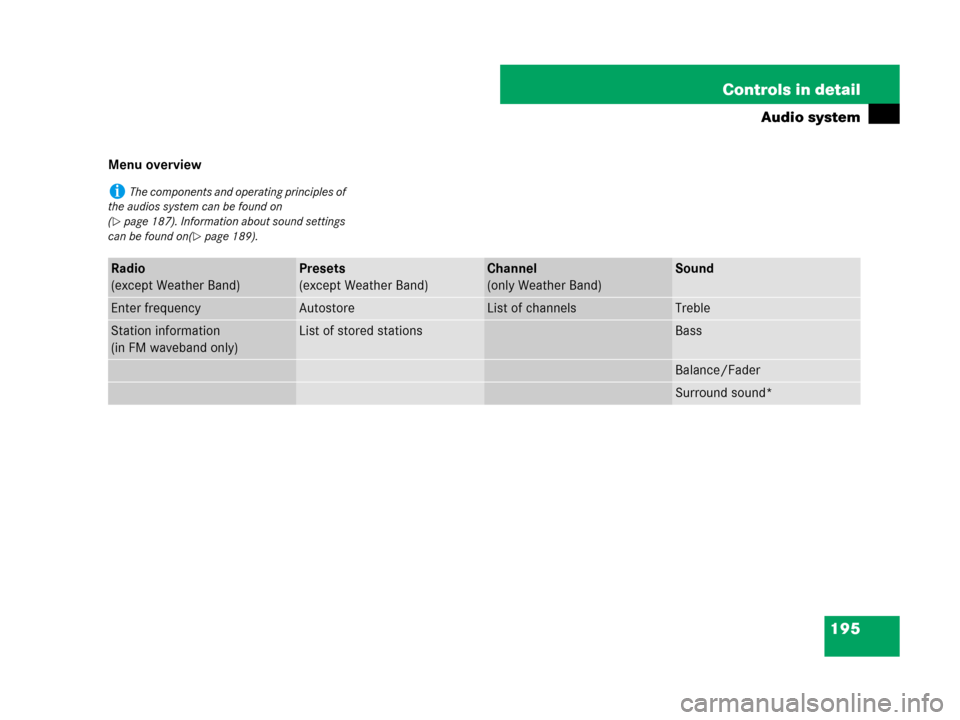
Menu overview
iThe components and operating principles of
the audios system can be found on
(
�page 187). Information about sound settings
can be found on(
�page 189).
Radio
(except Weather Band)Presets
(except Weather Band)Channel
(only Weather Band)Sound
Enter frequencyAutostoreList of channelsTreble
Station information
(in FM waveband only)List of stored stationsBass
Balance/Fader
Surround sound*
Page 198 of 509

�Station memory
(except Weather")
197 Controls in detail
Audio system
Selecting a station/channel
You have the following selection options:
�The station search function
�The channel list
(Weather Band)
�Station memory
(except Weather Band)
�The manual frequency entry
(except Weather Band)
The station search proceeds in the
following frequency increments:
�200 kHz in FM range
�10 kHz in AM range
Tuning to a station/channel via
station/channel search function
�Press buttonb on audio control
unit repeatedly until the FM/AM/WB
waveband is selected.
�Slide omp or rotate ymz when the
main area in the basic menu is active.
Depending on the direction in which
the controller is being slid or rotated,
the system searches upward or down-
ward and stops at the next receivable
station/channel.
or
�Press buttonG or H on audio
control unit.
Depending on the pressed button, the
system searches upward or downward
and stops at the next receivable
station/channel.Selecting a station using station
memory
�Press b button on audio control
unit repeatedly until desired waveband
has been selected.
�Select Presets.
or
�Press n when the main area is
selected.
The memory menu appears. The dot R
in front of a memory position indicates
that the currently selected station is
saved there.
�Select station in memory by rotating
ymz or sliding qmr and press n.
or
�Press desired station button1 to
R, with the keypad in audio control
unit briefly.
iThe search function searches for the next
receivable station in the FM or AM waveband.
In Weather Band (WB) the search function
switches to the next channel in the channel list.
For tuning to a station/channel you can also use
the buttons on the multifunction steering wheel
(
�page 159).
iThis function is not available for Weather
Band.
Page 199 of 509

198 Controls in detail
Audio system
Tuning to a station by entering the fre-
quency manually
�b� Radio � Enter Frequency
The menu for manual frequency entry
appears.
or
�Press buttonó, on the keypad in
audio control unit briefly.
�Enter frequency with keypad:
Enter desired frequency with
buttons1to R, with the keypad
in audio control unit briefly.
The audio system tunes in to the fre-
quency entered.
�Exiting menu without making an en-
try: Press button í in the center
console (
�page 184).Storing stations
You can store ten AM and ten FM stations
in the memory.
Storing stations manually with keypad
�Tune in desired station.
Basic menu is shown in the audio
display.
�Press and hold desired station
button1 to R until a brief signal
tone sounds.
The station is stored.
iThis function is not available for Weather
Band.
iIt is not possible to enter a frequency in the
respective waveband which is outside the fre-
quency range.
iIf you select a memory preset which is al-
ready in use, it will be overwritten by the new
station.