Page 188 of 509

187 Controls in detail
Audio system
Example of how to use the audio
system
Example: direct frequency input,
FM 104.5 MHz.
In the descriptions below, the mode always
serve as the starting point for locating the
individual menu items.
Example:
b�
Radio � Enter Frequency
The individual steps for the above-men-
tioned example are described below.
�Press buttonb on audio control
unit repeatedly until desired waveband
FM has been selected.
�Switching to the menu bar:
Slidemr.
�Selecting “Radio” in the menu bar:
Slideomor rotate ymz.
�Confirming selection: Press n.
The
Radio menu is selected and a list of
submenus appears.
�Selecting “Enter Frequency” in the
“Radio” menu: Slidemr.
�Confirming selection: Press n.
The
Enter Frequency submenu ap-
pears.
�Enter 1045 with the keypad on the au-
dio control unit.
The audio system tunes in to the
frequency entered.
iIt is not possible to enter a frequency in the
respective waveband which is outside the fre-
quency range. Frequencies within the current
frequency range, but outside the current fre-
quency step width are rounded to the next lower
allowed frequency.
Page 189 of 509

188 Controls in detail
Audio system
Operation
In the following descriptions, an operation
step is described as in example below.
�b� Radio � Enter Frequency
is the short for
�Press buttonb on audio control
unit repeatedly until desired waveband
has been selected.
�Slidemr.
�Slideomor rotate ymz the audio con-
troller to select
Radio.
�Press the audio controller n.
The
Radio menu is selected and a list of
submenus appears.
�Slideqmor rotate ymz the audio con-
troller to select
Enter Frequency.
�Press the audio controller n.
The
Enter Frequency submenu is
selected and appears in the audio
display.Switching audio system on or off
Rotary control/push buttono
1Push buttono
2Rotary control
�Switching on: Press push
buttono.
or
�Open the audio display cover.
or
�If the audio system was on as you
switched off the ignition, turn the
SmartKey in the starter switch to
position2.The audio system will come back on
with the last selected function.
�Switching off: Press push
buttono.
or
�Turn the SmartKey in the starter switch
to position0.
iIf the audio system is switched on without
the SmartKey in the starter switch, it will
automatically switch off again after
approximately 30 minutes.
If your vehicle is equipped with a telephone*, the
audio display may prompt you to enter your PIN
(GSM network) or passcode (CDMA network).
iShould excessively high temperatures occur
while the audio system is being operated,
HIGH TEMP will appear in the audio display, after
which the audio system will be switched off for a
cooling-down period.
iWhen you switch off the audio system, you
also switch off the currently playing audio source
and the telephone* operating via audio control
unit is not possible.
Page 191 of 509

190 Controls in detail
Audio system
Example Bass
�To change setting: Slide rmq or
rotateymz until desired treble or bass
setting is reached.
�To save setting: Press n.
The setting is stored and the menu is
exited.
�To exit menu without saving: Press
button í or slideomp.Adjusting balance or fader
Balance is used to determine whether the
sound focus should be shifted toward the
driver’s side or the passenger’s side.
Fader is used to determine whether the
sound focus should be shifted toward the
front or rear of the vehicle
�Select Sound � Bal/Fad.
The current setting is indicated by an
red cross-hair symbol.
Adjusting balance and fader
�To change setting: Slide rmq or omp
until desired balance/fader setting is
achieved.
�To save setting: Press n.The setting is stored and the menu is
exited.
�To exit menu without saving: Press
button í.
Surround sound* (Canada only)
If your vehicle is equipped with the har-
mann/kardon LOGIC7
® Surround Sound
system, you can choose between
LOGIC7®
On
and LOGIC7® Off for surround sound.
Harman/kardon LOGIC7
® Surround Sound
is available for the following operating
modes:
�Radio (FM only)
�Sat*
�CD audio
�MP3
�AUX
��
Page 192 of 509

191 Controls in detail
Audio system
Adjusting surround sound
With surround sound, you can choose be-
tween
LOGIC7® On and LOGIC7® Off.
�Select Sound � Sound.
A dot R indicates the current setting.
�To select a setting: Slidermq or
rotateymz.
�To save setting: Press n.
The setting is stored and the menu is
exited.
�To exit menu without saving: Press
button í or slideomp.
iThe LOGIC7® On function of the
harman/kardon LOGIC7® Surround Sound sys-
tem permits the playback of discrete 5.1 and ste-
reo recordings with an optimal surround sound
platform for each passenger.
The LOGIC7
® distributes the 5.1 surround infor-
mation over the 13-channel system architecture
to provide the optimum sound experience from
all seats. This produces the sound characteristic
as intended by the sound engineer during the
original recording.
Harman/kardon LOGIC7
® converts all two-chan-
nel stereo sound material into multi-channel sur-
round sound. The surround information stored
during the original recording is read out using
LOGIC7
® and likewise distributed over the
13 channels. No effects are created during this
process; only that which was already there be-
comes audible.
In addition, harman/kardon LOGIC7
® moves the
perceived sound source away from the individual
loudspeakers, thus generating a natural 360°
sound experience for each passenger.
iBy selecting LOGIC7® Off, all compatible
formats are played back as they are present on
the medium. Due to the vehicle’s spatial charac-
teristics, an optimal sound experience is not en-
sured from all seats.
iBalance and fader will be set to the default
value (0/0) automatically by activating or deacti-
vating LOGIC7
®.
iPlease note the following:
�For an optimal sound experience from all
seats, the balance and fader should be ad-
justed to the center of the passenger com-
partment with LOGIC7
® switched on.
�The best sound results are achieved when
playing high-quality audio CDs.
�For MP3 tracks, the bit rate should be at
least 128 kbit/s.
�Surround playback cannot be activated in
mono-signal sources as AM or Weatherband.
It will not function for mono-signal sources
as, e.g. mono audio tracks on some specific
audio CDs.
�In the case of poor radio reception quality,
e.g. in tunnels, LOGIC7® should be switched
off, as otherwise a dynamic switchover from
stereo to mono and thus temporary sound
characteristic shifts can occur.
�With certain stereo recordings, the resulting
sound characteristic may deviate from con-
ventional stereo playback.
Page 195 of 509
194 Controls in detail
Audio system
Radio operation
The radio mode is interrupted by an
incoming call on the telephone*
(
�page 222).
iThe language select in the Audio system is
also used for the displays and messages in the
multifunction display.
Available languages:
�German
�English
�Spanish
�French
�Italian
Warning!G
Please devote your attention first and fore-
most to the traffic situation you are in.
Before your journey, please familiarize your-
self with the radio functions.
Only use the audio system when road and
traffic conditions permit you to do so. Other-
wise you could be involved in an accident in
which you or others could be injured.
!Do not attach metallic film to the inside or
outside of windows which are fitted with an aeri-
al. Obstructing the metallic aerial structure on
the window will interfere with radio reception.
Cutting the film on the window can permanently
damage the aerial wires.��
Page 196 of 509
195 Controls in detail
Audio system
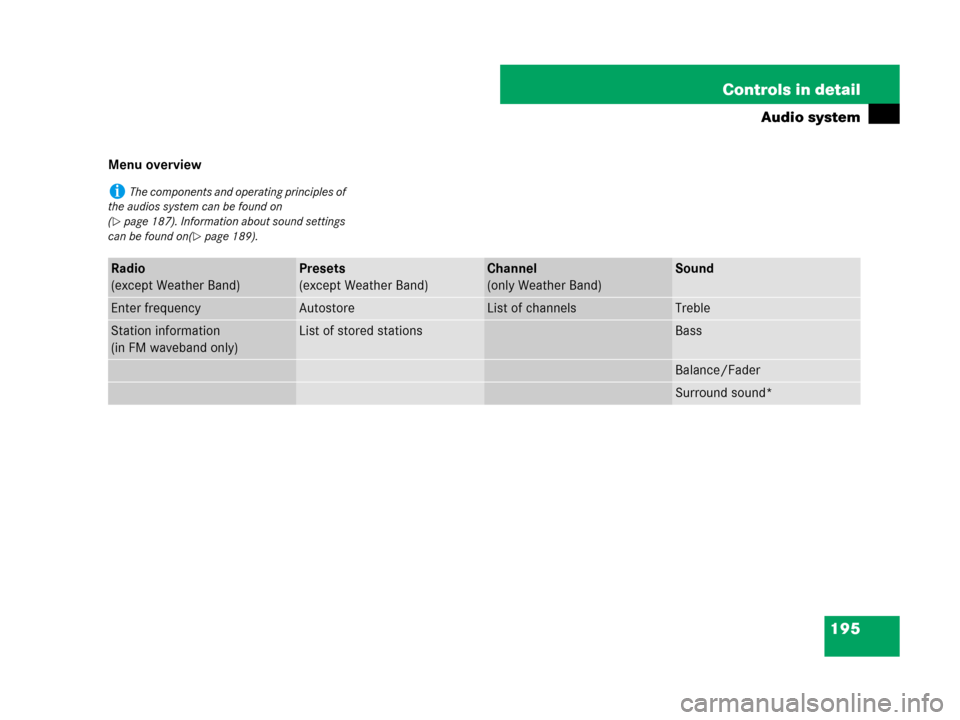
Menu overview
iThe components and operating principles of
the audios system can be found on
(
�page 187). Information about sound settings
can be found on(
�page 189).
Radio
(except Weather Band)Presets
(except Weather Band)Channel
(only Weather Band)Sound
Enter frequencyAutostoreList of channelsTreble
Station information
(in FM waveband only)List of stored stationsBass
Balance/Fader
Surround sound*
Page 197 of 509

196 Controls in detail
Audio system
Switching to radio mode
�Press buttonb on audio control
unit.
The radio basic menu appears in the
audio display once you have switched
to radio mode. You will hear the
station/channel last tuned in the previ-
ously selected waveband, provided
that the station/channel can be re-
ceived.
Illustration: radio mode in FM waveband
1Status line
2Station name
3Store position of station
4Main area with wavebandInformation displayed in the status line
(example)
The following information is displayed in
the status line:
�Time (04:38)
�Station name (WNYC)
Mobile phone readiness is indicated by
additional information being shown:
�Mobile phone network signal
strengthI
�Receiver symbol 4 ö.Calling up wavebands
You can choose from among the FM, AM
and WB wavebands and then request the
Sat mode*. Pressing again will switch back
to FM radio mode.
�Press buttonb on audio control
unit repeatedly until desired waveband
has been selected.
The FM, AM, and WB wavebands and
the satellite radio* mode are called up
one after another.
The waveband currently selected
appears in the status line of the audio
display. The last selected station in the
selected waveband is heard.
iStation names 3, available for the FM
waveband, can only be seen when the station
transmits a name.
In the WB waveband, the audio system displays
the channel number, e. g. Channel 6, instead of
the station names and/or frequency.
WavebandFrequency
WB (Weather Band)Weather channels
FM87.7......107.9 MHz
AM530.......1 710 KHz
Page 199 of 509

198 Controls in detail
Audio system
Tuning to a station by entering the fre-
quency manually
�b� Radio � Enter Frequency
The menu for manual frequency entry
appears.
or
�Press buttonó, on the keypad in
audio control unit briefly.
�Enter frequency with keypad:
Enter desired frequency with
buttons1to R, with the keypad
in audio control unit briefly.
The audio system tunes in to the fre-
quency entered.
�Exiting menu without making an en-
try: Press button í in the center
console (
�page 184).Storing stations
You can store ten AM and ten FM stations
in the memory.
Storing stations manually with keypad
�Tune in desired station.
Basic menu is shown in the audio
display.
�Press and hold desired station
button1 to R until a brief signal
tone sounds.
The station is stored.
iThis function is not available for Weather
Band.
iIt is not possible to enter a frequency in the
respective waveband which is outside the fre-
quency range.
iIf you select a memory preset which is al-
ready in use, it will be overwritten by the new
station.