Page 178 of 509

177 Controls in detail
Audio system
Operating safetyAudio system components
With the audio system you can operate the
following main functions:
�audio function with the radio, Sat*,
disc (CD audio or MP3 mode)
�the telephone* with the phone book
�various system settings
The audio system consists of the following:
�audio control unit
�audio display
�audio controller with back and delete
button
In addition, the audio system can also be
operated with the multifunction steering
wheel (
�page 152).
In these instructions, the keypad (right
side of audio control unit) and the function
buttons are referred to as “buttons”.Audio control unit
With the audio control unit you can:
�switch the audio system on/off
�adjust the volume
�select the operating modes
�enter telephone numbers and accept,
reject, initiate and end telephone calls
�load and eject CDs
Warning!G
Any alterations made to electronic
components can cause malfunctions.
The radio, amplifier, CD changer*, satellite
radio*, and telephone* are interconnected.
When one of the components is not opera-
tional or has not been removed/replaced
properly, the function of other components
may be impaired.
This condition might seriously impair the
operating safety of your vehicle.
We recommend that you have any service
work on electronic components carried out
at an authorized Mercedes-Benz Center.
Page 180 of 509
179 Controls in detail
Audio system
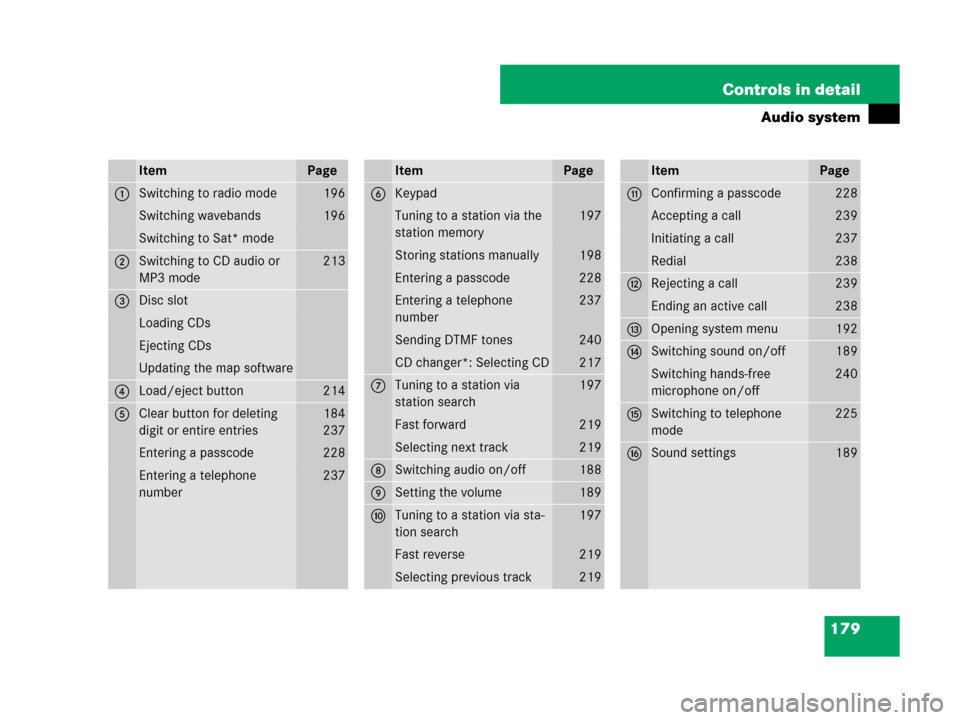
ItemPage
1Switching to radio mode196
Switching wavebands196
Switching to Sat* mode
2Switching to CD audio or
MP3 mode213
3Disc slot
Loading CDs
Ejecting CDs
Updating the map software
4Load/eject button214
5Clear button for deleting
digit or entire entries184
237
Entering a passcode228
Entering a telephone
number237
ItemPage
6Keypad
Tuning to a station via the
station memory197
Storing stations manually198
Entering a passcode228
Entering a telephone
number237
Sending DTMF tones240
CD changer*: Selecting CD217
7Tuning to a station via
station search197
Fast forward219
Selecting next track219
8Switching audio on/off188
9Setting the volume189
aTuning to a station via sta-
tion search197
Fast reverse219
Selecting previous track219
ItemPage
bConfirming a passcode228
Accepting a call239
Initiating a call237
Redial238
cRejecting a call239
Ending an active call238
dOpening system menu192
eSwitching sound on/off189
Switching hands-free
microphone on/off240
fSwitching to telephone
mode225
gSound settings189
Page 181 of 509
180 Controls in detail
Audio system
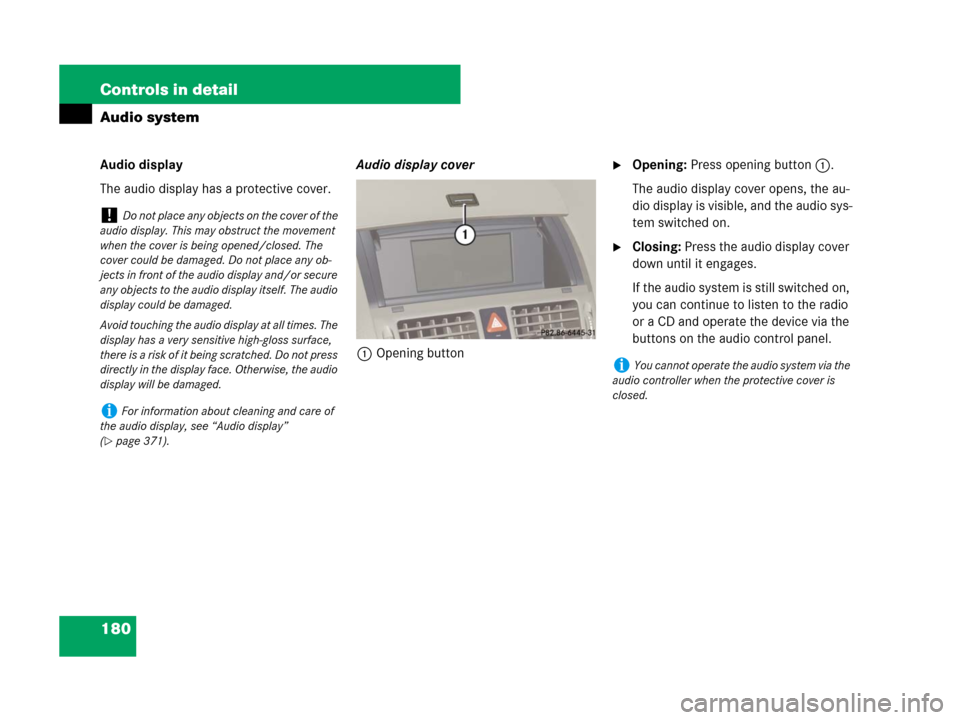
Audio display
The audio display has a protective cover.Audio display cover
1Opening button�Opening: Press opening button1.
The audio display cover opens, the au-
dio display is visible, and the audio sys-
tem switched on.
�Closing: Press the audio display cover
down until it engages.
If the audio system is still switched on,
you can continue to listen to the radio
or a CD and operate the device via the
buttons on the audio control panel.
!Do not place any objects on the cover of the
audio display. This may obstruct the movement
when the cover is being opened/closed. The
cover could be damaged. Do not place any ob-
jects in front of the audio display and/or secure
any objects to the audio display itself. The audio
display could be damaged.
Avoid touching the audio display at all times. The
display has a very sensitive high-gloss surface,
there is a risk of it being scratched. Do not press
directly in the display face. Otherwise, the audio
display will be damaged.
iFor information about cleaning and care of
the audio display, see “Audio display”
(
�page 371).
iYou cannot operate the audio system via the
audio controller when the protective cover is
closed.
Page 182 of 509
181 Controls in detail
Audio system
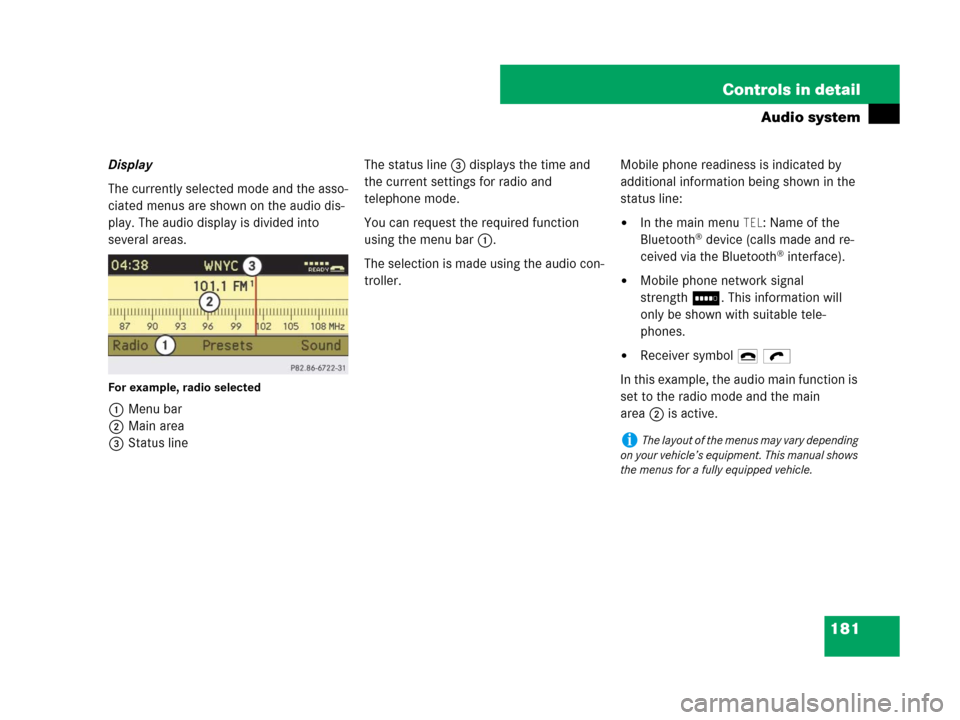
Display
The currently selected mode and the asso-
ciated menus are shown on the audio dis-
play. The audio display is divided into
several areas.
For example, radio selected
1Menu bar
2Main area
3Status lineThe status line3 displays the time and
the current settings for radio and
telephone mode.
You can request the required function
using the menu bar1.
The selection is made using the audio con-
troller.Mobile phone readiness is indicated by
additional information being shown in the
status line:
�In the main menu TEL: Name of the
Bluetooth® device (calls made and re-
ceived via the Bluetooth® interface).
�Mobile phone network signal
strengthI. This information will
only be shown with suitable tele-
phones.
�Receiver symbol 4 ö
In this example, the audio main function is
set to the radio mode and the main
area2 is active.
iThe layout of the menus may vary depending
on your vehicle’s equipment. This manual shows
the menus for a fully equipped vehicle.
Page 186 of 509
185 Controls in detail
Audio system
Menu
The illustration below shows the structure
of the modes and their menus.Each mode has a basic menu. In the menu
line of the basic menu display are several
menu items listed.Each menu item in turn has several sub-
menu items.
ButtonMode/Basic menuMenuPage
bRadioRadio (FM/AM)194
Weather Band194
Sat Radio*200
Presets198
Sound189
éDiscCD/MP3208
Track list/folder list219
CD changer*214
Sound189
hTelephone*Telephone*222
Name233
Call lists236
êSystemSystem192
Language193
Page 187 of 509
186 Controls in detail
Audio system
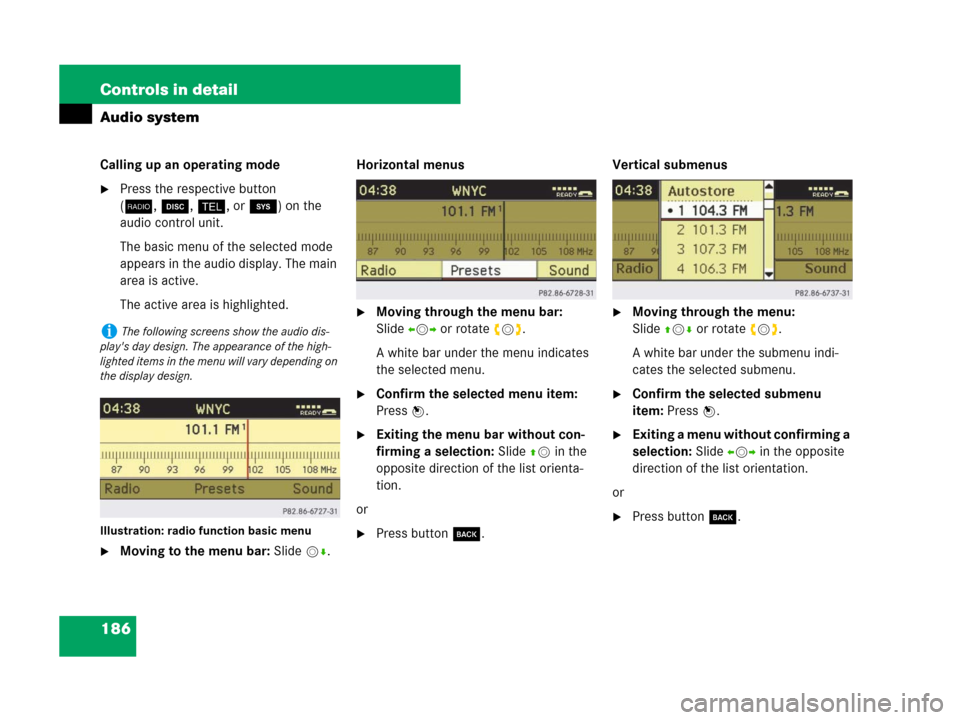
Calling up an operating mode
�Press the respective button
(b,é,h,orê) on the
audio control unit.
The basic menu of the selected mode
appears in the audio display. The main
area is active.
The active area is highlighted.
Illustration: radio function basic menu
�Moving to the menu bar: Slidemr.Horizontal menus
�Moving through the menu bar:
Slideomp or rotate ymz.
A white bar under the menu indicates
the selected menu.
�Confirm the selected menu item:
Press n.
�Exiting the menu bar without con-
firming a selection: Slide qmin the
opposite direction of the list orienta-
tion.
or
�Press buttoní.Vertical submenus
�Moving through the menu:
Slideqmr or rotate ymz.
A white bar under the submenu indi-
cates the selected submenu.
�Confirm the selected submenu
item: Press n.
�Exiting a menu without confirming a
selection: Slide ompin the opposite
direction of the list orientation.
or
�Press buttoní.
iThe following screens show the audio dis-
play's day design. The appearance of the high-
lighted items in the menu will vary depending on
the display design.
Page 188 of 509
187 Controls in detail
Audio system
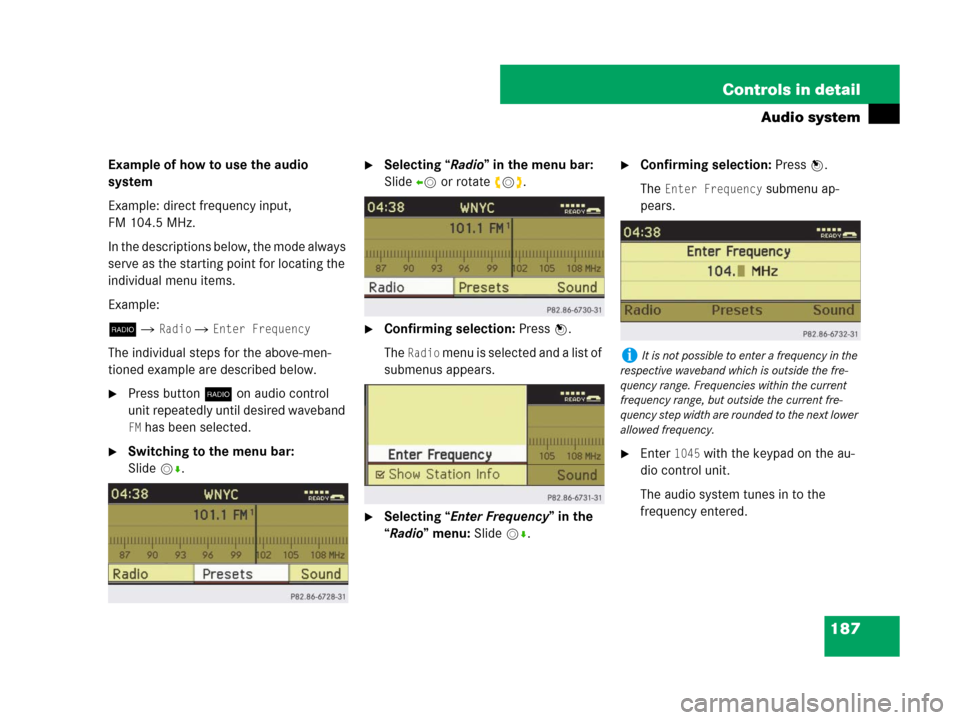
Example of how to use the audio
system
Example: direct frequency input,
FM 104.5 MHz.
In the descriptions below, the mode always
serve as the starting point for locating the
individual menu items.
Example:
b�
Radio � Enter Frequency
The individual steps for the above-men-
tioned example are described below.
�Press buttonb on audio control
unit repeatedly until desired waveband
FM has been selected.
�Switching to the menu bar:
Slidemr.
�Selecting “Radio” in the menu bar:
Slideomor rotate ymz.
�Confirming selection: Press n.
The
Radio menu is selected and a list of
submenus appears.
�Selecting “Enter Frequency” in the
“Radio” menu: Slidemr.
�Confirming selection: Press n.
The
Enter Frequency submenu ap-
pears.
�Enter 1045 with the keypad on the au-
dio control unit.
The audio system tunes in to the
frequency entered.
iIt is not possible to enter a frequency in the
respective waveband which is outside the fre-
quency range. Frequencies within the current
frequency range, but outside the current fre-
quency step width are rounded to the next lower
allowed frequency.
Page 189 of 509
188 Controls in detail
Audio system
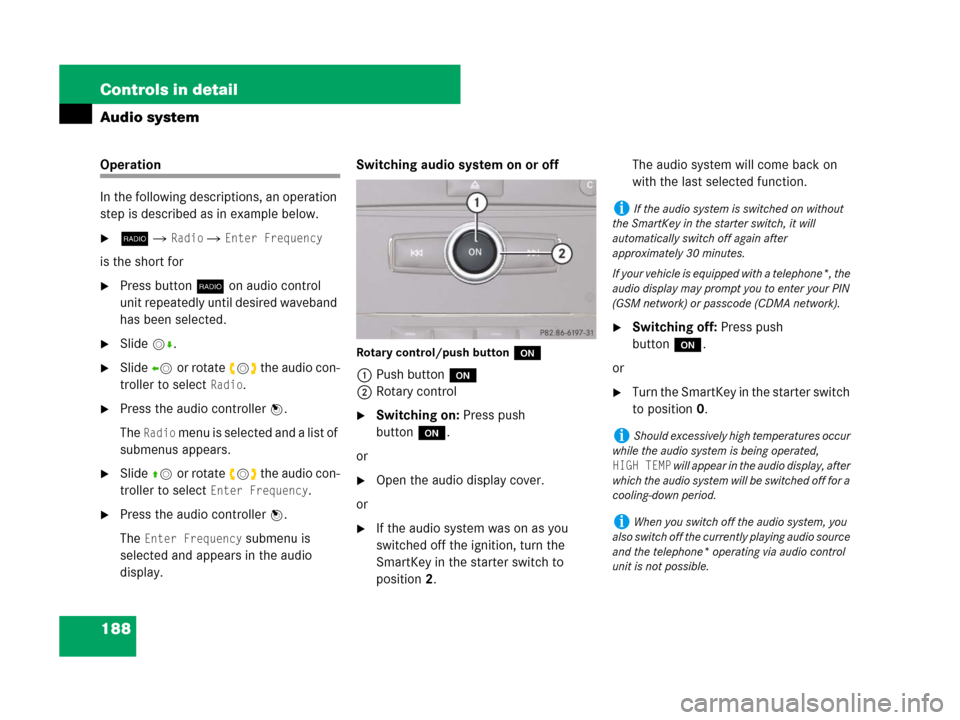
Operation
In the following descriptions, an operation
step is described as in example below.
�b� Radio � Enter Frequency
is the short for
�Press buttonb on audio control
unit repeatedly until desired waveband
has been selected.
�Slidemr.
�Slideomor rotate ymz the audio con-
troller to select
Radio.
�Press the audio controller n.
The
Radio menu is selected and a list of
submenus appears.
�Slideqmor rotate ymz the audio con-
troller to select
Enter Frequency.
�Press the audio controller n.
The
Enter Frequency submenu is
selected and appears in the audio
display.Switching audio system on or off
Rotary control/push buttono
1Push buttono
2Rotary control
�Switching on: Press push
buttono.
or
�Open the audio display cover.
or
�If the audio system was on as you
switched off the ignition, turn the
SmartKey in the starter switch to
position2.The audio system will come back on
with the last selected function.
�Switching off: Press push
buttono.
or
�Turn the SmartKey in the starter switch
to position0.
iIf the audio system is switched on without
the SmartKey in the starter switch, it will
automatically switch off again after
approximately 30 minutes.
If your vehicle is equipped with a telephone*, the
audio display may prompt you to enter your PIN
(GSM network) or passcode (CDMA network).
iShould excessively high temperatures occur
while the audio system is being operated,
HIGH TEMP will appear in the audio display, after
which the audio system will be switched off for a
cooling-down period.
iWhen you switch off the audio system, you
also switch off the currently playing audio source
and the telephone* operating via audio control
unit is not possible.