Page 113 of 509
112 Controls in detail
Lighting
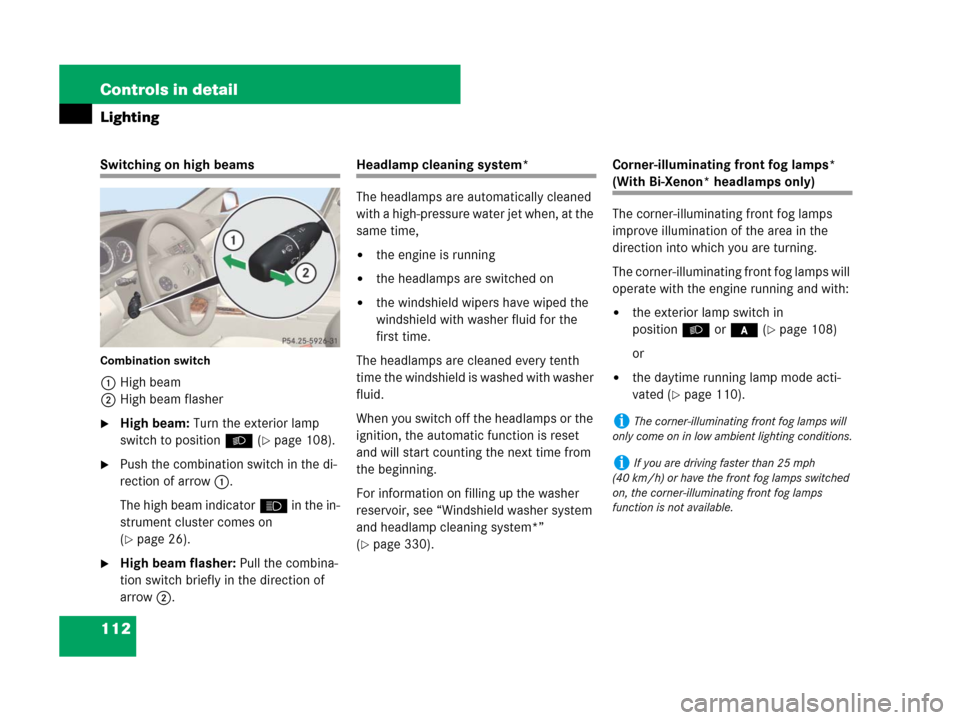
Switching on high beams
Combination switch
1High beam
2High beam flasher
�High beam: Turn the exterior lamp
switch to positionB (
�page 108).
�Push the combination switch in the di-
rection of arrow1.
The high beam indicatorA in the in-
strument cluster comes on
(
�page 26).
�High beam flasher: Pull the combina-
tion switch briefly in the direction of
arrow2.
Headlamp cleaning system*
The headlamps are automatically cleaned
with a high-pressure water jet when, at the
same time,
�the engine is running
�the headlamps are switched on
�the windshield wipers have wiped the
windshield with washer fluid for the
first time.
The headlamps are cleaned every tenth
time the windshield is washed with washer
fluid.
When you switch off the headlamps or the
ignition, the automatic function is reset
and will start counting the next time from
the beginning.
For information on filling up the washer
reservoir, see “Windshield washer system
and headlamp cleaning system*”
(
�page 330).Corner-illuminating front fog lamps*
(With Bi-Xenon* headlamps only)
The corner-illuminating front fog lamps
improve illumination of the area in the
direction into which you are turning.
The corner-illuminating front fog lamps will
operate with the engine running and with:
�the exterior lamp switch in
positionB or* (
�page 108)
or
�the daytime running lamp mode acti-
vated (
�page 110).
iThe corner-illuminating front fog lamps will
only come on in low ambient lighting conditions.
iIf you are driving faster than 25 mph
(40 km/h) or have the front fog lamps switched
on, the corner-illuminating front fog lamps
function is not available.
Page 389 of 509
388 Practical hints
What to do if …?
On the pages that follow, you will find a
compilation of the most important warning
and malfunction messages that may ap-
pear in the malfunction display.
For your convenience the messages are di-
vided into two sections:
�Text messages (�page 389)
�Symbol messages (�page 397)
Warning!G
All categories of messages contain impor-
tant information which should be taken note
of and, where a malfunction is indicated, ad-
dressed as soon as possible at an autho-
rized Mercedes-Benz Center.
Failure to repair condition noted may cause
damage not covered by the Mercedes-Benz
Limited Warranty, or result in property dam-
age or personal injury.
iSwitching on the ignition causes all instru-
ment cluster lamps (except high beam headlamp
indicator lamp and turn signal indicator lamps
unless activated) as well as the multifunction dis-
play to come on. Make sure the lamps and multi-
function display are in working order before
starting your journey.
Page 411 of 509
410 Practical hints
What to do if …?
Display Possible cause/consequencePossible solution
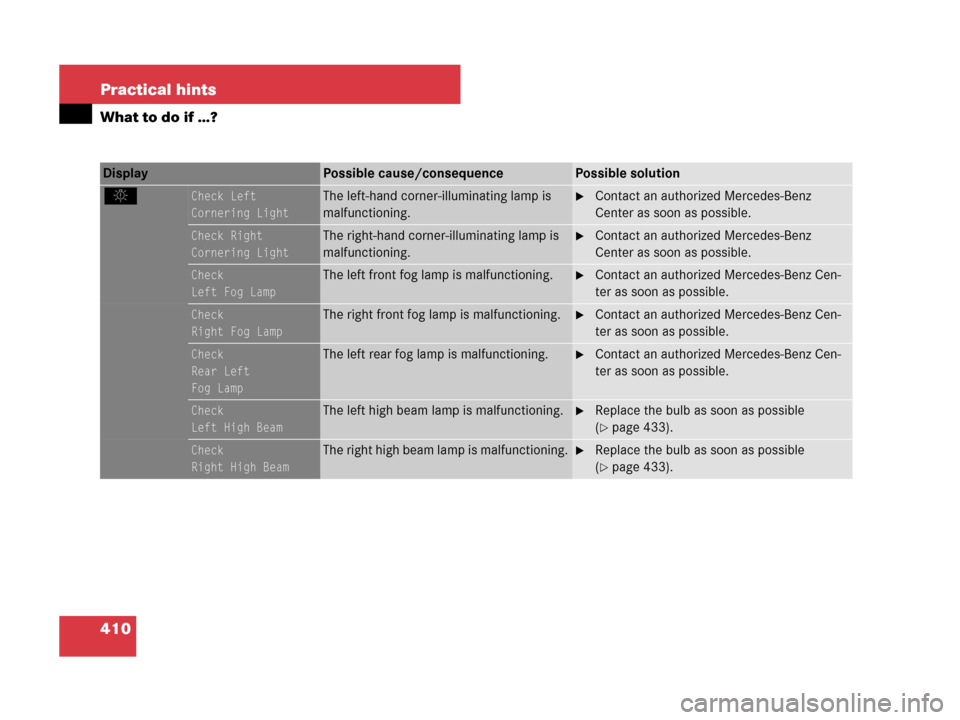
.Check Left
Cornering LightThe left-hand corner-illuminating lamp is
malfunctioning.�Contact an authorized Mercedes-Benz
Center as soon as possible.
Check Right
Cornering LightThe right-hand corner-illuminating lamp is
malfunctioning.�Contact an authorized Mercedes-Benz
Center as soon as possible.
Check
Left Fog LampThe left front fog lamp is malfunctioning.�Contact an authorized Mercedes-Benz Cen-
ter as soon as possible.
Check
Right Fog LampThe right front fog lamp is malfunctioning.�Contact an authorized Mercedes-Benz Cen-
ter as soon as possible.
Check
Rear Left
Fog LampThe left rear fog lamp is malfunctioning.�Contact an authorized Mercedes-Benz Cen-
ter as soon as possible.
Check
Left High BeamThe left high beam lamp is malfunctioning.�Replace the bulb as soon as possible
(
�page 433).
Check
Right High BeamThe right high beam lamp is malfunctioning.�Replace the bulb as soon as possible
(
�page 433).
Page 432 of 509
431 Practical hints
Replacing bulbs
Bulbs Front lamps Rear lamps
LampType
1Additional turn signal
lampLED
2Turn signal lampPY 21 W
3Halogen headlamp:
Low beam
Bi-Xenon* headlamp:
Low and high beam
1
1Regarding vehicles with Bi-Xenon headlamps*, do
not replace the Bi-Xenon bulbs yourself.
H7 (55 W)
D1S-35 W
4Halogen headlamp:
High beam/high beam
flasher
Bi-Xenon* headlamp:
High beam flasher
H7 (55 W)
H7 (55 W)
5Front fog lamp
Corner-illuminating
front fog lamp*H11 (55 W)
H11 (55 W)
6Side marker lampW 5 W
7Parking and standing
lamp2 x
W5W-BV
LampType
8High mounted brake
lampLED
9Side markerW 5 W
aTurn signal lampPY 21 W
bBrake lamp, parking
and standing lamp, tail
lamp2 x P 21 W
cBackup lampP 21 W
dLicense plate lampsW 5 W
eRear fog lamp
(driver’s side only),
Side markerP 21 W
W 5 W
Page 434 of 509
433 Practical hints
Replacing bulbs
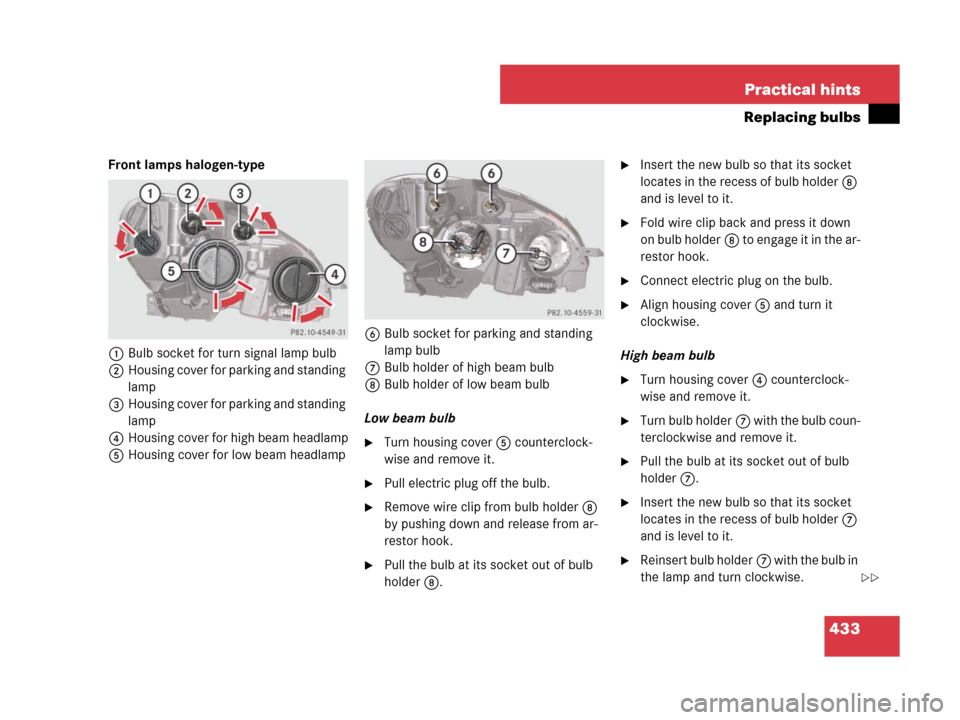
Front lamps halogen-type
1Bulb socket for turn signal lamp bulb
2Housing cover for parking and standing
lamp
3Housing cover for parking and standing
lamp
4Housing cover for high beam headlamp
5Housing cover for low beam headlamp6Bulb socket for parking and standing
lamp bulb
7Bulb holder of high beam bulb
8Bulb holder of low beam bulb
Low beam bulb
�Turn housing cover5 counterclock-
wise and remove it.
�Pull electric plug off the bulb.
�Remove wire clip from bulb holder8
by pushing down and release from ar-
restor hook.
�Pull the bulb at its socket out of bulb
holder8.
�Insert the new bulb so that its socket
locates in the recess of bulb holder8
and is level to it.
�Fold wire clip back and press it down
on bulb holder8 to engage it in the ar-
restor hook.
�Connect electric plug on the bulb.
�Align housing cover5 and turn it
clockwise.
High beam bulb
�Turn housing cover4 counterclock-
wise and remove it.
�Turn bulb holder7 with the bulb coun-
terclockwise and remove it.
�Pull the bulb at its socket out of bulb
holder7.
�Insert the new bulb so that its socket
locates in the recess of bulb holder7
and is level to it.
�Reinsert bulb holder7 with the bulb in
the lamp and turn clockwise.
��
Page 436 of 509
435 Practical hints
Replacing bulbs
1Bulb socket for turn signal lamp bulb
2Housing cover for parking and standing
lamp
3Housing cover for parking and standing
lamp
4Housing cover for high beam flasher
5Housing cover for Bi-Xenon headlamp6Bulb socket for parking and standing
lamp bulb
7Bulb holder for high beam flasher bulb
7Bulb holder for high beam bulbHigh beam bulb for high beam flasher
�Turn housing cover4 counterclock-
wise and remove it.
�Pull electric plug off the bulb.
�Pull out bulb holder7 with the bulb.
�Pull the bulb at its socket out of bulb
holder7.
�Insert the new bulb so that its socket
locates in the recess of bulb holder7
and is level to it.
�Reinsert bulb holder7 with the bulb in
the lamp.
�Connect electric plug on the bulb.
�Align housing cover4 and turn it
clockwise.
Page 491 of 509
490 Index
Dual-zone automatic climate
control 250
Front defroster 255
Rear climate control 268
Rear window defroster 256, 265
Residual engine heat and
ventilation 266
Setting the temperature 262
Temperature 253
Windshield, defogging 255
Clock 151
Setting time 170
Cockpit 24
Cold weather performance 483
COMAND* see separate COMAND
operating instructions
Combination switch 112
Corner-illuminating front fog
lamps* 112
High beam flasher 112
Turn signals 131
Windshield wipers 117
Control system 151
Multifunction display 151
Multifunction steering wheel 152
Resetting to factory default 165Control system menu 151
AUDIO 158
Menus overview 154
Navi* 158
Service menu 164
Settings menu 165
Standard display 156
TEL* 160
Trip computer 156
Vehicle status message
memory 164
Control system submenus 153, 155
Convenience 174
Instrument cluster 168
Lighting 171
Time/Date 170
Vehicle 173
Coolant 329
Adding 329
Anticorrosion/antifreeze mixing ratio
and quantity 484
Checking level 329
Messages in display 405
Temperature 321
Temperature gauge 27, 148Coolant level
Checking 329
Corner-illuminating front fog lamps* 112
Replacing bulbs 431
Cruise control 241
Activating 242
Canceling 243
Driving downhill 243
Driving uphill 243
Setting current speed 242
Setting to last stored speed
(“Resume” function) 245
Cruising range, fuel 483
Cup holder
In front seat armrest 287
In rear seat armrest 287
Curb weight 356
Page 496 of 509
495 Index
H
Halogen headlamp see Headlamps
Hands-free microphone 31
Hard plastic trim items, cleaning 370
Hazard warning flasher 114
Head restraints 89
Active head restraints 50
Adjustment 89
Front seat 89
Rear seat, Removing and
installing 90
Resetting activated active head
restraints 427
Headlamp cleaning system 112, 330
Washer fluid 479, 486
Headlamps
Automatic control 109
Automatic headlamp mode 172
Cleaning lenses 367
Cleaning system 330
Halogen 432
Manual headlamp mode 172
Messages in display 411
Refilling washer fluid 330
Replacing bulbs 431, 432Headliner and shelf below rear window,
Cleaning and care of 371
High beam flasher 112
Replacing bulbs (Bi-Xenon*) 431,
435
Replacing bulbs (Halogen) 431, 433
High beam headlamps
Indicator lamp 27
Replacing bulbs (Bi-Xenon*) 431
Replacing bulbs (Halogen) 431, 433
Replacing bulbs for high beam flasher
(Bi-Xenon*) 435
High mounted brake lamp 431
Hood 325
Message in display 406
Opening 325
Horn 25
Hot weather performance 483
HVAC see Climate control system
Hydroplaning 315I
Identification labels 462
Identification Number, Vehicle (VIN) 463
Ignition 82, 84, 127
Switching on 82
Switching on, KEYLESS-GO* 84
Immobilizer 66
Infant and child restraint systems see Chil-
dren in the vehicle
Inside door handle 79
Instrument cluster 26, 147
Coolant temperature gauge 27, 148
Fuel gauge 27, 150
Illumination 148
Lamps 374
Multifunction display 151
Outside temperature indicator 149
Setting the language (Audio
system) 193
Interior lighting 114
Activating automatic control 115
Deactivating automatic control 115
Delayed shut-off 173
In the rear 116
Reading lamps in the front 115, 116
Reading lamps in the rear 116