Page 109 of 509
108 Controls in detail
Lighting
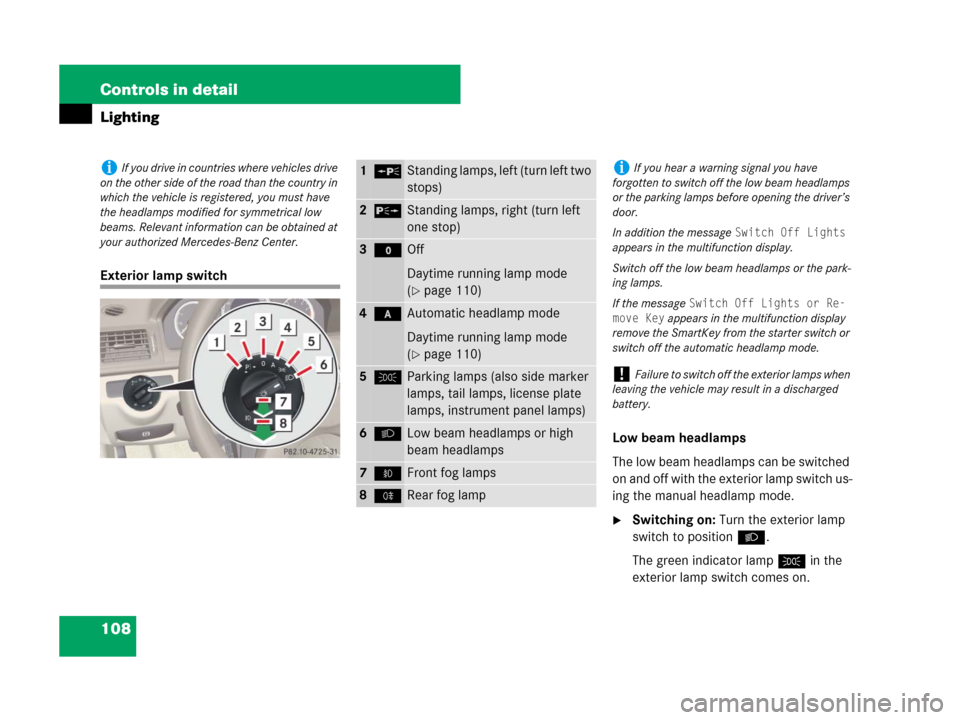
Exterior lamp switch
Low beam headlamps
The low beam headlamps can be switched
on and off with the exterior lamp switch us-
ing the manual headlamp mode.
�Switching on: Turn the exterior lamp
switch to positionB.
The green indicator lampC in the
exterior lamp switch comes on.
iIf you drive in countries where vehicles drive
on the other side of the road than the country in
which the vehicle is registered, you must have
the headlamps modified for symmetrical low
beams. Relevant information can be obtained at
your authorized Mercedes-Benz Center.1‚Standing lamps, left (turn left two
stops)
2ˆStanding lamps, right (turn left
one stop)
3MOff
Daytime running lamp mode
(
�page 110)
4*Automatic headlamp mode
Daytime running lamp mode
(
�page 110)
5CParking lamps (also side marker
lamps, tail lamps, license plate
lamps, instrument panel lamps)
6BLow beam headlamps or high
beam headlamps
7‡Front fog lamps
8†Rear fog lamp
iIf you hear a warning signal you have
forgotten to switch off the low beam headlamps
or the parking lamps before opening the driver’s
door.
In addition the message
Switch Off Lights
appears in the multifunction display.
Switch off the low beam headlamps or the park-
ing lamps.
If the message
Switch Off Lights or Re-
move Key
appears in the multifunction display
remove the SmartKey from the starter switch or
switch off the automatic headlamp mode.
!Failure to switch off the exterior lamps when
leaving the vehicle may result in a discharged
battery.
Page 110 of 509
109 Controls in detail
Lighting
The following lamps switch on:
�Low beam headlamps
�Tail and parking lamps
�License plate lamps
�Side marker lamps
�Switching off: Turn the exterior lamp
switch to positionM.
The green indicator lampC in the
exterior lamp switch goes out.
Automatic headlamp mode
The following lamps switch on and off au-
tomatically depending on the brightness of
the ambient light:
�Low beam headlamps
�Tail and parking lamps
�License plate lamps
�Side marker lamps
�Turn the exterior lamp switch to
position*.
With the SmartKey in starter switch
position1 or the KEYLESS-GO*
start/stop button (Canada only)
pressed once, the tail and parking
lamps, the license plate lamps and the
side marker lamps will switch on and
off depending on the brightness of the
ambient light.
When the engine is running, the low
beam headlamps, the tail and parking
lamps, the license plate lamps, and the
side marker lamps will switch on and
off depending on the brightness of the
ambient light.
Warning!G
If the exterior lamp switch is set to*,
the headlamps will not be automatically
switched on under foggy conditions.
To minimize risk to you and to others,
activate headlamps by turning exterior lamp
switch to positionB when driving or
when traffic and/or ambient lighting condi-
tions require you to do so.
In low ambient lighting conditions, only
switch from position * to B with the
vehicle at a standstill in a safe location.
Switching from position* to B will
briefly switch off the headlamps. Doing so
while driving in low ambient lighting condi-
tions may result in an accident.
The automatic headlamp feature is only an
aid to the driver. The driver is responsible for
the operation of the vehicle’s lights at all
times.
iCanada only:
High beam headlamps are only available with the
exterior lamp switch in position B.
Page 173 of 509
172 Controls in detail
Control system
Depending on the previous status, the
daytime running lamps feature will be
Enabled orDisabled.
With
Daytime Running Lamps mode En-
abled
selected and the exterior lamp
switch at position M or *, the low
beam headlamps are switched on when
the engine is running.
In low ambient light conditions the follow-
ing lamps will switch on additionally:
�Parking lamps
�Tail lamps
�License plate lamps
�Side marker lamps
also illuminates the instrument cluster.
For more information on the daytime run-
ning lamp mode (
�page 110).Setting locator lighting
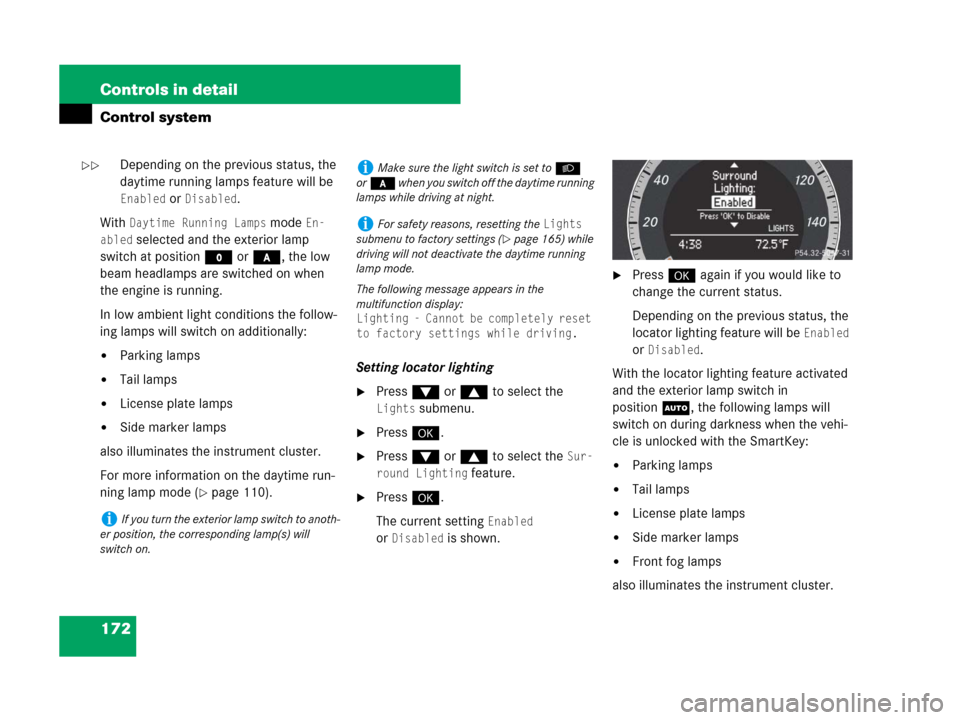
�Press % or $ to select the
Lights submenu.
�Press #.
�Press % or $ to select the Sur-
round Lighting
feature.
�Press #.
The current setting
Enabled
or
Disabled is shown.
�Press # again if you would like to
change the current status.
Depending on the previous status, the
locator lighting feature will be
Enabled
or
Disabled.
With the locator lighting feature activated
and the exterior lamp switch in
positionU, the following lamps will
switch on during darkness when the vehi-
cle is unlocked with the SmartKey:
�Parking lamps
�Tail lamps
�License plate lamps
�Side marker lamps
�Front fog lamps
also illuminates the instrument cluster.
iIf you turn the exterior lamp switch to anoth-
er position, the corresponding lamp(s) will
switch on.
iMake sure the light switch is set toB
or* when you switch off the daytime running
lamps while driving at night.
iFor safety reasons, resetting the Lights
submenu to factory settings (
�page 165) while
driving will not deactivate the daytime running
lamp mode.
The following message appears in the
multifunction display:
Lighting - Cannot be completely reset
to factory settings while driving.
��
Page 431 of 509
430 Practical hints
Replacing bulbs
Safe vehicle operation depends on proper
exterior lighting and signaling. It is there-
fore essential that all bulbs and lamp
assemblies are in good working order at all
times.Correct headlamp adjustment is extremely
important. Have headlamps checked and
readjusted at regular intervals and when a
bulb has been replaced. See an authorized
Mercedes-Benz Center for headlamp
adjustment.iIf the headlamps or front fog lamps are
fogged up on the inside as a result of high
humidity, driving the vehicle a distance with the
lights on should clear up the fogging.
iBackup bulbs will be brought into use when
lamps malfunction. Read and observe the mes-
sages in the multifunction display (
�page 413).
Page 433 of 509
432 Practical hints
Replacing bulbs
Notes on bulb replacement
�Only use 12 volt bulbs of the same type
and with the specified watt rating.
�Switch lights off before changing a bulb
to prevent short circuits.
�Always use a clean lint-free cloth when
handling bulbs.
�Your hands should be dry and free of oil
and grease.
�If the newly installed bulb does not
come on, visit an authorized
Mercedes-Benz Center.Have the LEDs and bulbs for the following
lamps replaced at an authorized
Mercedes-Benz Center.
�Additional turn signal lamps in the exte-
rior rear view mirrors
�High mounted brake lamp
�Bi-Xenon* lamps
�Front fog lamps
�Front side marker lamps
�License plate lamps
Replacing bulbs for front lamps
Before you start to replace a bulb for a
front lamp, do the following first:
�Turn the exterior lamp switch to
positionM (
�page 108).
�Open the hood (�page 325).
Warning!G
Keep bulbs out of reach of children.
Bulbs and bulb sockets can be very hot. Al-
low the lamp to cool down before changing
a bulb.
Halogen lamps contain pressurized gas. A
bulb can explode if you:
�touch or move it when hot
�drop the bulb
�scratch the bulb
Wear eye and hand protection.
Because of high voltage in Xenon lamps, it is
dangerous to replace the bulb or repair the
lamp and its components. We recommend
that you have such work done by a qualified
technician.!Do not replace the LEDs yourself. You could
otherwise damage the LEDs or parts of the
vehicle. Only have the LEDs replaced at an au-
thorized Mercedes-Benz Center.