Page 125 of 225
124 Navigation
Introduction
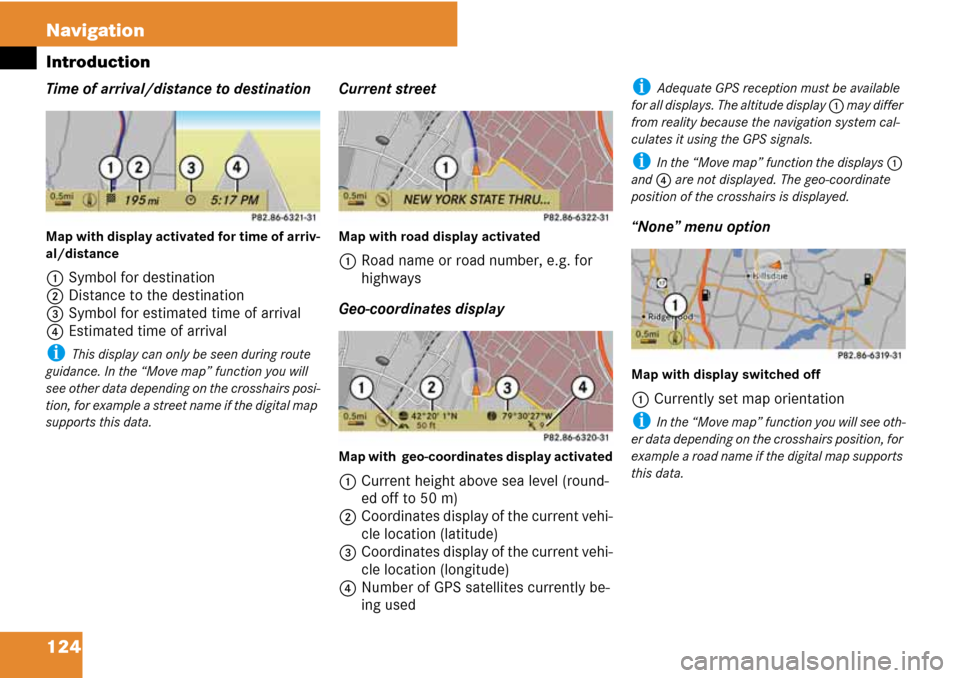
Time of arrival/distance to destination
Map with display activated for time of arriv-
al/distance
1Symbol for destination
2Distance to the destination
3Symbol for estimated time of arrival
4Estimated time of arrival
i This display can only be seen during route
guidance. In the “Move map” function you will
see other data depending on the crosshairs posi-
tion, for example a street name if the digital map
supports this data.
Current street
Map with road display activated
1Road name or road number, e.g. for
highways
Geo-coordinates display
Map with geo-coordinates display activated
1Current height above sea level (round-
ed off to 50 m)
2Coordinates display of the current vehi-
cle location (latitude)
3Coordinates display of the current vehi-
cle location (longitude)
4Number of GPS satellites currently be-
ing used
i Adequate GPS reception must be available
for all displays. The altitude display 1 may differ
from reality because the navigation system cal-
culates it using the GPS signals.
i In the “Move map” function the displays 1
and 4 are not displayed. The geo-coordinate
position of the crosshairs is displayed.
“None” menu option
Map with display switched off
1Currently set map orientation
i In the “Move map” function you will see oth-
er data depending on the crosshairs position, for
example a road name if the digital map supports
this data.
Page 150 of 225
149 Navigation
Route guidance
Preparation phase
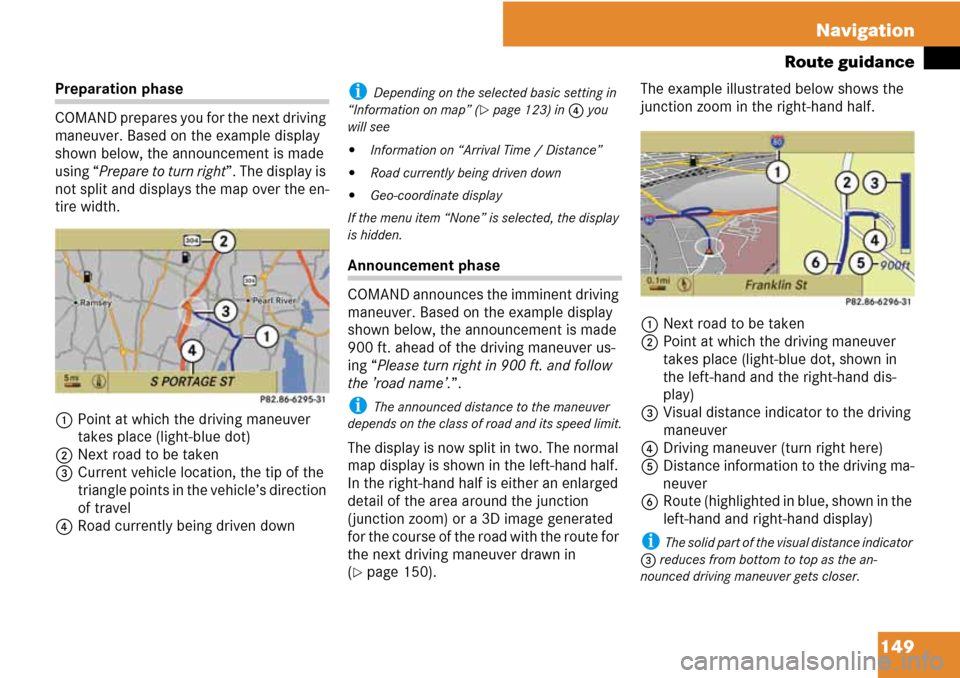
COMAND prepares you for the next driving
maneuver. Based on the example display
shown below, the announcement is made
using “Prepare to turn right”. The display is
not split and displays the map over the en-
tire width.
1Point at which the driving maneuver
takes place (light-blue dot)
2Next road to be taken
3Current vehicle location, the tip of the
triangle points in the vehicle’s direction
of travel
4Road currently being driven downi Depending on the selected basic setting in
“Information on map” (
�page 123) in 4 you
will see
�Information on “Arrival Time / Distance”
�Road currently being driven down
�Geo-coordinate display
If the menu item “None” is selected, the display
is hidden.
Announcement phase
COMAND announces the imminent driving
maneuver. Based on the example display
shown below, the announcement is made
900 ft. ahead of the driving maneuver us-
ing “Please turn right in 900 ft. and follow
the ’road name’.”.
i The announced distance to the maneuver
depends on the class of road and its speed limit.
The display is now split in two. The normal
map display is shown in the left-hand half.
In the right-hand half is either an enlarged
detail of the area around the junction
(junction zoom) or a 3D image generated
for the course of the road with the route for
the next driving maneuver drawn in
(
�page 150).The example illustrated below shows the
junction zoom in the right-hand half.
1Next road to be taken
2Point at which the driving maneuver
takes place (light-blue dot, shown in
the left-hand and the right-hand dis-
play)
3Visual distance indicator to the driving
maneuver
4Driving maneuver (turn right here)
5Distance information to the driving ma-
neuver
6Route (highlighted in blue, shown in the
left-hand and right-hand display)
i The solid part of the visual distance indicator
3 reduces from bottom to top as the an-
nounced driving maneuver gets closer.
Page 157 of 225
156 Navigation
Route guidance
i When calculating the estimated time of ar-
rival, COMAND uses the time set on the CO-
MAND as its basis. For this reason, the time on
COMAND must be set correctly (
�page 165).
The calculation of the estimated time of arrival
does not specifically take into consideration
whether it is summer time or standard time at
the destination. It is not taken into consideration
whether or not the destination is in a different
time zone.
The distance to the destination, the estimated
time of arrival and the estimated remaining jour-
ney time 1, 5 are not displayed until the route
calculation is complete.
�To close destination information:
Slide omp.
or
�Press the í button.
Page 164 of 225
163 System settings
Opening System menu .............. 164
Menu overview ........................... 164
Display settings .......................... 164
Time settings .............................. 165
Read-out settings ....................... 166
Voice control settings ............... 167
Bluetooth
® settings ................... 169
Reset ............................................ 171
Setting the system language .... 171
Tele Aid* ...................................... 172
Page 165 of 225
164 System settings
System settings
�Press the function button Z.
or
�Select “System” in the menu bar with
main functions.
Adjusting brightness
�Select “System” K “System Settings”
K “Display” K “Brightness”.
1Brightness bar
�To adjust brightness: Rotate ymz or
slide qmr.
The brightness bar moves up or down.
�To confirm selection: Press n or
slide om.
System settings
Opening System menu
Menu overview
System settingsLanguage
Display
Time
Text reader speed
Voice control
Bluetooth
Reset (resets
COMAND to
factory settings)
i Use this function
to delete your person-
al data, e.g. before
selling your vehicle.
Setting language
Display settings
Page 166 of 225
165 System settings
System settings
Setting the display design
�Select “System” K “System Settings”
K “Display”.
�Select “Day Mode” or “Night Mode” or
“Automatic”.
The dotRin front of the list entry indi-
cates the current selection.
i In the “Automatic” setting, COMAND evalu-
ates the automatic vehicle light sensor and auto-
matically switches over the display design.
Setting the time
i The correct time is essential for the follow-
ing system functions to operate correctly:
�Route guidance on routes with time-depen-
dent traffic routing
�Calculation of estimated time of arrival
�Time stamps for calls received and calls di-
aled
�Select “System” K “System Settings”
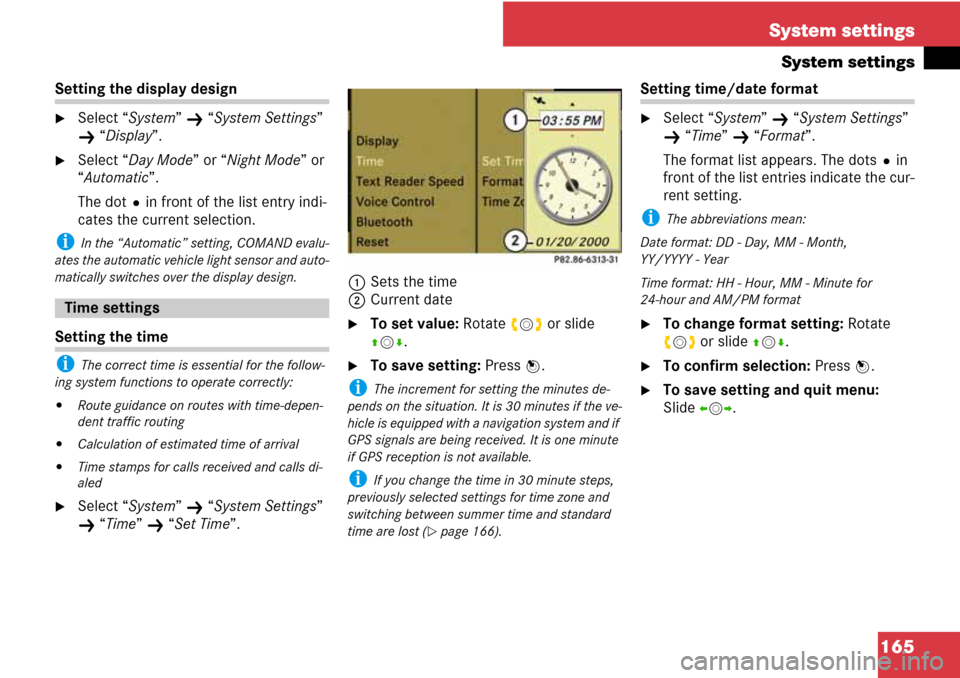
K “Time” K “Set Time”.1Sets the time
2Current date
�To set value: Rotate ymz or slide
qmr.
�To save setting: Press n.
i The increment for setting the minutes de-
pends on the situation. It is 30 minutes if the ve-
hicle is equipped with a navigation system and if
GPS signals are being received. It is one minute
if GPS reception is not available.
i If you change the time in 30 minute steps,
previously selected settings for time zone and
switching between summer time and standard
time are lost (
�page 166).
Setting time/date format
�Select “System” K “System Settings”
K “Time” K “Format”.
The format list appears. The dotsRin
front of the list entries indicate the cur-
rent setting.
i The abbreviations mean:
Date format: DD - Day, MM - Month,
YY/YYYY - Year
Time format: HH - Hour, MM - Minute for
24-hour and AM/PM format
�To change format setting: Rotate
ymz or slide qmr.
�To confirm selection: Press n.
�To save setting and quit menu:
Slide omp.
Time settings
Page 167 of 225
166 System settings
System settings
Setting time zone and switching be-
tween daylight saving time and stan-
dard time
i The correct time zone and daylight saving/
standard time settings are essential for the fol-
lowing system functions to operate correctly:
�Route guidance on routes with time-depen-
dent traffic routing
�Calculation of estimated time of arrival
�Time stamps for calls received and calls di-
aled
�To set time zone: Select “System” K
“System Settings”
K “Time” K “Time
Zone”.
A time zone list appears.
�Rotate ymz or slide qmr to select the
appropriate time zone.
�To switch between Daylight Saving
and standard time: Select “Daylight
Saving Time” (Summer) or “Standard Ti-
me” (Winter).
The dotRin front of a list entry indi-
cates the current setting.
�To save setting and exit menu:
Slide omp.
Setting reading speed
You can use this feature to adjust the read-
out speed of the address book via voice
control.
�Select “System” K “System Settings”
K “Text Reader Speed”.
The list of possible speeds appears.
The dotRin front of the list entry indi-
cates the current setting.
�Select the desired speed.
The new setting is stored.
Read-out settings
Page 170 of 225
169 System settings
System settings
General information on Bluetooth®
Bluetooth® is a technology for wireless
data communication over short distances
of up to approx. 30 feet. Using Bluetooth
®
you can exchange business cards (vCards),
for example.
Switching Bluetooth® on/off
�Select “System” K “System Settings”
K “Bluetooth” K “Activate Bluetooth”.
This switches Bluetooth
® on D or
off C.
Connecting Bluetooth® devices
i In order to connect Bluetooth® devices,
Bluetooth® must be activated on the COMAND
and on the particular device. In addition, a Blue-
tooth
® device must be ‘visible’ for COMAND, so
that COMAND can find it and display it. The pro-
cedure for performing this setting is given in the
manual for the Bluetooth
® device.
The following types of devices can be con-
nected to COMAND via Bluetooth®:
�Mobile phone
�Portable personal computer
�Laptop/PDA
You can connect a maximum of 10 devices
to COMAND.
The connection process includes search-
ing for a device and then authorizing it.
Opening the Bluetooth
® device list and
searching for a device
�To open the list: Select “System” K
“System Settings”
K “Bluetooth” K
“Bluetooth Device List”.
�To start search: Select “Update”.
COMAND starts searching for devices
in the reception range. After a short
time, the device list appears.
i If you open the device list again, the list of
authorized devices appears.
�To cancel search: Select “Cancel”.
The device list may contain the following
devices:
�All (available) devices found, regardless
of whether they have been authorized
or not.
�All authorized devices, regardless of
whether they have been found (are
available) or not.When first entering the device list and be-
fore running an update, the black
dotRindicates the active phone (found
and authorized).
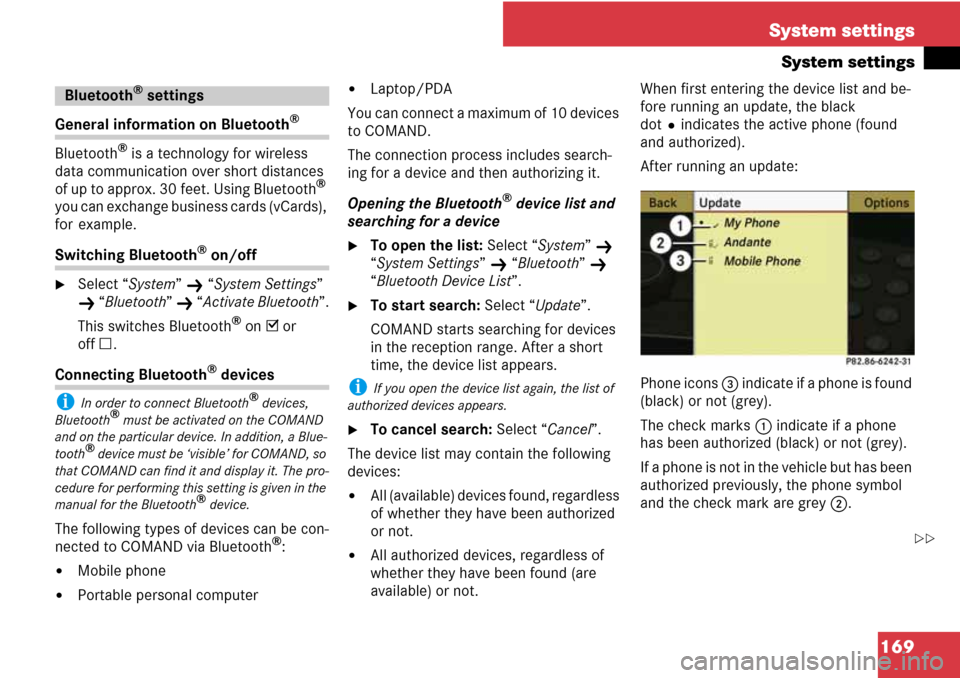
After running an update:
Phone icons 3 indicate if a phone is found
(black) or not (grey).
The check marks 1 indicate if a phone
has been authorized (black) or not (grey).
If a phone is not in the vehicle but has been
authorized previously, the phone symbol
and the check mark are grey 2.
Bluetooth® settings
��