2008 MERCEDES-BENZ A-CLASS HATCHBACK lights
[x] Cancel search: lightsPage 144 of 305

Air conditioning
141Activating/deactivating air-recircula-
tion mode
You can deactivate the flow of fresh air if
unpleasant odours are entering the vehicle
from outside. The air already inside the vehi-
cle will then be recirculated. G
Risk of accident
Only switch over to air-recirculation mode
briefly at low outside temperatures. Other-
wise, the windows could mist up, thus
impairing visibility and endangering your-
self and others. This may prevent you from
observing the traffic conditions, thereby
causing an accident.
X Turn the key to position 2in the ignition
lock.
X To activate: press theÄbutton.
The indicator lamp in the Äbutton lights
up.
i Air-recirculation mode is activated auto-
matically at high outside temperatures.
When air-recirculation mode is activated
automatically, the indicator lamp in the
Ä button is not lit.
Outside air is added after about 30
minutes. X
To deactivate: press theÄbutton.
The indicator lamp in the Äbutton goes
out.
i Air-recirculation mode switches off auto-
matically:
R after approximately five minutes at out-
side temperatures below approximately
7 †
R after approximately 5 minutes if cooling
with air dehumidification 23
is switched
off
R after approximately 30 minutes at out-
side temperatures above approximately
7 †
Convenience opening/closing feature G
Risk of injury
Make sure that nobody can become trap-
ped between the side window and the door
frame as the side windows are opened and
closed. Do not place objects or lean against
the side windows when they are being
opened or closed. You or the objects could
be drawn in or become trapped between
the side window and the door frame as the window moves. If there is a risk of entrap-
ment, press the
Äbutton again. Press
the button for stopping, opening or closing
the side windows in the opposite direction
as appropriate.
Make sure that nobody can become trap-
ped as the panorama louvred sliding sun-
roof *is opened and closed. If there is a risk
of entrapment, press the Äbutton
again. Press the button for stopping, open-
ing or closing the panorama louvred sun-
roof* in the opposite direction as appropri-
ate.
X Convenience closing: press and hold
the Ä button until the side windows and
the panorama louvred sliding sunroof*
have closed.
The indicator lamp in the Äbutton lights
up. Air-recirculation mode is activated.
X Convenience opening: press and hold the
Ä button until the side windows have
returned to the original position.
The indicator lamp in the Äbutton goes
out. Air-recirculation mode is deactivated.
The panorama louvred sliding sunroof*
moves to the ventilation position.
23 Vehicles with air conditioning*/Thermotronic*. Controls
* optional
169_AKB; 2; 4, en-GB
wdomann,
Version: 2.10.6 2008-07-16T08:52:06+02:00 - Seite 141 ZDateiname: 6515_0315_02_buchblock.pdf; preflight
Page 145 of 305

Roof
142
i
If you open the side windows or the pan-
orama louvred sliding sunroof* manually
after closing with the convenience closing
feature, they will remain in this position
when opened using the convenience open-
ing feature. Switching the residual heat on/off
The "residual heat" function is only available
with Thermotronic*.
It is possible to make use of the residual heat
of the engine to continue heating the station-
ary vehicle for up to 30 minutes after the
engine has been switched off. The heating
time depends on the set interior temperature.
i The blower will run at a low speed regard-
less of the airflow setting.
i If you activate the "residual heat" function
at high temperatures, only the ventilation
will be activated. The blower runs at
medium speed.
X Turn the key to position 0in the ignition
lock or remove it.
X To activate: press theTbutton.
The indicator lamp in the Tbutton lights
up. X
To deactivate: press theTbutton.
The indicator lamp in the Tbutton goes
out.
i The residual heat automatically switches
off after around 30 minutes or if:
R the ignition is switched on
R the battery voltage drops Roof
Panorama roof*
G
Risk of injury
The glass in the panorama sunroof* could
break in an accident.
If you are not wearing a seat belt, there is
a risk that you could be thrown through the
opening in the event of the vehicle over-
turning. Therefore, always wear a seat belt
to reduce the risk of injuries. Panorama louvred sliding sunroof*
G
Risk of injury
Make sure that nobody can become trap-
ped when closing the panorama louvred
sliding sunroof. If danger threatens, release
the switch and press the switch again to
reopen the panorama louvred sliding sun-
roof. G
Risk of injury
Never leave children unsupervised in the
vehicle. Always remove the key from the
ignition lock, even if you are leaving the
vehicle only briefly. Controls
* optional
169_AKB; 2; 4, en-GB
wdomann,
Version: 2.10.6
2008-07-16T08:52:06+02:00 - Seite 142 Dateiname: 6515_0315_02_buchblock.pdf; preflight
Page 159 of 305

Loading and stowing
156
X
Raise luggage compartment floor 2using
handle 1in the direction of the arrow 3
and tug it upwards sharply.
X Lower luggage compartment floor 2
again. To do this, push the luggage com-
partment floor away so that it engages in
the guide on the upper level.
Luggage compartment floor 2engages in
the higher position.
Lowering the luggage compartment floor
X Raise luggage compartment floor 2
slightly using handle 1and tug it briefly
towards you.
X Lower luggage compartment floor 2again
slowly. To do this, press the luggage com-
partment floor into the lower level.
Luggage compartment floor 2engages in
the lower position. Removing/fitting the removable
front-passenger seat*
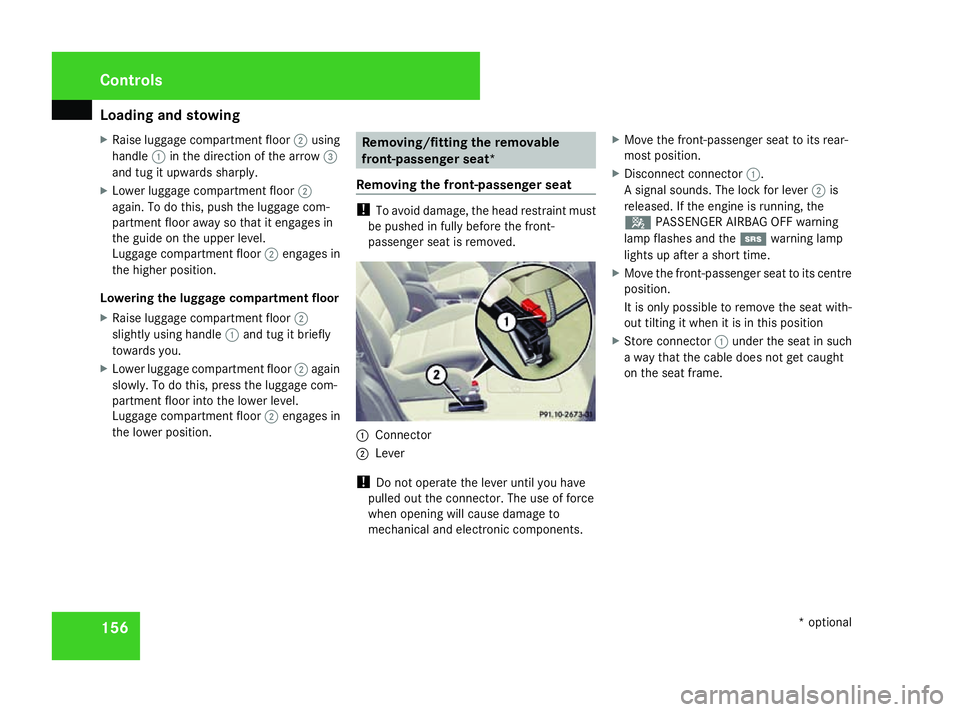
Removing the front-passenger seat !
To avoid damage, the head restraint must
be pushed in fully before the front-
passenger seat is removed. 1
Connector
2 Lever
! Do not operate the lever until you have
pulled out the connector. The use of force
when opening will cause damage to
mechanical and electronic components. X
Move the front-passenger seat to its rear-
most position.
X Disconnect connector 1.
A signal sounds. The lock for lever 2is
released. If the engine is running, the
5 PASSENGER AIRBAG OFF warning
lamp flashes and the 1warning lamp
lights up after a short time.
X Move the front-passenger seat to its centre
position.
It is only possible to remove the seat with-
out tilting it when it is in this position
X Store connector 1under the seat in such
a way that the cable does not get caught
on the seat frame. Controls
* optional
169_AKB; 2; 4, en-GB
wdomann,
Version: 2.10.6
2008-07-16T08:52:06+02:00 - Seite 156 Dateiname: 6515_0315_02_buchblock.pdf; preflight
Page 160 of 305

Loading and stowing
1571
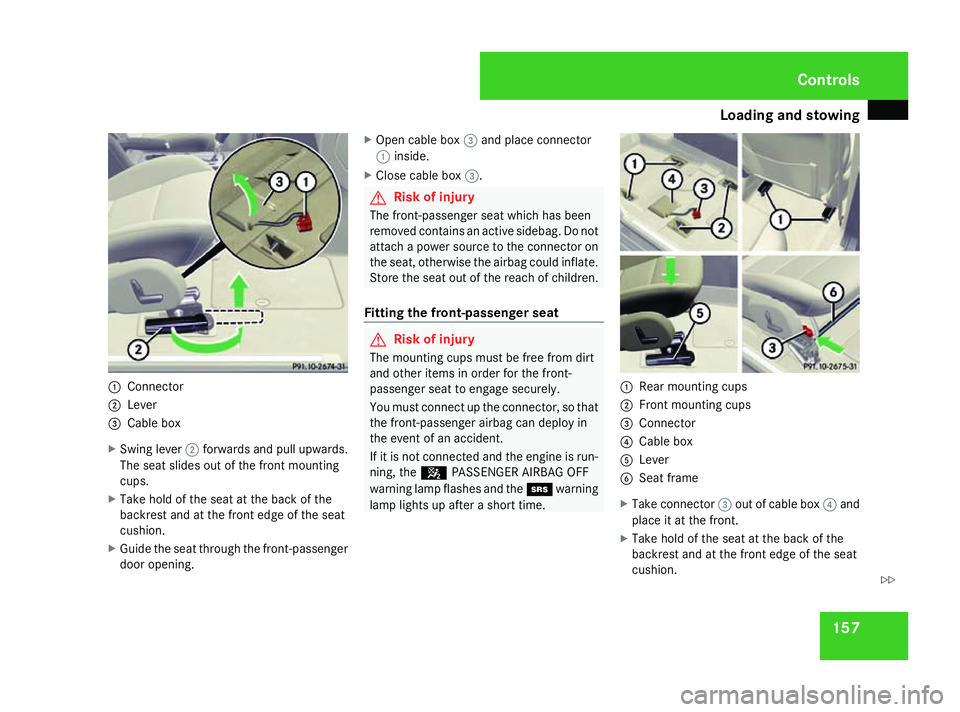
Connector
2 Lever
3 Cable box
X Swing lever 2forwards and pull upwards.
The seat slides out of the front mounting
cups.
X Take hold of the seat at the back of the
backrest and at the front edge of the seat
cushion.
X Guide the seat through the front-passenger
door opening. X
Open cable box 3and place connector
1 inside.
X Close cable box 3. G
Risk of injury
The front-passenger seat which has been
removed contains an active sidebag. Do not
attach a power source to the connector on
the seat, otherwise the airbag could inflate.
Store the seat out of the reach of children.
Fitting the front-passenger seat G
Risk of injury
The mounting cups must be free from dirt
and other items in order for the front-
passenger seat to engage securely.
You must connect up the connector, so that
the front-passenger airbag can deploy in
the event of an accident.
If it is not connected and the engine is run-
ning, the 5PASSENGER AIRBAG OFF
warning lamp flashes and the 1warning
lamp lights up after a short time. 1
Rear mounting cups
2 Front mounting cups
3 Connector
4 Cable box
5 Lever
6 Seat frame
X Take connector 3out of cable box 4and
place it at the front.
X Take hold of the seat at the back of the
backrest and at the front edge of the seat
cushion. Controls
169_AKB; 2; 4, en-GB
wdomann,
Version: 2.10.6
2008-07-16T08:52:06+02:00 - Seite 157 ZDateiname: 6515_0315_02_buchblock.pdf; preflight
Page 197 of 305

Care
194Do not aim directly at any of the following:
R
tyres
R door joint
R electrical components
R Battery
R connectors
R lights
R seals
R trim elements
Damaged seals or electrical components
can lead to failures or leaks.
Cleaning the wiper blades and the out-
side of the windscreen G
Risk of injury
Before cleaning the windscreen or wiper
blades, turn the key in the ignition to 0.
Otherwise, the windscreen wipers may
move and injure you. X
Turn the key to position 1(Y page 62) in
the ignition lock.
X Set the windscreen wipers to position
I(Y page 83) on the combination switch.
X Turn the key to position 0(Y page 62) or
remove it when the wiper arms are vertical.
! Only fold the windscreen wipers away
from the windscreen when vertical, other-
wise you will damage the bonnet.
X Fold the wiper arms away from the wind-
screen.
X Wipe the windscreen and wiper blades with
a damp, lint-free cloth (e.g. a microfibre
cloth) and cleaning agent.
X Fold the wiper arms back on to the wind-
screen before the ignition is switched on.
! Do not clean the wiper blades too often
as this will result in damage to the surface
coating, leading to wiper noise.
Cleaning the windows !
Do not use dry cloths, abrasive products,
solvents or cleaning agents containing sol-
vents to clean the inside of the windows.
Clean the insides of the windows with a
damp cloth or commercially-available glass cleaner. Avoid touching the inside of the
rear windscreen and the side windows with
hard objects, e.g. ice scrapers or rings. You
could otherwise cause damage to the win-
dows, rear window heating or aerial on the
rear window.
i Anti-glare film retrofitted to the insides of
the windows could interfere with radio or
mobile phone reception, especially if it is
conductive or metal-coated film. Informa-
tion about anti-glare film can be obtained
from any Mercedes-Benz Service Centre.
Cleaning the headlamps X
Clean the plastic lenses of the headlamps
with a damp sponge.
! Only use washer fluid which is suitable for
plastic lamp lenses. Unsuitable washer
fluid could damage the plastic lamp lenses
of the headlamps.
Therefore, do not use:
R dry cloths
R abrasive products
R solvents
R cleaning products containing solvents Operation
169_AKB; 2; 4, en-GB
wdomann
,V ersion: 2.10.6
2008-07-16T08:52:06+02:00 - Seite 194 Dateiname: 6515_0315_02_buchblock.pdf; preflight
Page 219 of 305

Display
messages 216 Display messages Possible cause/consequence Possible solution
. Cornering light
left
or
Cornering light
right The left-hand or right-hand cornering
light* is fa
ulty. X
Change the bulb (Y page 245).. Dipped-beam left
or
Dipped-beam right Vehicles with the light and visibility pack-
age*: the left-hand or right-hand dipped-
beam headlamp is faulty. X
Halogen headlamp: replace the bulbs
(Y page 245).
X Bi-xenon headlamp*: visit a qualified special-
ist workshop. . AUTO lights inop-
erative The light sensor is faulty. The constant
headlamp mode (daytime driving lights) is
switched on. X
Switch the lights to manual control in the on-
board computer (Y page 109).
X Switch the lights on and off using the light
switch. . Trailer turn sig-
nal left
or
Trailer turn sig-
nal right The left-hand or right-hand trailer turn sig-
nal lamp is faulty. X
Change the bulb. . Trailer tail lamp
left
or
Trailer tail lamp
right The left-hand or right-hand trailer tail light
is faulty. X
Change the bulb. Practical advice
* optional
169_AKB; 2; 4, en-GB
wdomann
,V ersion: 2.10.6
2008-07-16T08:52:06+02:00 - Seite 216 Dateiname: 6515_0315_02_buchblock.pdf; preflight
Page 220 of 305

Display
messages 217Display messages Possible cause/consequence Possible solution
. Turn signal rear
left
or
Turn signal rear
right The rear left-hand or rear right-hand turn
signal is fa
ulty. X
Change the bulb (Y page 245). . Turn signal left
mirror
or
Turn signal right
mirror The turn signal in the left-hand or right-
hand exterior mirror is faulty. This display
message will only appear if all LEDs are
faulty. X
Visit a qualified specialist workshop. . Turn signal front
left
or
Turn signal front
right The front left-hand or front right-hand turn
signal is faulty. X
Change the bulb (Y page 245). . Brake/tail lamp
left
or
Brake/tail lamp
right Vehicles with light and visibility pack-
age*: the left-hand or right-hand brake
lamp is faulty. X
Change the bulb (Y page 245). . 3rd brake lamp Vehicles with the lights and visibility pack-
age*: the third brake lamp is faulty. The
display message will only appear if all
LEDs are faulty. X
Visit a qualified specialist workshop. Practical advice
* optional
169_AKB; 2; 4, en-GB
wdomann
,V ersion: 2.10.6
2008-07-16T08:52:06+02:00 - Seite 217 ZDateiname: 6515_0315_02_buchblock.pdf; preflight
Page 221 of 305

Display
messages 218 Display messages Possible cause/consequence Possible solution
. Main-beam left
or
Main-beam right Vehicles with light and visibility pack-
age*: the left-hand or right-hand high
beam is fa
ulty. X
Change the bulb (Y page 245).. Licence plate lamp Vehicles with the lights and visibility pack-
age*: the left-hand or right-hand licence
plate lamp is faulty. X
Visit a qualified specialist workshop. . Switch off lights The light is switched on when you leave
the vehicle. X
Turn the light switch to MorU.
or
X If the rear foglamp is switched on: press the
light switch in to the stop. . Foglamp left
or
Foglamp right Vehicles with the lights and visibility pack-
age*: the left-hand or right-hand fog-
lamp* is faulty. X
Visit a qualified specialist workshop. . Left-hand Tail
lamp/rear foglamp
or
Right-hand Tail
lamp/rear foglamp Vehicles with lights and visibility pack-
age*: the tail lamp or the rear foglamp is
faulty. X
Change the bulb (Y page 245).. Parking lamp front
left
or
Parking lamp front
right Vehicles with the lights and visibility pack-
age*: the front left-hand or front right-
hand parking lamp is faulty. X
Change the bulb (Y page 245).Practical advice
* optional
169_AKB; 2; 4, en-GB
wdomann
,V ersion: 2.10.6
2008-07-16T08:52:06+02:00 - Seite 218 Dateiname: 6515_0315_02_buchblock.pdf; preflight