2008 MAZDA MODEL B2300 TRUCK ECU
[x] Cancel search: ECUPage 1 of 280

Introduction4
Instrument Cluster 12
Warning lights and chimes 12
Gauges 17
Entertainment Systems19
AM/FM stereo 19
AM/FM stereo with single CD 21
AM/FM stereo with CDX6/MP3 26
Auxiliary input jack (Line in) 32
Satellite radio information 35
Climate Controls39
Heater only 39
Manual heating and air conditioning 40
Lights42
Headlamps 42
Turn signal control 46
Bulb replacement 46
Driver Controls53
Windshield wiper/washer control 53
Steering wheel adjustment 54
Power windows 55
Mirrors 56
Speed control 57
Locks and Security62
Keys 62
Locks 62
Anti-theft system 66
Table of Contents
1
2008 B-Series(mbs)
Owners Guide (post-2002-fmt)
USA (fus)
Page 4 of 280

CALIFORNIA Proposition 65 WarningWARNING: Engine exhaust, some of its constituents, and
certain vehicle components contain or emit chemicals known to
the State of California to cause cancer and birth defects or
other reproductive harm. In addition, certain fluids contained in
vehicles and certain products of component wear contain or
emit chemicals known to the State of California to cause cancer
and birth defects or other reproductive harm.
PERCHLORATE MATERIAL
Certain components of this vehicle such as airbag modules, seat belt
pretensioners, and button cell batteries may contain Perchlorate Material
– Special handling may apply for service or vehicle end of life disposal.
See www.dtsc.ca.gov/hazardouswaste/perchlorate.
CONGRATULATIONS
Congratulations on acquiring your new Mazda product. Please take the
time to get well acquainted with your vehicle by reading this handbook.
The more you know and understand about your vehicle, the greater the
safety and pleasure you will derive from driving it.
For more information on Mazda and its products visit the following
website:
• In the United States: www.mazdausa.com
• In Canada: www.mazda.ca
Additional owner information is given in separate publications or refer to
the Mazda importers/distributors section in theCustomer Assistance
chapter.
This Owner’s Manual describes every option and model variant available
and therefore some of the items covered may not apply to your
particular vehicle. Furthermore, due to printing cycles it may describe
options before they are generally available.
Remember to pass on the Owner’s Manual when reselling the vehicle. It
is an integral part of the vehicle.
2008 B-Series (mbs)
Owners Guide (post-2002-fmt)
USA (fus)
Introduction
4
Page 16 of 280

NOTE:If the light continues to flash have the system serviced.
Anti-theft system: Flashes when
the SecuriLock™ Passive Anti-theft
System has been activated.
Speed control (if equipped):
Illuminates when the speed control
is engaged. Turns off when the
speed control system is disengaged.
Turn signal: Illuminates when the
left or right turn signal or the
hazard lights are turned on. If the
indicators stay on or flash faster, check for a burned out bulb.
High beams: Illuminates when the
high beam headlamps are turned on.
Key-in-ignition warning chime: Sounds when the key is left in the
ignition in the OFF/LOCK or ACCESSORY position and the driver’s door
is opened.
Headlamps on warning chime: Sounds when the headlamps or parking
lamps are on, the ignition is off (the key is not in the ignition) and the
driver’s door is opened.
Door ajar warning chime: Sounds when any door is opened (or not
fully closed).
Parking brake ON warning chime: Sounds when the parking brake is
set, the engine is running and the vehicle is driven more than 3 mph
(5 km/h).
2008 B-Series (mbs)
Owners Guide (post-2002-fmt)
USA (fus)
Instrument Cluster
16
Page 33 of 280

6. Press AUX on the vehicle radio repeatedly until LINE IN appears inthe display.
You should hear audio from your portable music player although it
may be low.
7. Adjust the sound on your portable music player until it reaches the level of the FM station or CD by switching back and forth between
the AUX and FM or CD controls.
Troubleshooting: 1. Do not connect the audio input jack to a line level output. Line level outputs are intended for connection to a home stereo and are not
compatible with the AIJ. The AIJ will only work correctly with
devices that have a headphone output with a volume control.
2. Do not set the portable music player’s volume level higher than is necessary to match the volume of the CD or FM radio in your audio
system as this will cause distortion and will reduce sound quality.
Many portable music players have different output levels, so not all
players should be set at the same levels. Some players will sound
best at full volume and others will need to be set at a lower volume.
3. If the music sounds distorted at lower listening levels, turn the portable music player volume down. If the problems persists, replace
or recharge the batteries in the portable music player.
4. The portable music player must be controlled in the same manner when it is used with headphones as the AIJ does not provide control
(play, pause, etc.) over the attached portable music player.
5. For safety reasons, connecting or adjusting the settings on your portable music player should not be attempted while the vehicle is
moving. Also, the portable music player should be stored in a secure
location, such as the center console or the glove box, when the
vehicle is in motion. The audio extension cable must be long enough
to allow the portable music player to be safely stored while the
vehicle is in motion.
GENERAL AUDIO INFORMATION
Radio frequencies:
AM and FM frequencies are established by the Federal Communications
Commission (FCC) and the Canadian Radio and Telecommunications
Commission (CRTC). Those frequencies are:
AM: 530, 540–1700, 1710 kHz
FM: 87.7, 87.9–107.7, 107.9 MHz
2008 B-Series (mbs)
Owners Guide (post-2002-fmt)
USA (fus)
Entertainment Systems
33
Page 50 of 280

5. Carefully pull bulb straight outof socket and push in the new
bulb.
6. Install the bulb socket in lamp assembly by turning clockwise.
7. Align the lamp on the vehicle and push to snap in place.
8. Install the screw on lamp assembly.
Replacing stop lamp/tail lamp/sidemarker lamp/turn lamp/backup
lamp bulbs
These bulbs are located in the same
portion of the tail lamp assembly,
one just below the other. Follow the
same steps to replace either bulb: 1. Open the tailgate to expose the lamp assemblies.
2. Remove the four screws and the lamp assembly from vehicle.
3. Rotate the bulb socket counterclockwise and remove
from lamp assembly.
4. Carefully pull the bulb straight out of the socket and push in
the new bulb.
5. Install the bulb socket in lamp assembly by turning clockwise.
6. Install the lamp assembly and secure with four screws.
2008 B-Series (mbs)
Owners Guide (post-2002-fmt)
USA (fus)
Lights
50
Page 51 of 280

Replacing fog lamp bulbsWARNING: Handling Halogen Bulbs: When a halogen bulb
breaks, it is dangerous. These bulbs contain pressurized gas. If
one is broken, it will explode and serious injuries could be
caused by the flying glass. If the glass portion of the bulb is
touched with bare hands, body oil could cause the bulb to
overheat and explode when lit. Never touch the glass portion of
the bulb with your bare hands and always wear eye protection
when handling or working around halogen bulbs.
WARNING: Children and Halogen Bulbs: Playing with a halogen
bulb is dangerous. Serious injuries could be caused by dropping
a halogen bulb or breaking in some other way. Always keep
halogen bulbs out of the reach of children.
NOTE: If the bulb is accidentally touched, it should be cleaned with
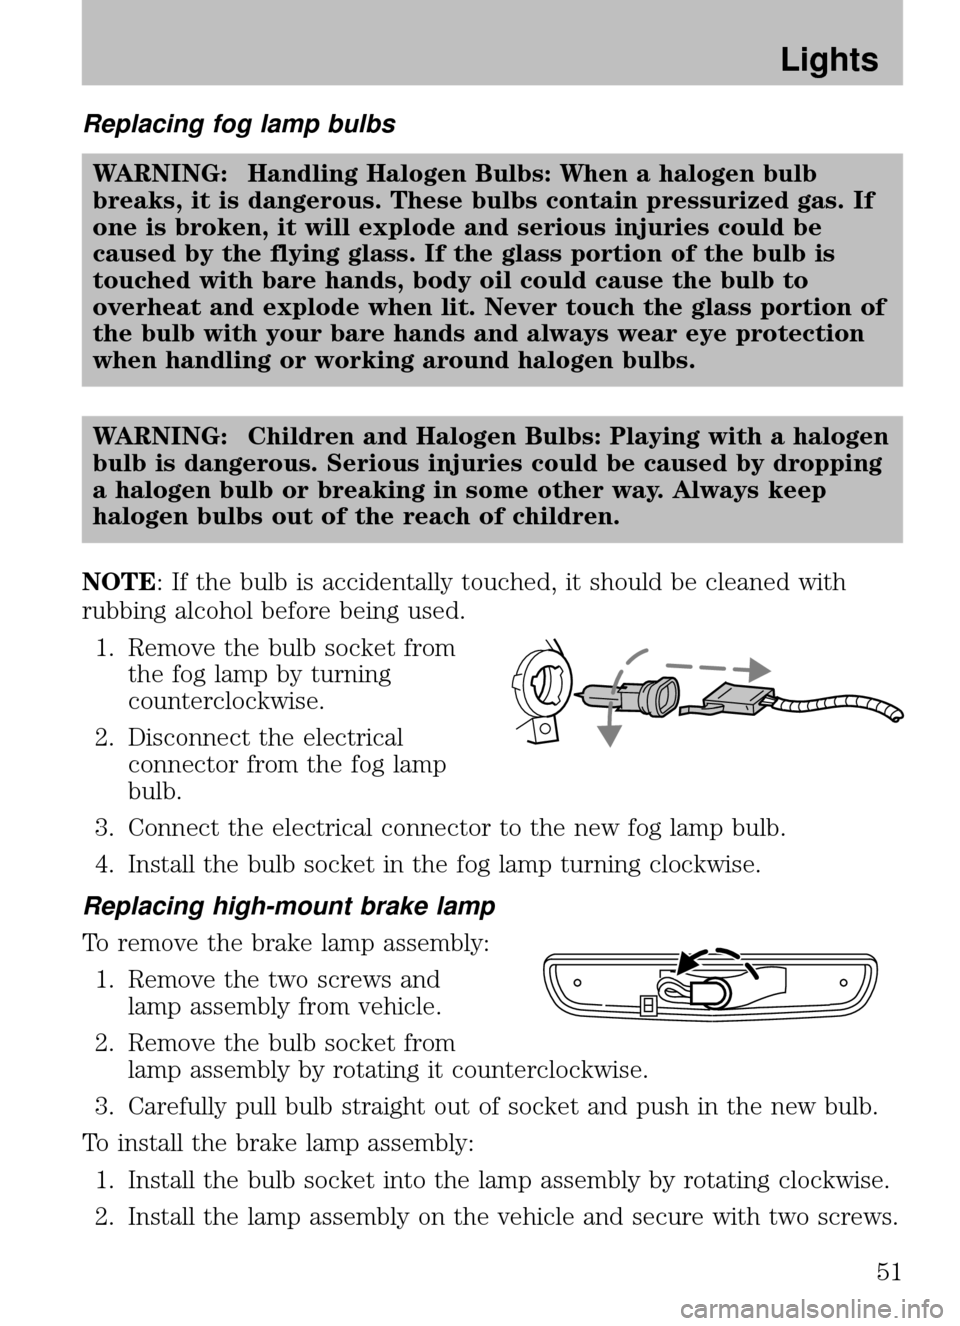
rubbing alcohol before being used. 1. Remove the bulb socket from the fog lamp by turning
counterclockwise.
2. Disconnect the electrical connector from the fog lamp
bulb.
3. Connect the electrical connector to the new fog lamp bulb.
4. Install the bulb socket in the fog lamp turning clockwise.
Replacing high-mount brake lamp
To remove the brake lamp assembly: 1. Remove the two screws and lamp assembly from vehicle.
2. Remove the bulb socket from lamp assembly by rotating it counterclockwise.
3. Carefully pull bulb straight out of socket and push in the new bulb.
To install the brake lamp assembly: 1. Install the bulb socket into the lamp assembly by rotating clockwise.
2. Install the lamp assembly on the vehicle and secure with two screws.
2008 B-Series (mbs)
Owners Guide (post-2002-fmt)
USA (fus)
Lights
51
Page 60 of 280

Deactivating overdrive
Press the Transmission Control
Switch (TCS) located on the end of
the gearshift lever. The O/D Off
indicator light will illuminate on the
instrument cluster. The transmission
will operate in all gears except overdrive.
To return to normal overdrive mode, press the Transmission Control
Switch again. The O/D Off indicator light will no longer be illuminated.
When you shut off and re-start your vehicle, the transmission will
automatically return to normal
(Overdrive) mode.
For additional information about the gearshift lever and the transmission
control switch operation refer to the Automatic Transmission
Operation section of the Drivingchapter.
BED EXTENDER (IF EQUIPPED)
Your vehicle may be equipped with a bed extender designed to extend
the pickup box for larger loads.
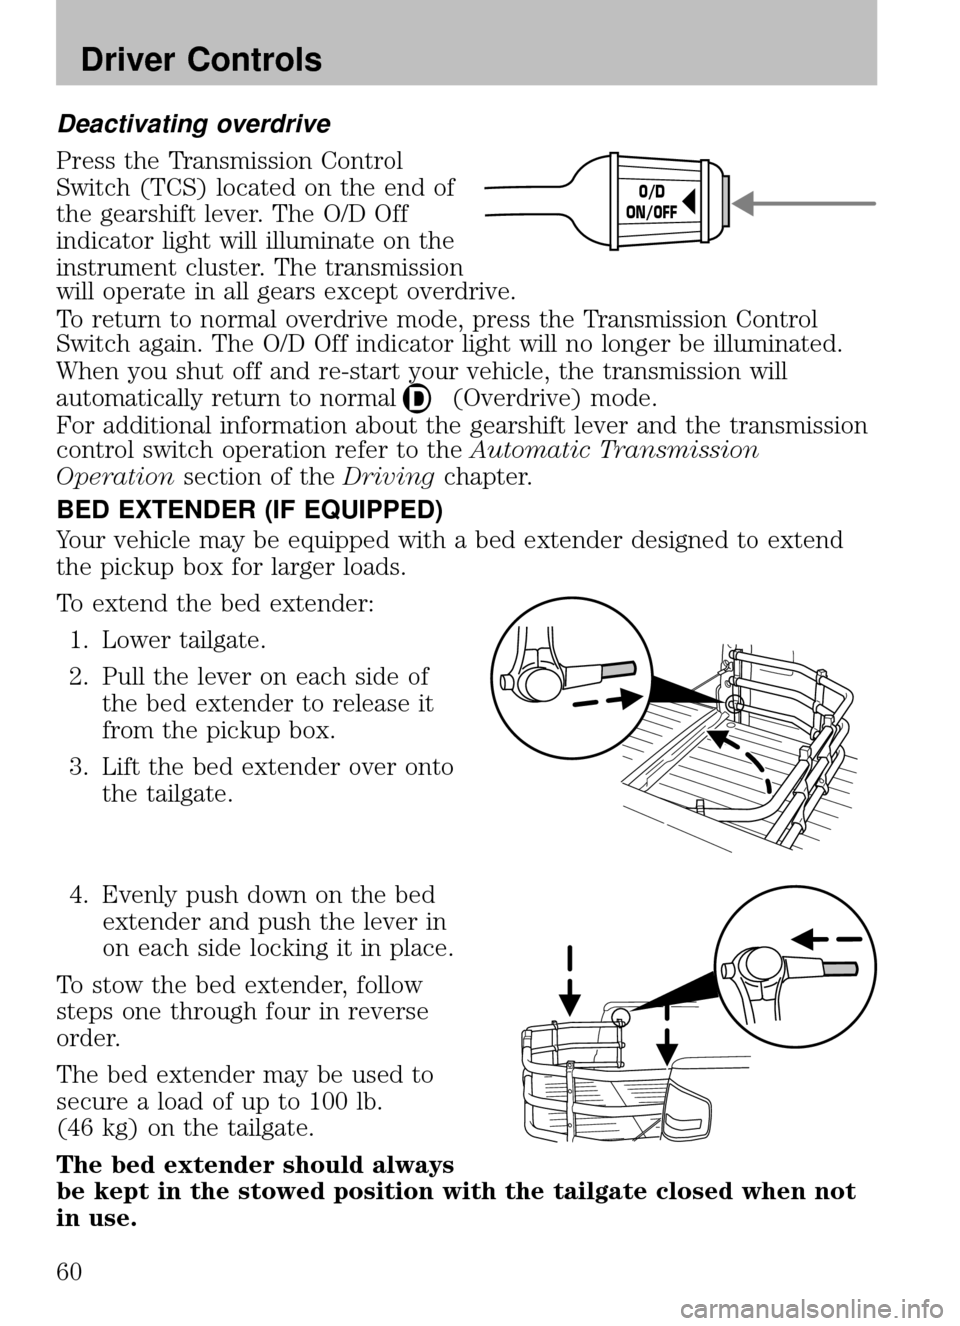
To extend the bed extender:
1. Lower tailgate.
2. Pull the lever on each side of the bed extender to release it
from the pickup box.
3. Lift the bed extender over onto the tailgate.
4. Evenly push down on the bed extender and push the lever in
on each side locking it in place.
To stow the bed extender, follow
steps one through four in reverse
order.
The bed extender may be used to
secure a load of up to 100 lb.
(46 kg) on the tailgate.
The bed extender should always
be kept in the stowed position with the tailgate closed when not
in use.
O/D
ON/OFF
2008 B-Series (mbs)
Owners Guide (post-2002-fmt)
USA (fus)
Driver Controls
60
Page 62 of 280

KEYS
The key operates all locks on your vehicle. You should always carry a
second key with you in a safe place in case you require it in an
emergency.
If your vehicle is equipped with the SecuriLock™ Passive Anti-theft
system, your keys are coded to your vehicle; using a non-coded key will
not permit your vehicle to start. If you lose your dealer supplied keys,
replacement keys are available through your authorized dealer.
POWER DOOR LOCKS (IF EQUIPPED)
Press the control to unlock or lock
all the doors.
REMOTE ENTRY SYSTEM (IF EQUIPPED)
This device complies with part 15 of the FCC rules and with RS-210 of
Industry Canada. Operation is subject to the following two conditions:
(1) This device may not cause harmful interference, and (2) This device
must accept any interference received, including interference that may
cause undesired operation.
Changes or modifications not expressly approved by the party
responsible for compliance could void the user’s authority to
operate the equipment.
The typical operating range for your remote entry transmitter is
approximately 33 feet (10 meters). A decrease in operating range could
be caused by:
•weather conditions,
• nearby radio towers,
• structures around the vehicle, or
• other vehicles parked next to your vehicle.
2008 B-Series (mbs)
Owners Guide (post-2002-fmt)
USA (fus)
Locks and Security
62