Page 55 of 273
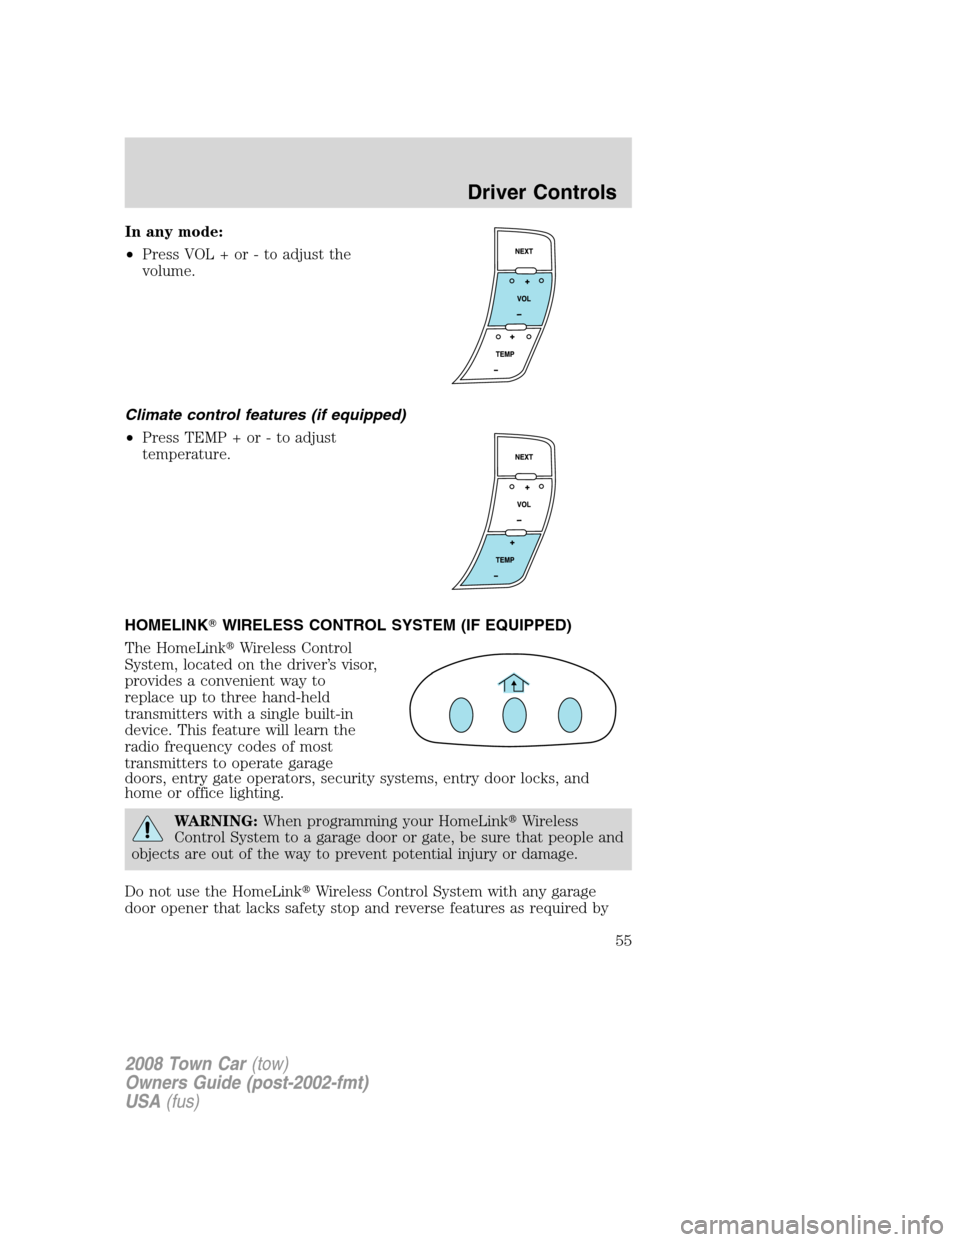
In any mode:
•Press VOL + or - to adjust the
volume.
Climate control features (if equipped)
•Press TEMP + or - to adjust
temperature.
HOMELINK�WIRELESS CONTROL SYSTEM (IF EQUIPPED)
The HomeLink�Wireless Control
System, located on the driver’s visor,
provides a convenient way to
replace up to three hand-held
transmitters with a single built-in
device. This feature will learn the
radio frequency codes of most
transmitters to operate garage
doors, entry gate operators, security systems, entry door locks, and
home or office lighting.
WARNING:When programming your HomeLink�Wireless
Control System to a garage door or gate, be sure that people and
objects are out of the way to prevent potential injury or damage.
Do not use the HomeLink�Wireless Control System with any garage
door opener that lacks safety stop and reverse features as required by
2008 Town Car(tow)
Owners Guide (post-2002-fmt)
USA(fus)
Driver Controls
55
Page 58 of 273

Operating the HomeLink�Wireless Control System
To operate, simply press and release
the appropriate HomeLink�button.
Activation will now occur for the
trained product (garage door, gate
operator, security system, entry
door lock, or home or office lighting
etc.). For convenience, the
hand-held transmitter of the device
may also be used at any time. In the event that there are still
programming difficulties, contact HomeLink�atwww.homelink.comor
1–800–355–3515.
Erasing HomeLink�buttons
To erase the three programmed
buttons (individual buttons cannot
be erased):
•Press and hold the two outer
HomeLink�buttons until the
indicator light begins to
flash-after 20 seconds. Release
both buttons. Do not hold for
longer that 30 seconds.
HomeLink�is now in the train (or learning) mode and can be
programmed at any time beginning with Step 1 in theProgramming
section.
Reprogramming a single HomeLink�button
To program a device to HomeLink�using a HomeLink�button previously
trained, follow these steps:
1. Press and hold the desired HomeLink�button.Do NOTrelease the
button.
2. The indicator light will begin to flash after 20 seconds. Without
releasing the HomeLink�button, follow Step 1 in theProgramming
section.
For questions or comments, contact HomeLink�atwww.homelink.com
or1–800–355–3515.
2008 Town Car(tow)
Owners Guide (post-2002-fmt)
USA(fus)
Driver Controls
58
Page 65 of 273
 have a magnetic north compass point that
varies slightly from the northerly direction on maps. This variation is four
degrees between adjacent zones and will become notic")
Most geographic areas (zones) have a magnetic north compass point that
varies slightly from the northerly direction on maps. This variation is four
degrees between adjacent zones and will become noticeable as the
vehicle crosses multiple zones. A correct zone setting will eliminate this
error. Refer toCompass zone/calibration adjustment.
Compass zone/calibration adjustment
1. Determine your magnetic zone by
referring to the zone map.
2. Turn ignition to the on position.
3. Start the engine.
4. From SETUP menu, select the
Compass/Odometer function.
5. Press SELECT to show the
current zone setting (XX).
6. Press the SELECT control
repeatedly until the correct zone
setting for your geographic location
is displayed on the message center.
The range of zone values are from
01 to 15 and “wraps” back to 01.
7. To exit the zone setting mode, and to “lock in” your change, press and
release the SETUP control.
Perform compass calibration in an open area free from steel structures
and high voltage lines. For optimum calibration, turn off all electrical
accessories (heater/air conditioning, wipers, etc.) and make sure all
vehicle doors are shut.
8. Press the SELECT control to
start the compass calibration
function.
1 2 3
4
5
6 7 8 9 101112 13 14 15
2008 Town Car(tow)
Owners Guide (post-2002-fmt)
USA(fus)
Driver Controls
65
Page 70 of 273
To reset the oil monitoring system to 100% after each oil change
[approximately 7,500 miles (12,000 km) or 6 months] perform the
following:
1. Press and hold the RESET
control for two seconds and release.
Oil life is set to 100% and “OIL LIFE
XXX% HOLD RESET IF NEW OIL”
is displayed.
2. Press and hold the RESET
control for three seconds and
release. Oil life is set to 100% and
“OIL LIFE START VALUE SET TO
XXX%” is displayed.
POSITIVE RETENTION FLOOR MAT
WARNING:Do not install additional floor mats on top of the
factory installed floor mats as they may interfere with the
accelerator or the brake pedals.
Position the driver floor mat so that
the eyelet is over the pointed end of
the retention post and rotate
forward to lock in. Make sure that
the mat does not interfere with the
operation of the accelerator or the
brake pedal. To remove the floor
mat, reverse the installation
procedure.
2008 Town Car(tow)
Owners Guide (post-2002-fmt)
USA(fus)
Driver Controls
70
Page 71 of 273

Your vehicle may be equipped with a power trunk controlled by the
interior trunk control, the key fob or the keypad on the door.
If anything obstructs the power trunk while i")
POWER TRUNK (IF EQUIPPED)
Your vehicle may be equipped with a power trunk controlled by the
interior trunk control, the key fob or the keypad on the door.
If anything obstructs the power trunk while it is closing, the trunk will
automatically reverse to the open position, provided it meets sufficient
resistance. Resistance must be as strong as the force of the closing
trunk, or stronger. The force of the closing trunk increases as the trunk
approaches the latched position. The trunk will close with the next press
of the interior trunk control or key fob button.
WARNING:Make sure all persons are clear of the luggage
compartment area before using the power trunk control.
If the battery is disconnected, discharged, or a new battery is installed,
the power trunk needs to be reset. To reset the power trunk:
•Reconnect the battery with the trunk closed
•Power activate the trunk with the power interior trunk release, the
key fob or the keypad on the door to the full open position, then
power activate the same power source and fully close the trunk. The
power trunk is now reset.
INTERIOR TRUNK CONTROL
The remote trunk release control is
located on the driver’s door trim
panel and can be operated at any
time except when your perimeter
alarm system is armed.
If your vehicle is equipped with a
power trunk, press the button once
to open the trunk, press it again to
close.
You can render the switch inoperable by locking the button with your
master key.
The remote trunk release control and power door locks will be disabled
when the vehicle perimeter alarm system is armed. This control will not
work until the vehicle perimeter alarm system is disarmed. Refer to
Perimeter Alarm Systemin theLocks and Securitychapter.
2008 Town Car(tow)
Owners Guide (post-2002-fmt)
USA(fus)
Driver Controls
71
Page 72 of 273
FUEL DOOR RELEASE
Your vehicle is equipped with a
locking fuel door. To open the door,
press the control located on the
door.
Fuel filler door override release
If the remote release is inoperative,
open the trunk, then pull the
override release handle located
inside the trunk to open the fuel
filler door.
2008 Town Car(tow)
Owners Guide (post-2002-fmt)
USA(fus)
Driver Controls
72
Page 73 of 273
 key lock system.
•The master key will access the vehicle’s doors, trunk, glove box,
ignition and remote")
KEYS
Your vehicle is equipped with a master key and a valet (identified with
the word VALET) key lock system.
•The master key will access the vehicle’s doors, trunk, glove box,
ignition and remote trunk release.
•The valet key will access doors and ignition only.
Before using the valet key with an attendant, lock the interior trunk
control to disable the interior trunk control located on the drivers door,
then lock the glove compartment with your master key. Do not hand
over the remote entry transmitter or the master key to the valet
attendant. For more information, refer toInterior trunk controlin the
Driver Controlschapter.
POWER DOOR LOCKS
Press control to unlock all doors.
Note:When the perimeter alarm is
armed, the power door locks are
disabled.
Press control to lock all doors.
Power door trim switch inhibit
This feature disables the power door locks and trunk interior release
switches if all doors are closed and the perimeter alarm becomes armed.
Once the power door trim switches are disabled, they can only become
active when perimeter alarm is disarmed.
Smart locks
With the key in the ignition, in any switch position, and either the
driver’s or passenger’s door open, the doors cannot be locked using the
power door lock switches.
Central locking/unlocking
•All doors are locked when the key is inserted into the driver door key
cylinder and turned to the lock position.
•The driver’s door is unlocked when the key is inserted into the driver
door key cylinder and turned to the unlock position.
2008 Town Car(tow)
Owners Guide (post-2002-fmt)
USA(fus)
Locks and Security
73
Page 74 of 273

•If the key is turned a second time to the unlock position within five
seconds, all vehicle doors will unlock.
Autolock
This feature automatically locks all vehicle doors when the following
conditions are met:
•all the doors are closed,
•the engine is running,
•you shift into gear, putting the vehicle in motion, and.
•the vehicle’s speed is greater than 3 mph (5 km/h).
Auto-relock
The autolock feature repeats when:
•a door is opened and closed while the engine is running,
•you shift into any gear, putting the vehicle in motion, and
•the vehicle’s speed is greater than 3 mph (5 km/h).
Auto-unlock
The auto-unlock feature will unlock all doors when:
•the ignition has been in the on position, all doors are closed, and the
vehicle has been in motion at a speed greater than 3 mph (5 km/h),
•the vehicle has then come to a stop and the ignition is turned to the
accessory or off position, and
•the driver door is opened (within ten minutes after the ignition was
transitioned to the accessory or off position).
Note:The vehicle doors will not auto-unlock if the vehicle has been
electronically locked prior to the driver door being opened.
Deactivating/activating the autolock or auto-unlock feature
Autolocking and auto-unlocking are independent features; either feature
may be enabled or disabled without affecting the other.
You must complete Steps 1-7 within 30 seconds or the procedure will
have to be repeated. If the procedure needs to be repeated, you must
wait at least 30 seconds.Note:Before following the procedure, make
sure that the ignition is in the off position and all vehicle doors, the
hood, and the decklid are closed.
2008 Town Car(tow)
Owners Guide (post-2002-fmt)
USA(fus)
Locks and Security
74
![LINCOLN TOWN CAR 2008 Owners Manual To reset the oil monitoring system to 100% after each oil change
[approximately 7,500 miles (12,000 km) or 6 months] perform the
following:
1. Press and hold the RESET
control for two seconds and rele](/manual-img/15/7051/w960_7051-69.png "LINCOLN TOWN CAR 2008 Owners Manual To reset the oil monitoring system to 100% after each oil change
[approximately 7,500 miles (12,000 km) or 6 months] perform the
following:
1. Press and hold the RESET
control for two seconds and rele")
