2008 LINCOLN NAVIGATOR power
[x] Cancel search: powerPage 1 of 352
Introduction 4
Instrument Cluster 12
Warning lights and chimes 12
Gauges 17
Entertainment Systems 20
AM/FM stereo with CDX6/MP3 20
Auxiliary input jack (Line in) 27
Rear seat controls 28
Satellite radio information 33
Family entertainment system 35
Navigation system 64
Climate Controls 65
Dual automatic temperature control 65
Rear window defroster 71
Lights 72
Headlamps 72
Turn signal control 75
Bulb replacement 77
Driver Controls 83
Windshield wiper/washer control 83
Steering wheel adjustment 84
Power windows 89
Mirrors 91
Speed control 96
Moon roof 101
Message center 106
Locks and Security 124
Keys 124
Locks 124
Table of Contents
1
2008 Navigator(nav)
Owners Guide (post-2002-fmt)
USA(fus)
Page 11 of 352
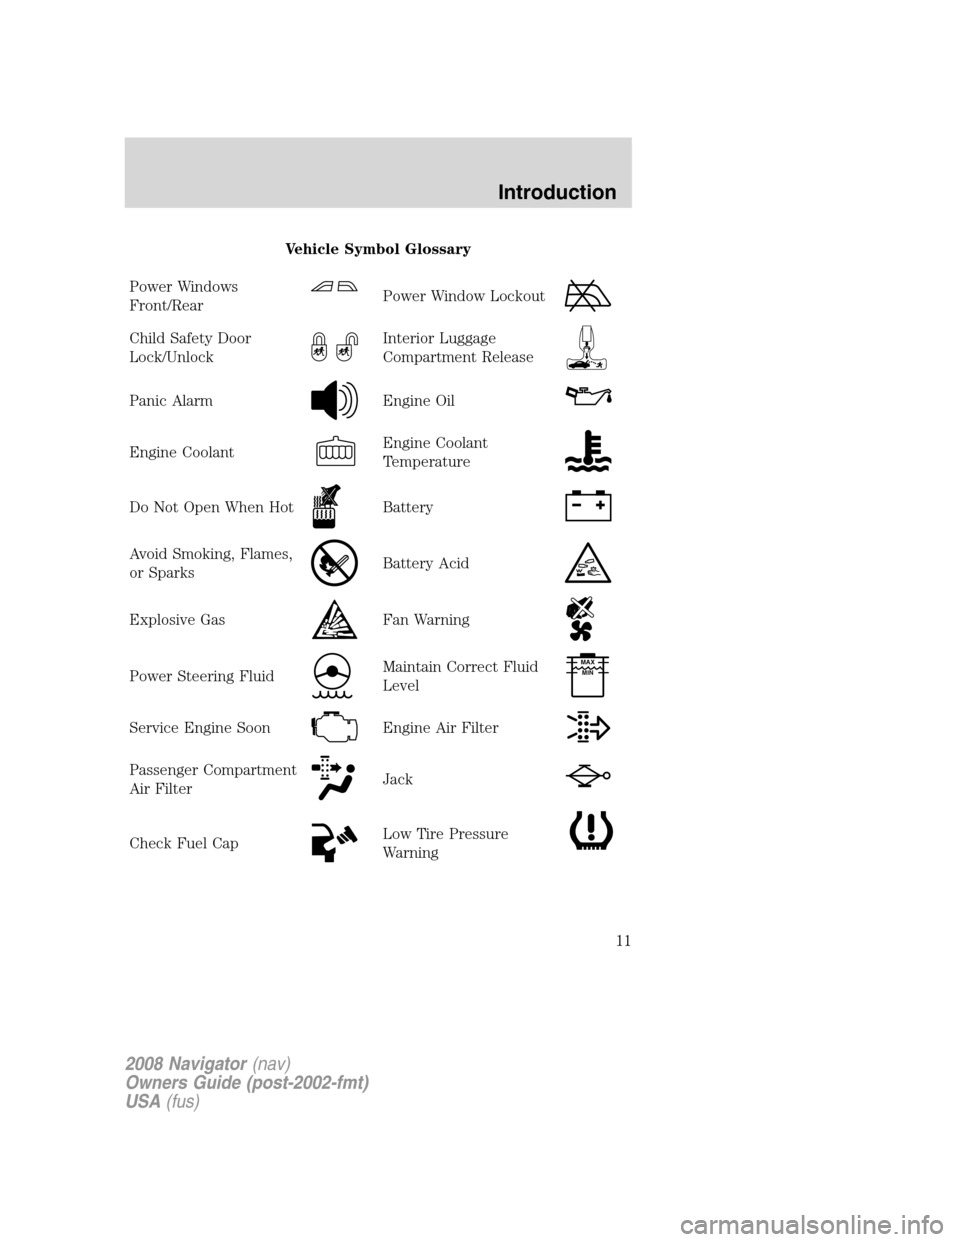
Vehicle Symbol Glossary
Power Windows
Front/Rear
Power Window Lockout
Child Safety Door
Lock/UnlockInterior Luggage
Compartment Release
Panic AlarmEngine Oil
Engine CoolantEngine Coolant
Temperature
Do Not Open When HotBattery
Avoid Smoking, Flames,
or SparksBattery Acid
Explosive GasFan Warning
Power Steering FluidMaintain Correct Fluid
LevelMAX
MIN
Service Engine SoonEngine Air Filter
Passenger Compartment
Air FilterJack
Check Fuel CapLow Tire Pressure
Warning
2008 Navigator(nav)
Owners Guide (post-2002-fmt)
USA(fus)
Introduction
11
Page 13 of 352

damage your catalytic converter. Drive in a moderate fashion (avoid
heavy acceleration and deceleration) and have your vehicle serviced
immediately by your authorized dealer.
Under engine misfire conditions, excessive exhaust temperatures
could damage the catalytic converter, the fuel system, interior
floor coverings or other vehicle components, possibly causing a fire.
Powertrain malfunction/reduced
power (RTT) (if equipped):
Displays when the engine has
defaulted to a ’limp-home’ operation.
Report the fault to a dealer at the
earliest opportunity.
Brake system warning light:To
confirm the brake system warning
light is functional, it will
momentarily illuminate when the
ignition is turned to the ON position
when the engine is not running, or in a position between ON and START,
or by applying the parking brake when the ignition is turned to the ON
position. If the brake system warning light does not illuminate at this
time, seek service immediately from your authorized dealer. Illumination
after releasing the parking brake indicates low brake fluid level and the
brake system should be inspected immediately by your authorized dealer.
Driving a vehicle with the brake system warning light on is
dangerous. A significant decrease in braking performance may
occur. It will take you longer to stop the vehicle. Have the vehicle
checked by your authorized dealer. Driving extended distances with
the parking brake engaged can cause brake failure and the risk of
personal injury.
Anti-lock brake system:If the
ABS light stays illuminated or
continues to flash, a malfunction has
been detected, have the system
serviced immediately by your
authorized dealer. Normal braking is still functional unless the brake
warning light also is illuminated.
P!
BRAKE
ABS
2008 Navigator(nav)
Owners Guide (post-2002-fmt)
USA(fus)
Instrument Cluster
13
Page 31 of 352

The rear speakers will cut out once the speaker on/off control is pressed.
The front speaker will remain playing for the front passengers. Press the
control again to deactivate the headphones. SINGLE PLAY illuminates in
the radio display and the fade control is enabled, signaling that Dual Play
mode has been deactivated.
To enable Dual Play, the rear seat controls must be active
and
illuminated in the radio display.
GENERAL AUDIO INFORMATION
Radio frequencies:
AM and FM frequencies are established by the Federal Communications
Commission (FCC) and the Canadian Radio and Telecommunications
Commission (CRTC). Those frequencies are:
AM: 530, 540–1700, 1710 kHz
FM: 87.7, 87.9–107.7, 107.9 MHz
Radio reception factors:
There are three factors that can affect radio reception:
•Distance/strength: The further you travel from an FM station, the
weaker the signal and the weaker the reception.
•Terrain: Hills, mountains, tall buildings, power lines, electric fences,
traffic lights and thunderstorms can interfere with your reception.
•Station overload: When you pass a broadcast tower, a stronger signal
may overtake a weaker one and play while the weak station frequency
is displayed.
CD/CD player care
Do:
•Handle discs by their edges only.
(Never touch the playing
surface).
•Inspect discs before playing.
•Clean only with an approved CD
cleaner.
2008 Navigator(nav)
Owners Guide (post-2002-fmt)
USA(fus)
Entertainment Systems
31
Page 36 of 352

Your vehicle may be equipped with a Family Entertainment System
(FES) which allows you to listen to audio CDs, MP3 discs, watch DVDs
and to plug in and play a variety of standard video game systems. The
DVD player is capable of playing standard DVDs, CDs, MP3s and is
compatible with CD-R/W, CD-R and certain CD-ROM media.
Please review this material to become familiar with the FES features and
controls as well as the very important safety information.
The driver should not attempt to operate any function of the
DVD system while the vehicle is in motion. Give full attention to
driving and to the road. Pull off the road in a safe place before
inserting or extracting DVDs from the system. A remote control is
included in the system to allow the rear seat occupants to operate the
FES functions without distracting the driver.
Quick start
Your Family Entertainment System includes a DVD system, two sets of
wireless infrared (IR) headphones and a wireless infrared (IR) remote
control.
To play a DVD in the DVD system:
The DVD system can play DVD-Video, DVD-R, DVD-R/W discs as well as
audio CDs and video CDs. To ensure proper disc operation, check the
disc for finger prints, scratches and cleanliness. Clean with a soft cloth,
wiping from center to edge.
1. Ensure that the vehicle ignition is in the RUN or ACCESSORY
position.
2. Insert a DVD into the system,
label-side up to turn on the system.
It will load automatically.
3. Press the power button on the
DVD player, then press Play (
)
to begin to play the disc.
If a DVD is already loaded into the
system, press PLAY on the DVD
player.
Note:If sound can be heard, but no video is present, press VIDEO to
select the video source (DVD or aux-inputs).
2008 Navigator(nav)
Owners Guide (post-2002-fmt)
USA(fus)
Entertainment Systems
36
Page 37 of 352

Press VIDEO to change the source
displayed on the screen. Press
repeatedly to cycle through:
DVD-DISC, DVD-AUX, NON-DVD,
OFF.
Press the power button to turn the
system OFF. The indicator light will
turn off indicating the system is off.
Note:The audio from the DVD system will play over all vehicle speakers
and can be adjusted by the radio volume control.
To play a CD in the DVD system:
The DVD system can play audio CDs, CD-R and CD-R/W, CD-ROM and
video CDs. To ensure proper disc operation, check the disc for finger
prints and scratches. Clean the disc with a soft cloth, wiping from the
center to the edge.
1. Ensure that the vehicle ignition is in the RUN or ACCESSORY
position.
2. Insert a CD into the system,
label-side up to turn on the DVD
system. It will load and
automatically begin to play. If there
is already a CD in the system, press
PLAY on the DVD player.
3. The disc will begin to play and
the ’CD Audio Disc’ screen will
display. From this screen, you can
also select from COMPRESSION,
SHUFFLE and SCAN features.
2008 Navigator(nav)
Owners Guide (post-2002-fmt)
USA(fus)
Entertainment Systems
37
Page 38 of 352
To play an MP3 disc in the DVD system:
1. Ensure that the vehicle ignition is in the RUN or ACCESSORY
position.
2. Insert an MP3 disc into the
system, label-side up to turn on the
DVD system. It will load and
automatically begin to play. If there
is already a disc in the system, press
PLAY on the DVD player.
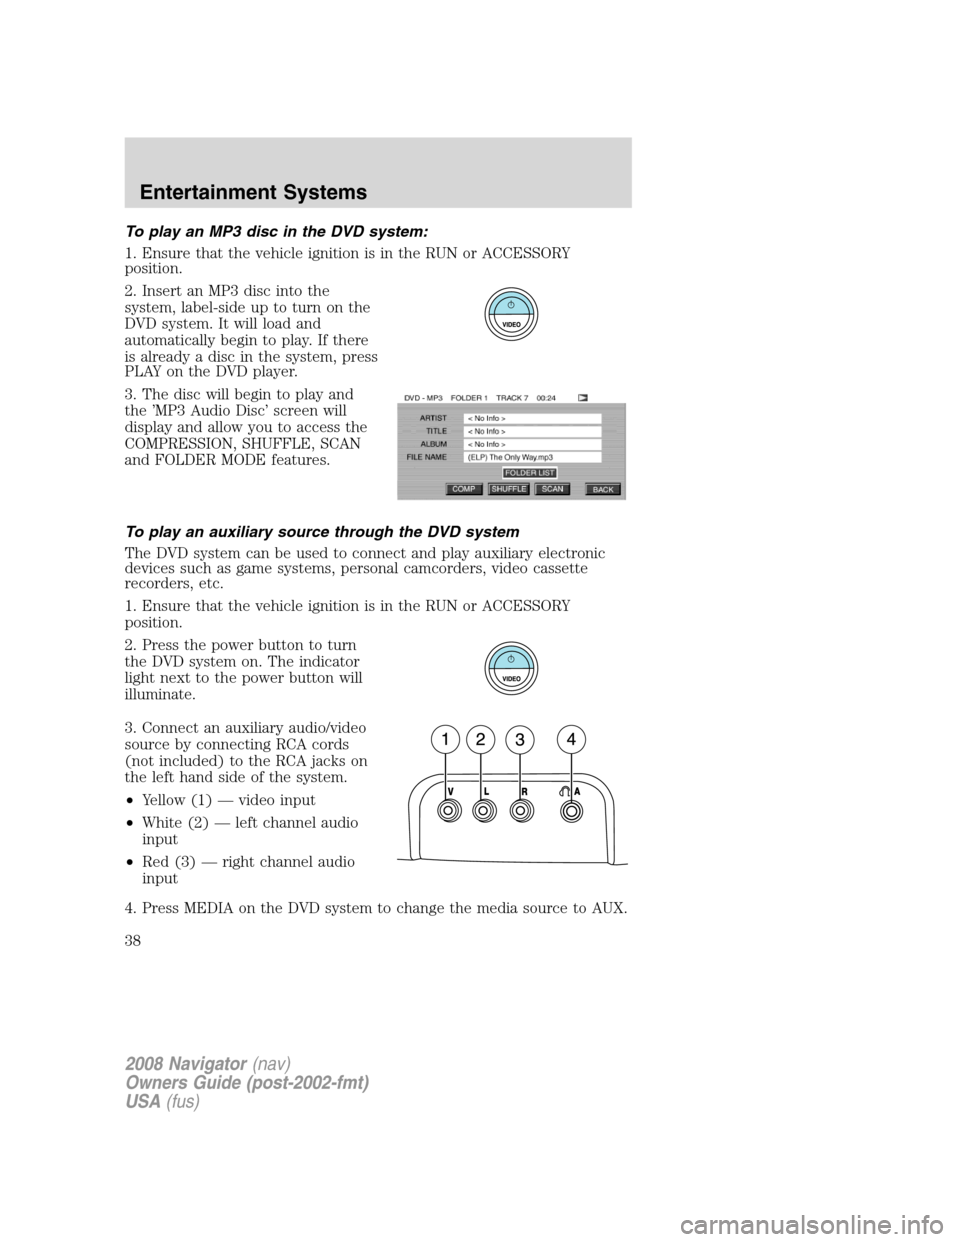
3. The disc will begin to play and
the ’MP3 Audio Disc’ screen will
display and allow you to access the
COMPRESSION, SHUFFLE, SCAN
and FOLDER MODE features.
To play an auxiliary source through the DVD system
The DVD system can be used to connect and play auxiliary electronic
devices such as game systems, personal camcorders, video cassette
recorders, etc.
1. Ensure that the vehicle ignition is in the RUN or ACCESSORY
position.
2. Press the power button to turn
the DVD system on. The indicator
light next to the power button will
illuminate.
3. Connect an auxiliary audio/video
source by connecting RCA cords
(not included) to the RCA jacks on
the left hand side of the system.
•Yellow (1) — video input
•White (2) — left channel audio
input
•Red (3) — right channel audio
input
4. Press MEDIA on the DVD system to change the media source to AUX.
2008 Navigator(nav)
Owners Guide (post-2002-fmt)
USA(fus)
Entertainment Systems
38
Page 39 of 352

5. Press VIDEO on the DVD system to change the video source to
DVD-AUX. If your source is properly plugged in, it will appear on the
LCD (Liquid Crystal Display) screen. If your auxiliary source does not
have a video signal, or if the DVD system does not detect a video signal
from the auxiliary source, the screen will remain black. If the video
source is set to DVD-AUX, the display will automatically turn on if a
video signal is detected.
To listen to audio over the headphones (Dual play mode):
1. You may listen to channels A and B over wired or wireless
headphones. Refer toUsing the infrared wireless headphonesand
Using wired headphonesfor further information.
•Black (4) — wired headphone output (wired headphones not
included)
2. Press the headphone/speaker
button on the DVD player or press
the 2 and 4 memory presets on the
audio system at the same time.
A green light will illuminate next to either the A or B Headphone Control
Button to indicate which channel is active (able to be controlled).
3. Press MEDIA to change the audio source of the active channel (A or
B). The audio source will be shown on the display. You may change the
active channel by pressing the A or B headphone control button.
Note:Channel A can access any possible media source (AM, FM1, FM2,
SAT (if equipped), CD, DVD, AUX). Channel B can only access DVD and
AUX sources.
Note:Refer toSingle play/Dual playfor more information.
Using the infrared (IR) wireless headphones:
1. Press the power control on the earpiece to turn the headphones ON.
2. Select Channel A or B for each set of wireless headphones by using
the A/B control on the ear piece.
3. Adjust the headphone volume using the rotary dial on the earpiece.
Using wired headphones (not included):
Do not leave children unattended in the vehicle and do not let
children operate the system while unsupervised. If wired
headphones or auxiliary systems are used, children may become
entangled in the cords and seriously injure themselves.
2008 Navigator(nav)
Owners Guide (post-2002-fmt)
USA(fus)
Entertainment Systems
39