Page 49 of 57
344
4-3. Do-it-yourself maintenance
Headlight aim (vehicles with discharge headlights)
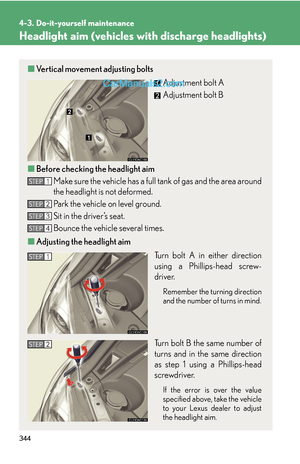
■Vertical movement adjusting bolts
Adjustment bolt A
Adjustment bolt B
■Before checking the headlight aim
Make sure the vehicle has a full tank of gas and the area around
the headlight is not deformed.
Park the vehicle on level ground.
Sit in the driver’s seat.
Bounce the vehicle several times.
■Adjusting the headlight aim
Turn bolt A in either direction
using a Phillips-head screw-
driver.
Remember the turning direction
and the number of turns in mind.
Turn bolt B the same number of
turns and in the same direction
as step 1 using a Phillips-head
screwdriver.
If the error is over the value
specified above, take the vehicle
to your Lexus dealer to adjust
the headlight aim.
STEP1
STEP2
STEP3
STEP4
STEP1
STEP2
Page 50 of 57
345
4-3. Do-it-yourself maintenance
4
Maintenance and care
Light bulbs
You may replace the following bulbs yourself. For more information about
replacing other light bulbs, contact your Lexus dealer.
■Prepare a replacement light bulb.
Check the wattage of the light bulb being replaced. (→P. 4 1 9 )
■Remove the engine compartment cover.
→P. 3 0 4
■Front bulb locations
■Rear bulb locations
Headlight high beam
Headlight
low beam
(halogen
bulb)
Front turn signal lightFront side marker light
Parking light
Rear turn signal lightStop/tail light
Rear side marker light
Page 51 of 57
346
4-3. Do-it-yourself maintenance
Replacing light bulbs
■Headlight low beams (for vehicles without discharge bulbs)
Unplug the connector.
Remove the cover.
Release the lock.
STEP1
STEP2
STEP3
Page 52 of 57
347
4-3. Do-it-yourself maintenance
4
Maintenance and care
Remove the light bulb.
■Headlight high beams
Turn the bulb base counterclock-
wise.
Unplug the connector while
depressing the lock release.
■Parking lights and front side marker lights, front turn signal lights
Remove the access hole cover.STEP4
STEP1
STEP2
STEP1
Page 53 of 57
348
4-3. Do-it-yourself maintenance
Parking light and front side
marker light
Front turn signal light
Turn the bulb base counterclock-
wise.
Parking light and front side marker light
Remove the light bulb.
Front turn signal light
Remove the light bulb.STEP2
STEP3
STEP3
Page 54 of 57
349
4-3. Do-it-yourself maintenance
4
Maintenance and care
■Stop/tail, rear turn signal and rear side marker lights
Open the trunk lid and remove the
access hole cover.
Stop/tail light
Rear turn signal light
Rear side marker light
Turn the bulb base counterclock-
wise.
Stop/tail light
Remove the light bulb.
STEP1
STEP2
STEP3
Page 55 of 57
350
4-3. Do-it-yourself maintenance
Rear turn signal light
Remove the light bulb.
Rear side marker light
Remove the light bulb.
■Bulbs other than the above
If any of the bulbs listed below has burnt out, have your Lexus dealer
replace it.
●Headlight low beams (discharge bulbs)
●Front fog lights
●Tail lights
●High mounted stoplight
●License plate lights
●Back-up lights
STEP3
STEP3
Page 56 of 57
351
4-3. Do-it-yourself maintenance
4
Maintenance and care
■Condensation build-up on the inside of the lens
Contact your Lexus dealer for more information in the following situations. Tempo-
rary condensation build-up on the inside of the headlight lens does not indicate a
malfunction.
●Large drops of water are built up on the inside of the lens.
●Water has built up inside the headlight.
■Discharge headlights
If voltage to the discharge bulbs is insufficient, the bulbs may not come on, or may
go out temporarily. The discharge bulbs will come on when normal power is
restored.
■LED stop lights
The high mounted stoplight consists of a number of LEDs. If any of the LEDs burn
out, take your vehicle to your Lexus dealer to have the light replaced.


■Vertical movement adjusting bolts
Adjustment bolt A
Adjustment bolt B
■Before checking the headlight aim
Mak")


Unplug the connector.
Remove the cover.
Release the lock.
STEP1
STEP2
STEP3")


