Page 9 of 350
23
1
2
3
4
5
6
7
8
9
Your vehicle at a glance
INSTRUMENT PANEL OVERVIEW
1. Driver’s airbag
2. Light control / Turn signals
3. Instrument cluster
4. Wiper/Washer
5. Ignition switch
6. Steering wheel
7. Digital clock
8. Hazard
9. Audio controls (if equipped)
10. Climate control system (if equipped)
11. Passenger’s airbag
12. Vent controls
13. Glove box
14. Ashtray
15. Cigar lighter
16. Shift lever
17. Auto cruise controls (if equipped)
18. PASSENGER AIR BAG OFF
indicator
1KMA0003
Page 91 of 350
Knowing your vehicle
82 3
1
2
3
4
5
6
7
8
9
1. Stop the engine.
2. To open the fuel filler lid, pull the
release lever.3. Pull the fuel filler lid out to open.
4. To remove the cap, turn the fuel
tank cap counter-clockwise.
5. Refuel as needed.
6. To install the cap, turn it clockwise
until it “clicks”. This indicates that
the cap is securely tightened.
7. Close the fuel filler lid and push it
lightly and make sure that it is
securely closed.
FUEL FILLER LID
1KMA20191KMB2020
WARNING - Refueling
If pressurized fuel sprays out,it
can cover your clothes or skin
and thus subject you to the risk
of fire and burns.Always
remove the fuel cap carefully
and slowly.If the cap is venting
fuel or if you hear a hissing
sound, wait until the condition
stops before completely remov-
ing the cap.
CAUTION
To a v oid injury from sharp
edges,it is recommended that
protective gloves be worn if
there is a need to open the fuel
filler door manually.
Page 107 of 350

Knowing your vehicle
98 3
1
2
3
4
5
6
7
8
9
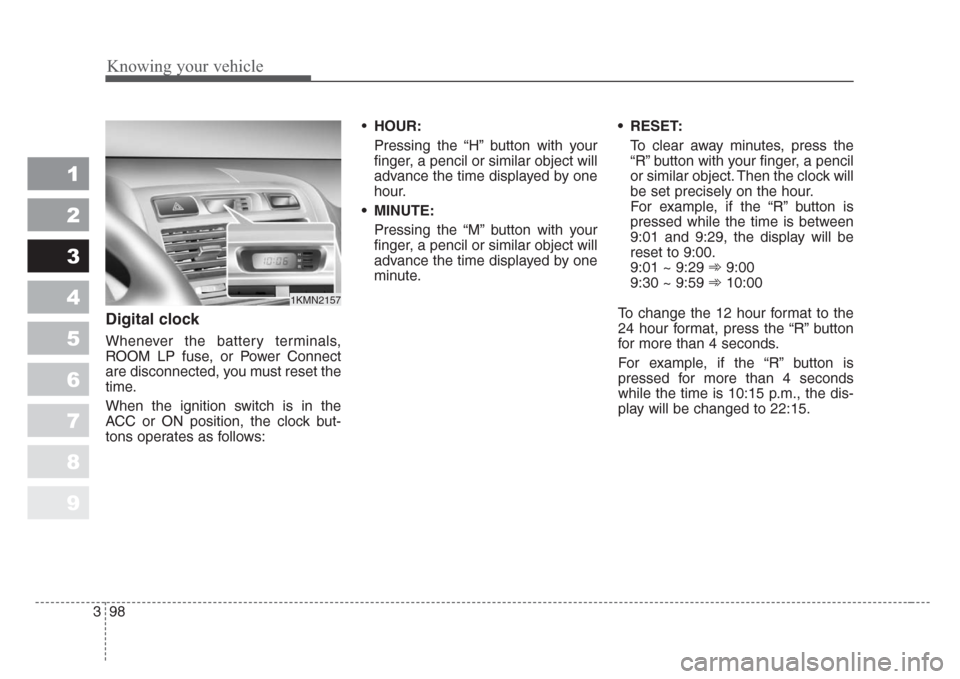
Digital clock
Whenever the battery terminals,
ROOM LP fuse, or Power Connect
are disconnected, you must reset the
time.
When the ignition switch is in the
ACC or ON position, the clock but-
tons operates as follows:•HOUR:
Pressing the “H” button with your
finger, a pencil or similar object will
advance the time displayed by one
hour.
• MINUTE:
Pressing the “M” button with your
finger, a pencil or similar object will
advance the time displayed by one
minute.• RESET:
To clear away minutes, press the
“R” button with your finger, a pencil
or similar object. Then the clock will
be set precisely on the hour.
For example, if the “R” button is
pressed while the time is between
9:01 and 9:29, the display will be
reset to 9:00.
9:01 ~ 9:29 ➾9:00
9:30 ~ 9:59 ➾10:00
To change the 12 hour format to the
24 hour format, press the “R” button
for more than 4 seconds.
For example, if the “R” button is
pressed for more than 4 seconds
while the time is 10:15 p.m., the dis-
play will be changed to 22:15.
1KMN2157
Page 112 of 350
3 103
1
2
3
4
5
6
7
8
9
Knowing your vehicle
2. Remove the two (2) screws, and
then remove the overhead con-
sole.3. Insert the emergency handle (pro-
vided with the vehicle) and turn
the handle clockwise to open or
counterclockwise to close.
Resetting the sunroof
Whenever the vehicle battery is dis-
connected or discharged, or you use
the emergency handle to operate the
sunroof, you have to reset your sun-
roof system as follows:
1. Turn the ignition key to the ON
position.
2. According to the position of the
sunroof, do as follows.
1) in case that the sunroof has
closed completely or been tilt-
ed :
Press the TILT UP button until
the sunroof has tilted upward
completely.
2) in case that the sunroof has
slide-opened:
Press and hold the CLOSE
button for more than 5 seconds
until the sunroof has closed
completely. Press the TILT UP
button until the sunroof has tilt-
ed upward completely.
1KMA20311KMA2032
Page 173 of 350

455
Driving your vehicle
1
2
3
4
5
6
7
8
9
4) Make sure the vehicle windshield
wipers are turned off.
5) Drive your vehicle in at least 2
complete (either clockwise or
counter-clockwise) circles at less
than 8 km/h (5 mph) until the com-
pass heading appears. Driving in
a circle in right-handed direction
and opposite direction is possible
and if possible, stop the wiper
operation.
6) If the vehicle's compass headings
become inaccurate again, repeat
steps 1 through 6 above.
✽
NOTICE
If new vehicle is first driven or if the
battery has been disconnected, do
the calibration procedure as above.
Setting the compass zone
This compass must be set to com-
pensate for the variation between
true north and magnetic north. To set
variation:
1. Find your current location and
variance zone number on the zone
map.
2. Press and hold the ON/OFF but-
ton for 6~9 seconds. The current
zone number will appear in the
display.
3. Release and press the ON/OFF
button until the new zone number
appears in the display. After you
stop pressing the button in, the
display will show a compass direc-
tion within a few seconds.
✽
NOTICE
1. Do not install a ski rack, antenna,
etc. that are attached to the vehi-
cle using a magnet as anything
attached to the roof of the vehicle
with a magnet will effect compass
operation.
2. If the compass deviates from the
correct indication soon after
repeated adjustment, have the
compass checked at an authorized
dealer.
3. The compass may not indicate the
correct compass point in tunnels
or while driving up or down a
steep hill.
(The compass returns to the cor-
rect compass point when the vehi-
cle moves to an area where the
geomagnetism is stabilized.)
Page 233 of 350

523
Driving tips
1
2
3
4
5
6
7
8
9
Stalling while driving uphill
What should I do if my vehicle stalls,
or is about to stall, and I can’t make
it up the hill?
If your vehicle stalls, or is about to
stall while driving uphill, there are
some things you should do, and
there are some things you must not
do. First, here’s what you should do:
• Push the brake pedal to stop the
vehicle and keep it from rolling
backwards. Also, apply the parking
brake.
• If your engine is still running, shift
the transaxle into reverse, release
the parking brake, and slowly back
down the hill in reverse.• If your engine has stopped run-
ning, you’ll need to restart it. With
the brake pedal depressed and the
parking brake still applied, shift a
manual transaxle to N (Neutral), or
an automatic transaxle to P (Park)
and restart the engine. Then, shift
to reverse, release the parking
brake, and slowly back down the
hill in reverse.
• As you are backing down the hill,
put your left hand on the steering
wheel at the 12 o’clock position.
This way, you’ll be able to tell if
your wheels are straight or turned
to the left or right as you back
down.Here are some things you must not
do if you stall, or are about to stall,
when going up a hill.
• Never attempt to prevent a stall by
depressing the clutch or shifting to
N (Neutral) to “rev-up” the engine
and regain forward momentum.
This won’t work. Your vehicle will
roll backwards very quickly and
you could go out of control or roll
over.
Instead, apply the brake to stop the
vehicle. Then apply the parking
brake. Shift into reverse, release the
parking brake, and slowly back
down.
Page 273 of 350

611
In case of an emergency
1
2
3
4
5
6
7
8
9
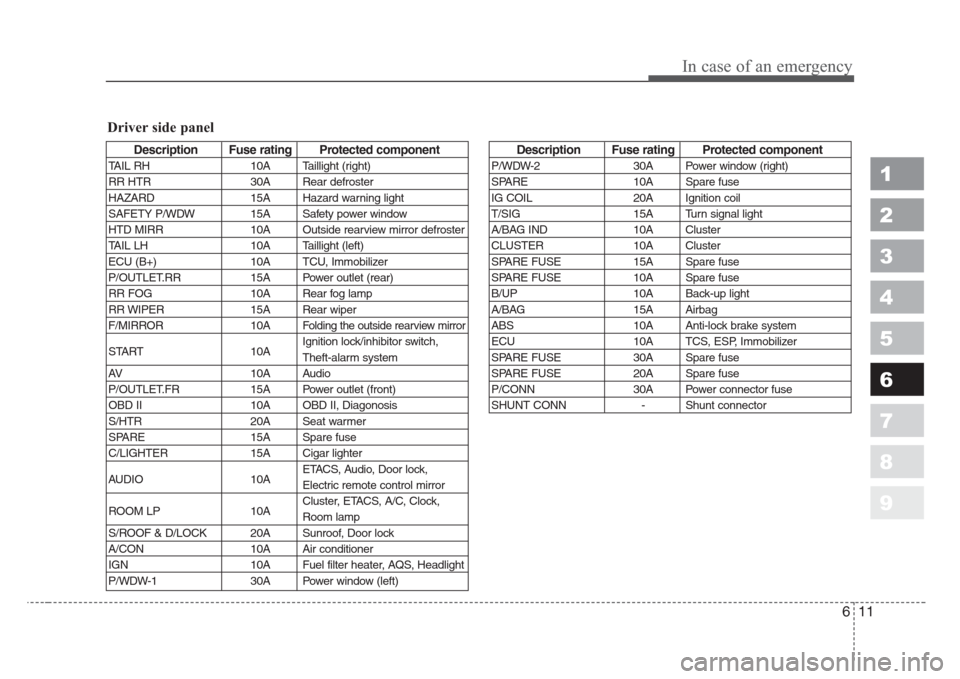
Description Fuse rating Protected component
TAIL RH 10A Taillight (right)
RR HTR 30A Rear defroster
HAZARD 15A Hazard warning light
SAFETY P/WDW 15A Safety power window
HTD MIRR 10A Outside rearview mirror defroster
TAIL LH 10A Taillight (left)
ECU (B+) 10A TCU, Immobilizer
P/OUTLET.RR 15A Power outlet (rear)
RR FOG 10A Rear fog lamp
RR WIPER 15A Rear wiper
F/MIRROR 10A
Folding the outside rearview mirror
START 10AIgnition lock/inhibitor switch,
Theft-alarm system
AV 10A Audio
P/OUTLET.FR 15A Power outlet (front)
OBD II 10A OBD II, Diagonosis
S/HTR 20A Seat warmer
SPARE 15A Spare fuse
C/LIGHTER 15A Cigar lighter
AUDIO 10AETACS, Audio, Door lock,
Electric remote control mirror
ROOM LP 10ACluster, ETACS, A/C, Clock,
Room lamp
S/ROOF & D/LOCK 20A Sunroof, Door lock
A/CON 10A Air conditioner
IGN 10A Fuel filter heater, AQS, Headlight
P/WDW-1 30A Power window (left)
Description Fuse rating Protected component
P/WDW-2 30A Power window (right)
SPARE 10A Spare fuse
IG COIL 20A Ignition coil
T/SIG 15A Turn signal light
A/BAG IND 10A Cluster
CLUSTER 10A Cluster
SPARE FUSE 15A Spare fuse
SPARE FUSE 10A Spare fuse
B/UP 10A Back-up light
A/BAG 15A Airbag
ABS 10A Anti-lock brake system
ECU 10A TCS, ESP, Immobilizer
SPARE FUSE 30A Spare fuse
SPARE FUSE 20A Spare fuse
P/CONN 30A Power connector fuse
SHUNT CONN - Shunt connector
Driver side panel
Page 275 of 350
613
In case of an emergency
1
2
3
4
5
6
7
8
9
Power connector fuse
Your vehicle is equipped with a
power connector fuse to prevent bat-
tery discharge if your vehicle is
parked without being operated for
prolonged periods. Use the following
procedures before parking the vehi-
cle for prolonged period.
1. Turn off the engine.
2. Turn off the headlights and tail
lights.
3. Open the driver’s side panel cover
and pull up the “P/CONN 30A”.
✽
NOTICE
• If the power connector fuse is
pulled up from the fuse panel, the
warning chime, audio, clock and
interior lamps, etc., will not oper-
ate. Some items must be reset after
replacement. (Refer to “Items to
be reset···.” on page 7-32)
• Even though the power connector
fuse is pulled up, the battery can
still be discharged by operation of
the headlights or other electrical
devices.
1KMA4005
Power connector fuse