2008 KIA Sedona washer fluid
[x] Cancel search: washer fluidPage 130 of 339
3 121
Features of your vehicle
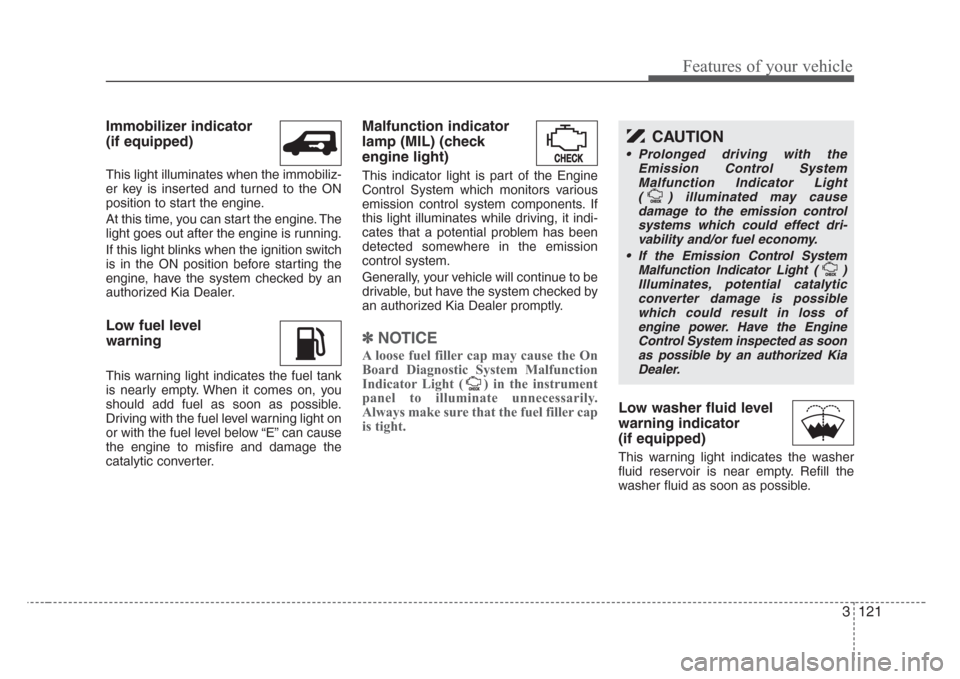
Immobilizer indicator
(if equipped)
This light illuminates when the immobiliz-
er key is inserted and turned to the ON
position to start the engine.
At this time, you can start the engine. The
light goes out after the engine is running.
If this light blinks when the ignition switch
is in the ON position before starting the
engine, have the system checked by an
authorized Kia Dealer.
Low fuel level
warning
This warning light indicates the fuel tank
is nearly empty. When it comes on, you
should add fuel as soon as possible.
Driving with the fuel level warning light on
or with the fuel level below “E” can cause
the engine to misfire and damage the
catalytic converter.
Malfunction indicator
lamp (MIL) (check
engine light)
This indicator light is part of the Engine
Control System which monitors various
emission control system components. If
this light illuminates while driving, it indi-
cates that a potential problem has been
detected somewhere in the emission
control system.
Generally, your vehicle will continue to be
drivable, but have the system checked by
an authorized Kia Dealer promptly.
✽
NOTICE
A loose fuel filler cap may cause the On
Board Diagnostic System Malfunction
Indicator Light ( ) in the instrument
panel to illuminate unnecessarily.
Always make sure that the fuel filler cap
is tight.
Low washer fluid level
warning indicator
(if equipped)
This warning light indicates the washer
fluid reservoir is near empty. Refill the
washer fluid as soon as possible.
CAUTION
• Prolonged driving with the
Emission Control System
Malfunction Indicator Light
( ) illuminated may cause
damage to the emission control
systems which could effect dri-
vability and/or fuel economy.
•
If the EmissionControl System
Malfunction Indicator Light ( )
Illuminates, potential catalytic
converter damage is possible
which could result in loss of
engine power. Have the Engine
Control System inspected as soon
as possible by an authorized Kia
Dealer.
Page 140 of 339

3 131
Features of your vehicle
A : Wiper speed control
· MIST – Single wipe
· OFF – Off
· INT/AUTO – Intermittent wipe or
AUTO control wipe
· LO – Low wiper speed
· HI – High wiper speed
B : Intermittent or Auto control wipe
time adjustment
C : Wash with brief wipes
D : Rear wiper/washer control
· – Spraying washer fluid
· OFF – Off
· INT – Intermittent wipe (if equipped)
· ON – Continuous wipe
· – Wash with brief wipes
Windshield wipers
Operates as follows when the ignition
switch is turned ON.MIST: For a single wiping cycle, push the
lever upward and release it with
the lever in the OFF position. The
wipers will operate continuously if
the lever is pushed upward and
held.
OFF : Wiper is not in operation
INT : Wiper operates intermittently at
the same wiping intervals. Use
this mode in a light rain or mist. To
vary the speed setting, turn the
speed control knob (1).
LO : Normal wiper speed
HI : Fast wiper speed
✽
NOTICE
If there is heavy accumulation of snow
or ice on the windshield, defrost the
windshield for about 10 minutes, or
until the snow and/or ice is removed
before using the windshield wipers to
ensure proper operation.
OVQ037051N-1
OVQ038051N-1
Type A
Type B
F F
a a
s s
t t
F F
a a
s s
t tS S
l l
o o
w w
S S
l l
o o
w w
Page 142 of 339

3 133
Features of your vehicle
Variable intermittent wipers
Set the lever to the INT/AUTO position
and choose the desired wiper interval by
turning the ring(1).
One - touch wiper
For a single wiping cycle, push the lever
upward and release it with the lever in the
OFF position.
The wipers will operate continuously if
the lever is pushed upward and held.
Windshield washers
In the OFF position, pull the lever gently
toward you to spray washer fluid on the
windshield and to run the wipers 1-3
cycles.
Use this function when the windshield is
dirty.
The spray and wiper operation
will continue until you release the
lever.
If the washer does not work, check the
washer fluid level. If the fluid level is not
sufficient, you will need to add appropri-
ate non-abrasive windshield washer fluid
to the washer reservoir.
The reservoir filler neck is located in the
front of the engine compartment on the
passenger side.
CAUTION
• To prevent possible damage to
the wipers or windshield, do not
operate the wipers when the
windshield is dry.
• To prevent damage to the wiper
blades, do not use gasoline,
kerosene, paint thinner, or other
solvents on or near them.
• To prevent damage to the wiper
arms and other components, do
not attempt to move the wipers
manually.
CAUTION
To prevent possible damage to the
washer pump, do not operate the
washer when the fluid reservoir is
empty.
WARNING
Do not use the washer in freezing
temperatures without first warming
the windshield with the defrosters;
the washer solution could freeze on
contact with the windshield and
obscure your vision.
OVQ037053N-1
OVQ038053N-1
Type A
Type B
Page 143 of 339
Features of your vehicle
134 3
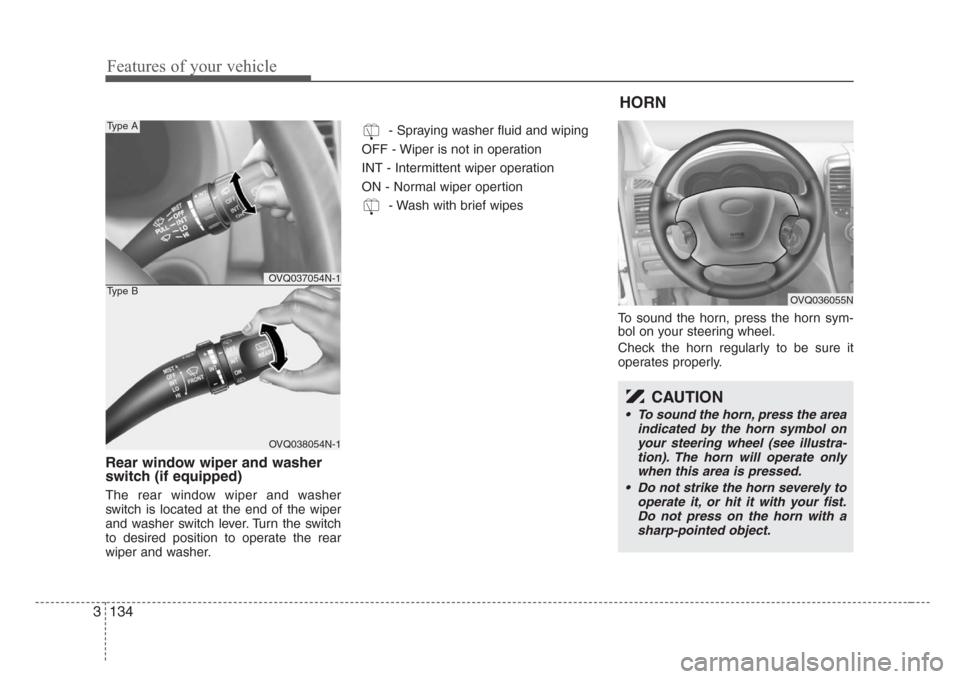
Rear window wiper and washer
switch (if equipped)
The rear window wiper and washer
switch is located at the end of the wiper
and washer switch lever. Turn the switch
to desired position to operate the rear
wiper and washer.- Spraying washer fluid and wiping
OFF - Wiper is not in operation
INT - Intermittent wiper operation
ON - Normal wiper opertion
- Wash with brief wipes
To sound the horn, press the horn sym-
bol on your steering wheel.
Check the horn regularly to be sure it
operates properly.
OVQ037054N-1
OVQ038054N-1
Type A
Type B
HORN
CAUTION
• To sound the horn, press the area
indicated by the horn symbol on
your steering wheel (see illustra-
tion). The horn will operate only
when this area is pressed.
• Do not strike the horn severely to
operate it, or hit it with your fist.
Do not press on the horn with a
sharp-pointed object.
OVQ036055N
Page 234 of 339
Driving your vehicle
2 4
Before entering vehicle:
• Be sure that all windows, outside mir-
ror(s), and outside lights are clean.
• Check the condition of the tires.
• Check under the vehicle for any sign of
leaks.
• Be sure there are no obstacles behind
you if you intend to back up.
Necessary inspections
Fluid levels, such as engine oil, engine
coolant, brake fluid, and washer fluid
should be checked on a regular basis,
with the exact interval depending on the
fluid. Further details are provided in
Section 6, Maintenance.
Before starting
• Close and lock all doors.
• Position the seat so that all controls are
easily reached.
• Adjust the inside and outside rearview
mirrors.
• Be sure that all lights work.
• Check all gauges.
• Check the operation of warning lights
when the ignition switch is turned to
the ON position.
• Release the parking brake and make
sure the brake warning light goes out.
For safe operation, be sure you are famil-
iar with your vehicle and its equipment.
BEFORE DRIVING
WARNING- Driving under
the influence of alcohol or
drugs
Drinking and driving is dangerous.
Drunk driving is the number one
contributor to the highway death
toll each year. Even a small amount
of alcohol will affect your reflexes,
perceptions and judgement. Driving
while under the influence of drugs
is as dangerous or more dangerous
than driving drunk.
You are much more likely to have a
serious accident if you drink or take
drugs and drive.
If you are drinking or taking drugs,
don’t drive. Do not ride with a driv-
er who has been drinking or taking
drugs. Choose a designated driver
or call a cab.
Page 260 of 339
Driving your vehicle
28 4
• We recommend that you carry emer-
gency equipment, including a window
scraper, windshield de-icer, a bag of
sand or salt, flares, a small shovel and
jumper cables.
• Make sure you have sufficient ethyl-
ene-glycol coolant in the radiator.
• Check the battery condition and
cables. Cold temperatures reduce the
capacity of any battery, so it must be in
excellent condition to provide enough
winter starting power.
• Make sure the engine oil viscosity is
suitable for cold weather.
• Check the ignition system for loose
connections and damage.
• Use antifreeze-formulated windshield
washer fluid. (Do not use engine
coolant antifreeze.)
• Do not use the parking brake if it might
freeze. When parking, shift to P (Park)
with an automatic transaxle and block
the rear wheels.Snow tires
If you mount snow tires on your Kia,
make sure they are radial tires of the
same size and load range as the original
tires. Mount snow tires on all four wheels
to balance your vehicle’s handling in all
weather conditions. Keep in mind that the
traction provided by snow tires on dry
roads may not be as high as your vehi-
cle's original equipment tires. You should
drive cautiously even when the roads are
clear. Check with the tire dealer for max-
imum speed recommendations.
Do not install studded tires without first
checking local, state and municipal regu-
lations for possible restrictions against
their use.
WINTER DRIVING
WARNING- Snow tire size
Snow tires should be equivalent in
size and type to the vehicle's stan-
dard tires. Otherwise, the safety and
handling of your vehicle may be
adversely affected.
TRAILER TOWING
WARNING- Towing a trail-
er
If you don't use the correct equip-
ment and drive improperly, you can
lose control when you pull a trailer.
For example, if the trailer is too
heavy, the brakes may not work well
- or even at all. You and your pas-
sengers could be seriously or fatal-
ly injured. Pull a trailer only if you
have followed all the steps in this
section.
WARNING- Weight limits
Before towing, make sure the total
trailer weight, gross combination
weight, gross vehicle weight, gross
axle weight and trailer tongue load
are all within the limits.
Page 292 of 339
67
Maintenance
OWNER MAINTENANCE
Owner maintenance schedule
The following lists are vehicle checks and
inspections that should be performed by
the owner or an Authorized Kia Dealer at
the frequencies indicated to help ensure
safe, dependable operation of your vehi-
cle.
Any adverse conditions should be
brought to the attention of your dealer as
soon as possible.
These Owner Maintenance Checks are
generally not covered by warranties and
you may be charged for labor, parts and
lubricants used.
When you stop for fuel:
• Check the engine oil level.
• Check coolant level in coolant reser-
voir.
• Check the windshield washer fluid
level.
• Look for low or under-inflated tires.
While operating your vehicle:
• Note any changes in the sound of the
exhaust or any smell of exhaust fumes
in the vehicle.
• Check for vibrations in the steering
wheel. Notice any increased steering
effort or looseness in the steering
wheel, or change in its straight-ahead
position.
• Notice if your vehicle constantly turns
slightly or “pulls” to one side when trav-
eling on smooth, level road.
• When stopping, listen and check for
unusual sounds, pulling to one side,
increased brake pedal travel or “hard-
to-push” brake pedal.
• If any slipping or changes in the oper-
ation of your transaxle occurs, check
the transaxle fluid level.
• Check automatic transaxle P (Park)
function.
• Check parking brake.
• Check for fluid leaks under your vehicle
(water dripping from the air condition-
ing system during or after use is nor-
mal).
At least monthly:
• Check coolant level in the coolant
recovery reservoir.
• Check the operation of all exterior
lights, including the stoplights, turn sig-
nals and hazard warning flashers.
• Check the inflation pressures of all
tires including the spare.
At least twice a year
(i.e., every Spring and Fall):
• Check radiator, heater and air condi-
tioning hoses for leaks or damage.
• Check windshield washer spray and
wiper operation. Clean wiper blades
with clean cloth dampened with wash-
er fluid.
• Check headlight alignment.
• Check muffler, exhaust pipes, shields
and clamps.
• Check the lap/shoulder belts for wear
and function.
• Check for worn tires and loose wheel
lug nuts.
WARNING
Be careful when checking your
engine coolant level when the
engine is hot. Scalding hot coolant
and steam may blow out under
pressure. This could cause burns or
other serious injury.
Page 294 of 339

69
Maintenance
ENGINE COMPARTMENT
OVQ068001N
1. Engine coolant reservoir
2. Engine oil filler cap
3. Brake fluid reservoir
4. Air cleaner
5. Fuse box
6. Negative battery terminal
7. Positive battery terminal
8. Auto transaxle oil dipstick
9. Radiator cap
10. Engine oil dipstick
11. Power steering fluid reservoir
12. Windshield washer fluid reservoir
* The actual engine room in the vehicle may differ from the illustration.