2008 KIA Sedona ECU
[x] Cancel search: ECUPage 279 of 339

What to do in an emergency
12 5
8. Insert the jack handle into the jack
and turn it clockwise, raising the
vehicle until the tire just clears the
ground. This measurement is
approximately 30 mm (1.2 in).
Before removing the wheel lug
nuts, make sure the vehicle is sta-
ble and that there is no chance for
movement or slippage.
9. Remove the wheel lug nuts by
turning them counterclockwise,
then remove the wheel.
10. Mount the spare tire into position
and install the wheel lug nuts
with the beveled edge inward.11. Once the wheel lug nuts have
been tightened, lower the vehicle
fully to the ground and continue to
tighten the lug nuts until they are
fully secured. Tighten the wheel
lug nuts firmly in a “ ” pattern.
If you are unsure of the tightness
of the wheel lug nuts, have them
checked at the nearest service
station. The specified tightening
torque is 9~11 kg•m (65-79 lb•ft,
88-107 N•m). Improperly tight-
ened wheel lug nuts could cause
brake pedal vibration while brak-
ing.
CAUTION
Your vehicle has metric threads
on the wheel studs and nuts.
Make certain during wheel
removal that the same nuts
removed are reinstalled - or, if
replaced, that nuts with metric
threads and the same chamfer
configuration are used.
Installation of a non-metric
thread nut on a metric stud or
vice-versa will not secure the
wheel to the hub properly and
will damage the stud so that it
must be replaced.
Note that most lug nuts do not
have metric threads. Be sure to
use extreme care in checking
for thread style before installing
aftermarket lug nuts or wheels.
If in doubt, consult an
Authorized Kia Dealer.
OVQ056008N1VQA4026
X
Page 281 of 339

What to do in an emergency
14 5
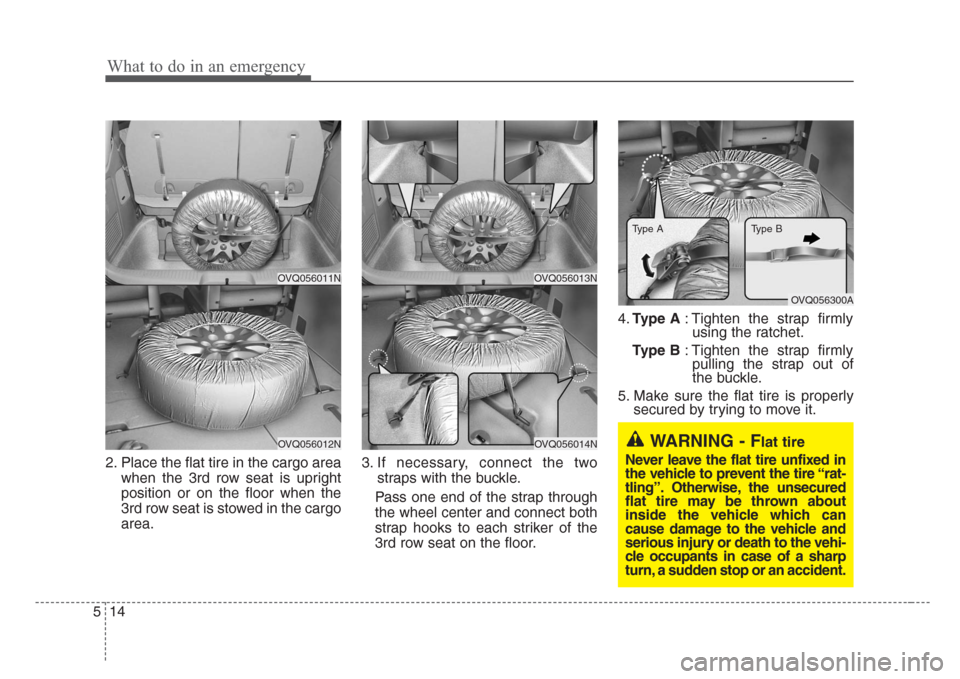
2. Place the flat tire in the cargo area
when the 3rd row seat is upright
position or on the floor when the
3rd row seat is stowed in the cargo
area.3. If necessary, connect the two
straps with the buckle.
Pass one end of the strap through
the wheel center and connect both
strap hooks to each striker of the
3rd row seat on the floor.4.Type A: Tighten the strap firmly
using the ratchet.
Type B: Tighten the strap firmly
pulling the strap out of
the buckle.
5. Make sure the flat tire is properly
secured by trying to move it.
OVQ056013N
OVQ056014N
OVQ056011N
OVQ056012N
OVQ056300A
WARNING - Flat tire
Never leave the flat tire unfixed in
the vehicle to prevent the tire “rat-
tling”. Otherwise, the unsecured
flat tire may be thrown about
inside the vehicle which can
cause damage to the vehicle and
serious injury or death to the vehi-
cle occupants in case of a sharp
turn, a sudden stop or an accident.
Type A Type B
Page 283 of 339

What to do in an emergency
16 5
When towing your vehicle in an emer-
gency without wheel dollies :
1. Set the ignition switch in the ACC posi-
tion.
2. Place the transaxle shift lever in N
(Neutral).
3. Release the parking brake.
If your car must be towed
Towing with a vehicle other than a
tow truck
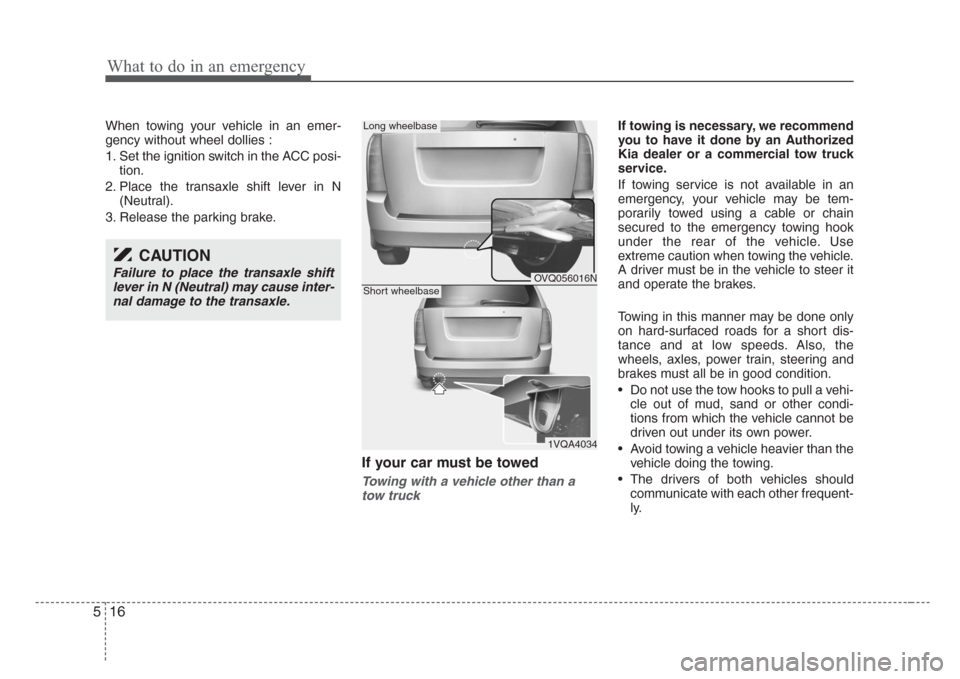
If towing is necessary, we recommend
you to have it done by an Authorized
Kia dealer or a commercial tow truck
service.
If towing service is not available in an
emergency, your vehicle may be tem-
porarily towed using a cable or chain
secured to the emergency towing hook
under the rear of the vehicle. Use
extreme caution when towing the vehicle.
A driver must be in the vehicle to steer it
and operate the brakes.
Towing in this manner may be done only
on hard-surfaced roads for a short dis-
tance and at low speeds. Also, the
wheels, axles, power train, steering and
brakes must all be in good condition.
• Do not use the tow hooks to pull a vehi-
cle out of mud, sand or other condi-
tions from which the vehicle cannot be
driven out under its own power.
• Avoid towing a vehicle heavier than the
vehicle doing the towing.
• The drivers of both vehicles should
communicate with each other frequent-
ly.
CAUTION
Failure to place the transaxle shift
lever in N (Neutral) may cause inter-
nal damage to the transaxle.OVQ056016N
1VQA4034
Long wheelbase
Short wheelbase
Page 284 of 339

517
What to do in an emergency
• Before emergency towing, check that
the hook is not broken or damaged.
• Fasten the towing cable or chain
securely to the hook.
• Do not jerk the hook. Apply steady and
even force.
• To avoid damaging the hook, do not
pull from the side or at a vertical angle.
Always pull straight ahead.
WARNING
Use extreme caution when towing
the vehicle.
• Avoid sudden starts or erratic
driving maneuvers which would
place excessive stress on the
emergency towing hook and tow-
ing cable or chain. The hook and
towing cable or chain may break
and cause serious injury or dam-
age.
• If the disable vehicle is unable to
be moved, do not forcibly contin-
ue the towing. Contact an
Authorized Kia dealer or a com-
mercial tow truck service for
assistance.
• Tow the vehicle as straight ahead
as possible.
• Keep away from the vehicle dur-
ing towing.
CAUTION
To prevent internal damage to the
transaxle, never tow your vehicle
from the rear (backwards) with all
four tires in contact with the sur-
face.
CAUTION
• Attach a towing strap to the tow
hook.
• Using a portion of the vehicle
other than the tow hooks for tow-
ing may damage the body of your
vehicle.
• Use only a cable or chain specifi-
cally intended for use in towing
vehicles. Securely fasten the
cable or chain to the towing hook
provided.
Page 306 of 339

621
Maintenance
Engine compartment
1. Turn the ignition switch and all other
switches off.
2. Remove the fuse box cover by press-
ing the tap and pulling up.
3. Check the removed fuse; replace it if it
is blown. To remove or insert the fuse,
use the fuse puller in the main fuse
box in the engine compartment.
4. Push in a new fuse of the same rating,
and make sure it fits tightly in the clips.
If it fits loosely, consult an Authorized Kia
Dealer.
Inner panel
1. Turn the ignition switch and all other
switches off.
2. Open the fuse panel cover.
1VQA4006
CAUTION
After checking the fuse box in the
engine compartment, securely
install the fuse box cover. If not,
electrical failures may occur from
water leaking in.
1VQA4002
OVQ066016N
Driver’s side panel
Rear cargo area panel
Page 311 of 339

Maintenance
26 6
Description Fuse rating Protected component
P/TRAIN 7.5A Theft alarm relay, Main relay,
TCM, Generator, ECM, Injector
15A, ECU 2 15A, ECU 1 10A,
Air conditioner compressor relay,
Inlet metering valve, EGR sole-
noid valve, Air flow sensor,
Diesel box, Immobilizer module
FUEL PUMP 15A Fuel pump motor
SP 7.5A Spare fuse
SP 10A Spare fuse
SP 15A Spare fuse
SP 20A Spare fuse
SP 25A Spare fuse
ABS 1 40A ABS control module,
ESC control module
ABS 2 20A ABS control module,
ESC control module
FRT WIPER 30A Front wiper ON relay
KEY SW 2 30A Start relay, IG2 Load(Variable
rack stroke, ECM mirror, Rain
sensor, Seat warmer)
RAM 1 50A Rear area module
RAM 2 50A Rear area module
RAM 3 50A Rear area module
Engine compartment
Description Fuse rating Protected component
FRT/RR WASHER 10A Front washer motor relay,
Rear washer motor relay
IG 2 7.5A Fuel filter
STOP LAMP 20A Stop lamp,
High mounted stop lamp
FUEL HEATER 20A Fuel filter heater
KEY SW 1 25A Instrument panel module
STOP SIGNAL 7.5A TCU, PCU/ECU, ABS/ESC Unit
A/C COMP 7.5A Air conditioner compressor relay
ATM 15A ATM solenoid
FRT DEICER 15A Front deicer
HORN 15A Horn relay
ECU 1 10A PCU/ECU, A/C comp relay, Mass
air flow sensor, Immobilizer unit
O2 DN 10A O2 sensor(RL, RR)
ECU 2 15A PCU/ECU, Oil control valve 1/2,
Variable intake manifold valve 1/2,
Canister purge solenoid valve,
Canister close valve,
Pulse width modulation relay
O2 UP 10A O2 sensor(FL, FR)
IGN COIL 20AIgnition coil 1/2/3/4/5/6, Condensor
INJECTOR 15APCU/ECU, Injector 1/2/3/4/5/6,
Glow relay 1/2, Intake manifold
valve, EGR Solenoid valve,
Cooling fan relay, Air flow sen-
sor, Intake throttle valve
Page 314 of 339

629
Maintenance
For best battery service:
• Keep the battery securely mounted.
• Keep the battery top clean and dry.
• Keep the terminals and connections
clean, tight, and coated with petroleum
jelly or terminal grease.
• Rinse any spilled electrolyte from the
battery immediately with a solution of
water and baking soda.
• If the vehicle is not going to be used for
an extended time, disconnect the bat-
tery cables.
Battery recharging
Your vehicle has a maintenance-free,
calcium-based battery.
• If the battery becomes discharged in a
short time (because, for example, the
headlights or interior lights were left on
while the vehicle was not in use),
recharge it by slow charging (trickle)
for 10 hours.
• If the battery gradually discharges
because of high electric load while the
vehicle is being used, recharge it at 20-
30A for two hours.
(Continued)
Keep batteries out of the
reach of children because
batteries contain highly
corrosive SULFURIC ACID.
Do not allow battery acid to
contact your skin, eyes,
clothing or paint finish.
If any electrolyte gets into
your eyes, flush your eyes
with clean water for at least
15 minutes and get immedi-
ate medical attention. If
possible, continue to apply
water with a sponge or
cloth until medical attention
is received. If electrolyte
gets on your skin, thor-
oughly wash the contacted
area. If you feel a pain or a
burning sensation, get med-
ical attention immediately.
Wear eye protection when
charging or working near a
battery. Always provide
ventilation when working in
an enclosed space.
(Continued)(Continued)
• When lifting a plastic-cased bat-
tery, excessive pressure on the
case may cause battery acid to
leak, resulting in personal injury.
Lift with a battery carrier or with
your hands on opposite corners.
• Never attempt to recharge the
battery when the battery cables
are connected.
• The electrical ignition system
works with high voltage. Never
touch these components with the
engine running or the ignition
switched on.
Failure to follow the above warn-
ings can result in serious bodily
injury or death.