2008 KIA Sedona tow
[x] Cancel search: towPage 233 of 339
4
Before driving / 4-2
Key positions / 4-3
Starting the engine / 4-4
Automatic transaxle / 4-5
Cruise control system / 4-11
Brake system / 4-14
Electronic stability control / 4-19
Rear parking assist system / 4-22
Economical operation / 4-25
Special driving conditions / 4-26
Winter driving / 4-28
Trailer towing / 4-28
Overloading / 4-34
Label information / 4-35
Driving your vehicle
Page 235 of 339
43
Driving your vehicle
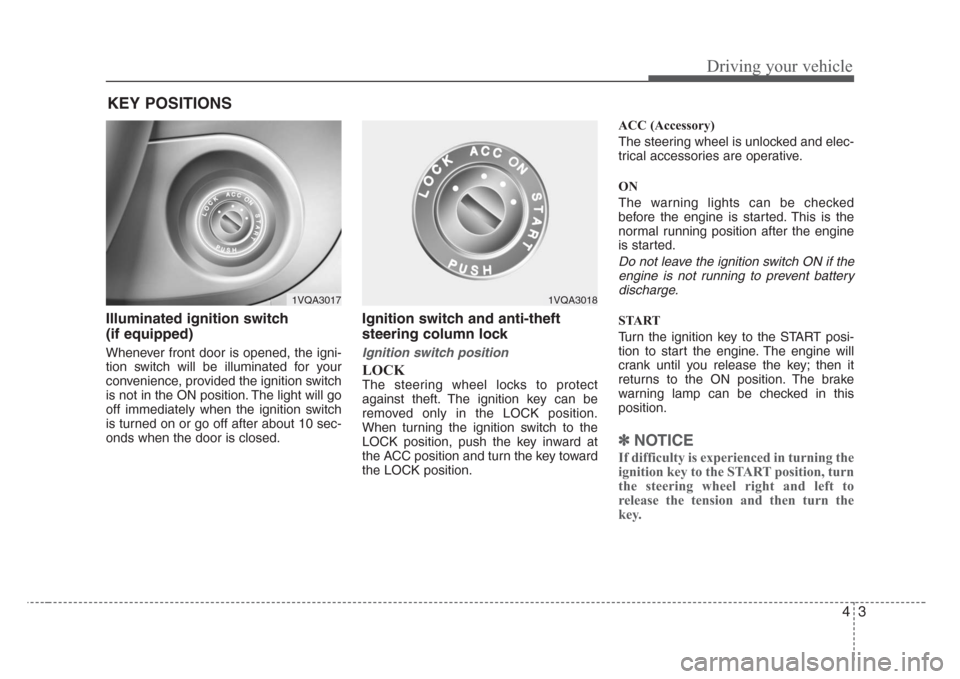
Illuminated ignition switch
(if equipped)
Whenever front door is opened, the igni-
tion switch will be illuminated for your
convenience, provided the ignition switch
is not in the ON position. The light will go
off immediately when the ignition switch
is turned on or go off after about 10 sec-
onds when the door is closed.
Ignition switch and anti-theft
steering column lock
Ignition switch position
LOCK
The steering wheel locks to protect
against theft. The ignition key can be
removed only in the LOCK position.
When turning the ignition switch to the
LOCK position, push the key inward at
the ACC position and turn the key toward
the LOCK position.ACC (Accessory)
The steering wheel is unlocked and elec-
trical accessories are operative.
ON
The warning lights can be checked
before the engine is started. This is the
normal running position after the engine
is started.
Do not leave the ignition switch ON if the
engine is not running to prevent battery
discharge.
START
Turn the ignition key to the START posi-
tion to start the engine. The engine will
crank until you release the key; then it
returns to the ON position. The brake
warning lamp can be checked in this
position.
✽
NOTICE
If difficulty is experienced in turning the
ignition key to the START position, turn
the steering wheel right and left to
release the tension and then turn the
key.
KEY POSITIONS
1VQA30171VQA3018
Page 247 of 339
415
Driving your vehicle
Disc brakes wear indicator
Your vehicle has disc brakes.
When your brake pads are worn and new
pads are required, you will hear a high-
pitched warning sound from your front
brakes or rear brakes (if equipped). You
may hear this sound come and go or it
may occur whenever you depress the
brake pedal.
Please remember that some driving con-
ditions or climates may cause a brake
squeal when you first apply (or lightly
apply) the brakes. This is normal and
does not indicate a problem with your
brakes.
Parking on curbed streets
• When parking your vehicle on an uphill
grade, park as close to the curb as
possible and turn the front wheels
away from the curb so that the front
wheels will contact the curb if the vehi-
cle moves backward.
• When parking your vehicle on a down-
hill grade, park as close to the curb as
possible and turn the front wheels
toward the curb so that the front
wheels will contact the curb if the vehi-
cle moves forward.
WARNING- Brake wear
This brake wear warning sound
means your vehicle needs service.
If you ignore this audible warning,
you will eventually lose braking per-
formance, which could lead to a
serious accident.
CAUTION
Always replace brake pads as com-
plete front or rear axle sets.
CAUTION
To avoid costly brake repairs, do
not continue to drive with worn
brake pads.
Page 255 of 339

423
Driving your vehicle
Non-operational conditions of
rear parking assist system
Rear parking assist system may not
operate normally when:
1. Moisture is frozen to the sensor. (It will
operate normally when moisture
melts.)
2. Sensor is covered with foreign matter,
such as snow or water, or the sensor
cover is blocked. (It will operate nor-
mally when the material is removed or
the sensor is no longer blocked.)
3. Driving on uneven road surfaces
(unpaved roads, gravel, bumps, gradi-
ent).
4. Objects generating excessive noise
(vehicle horns, loud motorcycle
engines, or truck air brakes) are within
range of the sensor.
5. Heavy rain or water spray exists.
6. Wireless transmitters or mobile phones
are within range of the sensor.
7. Sensor is covered with snow.
8. Trailer towing
Detecting range may decrease when:
1. Sensor is stained with foreign matter
such as snow or water. (Sensing range
will return to normal when removed.)
2. Outside air temperature is extremely
hot or cold.
Following objects may not be recog-
nized by the sensor:
1. Sharp or slim objects such as ropes,
chains or small poles.
2. Objects which tend to absorb sensor
frequency such as clothes, spongy
material or snow.
3. Undetectable objects smaller than 1 m
(40 in.) and narrower than 14 cm (6 in.)
in diameter.
CAUTION
1. The rear parking assist system
may not sound sequentially
depending on the speed and
shapes of the objects detected.
2. The rear parking assist system
may malfunction if the vehicle
bumper height or sensor installa-
tion has been modified or dam-
aged. Any non-factory installed
equipment or accessories may
also interfere with the sensor per-
formance.
3. Sensor may not recognize
objects less than 40 cm (15 in.)
from the sensor, or it may sense
an incorrect distance. Use cau-
tion.
4. When sensor is frozen or stained
with snow, dirt, or water, sensor
may be inoperative until the
stains are removed using a soft
cloth.
5. Do not push, scratch or strike the
sensor. Sensor damage could
occur.
Page 258 of 339

Driving your vehicle
26 4
Hazardous driving conditions
When hazardous driving conditions are
encountered such as water, snow, ice,
mud, sand, or similar hazards, follow
these suggestions:
• Drive cautiously and allow extra dis-
tance for braking.
• Avoid sudden movements in braking or
steering.
• When braking with non-ABS brakes
pump the brake pedal with a light up-
and-down motion until the vehicle is
stopped.
• If stalled in snow, mud, or sand, use
second gear. Accelerate slowly to
avoid spinning the drive wheels.
• Use sand, rock salt or other non-slip
material under the drive wheels to pro-
vide traction when stalled in ice, snow,
or mud.
Rocking the vehicle
If it is necessary to rock the vehicle to
free it from snow, sand, or mud, first turn
the steering wheel right and left to clear
the area around your front wheels. Then,
shift back and forth between R (Reverse)
and any forward gear in vehicles
equipped with an automatic transaxle. Do
not race the engine, and spin the wheels
as little as possible. If you are still stuck
after a few tries, have the vehicle pulled
out by a tow vehicle to avoid engine over-
heating and possible damage to the
transaxle.
SPECIAL DRIVING CONDITIONS
WARNING - Downshifting
Downshifting with an automatic
transaxle, while driving on slippery
surfaces can cause an accident.
The sudden change in tire speed
could cause the tires to skid. Be
careful when downshifting on slip-
pery surfaces.
WARNING - ABS
Do not pump the brake pedal on a
vehicle equipped with ABS.
CAUTION
Prolonged rocking may cause
engine over-heating, transaxle dam-
age or failure, and tire damage.
CAUTION
The ESC system (if equipped)
should be turned OFF prior to rock-
ing the vehicle.
WARNING- Spinning tires
Do not spin the wheels, especially
at speeds more than 56 km/h (35
mph). Spinning the wheels at high
speeds when the vehicle is station-
ary could cause a tire to overheat,
explode and injure bystanders.
WARNING
If your vehicle becomes stuck in
snow, mud, sand, etc., then you may
attempt to rock the vehicle free by
moving it forward and backward. Do
not attempt this procedure if people
or objects are anywhere near the
vehicle. During the rocking opera-
tion the vehicle may suddenly move
forward or backward as it becomes
unstuck, causing injury or damage
to nearby people or objects.
Page 260 of 339
Driving your vehicle
28 4
• We recommend that you carry emer-
gency equipment, including a window
scraper, windshield de-icer, a bag of
sand or salt, flares, a small shovel and
jumper cables.
• Make sure you have sufficient ethyl-
ene-glycol coolant in the radiator.
• Check the battery condition and
cables. Cold temperatures reduce the
capacity of any battery, so it must be in
excellent condition to provide enough
winter starting power.
• Make sure the engine oil viscosity is
suitable for cold weather.
• Check the ignition system for loose
connections and damage.
• Use antifreeze-formulated windshield
washer fluid. (Do not use engine
coolant antifreeze.)
• Do not use the parking brake if it might
freeze. When parking, shift to P (Park)
with an automatic transaxle and block
the rear wheels.Snow tires
If you mount snow tires on your Kia,
make sure they are radial tires of the
same size and load range as the original
tires. Mount snow tires on all four wheels
to balance your vehicle’s handling in all
weather conditions. Keep in mind that the
traction provided by snow tires on dry
roads may not be as high as your vehi-
cle's original equipment tires. You should
drive cautiously even when the roads are
clear. Check with the tire dealer for max-
imum speed recommendations.
Do not install studded tires without first
checking local, state and municipal regu-
lations for possible restrictions against
their use.
WINTER DRIVING
WARNING- Snow tire size
Snow tires should be equivalent in
size and type to the vehicle's stan-
dard tires. Otherwise, the safety and
handling of your vehicle may be
adversely affected.
TRAILER TOWING
WARNING- Towing a trail-
er
If you don't use the correct equip-
ment and drive improperly, you can
lose control when you pull a trailer.
For example, if the trailer is too
heavy, the brakes may not work well
- or even at all. You and your pas-
sengers could be seriously or fatal-
ly injured. Pull a trailer only if you
have followed all the steps in this
section.
WARNING- Weight limits
Before towing, make sure the total
trailer weight, gross combination
weight, gross vehicle weight, gross
axle weight and trailer tongue load
are all within the limits.
Page 261 of 339
429
Driving your vehicle
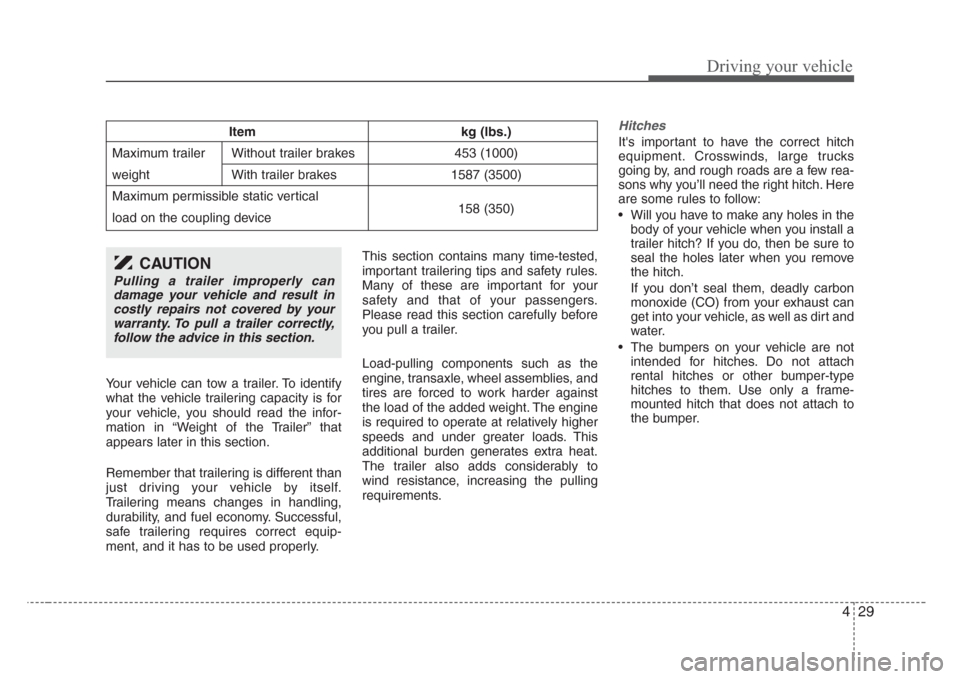
Your vehicle can tow a trailer. To identify
what the vehicle trailering capacity is for
your vehicle, you should read the infor-
mation in “Weight of the Trailer” that
appears later in this section.
Remember that trailering is different than
just driving your vehicle by itself.
Trailering means changes in handling,
durability, and fuel economy. Successful,
safe trailering requires correct equip-
ment, and it has to be used properly.This section contains many time-tested,
important trailering tips and safety rules.
Many of these are important for your
safety and that of your passengers.
Please read this section carefully before
you pull a trailer.
Load-pulling components such as the
engine, transaxle, wheel assemblies, and
tires are forced to work harder against
the load of the added weight. The engine
is required to operate at relatively higher
speeds and under greater loads. This
additional burden generates extra heat.
The trailer also adds considerably to
wind resistance, increasing the pulling
requirements.
Hitches
It's important to have the correct hitch
equipment. Crosswinds, large trucks
going by, and rough roads are a few rea-
sons why you’ll need the right hitch. Here
are some rules to follow:
• Will you have to make any holes in the
body of your vehicle when you install a
trailer hitch? If you do, then be sure to
seal the holes later when you remove
the hitch.
If you don’t seal them, deadly carbon
monoxide (CO) from your exhaust can
get into your vehicle, as well as dirt and
water.
• The bumpers on your vehicle are not
intended for hitches. Do not attach
rental hitches or other bumper-type
hitches to them. Use only a frame-
mounted hitch that does not attach to
the bumper.Item kg (lbs.)
Maximum trailer Without trailer brakes 453 (1000)
weight With trailer brakes 1587 (3500)
Maximum permissible static vertical
load on the coupling device 158 (350)
CAUTION
Pulling a trailer improperly can
damage your vehicle and result in
costly repairs not covered by your
warranty. To pull a trailer correctly,
follow the advice in this section.
Page 262 of 339
Driving your vehicle
30 4
Safety chains
You should always attach chains
between your vehicle and your trailer.
Cross the safety chains under the tongue
of the trailer so that the tongue will not
drop to the road if it becomes separated
from the hitch.
Instructions about safety chains may be
provided by the hitch manufacturer or by
the trailer manufacturer. Follow the man-
ufacturer’s recommendation for attaching
safety chains. Always leave just enough
slack so you can turn with your trailer.
And, never allow safety chains to drag on
the ground.
Trailer brakes
If your trailer weighs more than the max-
imum trailer weight without trailer brakes
loaded, then it needs its own brakes and
they must be adequate. Be sure to read
and follow the instructions for the trailer
brakes so you’ll be able to install, adjust
and maintain them properly.
• Don’t tap into your vehicle's brake sys-
tem.
Driving with a trailer
Towing a trailer requires a certain
amount of experience. Before setting out
for the open road, you must get to know
your trailer. Acquaint yourself with the
feel of handling and braking with the
added weight of the trailer. And always
keep in mind that the vehicle you are
driving is now a good deal longer and not
nearly so responsive as your vehicle is
by itself.
Before you start, check the trailer hitch
and platform, safety chains, electrical
connector(s), lights, tires and mirror
adjustment. If the trailer has electric
brakes, start your vehicle and trailer mov-
ing and then apply the trailer brake con-
troller by hand to be sure the brakes are
working. This lets you check your electri-
cal connection at the same time.
During your trip, check occasionally to be
sure that the load is secure, and that the
lights and any trailer brakes are still work-
ing.
WARNING- Trailer brakes
Do not use a trailer with its own
brakes unless you are absolutely
certain that you have properly set
up the brake system. This is not a
task for amateurs. Use an experi-
enced, competent trailer shop for
this work.