2008 KIA Sedona change time
[x] Cancel search: change timePage 210 of 339
3201
Features of your vehicle
✽
NOTICE
Playback of MP3 and WMA file formats
are supported. Load to play time for
these formats may be longer due to the
compressed nature of these discs.
✽
NOTICE
• Do not stick paper or tape etc., on the
label side or the recording side of any
discs, as it may cause a malfunction.
• The unit can play a multi-session CD-
R (recordable CD) and CD-RW
(rewritable CD) that consists of more
than two sessions.
Please refer to the manual of CD-
R/CD-RW recorder or CD-R/CD-RW
software for more information on
finalization process.
• Depending on the recording status,
some CD-Rs/CD-RWs may not play
on this unit.
CD/AUX Select
If the button is written CD/AUX, you can
switch to CD mode or AUX mode by
pressing the button.
• The AUX mode is selectable only if
RSE unit is on.
• You can enjoy the RSE audio through
the speakers in AUX mode.• The speaker volume level is adjustable
by VOLUME(+, -) key, on RSE unit or
wireless remote control.
• Refer to the “RSE” in this section for
details RSE operation.
• RSE : Rear Seat Entertainment
System(A/V)
3. CD EJECT Button
• When the button is pressed with a
CD loaded, the CD will eject.
• To eject all of the discs, press this but-
ton for one second or more.
4. TRACK UP/DOWN Button
• The desired track on the disc currently
being played can be selected using the
track number.
• Press once to skip forward to the
beginning of the next track.
• Press once to skip back to the
beginning of the track.
• Press before playback begins to
quickly move backward through a CD.
5. SCROLL Button
Press the button, and you can check the file
names with more than 16 characters on
MP3 CD(max 34 characters).
The button doesn’t work on file names
less than 16 characters.
6. FF/REW Button
If you want to fast forward or reverse
through the compact disc track, push and
hold the FF or REW button.
When you release the button, the compact
disc player will resume playing.
7 . EQ Button
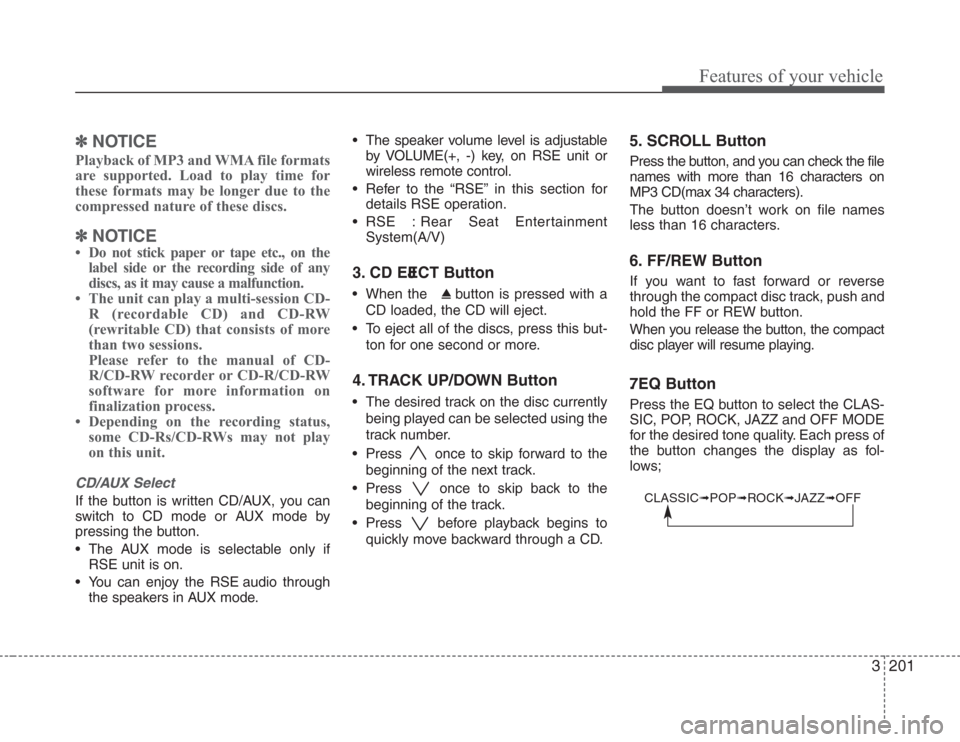
Press the EQ button to select the CLAS-
SIC, POP, ROCK, JAZZ and OFF MODE
for the desired tone quality. Each press of
the button changes the display as fol-
lows;
CLASSIC➟POP➟ROCK➟JAZZ➟OFF
Page 221 of 339
Features of your vehicle
212 3
You have two options: 4:3 (normal) and 16:9
(widescreen). Press the display button to
select the preferred aspect ratio.
When the RSE unit receives video signals
from the AUX, the aspect ratio can be
changed to 16:9 or 4:3 by the DISP button.
The aspect ratio information will auto-
matically disappear if no button is
pressed for three seconds.
5. Forward
There are three DVD and VCD fast for-
ward speeds. Press and hold the FWD
button for up to 2 seconds and the player
will fast forward at 4 times the normal
speed (8 times for VCDs). Hold the but-
ton for more than 2 seconds but less than
4 seconds and the player will fast forward
at about 8 times the normal speed (20
times for VCDs). Hold the button for more
than 4 seconds and the fast forward will
increase to about 32 times the normal
speed for both DVDs and VCDs. Press
the FWD button again to stop fast for-
warding and return to normal speed play.
6. Reverse
There are three DVD and VCD fast
reverse speeds. Press and hold the REV
button for up to 2 seconds and the player
will reverse through the DVD at 4 times
the normal speed (8 times for VCDs).
Hold the button for more than 2 seconds
but less than 4 seconds and the player
will reverse at about 8 times the normal
speed (20 times for VCDs). Hold the but-
ton for more than 4 seconds and the
reverse will increase to 32 times the nor-
mal speed for both DVDs and VCDs.
Press the REV button again to stop
reversing and return to normal speed
play.
7 . Next Chapter
While a DVD is playing, press the NEXT
button to skip to the next chapter. The
current chapter number is shown on the
screen. Press and hold the NEXT button
to move quickly through the chapters.
✽
NOTICE
Depending on the DVD, if NEXT is
pressed during the last chapter on a
DVD, a red circle with a “Invalid
icon[�:
]” may be displayed, indicating
an invalid button press.
8 . Previous Chapter
Press the PREV button to skip to the
beginning of the previous chapter. Press
and hold the PREV button to move quick-
ly through the chapters.
Depending on your DVD, if the PREV
button is pressed during the first 8 sec-
onds of the first chapter, the player will
skip to the beginning of the last chapter
of the DVD.
9 . Enter
A momentary press shall initiate a select
or enter function of a selected menu
item.
10. Menu
DVDs may contain special programming
or features that are accessed by using the
menu. To use the menu with a DVD that is
playing, press the MENU button once to
display the DVD disc menu. Press the but-
ton a second time to exit the menu and
return to the DVD program.
The menu is not available during disc ini-
tialization, the beginning credits or any
copyright FBI warnings.
Page 224 of 339
3215
Features of your vehicle
1. Stop/Eject
While the disc is playing, press the
STOP/EJECT( ) button to stop disc
play.
While the disc is stopped, press the
STOP/EJECT( ) button again to eject
the disc.
2. Volume Control
You can adjust the volume one of two
ways. First, if you are adjusting the vol-
ume for audio through the vehicle speak-
ers, you can use the VOLUME (
)button on the control panel or the
remote control. Press “+” to increase the
volume and “-” to decrease the volume.
The volume level will be displayed on the
head-unit, when the RSE unit volume
level is adjusted from its control panel or
remote control. This button does not
affect headphone volume.
Second, you can adjust the volume on
the wireless headphones by locating the
VOL control wheel on the left side of the
headphones. Roll the control wheel to
adjust the volume.
3. Play/Pause
When an audio CD is inserted, the RSE
will display the KIA logo, then automati-
cally begin playing the first track. The
track number and time elapsed for the
current track is displayed.
If a CD is loaded and playing, press the
PLAY/PAUSE( ) button to pause the
CD. Press the button again to resume
play.
If a CD is already loaded, stopping and
playing the CD by pressing
PLAY/PAUSE( ) button on the remote
control; cycling the ignition and pressing
play; or changing the source will cause the
CD to begin playing at the point where it
was stopped during the previous play. The
player will automatically play this previous
play position unless the
STOP/EJECT( ) button is pressed.
At the end of the CD, the player will auto-
matically return to the first track and con-
tinue playing.
4. Display
When the player is in DVD mode, press the
DISP button to view the DVD title, chapter
number and elapsed time and other infor-
mation about the DVD currently playing.
The next time the player is turned on, it will
return to the brightness level it was adjusted
to when last used.
The RSE unit has two presets of display
brightness. When the headlamp is turned
on, the display brightness level will be
dimmed as the preset. However, when the
headlamp is turned off, the display bright-
ness will return to the daytime brightness.
Press DISP to adjust the image format. The
image format, also known as the aspect
ratio, is a ratio of the height to width of the
image on the screen. For example, a 4:3
ratio would mean an image that is 4 units by
3 units. You have two options: 4:3 (normal)
and 16:9 (widescreen). Press the display
button to select the preferred aspect ratio.
When the RSE unit receives video signals
from the AUX, the aspect ratio can be
changed to 16:9 or 4:3 by the DISP button.
The aspect ratio information will auto-
matically disappear if no button is
pressed for three seconds.
Page 227 of 339
Features of your vehicle
218 3
Using the Remote Control
In addition to having all the buttons and
functionality listed in the DVD and CD
Controls section, the remote control has
several other buttons that offer additional
functions. It is an infrared remote control,
and must be pointed at the face of the
RSE at a 45° angle for best results. It
requires a CR2025 battery (included).
The remote control has the following
additional buttons:
✽
NOTICE
The RSE system is always “awake”
when the vehicle's ignition is turned on
or when the vehicle is in “accessory
power mode.”
1. Stop
Pressing this button once will stop DVD
or CD play. To eject a disc, you must use
the eject button on the control panel.
2. Speaker Volume “+” and “-”
These buttons control the volume of the
audio of a DVD or CD through the vehicle
speakers, not the volume from head-
phones. Press “+” to turn the volume up
and “-” to turn the volume down.
3. Play/Pause
When an audio CD(VCD/DVD) is insert-
ed, the RSE will display the KIA logo,
then automatically begin playing the first
track. The track number and time elapsed
for the current track is displayed.
If a CD(VCD/DVD) is loaded and playing,
press the PLAY/PAUSE( ) button to
pause the CD(VCD/DVD). Press the but-
ton again to resume play.
If a CD(VCD/DVD) is already loaded, stop-
ping and playing the CD(VCD/ DVD) by
pressing PLAY/PAUSE( ) button on
the remote control; cycling the ignition and
pressing play; or changing the source will
cause the CD(VCD/DVD) to begin playing
at the point where it was stopped during
the previous play. The player will automati-
cally play this previous play position unless
the STOP/EJECT( ) button is pressed.
At the end of the CD(VCD/DVD), the
player will automatically return to the first
track and continue playing.
4. Display
When the player is in DVD mode, press the
DISP button to view the DVD title, chapter
number and elapsed time and other infor-
mation about the DVD currently playing.It will also display brightness. There are
“Day Time” brightness with brightest level
and “Night Time” brightness which has 70%
level of “Day Time” brightness. Adjust the
level of brightness by pressing the
REV(dimmer) or FWD(brighter) buttons.
The next time the player is turned on, it will
return to the brightness level it was adjusted
to when last used.
The RSE unit has two presets of display
brightness. When the headlamp is turned
on, the display brightness level will be
dimmed as the preset. However, when the
headlamp is turned off, the display bright-
ness will return to the daytime brightness.
Press DISP to adjust the image format. The
image format, also known as the aspect
ratio, is a ratio of the height to width of the
image on the screen. For example, a 4:3
ratio would mean an image that is 4 units by
3 units. You have two options: 4:3 (normal)
and 16:9 (widescreen). Press the display
button to select the preferred aspect ratio.
When the RSE unit receives video signals
from the AUX, the aspect ratio can be
changed to 16:9 or 4:3 by the DISP button.
The aspect ratio information will auto-
matically disappear if no button is
pressed for three seconds.
Page 232 of 339
3223
Features of your vehicle
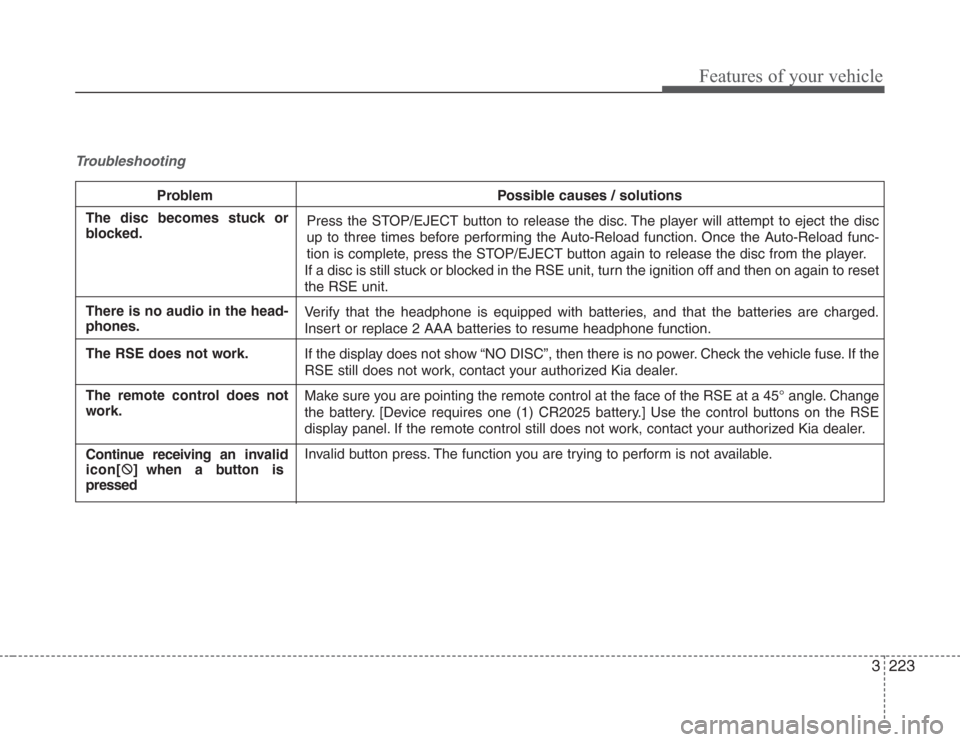
Troubleshooting
Problem Possible causes / solutions
Press the STOP/EJECT button to release the disc. The player will attempt to eject the disc
up to three times before performing the Auto-Reload function. Once the Auto-Reload func-
tion is complete, press the STOP/EJECT button again to release the disc from the player.
If a disc is still stuck or blocked in the RSE unit, turn the ignition off and then on again to reset
the RSE unit.
Verify that the headphone is equipped with batteries, and that the batteries are charged.
Insert or replace 2 AAA batteries to resume headphone function.
If the display does not show “NO DISC”, then there is no power. Check the vehicle fuse. If the
RSE still does not work, contact your authorized Kia dealer.
Make sure you are pointing the remote control at the face of the RSE at a 45° angle. Change
the battery. [Device requires one (1) CR2025 battery.] Use the control buttons on the RSE
display panel. If the remote control still does not work, contact your authorized Kia dealer.
Invalid button press. The function you are trying to perform is not available.
The disc becomes stuck or
blocked.
There is no audio in the head-
phones.
The RSE does not work.
The remote control does not
work.
Continue receiving an invalid
icon[�:
] when a button is
pressed
Page 245 of 339
413
Driving your vehicle
To temporarily accelerate with the
cruise control on:
If you want to speed up temporarily when
the cruise control is on, depress the
accelerator pedal. Increased speed will
not interfere with cruise control operation
or change the set speed.
To return to the set speed, take your foot
off the accelerator.
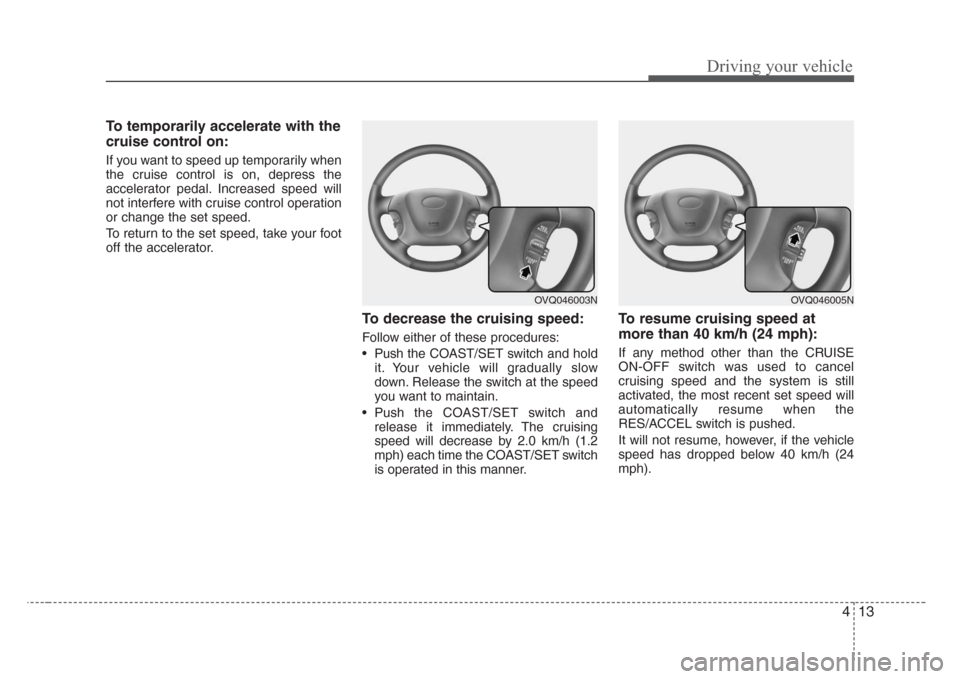
To decrease the cruising speed:
Follow either of these procedures:
• Pushthe COAST/SET switch and hold
it. Your vehicle will gradually slow
down. Release the switch at the speed
you want to maintain.
• Pushthe COAST/SET switch and
release it immediately. The cruising
speed will decrease by 2.0 km/h (1.2
mph) each time the COAST/SET switch
is operated in this manner.
To resume cruising speed at
more than 40 km/h (24 mph):
If any method other than the CRUISE
ON-OFF switch was used to cancel
cruising speed and the system is still
activated, the most recent set speed will
automatically resume when the
RES/ACCEL switch is pushed.
It will not resume, however, if the vehicle
speed has dropped below 40 km/h (24
mph).
OVQ046003NOVQ046005N
Page 261 of 339
429
Driving your vehicle
Your vehicle can tow a trailer. To identify
what the vehicle trailering capacity is for
your vehicle, you should read the infor-
mation in “Weight of the Trailer” that
appears later in this section.
Remember that trailering is different than
just driving your vehicle by itself.
Trailering means changes in handling,
durability, and fuel economy. Successful,
safe trailering requires correct equip-
ment, and it has to be used properly.This section contains many time-tested,
important trailering tips and safety rules.
Many of these are important for your
safety and that of your passengers.
Please read this section carefully before
you pull a trailer.
Load-pulling components such as the
engine, transaxle, wheel assemblies, and
tires are forced to work harder against
the load of the added weight. The engine
is required to operate at relatively higher
speeds and under greater loads. This
additional burden generates extra heat.
The trailer also adds considerably to
wind resistance, increasing the pulling
requirements.
Hitches
It's important to have the correct hitch
equipment. Crosswinds, large trucks
going by, and rough roads are a few rea-
sons why you’ll need the right hitch. Here
are some rules to follow:
• Will you have to make any holes in the
body of your vehicle when you install a
trailer hitch? If you do, then be sure to
seal the holes later when you remove
the hitch.
If you don’t seal them, deadly carbon
monoxide (CO) from your exhaust can
get into your vehicle, as well as dirt and
water.
• The bumpers on your vehicle are not
intended for hitches. Do not attach
rental hitches or other bumper-type
hitches to them. Use only a frame-
mounted hitch that does not attach to
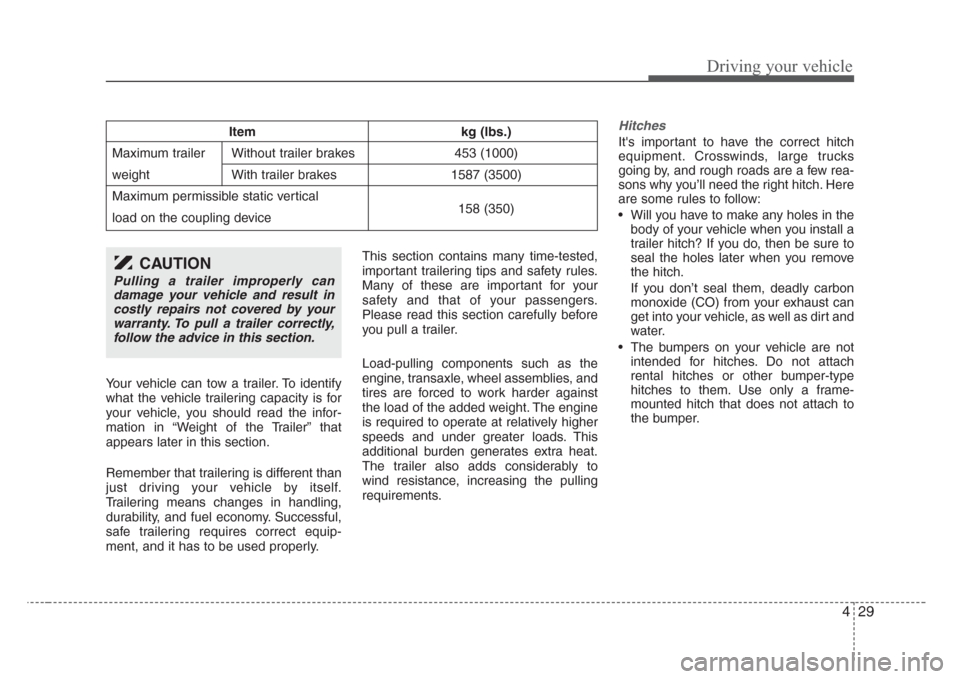
the bumper.Item kg (lbs.)
Maximum trailer Without trailer brakes 453 (1000)
weight With trailer brakes 1587 (3500)
Maximum permissible static vertical
load on the coupling device 158 (350)
CAUTION
Pulling a trailer improperly can
damage your vehicle and result in
costly repairs not covered by your
warranty. To pull a trailer correctly,
follow the advice in this section.
Page 263 of 339

431
Driving your vehicle
Following distance
Stay at least twice as far behind the vehi-
cle ahead as you would when driving
your vehicle without a trailer. This can
help you avoid situations that require
heavy braking and sudden turns.
Passing
You’ll need more passing distance up
ahead when you’re towing a trailer. And,
because of the increased vehicle length,
you’ll need to go much farther beyond the
passed vehicle before you can return to
your lane.
Backing up
Hold the bottom of the steering wheel
with one hand. Then, to move the trailer
to the left, just move your hand to the left.
To move the trailer to the right, move your
hand to the right. Always back up slowly
and, if possible, have someone guide
you.
Making turns
When you’re turning with a trailer, make
wider turns than normal. Do this so your
trailer won’t strike soft shoulders, curbs,
road signs, trees, or other objects. Avoid
jerky or sudden maneuvers. Signal well
in advance.
Turn signals when towing a trailer
When you tow a trailer, your vehicle has
to have a different turn signal flasher and
extra wiring. The green arrows on your
instrument panel will flash whenever you
signal a turn or lane change. Properly
connected, the trailer lights will also flash
to alert other drivers you’re about to turn,
change lanes, or stop.
When towing a trailer, the green arrows
on your instrument panel will flash for
turns even if the bulbs on the trailer are
burned out. Thus, you may think drivers
behind you are seeing your signals
when, in fact, they are not. It’s important
to check occasionally to be sure the trail-
er bulbs are still working. You must also
check the lights every time you discon-
nect and then reconnect the wires.
Do not connect a trailer lighting system
directly to your vehicle’s lighting system.
Use only an approved trailer wiring har-
ness.
Your Authorized Kia Dealer can assist
you in installing the wiring harness.
Driving on grades
Reduce speed and shift to a lower gear
before you start down a long or steep
downgrade. If you don’t shift down, you
might have to use your brakes so much
that they would get hot and no longer
operate efficiently.
On a long uphill grade, shift down and
reduce your speed to around 70 km/h (45
mph) to reduce the possibility of engine
and transaxle overheating.
If your trailer weighs more than the max-
imum trailer weight without trailer brakes
and you have an automatic transaxle,
you should drive in D (Drive) when tow-
ing a trailer.
Operating your vehicle in D (Drive) when
towing a trailer will minimize heat build up
and extend the life of your transaxle.
WARNING
Failure to use an approved trailer
wiring harness could result in dam-
age to the vehicle electrical system
and/or personal injury.