2008 KIA Sedona warning
[x] Cancel search: warningPage 174 of 339

3 165
Features of your vehicle
Your new mirror comes with an integrat-
ed HomeLink Universal Transceiver,
which allows you to program the mirror to
activate your garage door(s), estate gate,
home lighting, etc. The mirror actually
learns the codes from your various exist-
ing transmitters.
Programming
Your vehicle may require the ignition
switch to be turned to the ACC position
for programming and/or operation of
HomeLink. It is also recommended that a
new battery be replaced in the hand-held
transmitter of the device being pro-
grammed to HomeLink for quicker train-
ing and accurate transmission of the
radio-frequency.
Follow these steps to train your
HomeLink mirror:
HOMELINK® WIRELESS CONTROL SYSTEM (IF EQUIPPED)
WARNING
• When programming the
HomeLink® Wireless Control
System, you may be operating a
garage door or gate operator.
Make sure that people and objects
are out of the way of the moving
door or gate to prevent potential
harm or damage.
(Continued)
(Continued)
• Do not use HomeLink with any
garage door opener that lacks the
safety stop and reverse feature as
required by federal safety stan-
dards. (This includes any garage
door opener model manufactured
before April 1, 1982.) A garage
door opener which cannot detect
an object, signaling the door to
stop and reverse, does not meet
current federal safety standards.
Using a garage door opener with-
out these features increases risk
of serious injury or death. For
more information, call 1-800-355-
3515 or on the internet at
www.homelink.com.
• Retain the original transmitter for
future programming procedures
(i.e., new vehicle purchase). It is
also suggested that upon the sale
of the vehicle, the programmed
HomeLink buttons be erased for
security purposes (follow step 1
in the “Programming” portion of
this text).
OVQ036305N Glare detection sensor
Indicator light
Homelink buttons
Page 177 of 339
Features of your vehicle
168 3
Reprogramming a single
HomeLink button
To program a device to HomeLink using
a HomeLink button previously trained,
follow these steps:
1. Press and hold the desired HomeLink
button. Do NOT release until step 4
has been completed.
2. When the indicator light begins to flash
slowly (after 20 seconds), position the
hand-held transmitter 1 to 3 inches
away from the HomeLink surface.
3. Press and hold the hand-held trans-
mitter button (or press and “cycle” - as
described in “Canadian Programming”
above).
4. The HomeLink indicator light will flash,
first slowly and then rapidly. When the
indicator light begins to flash rapidly,
release both buttons.
The previous device has now been
erased and the new device can be acti-
vated by pushing the HomeLink button
that has just been programmed. This pro-
cedure will not affect any other pro-
grammed HomeLink buttons.
Gate operator programming &
canadian programming
During programming, your hand-held
transmitter may automatically stop trans-
mitting. Continue to press and hold the
HomeLink button (note steps 2 through 4
in the “Programming” portion of this text)
while you press and re-press (“cycle”)
your handheld transmitter every two sec-
onds until the frequency signal has been
learned. The indicator light will flash
slowly and then rapidly after several sec-
onds upon successful training.
Accessories
If you would like additional information on
the HomeLink Wireless Control System,
HomeLink compatible products, or to
purchase other accessories such as the
HomeLink® Lighting Package, please
contact HomeLink at 1-800-355-3515 or
on the internet at www.homelink.com.
This device complies with Industry
Canada Standard RSS-210.Operation
is subject to the following two conditions:
1. This device may not cause interfer-
ence, and
2. This device must accept any interfer-
ence, including interference that may
cause undesired operation of the
device.
CAUTION
If programming a garage door
opener or gate, it is advised to
unplug the device during the
“cycling” process to prevent possi-
ble motor burn-up.
WARNING
Changes or modifications not
expressly approved by the party
responsible for compliance could
void the user’s authority to operate
the equipment.
IC: 4112104541A Gentex
MODEL/FCC ID: NZLSTDHL3
Page 178 of 339
3 169
Features of your vehicle
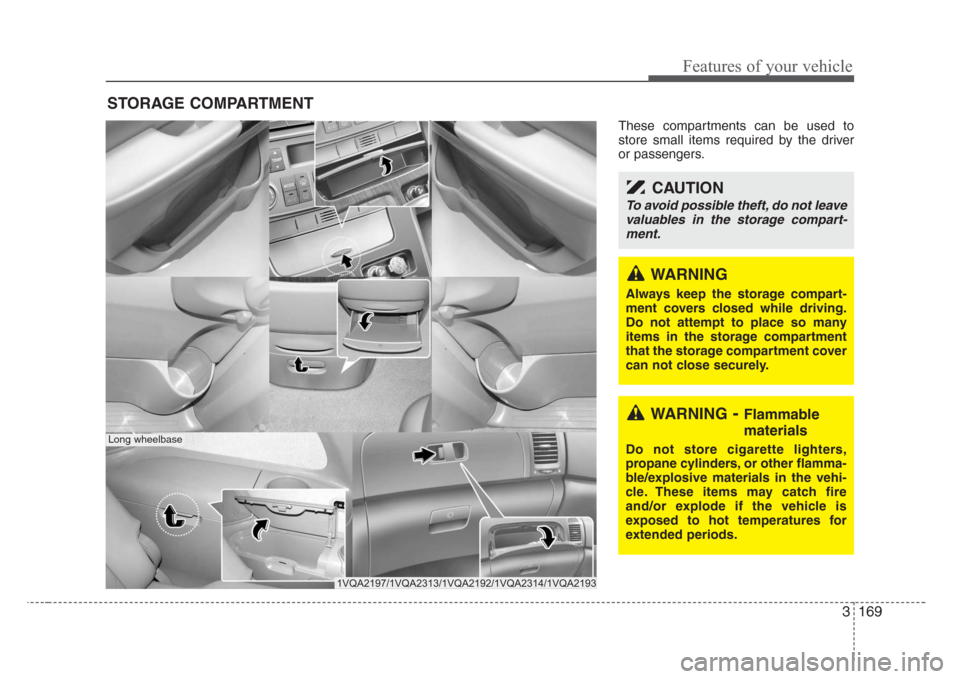
These compartments can be used to
store small items required by the driver
or passengers.
STORAGE COMPARTMENT
CAUTION
To avoid possible theft, do not leave
valuables in the storage compart-
ment.
1VQA2197/1VQA2313/1VQA2192/1VQA2314/1VQA2193
WARNING-Flammable
materials
Do not store cigarette lighters,
propane cylinders, or other flamma-
ble/explosive materials in the vehi-
cle. These items may catch fire
and/or explode if the vehicle is
exposed to hot temperatures for
extended periods.
WARNING
Always keep the storage compart-
ment covers closed while driving.
Do not attempt to place so many
items in the storage compartment
that the storage compartment cover
can not close securely.
Long wheelbase
Page 179 of 339
Features of your vehicle
170 3
Glove box
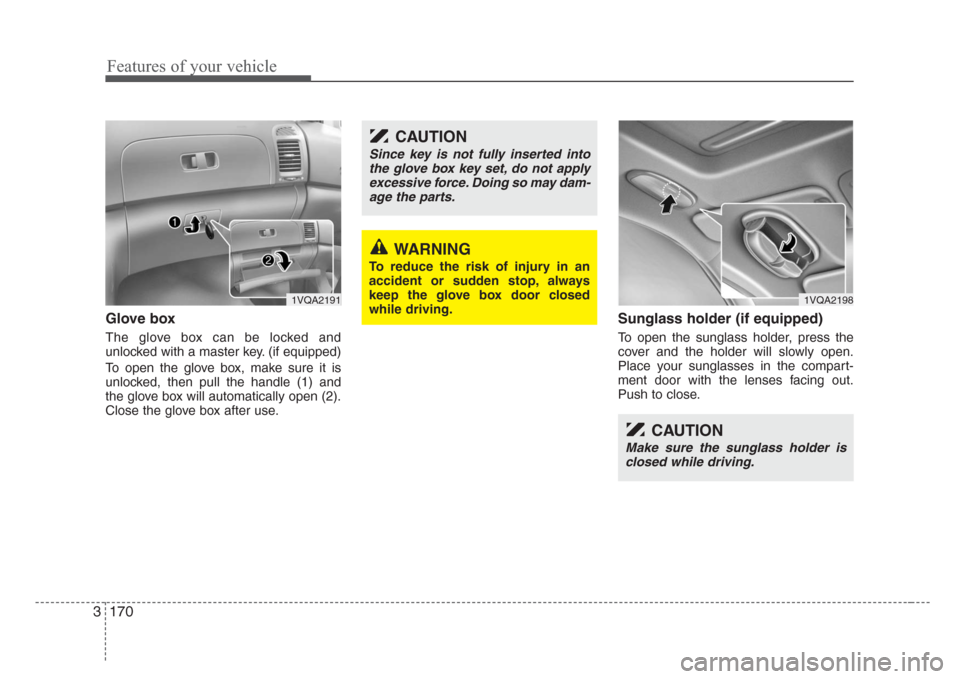
The glove box can be locked and
unlocked with a master key. (if equipped)
To open the glove box, make sure it is
unlocked, then pull the handle (1) and
the glove box will automatically open (2).
Close the glove box after use.
Sunglass holder (if equipped)
To open the sunglass holder, press the
cover and the holder will slowly open.
Place your sunglasses in the compart-
ment door with the lenses facing out.
Push to close.
1VQA2191
CAUTION
Since key is not fully inserted into
the glove box key set, do not apply
excessive force. Doing so may dam-
age the parts.
WARNING
To reduce the risk of injury in an
accident or sudden stop, always
keep the glove box door closed
while driving.
1VQA2198
CAUTION
Make sure the sunglass holder is
closed while driving.
Page 181 of 339

Features of your vehicle
172 3
Cigarette lighter (if equipped)
To operate the cigarette lighter, press it in
and release it. When it is heated, it auto-
matically pops out ready for use.
If the engine is not running, the ignition
switch must be in the ACC or ON position
for the lighter to operate.
Ashtray (if equipped)
To use the ashtray, press the cover and
release it.
To remove the ashtray to empty or clean
it, lift it upward and pull it out.
INTERIOR FEATURES
1VQA21851VQA2186
CAUTION
• Do not hold the lighter in after it is
already heated because it will
overheat.
• Only a genuine Kia lighter should
be used in the cigarette lighter
socket. The use of plug-in acces-
sories (shavers, hand-held vacu-
ums, and coffee pots, for exam-
ple) may damage the socket or
cause electrical failure.
• If the lighter does not pop out
within 30 seconds, remove it to
prevent overheating.
WARNING- Ashtray use
• Do not use the vehicle’s ashtrays
as waste receptacles.
• Putting lit cigarettes or matches
in an ashtray with other com-
bustible materials may cause a
fire.
Page 182 of 339
3 173
Features of your vehicle
Cup holder
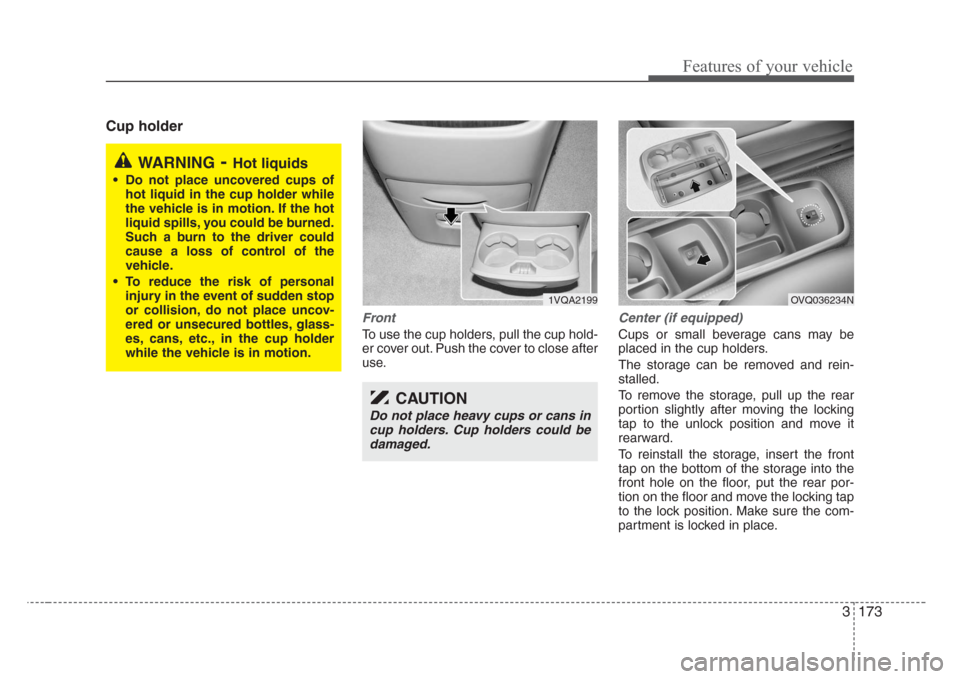
Front
To use the cup holders, pull the cup hold-
er cover out. Push the cover to close after
use.
Center (if equipped)
Cups or small beverage cans may be
placed in the cup holders.
The storage can be removed and rein-
stalled.
To remove the storage, pull up the rear
portion slightly after moving the locking
tap to the unlock position and move it
rearward.
To reinstall the storage, insert the front
tap on the bottom of the storage into the
front hole on the floor, put the rear por-
tion on the floor and move the locking tap
to the lock position. Make sure the com-
partment is locked in place.
WARNING-Hot liquids
• Do not place uncovered cups of
hot liquid in the cup holder while
the vehicle is in motion. If the hot
liquid spills, you could be burned.
Such a burn to the driver could
cause a loss of control of the
vehicle.
• To reduce the risk of personal
injury in the event of sudden stop
or collision, do not place uncov-
ered or unsecured bottles, glass-
es, cans, etc., in the cup holder
while the vehicle is in motion.
1VQA2199
CAUTION
Do not place heavy cups or cans in
cup holders. Cup holders could be
damaged.
OVQ036234N
Page 189 of 339
Features of your vehicle
180 3
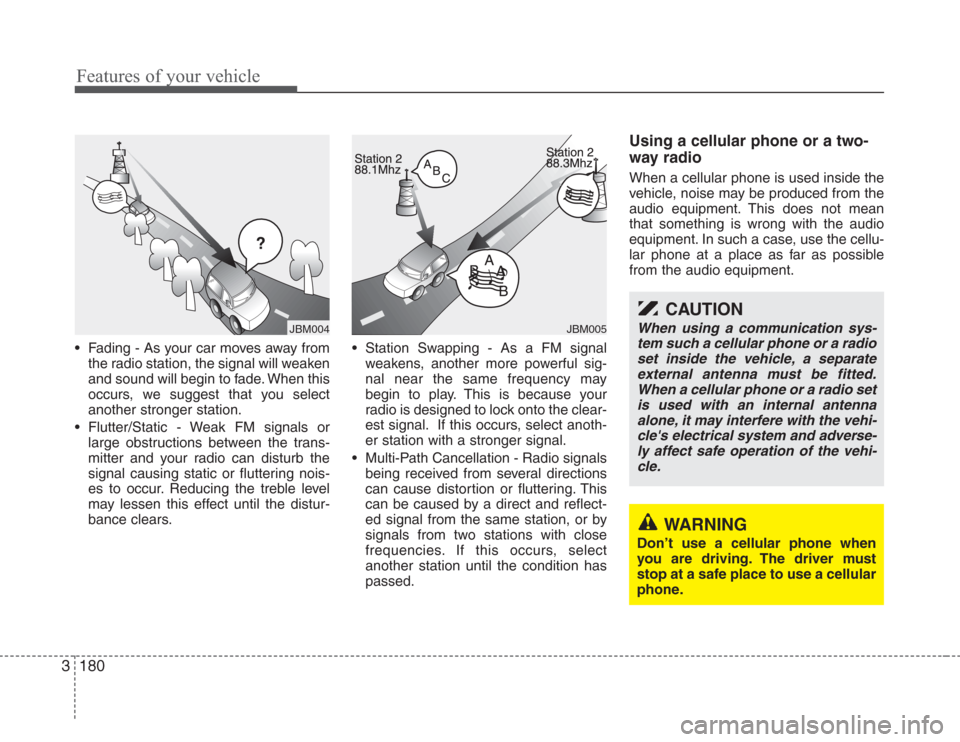
• Fading - As your car moves away from
the radio station, the signal will weaken
and sound will begin to fade. When this
occurs, we suggest that you select
another stronger station.
• Flutter/Static - Weak FM signals or
large obstructions between the trans-
mitter and your radio can disturb the
signal causing static or fluttering nois-
es to occur. Reducing the treble level
may lessen this effect until the distur-
bance clears.• Station Swapping - As a FM signal
weakens, another more powerful sig-
nal near the same frequency may
begin to play. This is because your
radio is designed to lock onto the clear-
est signal. If this occurs, select anoth-
er station with a stronger signal.
• Multi-Path Cancellation - Radio signals
being received from several directions
can cause distortion or fluttering. This
can be caused by a direct and reflect-
ed signal from the same station, or by
signals from two stations with close
frequencies. If this occurs, select
another station until the condition has
passed.
Using a cellular phone or a two-
way radio
When a cellular phone is used inside the
vehicle, noise may be produced from the
audio equipment. This does not mean
that something is wrong with the audio
equipment. In such a case, use the cellu-
lar phone at a place as far as possible
from the audio equipment.
¢¢¢
JBM004JBM005
CAUTION
When using a communication sys-
tem such a cellular phone or a radio
set inside the vehicle, a separate
external antenna must be fitted.
When a cellular phone or a radio set
is used with an internal antenna
alone, it may interfere with the vehi-
cle's electrical system and adverse-
ly affect safe operation of the vehi-
cle.
WARNING
Don’t use a cellular phone when
you are driving. The driver must
stop at a safe place to use a cellular
phone.
Page 218 of 339

3209
Features of your vehicle
Using the DVD player
Disc compatibility
Your RSE player accepts and plays all
DVDs in 4:3 (normal) and 16:9 (wide
screen) video formats. With DVDs that
offer multiple formats, the default format
is 16:9 and will stay that way unless the
user changes the format. (See “Display”
to learn how to adjust the format.)
✽
NOTICE
• The DVD player has the capability to
play DVD-Video, DVD-R, DVD-RW,
CD-DA, CD-R, CD-RW and Video-
CD.
• The DVD player has the capability to
play CD-DA, DVD, VCD, PCM,
Dolby Digital and DTS formats.
• Please refer to the appendix for the
error messages.
Loading a Disc
Insert the disc part way into the load slot.
The player will automatically grip the disc
and pull it in the rest of the way. The player
will display “reading” on the screen and
show the “Kia Motors” logo before begin-
ning the DVD.The player is only capable of reading the
bottom side of a disc. When inserting a
single-sided disc, the label side should be
up. When inserting a two-sided disc, the
desired play side should be down.
✽
NOTICE
• Because there is no universal standard
for DVD programming, your disc may
behave differently than below. Some
DVDs may present warning messages
about unauthorized duplication, some
will go directly to a menu and others
may start playing the movie immedi-
ately.
• When the vehicle's ignition is active,
the loading of any playable disc will
cause the player to initialize and auto-
matically play the disc. If a disc was
playing prior to the ignition being
turned off, it will not automatically
replay once the ignition is turned on
again. Instead, it will go into standby
mode. Press the SRC or
PLAY/PAUSE( ) button to “wake
up” the unit and resume disc play.
Disc Protection
The player has an Auto-Reload Disc
Protection feature to protect discs from
accidental damage. If an ejected disc is
not removed within 25 seconds after being
ejected, it will be pulled back into the play-
er. The disc will not begin playing. Disc can
be played by the SRC or
PLAY/PAUSE( ) buttons.
DVD Controls
You can control your DVD by using the
buttons on the unit's control panel or by
using the remote control. Instructions for
the controls listed below are the same
whether you are using the control panel
or the remote control. However, there are
functions that are only available from the
remote control. These buttons and their
functionality are discussed in the
“REMOTE CONTROL” section begin-
ning.