2008 KIA Rio sunroof
[x] Cancel search: sunroofPage 10 of 219

3
Keys / 3-2
Remote keyless entry / 3-3
Theft-alarm system / 3-5
Immobilizer system / 3-7
Door locks / 3-9
Windows / 3-14
Seat / 3-17
Safety belts / 3-27
Air bags-supplemental restraint system / 3-47
Trunk / 3-62
Hood / 3-64
Fuel filler lid / 3-65
Mirrors / 3-68
Interior lights / 3-71
Storage compartment / 3-72
Interior features / 3-73
Sunroof / 3-76
Luggage net / 3-78
Antenna / 3-79
Audio system / 3-80
Knowing your vehicle
Page 85 of 219

Knowing your vehicle
76 3
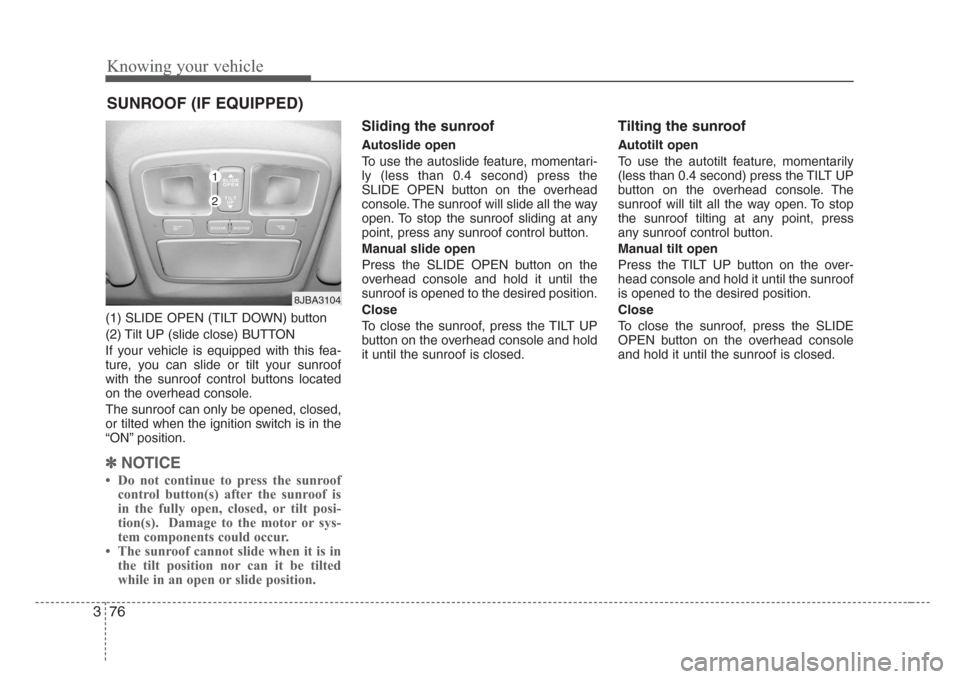
(1) SLIDE OPEN (TILT DOWN) button
(2) Tilt UP (slide close) BUTTON
If your vehicle is equipped with this fea-
ture, you can slide or tilt your sunroof
with the sunroof control buttons located
on the overhead console.
The sunroof can only be opened, closed,
or tilted when the ignition switch is in the
“ON” position.
✽
NOTICE
• Do not continue to press the sunroof
control button(s) after the sunroof is
in the fully open, closed, or tilt posi-
tion(s). Damage to the motor or sys-
tem components could occur.
• The sunroof cannot slide when it is in
the tilt position nor can it be tilted
while in an open or slide position.
Sliding the sunroof
Autoslide open
To use the autoslide feature, momentari-
ly (less than 0.4 second) press the
SLIDE OPEN button on the overhead
console. The sunroof will slide all the way
open. To stop the sunroof sliding at any
point, press any sunroof control button.
Manual slide open
Press the SLIDE OPEN button on the
overhead console and hold it until the
sunroof is opened to the desired position.
Close
To close the sunroof, press the TILT UP
button on the overhead console and hold
it until the sunroof is closed.
Tilting the sunroof
Autotilt open
To use the autotilt feature, momentarily
(less than 0.4 second) press the TILT UP
button on the overhead console. The
sunroof will tilt all the way open. To stop
the sunroof tilting at any point, press
any sunroof control button.
Manual tilt open
Press the TILT UP button on the over-
head console and hold it until the sunroof
is opened to the desired position.
Close
To close the sunroof, press the SLIDE
OPEN button on the overhead console
and hold it until the sunroof is closed.
SUNROOF (IF EQUIPPED)
8JBA3104
1
2
Page 86 of 219

377
Knowing your vehicle
Sunshade
The sunshade will be opened with the
glass panel automatically when the glass
panel is slid. You will have to close it man-
ually if you want it closed.
✽
NOTICE
• Do not press any sunroof control but-
ton longer than necessary. Damage to
the motor or system components
could occur.
• Periodically remove any dirt that may
accumulate on the guide rail.
• If you try to open the sunroof when
the temperature is below freezing or
when the sunroof is covered with snow
or ice, the glass or the motor could be
damaged.
• The sunroof is made to slide together
with sunshade. Do not leave the sun-
shade closed while the sunroof is open.
In case of an emergency
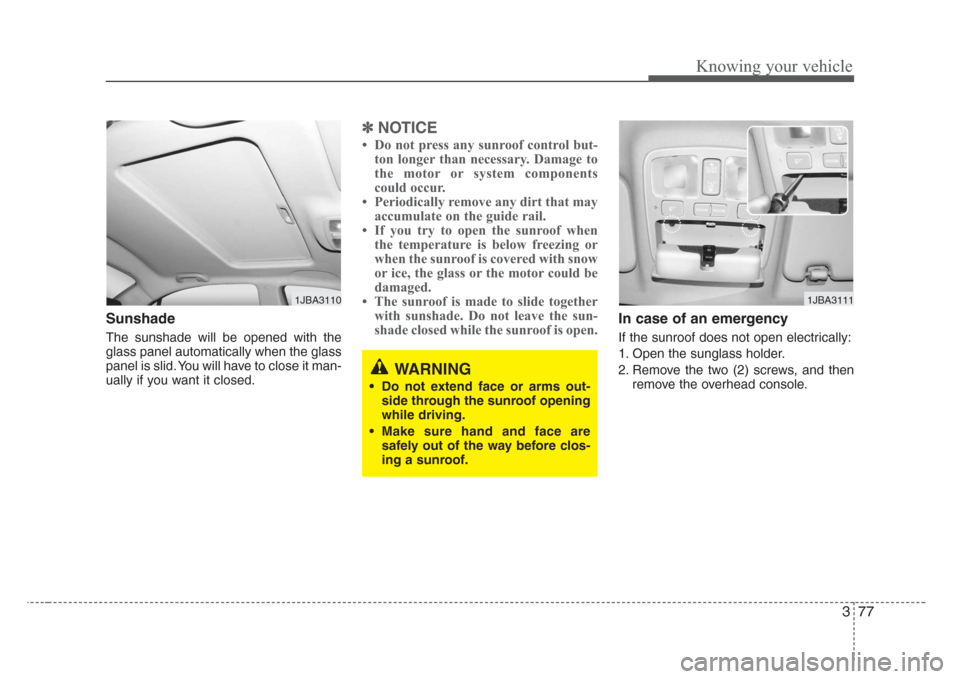
If the sunroof does not open electrically:
1. Open the sunglass holder.
2. Remove the two (2) screws, and then
remove the overhead console.
1JBA3110
WARNING
• Do not extend face or arms out-
side through the sunroof opening
while driving.
• Make sure hand and face are
safely out of the way before clos-
ing a sunroof.
1JBA3111
Page 87 of 219

Knowing your vehicle
78 3
3. Insert the emergency handle (provided
with the vehicle) and turn the handle
clockwise to open or counterclockwise
to close.
Resetting the sunroof
Whenever the vehicle battery is discon-
nected or discharged, or you use the
emergency handle to operate the sun-
roof, you have to reset your sunroof sys-
tem as follows:
1. Turn the ignition key to the ON posi-
tion.
2. Set the sunroof to the maximum TILT-
UP position using the corresponding
sunroof switch.
3. Then, release it.
4. Press and hold the TILT UP button
once again until the sunroof has
returned to the original position of TILT
UP after it is raised a little higher than
the maximum TILT UP position. This
may take several seconds.
When this is complete, the sunroof
system is reset.
To keep items from shifting in the trunk,
you can use the four rings located in the
trunk to attach the cargo net.
1JBA3112
1JBA3113
1JBA3216
4 Door
5 Door
LUGGAGE NET (IF EQUIPPED)
Page 165 of 219

611
In case of an emergency
Driver-side knee bolster
Description Fuse rating Protected component
RR WIPER 15A Rear wiper
H/LP(LH) 10A Headlight (left)
FR WIPER 25A Front wiper
BLOWER 10A Blower
H/LP(RH) 10A Headlight (right)
S/ROOF 20A Sunroof
STOP LP 15A Stop light
C/DR LOCK 20A Central door lock
IGN COIL 15A Ignition coil
ABS 10A ABS
B/UP LP 10A Back-up light
SPARE - Spare fuse
C/LIGHTER 25A Cigar lighter
FOLD'G 10A Outside rearview mirror folding
HTD SEAT 20A Seat warmer
AMP 25A Amplifier
FR FOG LP 10A Front fog light
SPARE - Spare fuse
ECU 10A Engine control unit
CLUSTER 10A Cluster
P/WDW RH 25A Power window (right)
AUDIO 10A Audio
RR FOG LP 10A Rear fog light
IGN 10A Ignition
Description Fuse rating Protected component
HTD GLASS 30A Rear window defroster
A/BAG 15A Air bag
TCU 10A Automatic transaxle control
SNSR 10A Sensors
SPARE - Spare fuse
MULT B/UP 10A Cluster, ETACS, A/C, Clock,
Room lamp
AUDIO 15A Audio
P/WDW LH 25A Power window (left)
HTD MIRR 10A Outside rearview mirror heater
TAIL LP(LH) 10A Taillight (left)
TAIL LP(RH) 10A Taillight (right)
HAZARD 10A Hazard warning light
T/SIG LP 10A Turn signal light
A/BAG IND 10A Air bag warning
START 10A Start motor
Page 198 of 219

Maintenance
22 7
For best battery service :
• Keep the battery securely mounted.
• Keep the top of the battery clean and
dry.
• Keep the terminals and connections
clean, tight, and coated with petroleum
jelly or terminal grease.
• Rinse any spilled electrolyte from the
battery immediately with a solution of
water and baking soda.
• If the vehicle is not going to be used for
an extended time, disconnect the bat-
tery cables.
Battery recharging
Your vehicle has a maintenance-free,
calcium-based battery.
• If the battery becomes discharged in a
short time (because, for example, the
headlights or interior lights were left on
while the vehicle was not in use),
recharge it by slow charging (trickle)
for 10 hours.
• If the battery gradually discharges
because of high electric load while the
vehicle is being used, recharge it at 20-
30A for two hours.
Items to be reset after the battery has
been discharged or the battery has
been disconnected.
• Clock (See Chapter 3)
• Audio (See Chapter 3)
• Sunroof (See Chapter 3)
✽
NOTICE
• Before performing maintenance or
recharging the battery, turn off all
accessories and stop the engine.
• The negative battery cable must be
removed first and installed last when
the battery is disconnected.
1JBA7017
WARNING- Recharging
battery
When recharging the battery,
observe the following precautions:
• The battery must be removed
from the vehicle and placed in an
area with good ventilation.
(Continued)
(Continued)
• Do not allow cigarettes,sparks,or
flame near the battery.
• Watch the battery during charg-
ing, and stop or reduce the charg-
ing rate if the battery cells begin
gassing (boiling) violently or if
the temperature of the electrolyte
of any cell exceeds 49°C (120°F).
• Wear eye protection when check-
ing the battery during charging.
•Disconnect the battery charger in
the following order.
1. Turn off the battery charger main
switch.
2. Unhook the negative clamp from
the negative battery terminal.
3. Unhook the positive clamp from
the positive battery terminal.
Page 219 of 219

93
Index
Keys ·················································································3-2
Label information ··························································5-10
Lighting··········································································4-23
Lubricant specifications ·················································7-32
Lubricants and fluids ·····················································7-16
Luggage net ···································································3-78
Maintenance schedule······················································7-3
Maintenance services ·······················································7-2
Manual transaxle······························································4-4
Mirrors ···········································································3-68
Overheating······································································6-2
Overloading ·····································································5-9
Owner maintenance ·························································7-7
Power steering ·······························································7-14
Remote keyless entry ·······················································3-3
Road warning ···································································6-2Safety belts·····································································3-27
Seat·················································································3-17
Special driving conditions ···············································5-6
Specifications ···································································8-2
Starting the engine ···························································4-3
Steering wheel································································4-14
Storage compartment ·····················································3-72
Suggestions for economical operation·····························5-5
Sunroof···········································································3-76
Theft-alarm system ··························································3-5
Tires and wheels ····························································7-23
Towing ···········································································6-12
Trailer towing ··································································5-9
Trunk ··············································································3-62
Vehicle break-in process ··················································1-2
Warnings and indicators ················································4-19
Windows ········································································3-14
Windshield defrosting and defogging····························4-37
Wiper blades ··································································7-19
Wipers and washers ·······················································4-26
K
L
M
O
P
R
S
W
T
V