2008 KIA Opirus air condition
[x] Cancel search: air conditionPage 190 of 283

Driving tips
65
SUGGESTIONS FOR ECONOMICAL OPERATION
Your vehicle's fuel economy depends
mainly on your style of driving, where you
drive and when you drive.
Each of these factors affects how many
kilometers (miles) you can get from a liter
(gallon) of fuel. To operate your vehicle
as economically as possible, use the fol-
lowing driving suggestions to help save
money in both fuel and repairs:
• Avoid lengthy warm-up idling. Once theengine is running smoothly, begin driv-
ing. Remember, engine warm-up may
take a little longer on cold days.
• Save fuel by accelerating slowly after stopping.
• Keep the engine in tune and follow the recommended periodic maintenance
schedule. This will increase the life of
all parts and lower your operating
costs. • Do not use the air conditioner unnec-
essarily.
• Slow down when driving on rough roads.
• For longer tire life and better fuel econ- omy, always keep the tires inflated to
the recommended pressures.
• Maintain a safe distance from other vehicles to avoid sudden stops. This
will reduce wear on brake linings and
pads. Driving in such a way will also
save fuel because extra fuel is required
to accelerate back to driving speed.
• Do not carry unnecessary weight in the vehicle.
• Do not rest your foot on the brake pedal while driving. This can cause
needless wear, possible damage to the
brakes, and poor fuel economy.
• Improper wheel alignment results in faster tire wear and lower fuel econo-
my. • Open windows at high speeds can
reduce fuel economy.
• Fuel economy is less in crosswinds and headwinds. To help offset some of
this loss, slow down when driving in
these conditions.
Keeping a vehicle in good operating con-
dition is important both for economy and
safety. Therefore, have an authorized Kia
dealer perform scheduled inspections
and maintenance.
WARNING - Engine off dur-
ing motion
Never turn the engine off to coa st
down hills or anytime the vehicle i s
in motion. The power steering and
power brakes will not function with-
out the engine running. Ins tead,
downshift to an appropriate gear for
engine braking effect.
Page 194 of 283

Driving tips
105
HLA (Hydraulic Lash Adjuster)
noise
The engine HLA's keep the gap between
the valve and cam at zero regardless of
the valve expansion.
Occasionally, you may hear a temporary
or continuous sound (clatter) from the
engine when starting or idling. This noise
will usually go away by following a few
simple steps: If the temporary sound occurs when
starting a cold engine:
This is a normal condition. This sound
will disappear after the engine oil has
reached normal operating pressure.
If the sound occurs when starting the
engine after the engine has not been oper-
ated for more than 48 hours; or engine
has been cranked excessively:
This condition may be caused by oil
draining from the HLA's. This allows air to
enter the HLA causing insufficient lubri-
cating oil in the HLA. This will usually dis-
appear within 15 minutes with the engine
running at 2000~3000 rpm. If the sound
does not disappear, have the engine oil
pressure, engine lubrication system and
HLA's inspected by an Authorized Kia
Dealer.
CAUTION
Do not run the engine at more than
3000 rpm until the noi se goes away.
Damage to the HLA's could occur.
Page 215 of 283

In case of an emergency
26
ROAD WARNING
Hazard warning flasher
The hazard warning flasher serves as a
warning to other drivers to exercise
extreme caution when approaching,
overtaking, or passing your vehicle. It
should be used whenever emergency
repairs are being made or when the vehi-
cle is stopped near the edge of a road-
way.Depress the flasher switch with the igni-
tion switch in any position. The flasher
switch is located in the center console
switch panel. All turn signal lights will
flash simultaneously.
• The hazard warning flasher operates
whether your vehicle is running or not.
• The turn signals do not work when the hazard flasher is on.
• Care must be taken when using the hazard warning flasher while the vehi-
cle is being towed. If your temperature gauge indicates over-
heating, if you experience a loss of
power, or if you hear a loud knocking or
pinging noise, the engine has probably
overheated. Should any of these symp-
toms occur, use the following procedure:
1. Turn on the hazard warning flasher,
then drive to the nearest safe location
and stop your vehicle; set the automat-
ic transaxle in P (Park) and apply the
parking brake.
2. Make sure the air conditioner is off.
3. If coolant or steam is boiling out of the radiator, stop the engine and call an
Authorized Kia Dealer for assistance.
If coolant is not boiling out, allow the
engine to idle and open the hood to
permit the engine to cool gradually.
If the temperature does not go down
with the engine idling, stop the engine
and allow sufficient time for it to cool.
OGH026040
OVERHEATING
Page 222 of 283

69
In case of an emergency
Description Fus e rating Protected component
1 FUEL PUMP 20A Fuel pump
2 H/LP (LO-LH) 15A Headlight (low-left)
3 ABS 10A Anti-lock brake system
4 IGN COIL 15A Ignition coil
5 A/CON COMP 10A Air-conditioner compressor
6 ATM 20A Automatic transaxle control relay
7 MAIN 20A Engine control unit relay
8 O2 SNSR 15A Oxygen sensor
9 EGR 15A
Power train control system sensors
10 HORN 15A Horn
11 TAIL 20A Tail light
12 SUNROOF 20A Sun roof
13 P/SEAT (RH) 20A Power seat (right)
14 FOG LP (FR) 15A Fog light (front)
15 H/LP (HI) 15A Headlight (high)
16 SPARE 30A spare fuse
17 SPARE 20A spare fuse
18 SPARE 15A spare fuse
19 SPARE 10A spare fuse
20 P/SEAT (LH) 30A Power seat (left)
21 AMP 20A Radio amplifier
22 DRL* 15A Daytime running light
Engine compartment
Description Fus e rating Protected component
23 H/LP (LO-RH) 15A Headlight (low beam-right)
24 I/P B+ 30A All electrical system
25 ECU 10A Engine control unit
26 INJECTOR 10A Injector
27 ECS * 15A Electronic control suspension
BLOWER 40A Blower motor
IGN 1 30A Ignition switch
ABS 2 30A Anti-lock brake system
ABS 1 30A Anti-lock brake system
IGN 2 30A Ignition switch
S/WARM 30A Seat warmer
H/LP (LO-LH) - Headlight relay (low beam-left)
FUEL PUMP - Fuel pump relay
HORN - Horn relay
START - Start motor relay
A/CON - Air conditioner relay
H/LP (HI) - Headlight relay (high beam)
FOG LP (FR) - Fog light relay (front)
TAIL LP - Taillight relay
WIPER - Wiper relay
BATT 60A Alternator, Battery
ALT 150A Alternator
COOLING 60A Cooling fan
* : if equipped
Page 224 of 283

611
In case of an emergency
Power connector
Your vehicle is equipped with a power connector to prevent bat-
tery discharge if your vehicle is parked without being operated
for prolonged periods. Use the following procedures before
parking the vehicle for prolonged period.
1. Turn off the engine.
2. Turn off the headlights and tail lights.
3. Open the driver-side knee bolster cover and pull up the“POWER/CONN”.
✽NOTICE
If the power connector is pulled up from the fuse panel, the
warning chime, AV system, clock and intetrior lamps, etc.,
will not operate. Some items must be reset after replace-
ment.
Even though the power connector is pulled up, the battery can still be discharged by operation of the headlights or
other electrical devices.
Des cription Fus e rating Protected component
A/CON 10A Air-conditioning system
P/WDW(LH) 20A Power window (left)
TAIL LP(RH) 10A Taillight (right)
BACK WARN’G 10A Back warning system
DR LP 10A Door courtesy lamp
MIRROR HTD 15A Outside review mirror defroster
ENG SNSR 10A
Power train control system sensors
T/REDUCER10A Seat belt tension reducer
CLOCK 10A Clock
WIPER(FR) 25A Wiper (front)
EPS 10A Electronic power steering
TAIL LP(LH) 10A Tail light (left)
ROOM LP 10A Room lamp
AV, CLOCK 15A Audio, Clock
LAN UNIT 10A Lan unit
TPMS 15A -
H/LP WASHER 20A Headlight washer
SHUNT CONN - Switch illumination
POWER/CONN - Power connector
1GHA403
Power
connector
Page 239 of 283

Maintenance
47
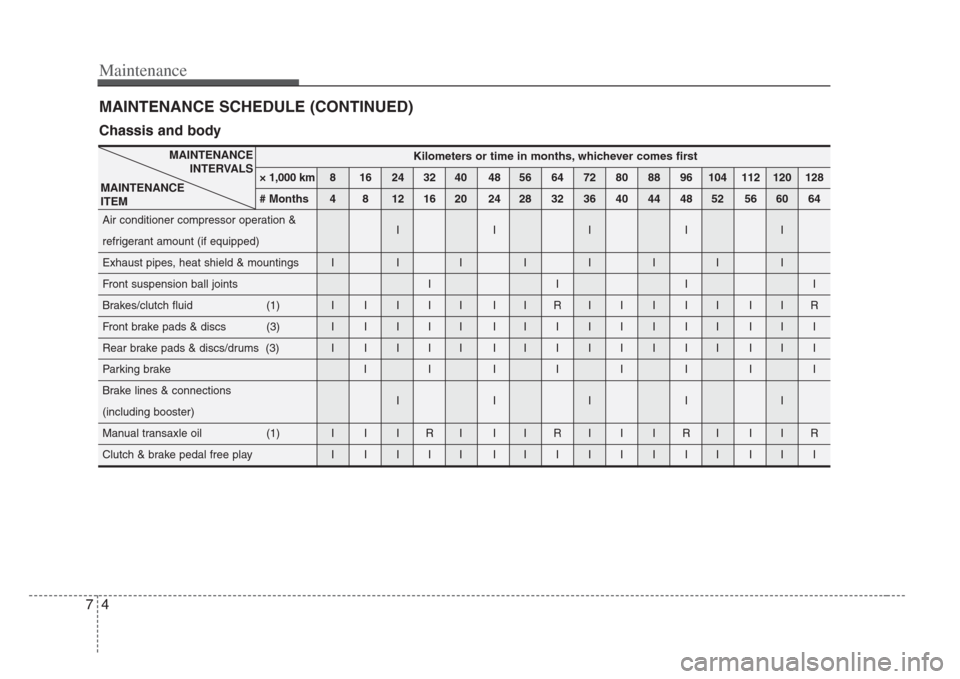
MAINTENANCE SCHEDULE (CONTINUED)
Kilometers or time in months, whichever come s first
× 1,000 km 8 16 24 32 40 48 56 64 72 80 88 96 104 112 120 128
# Months 4 8 12 16 20 24 28 32 36 40 44 48 52 56 60 64
Air conditioner compressor operation & IIIII
refrigerant amount (if equipped)
Exhaust pipes, heat shield & mountings I I IIIIII
Front suspension ball joints I I I I
Brakes/clutch fluid (1) I I I I I I I R IIIII IIR
Front brake pads & discs (3) I I I I I I IIIIIII III
Rear brake pads & discs/drums (3) I I I I I I IIIIIII III
Parking brake I I I IIIII
Brake lines & connections IIIII
(including booster)
Manual transaxle oil (1) I I I R I I I R I I I R I I I R
Clutch & brake pedal free play I I I I I I IIIIIII III
MAINTENANCE
INTERVALS
MAINTENANCE
ITEM
Chassis and body
Page 242 of 283

77
Maintenance
OWNER MAINTENANCE
Owner maintenance schedule
The following lists are vehicle checks and
inspections that should be performed by
the owner or qualified service technician
at the frequencies indicated to help
ensure safe, dependable operation of
your vehicle.
Any adverse conditions should be
brought to the attention of your dealer or
qualified service technician or service
advisor as soon as possible.
These Owner Maintenance Checks are
generally not covered by warranties and
you may be charged for labor, parts and
lubricants used.
When you stop for fuel:
• Check the engine oil level.
• Check coolant level in coolant reser-voir.
• Check the windshield washer fluid level.
• Look for low or under-inflated tires.
While operating your vehicle:
• Note any changes in the sound of the exhaust or any smell of exhaust fumes
in the vehicle.
• Check for vibrations in the steering wheel. Notice any increased steering
effort or looseness in the steering
wheel, or change in its straight-ahead
position.
• Notice if your vehicle constantly turns slightly or “pulls” to one side when trav-
eling on smooth, level road.
• When stopping, listen and check for strange sounds, pulling to one side,
increased brake pedal travel or “hard-
to-push” brake pedal.
• If any slipping or changes in the oper- ation of your transaxle occurs, check
the transaxle fluid level.
• Check automatic transaxle P (Park) function.
• Check parking brake.
• Check for fluid leaks under your vehicle (water dripping from the air condition-
ing system after use is normal).
WARNING
Be careful when checking your
engine coolant level when the
engine is hot. Scalding hot coolant
and steam may blow out under
pressure. This could cause serious
injury.
Page 243 of 283

Maintenance
87
At least monthly:
• Check coolant level in the coolantrecovery reservoir.
• Check the operation of all exterior lights, including the stoplights, turn sig-
nals and hazard warning flashers.
• Check the inflation pressures of all tires including the spare.
At least twice a year (i.e., every Spring and Fall) :
• Check radiator, heater and air condi- tioning hoses for leaks or damage.
• Check windshield washer spray and wiper operation. Clean wiper blades
with clean cloth dampened with wash-
er fluid.
• Check headlight alignment.
• Check muffler, exhaust pipes, shields and clamps.
• Check the lap/shoulder belts for wear and function.
• Check for worn tires and loose wheel lug nuts.
At least once a year :
• Clean body and door drain holes.
• Lubricate door hinges and checks, andhood hinges.
• Lubricate door and hood locks and latches.
• Lubricate door rubber weatherstrips.
• Check the air conditioning system before the warm weather season.
• Check the power steering fluid level.
• Inspect and lubricate automatic transaxle linkage and controls.
• Clean battery and terminals.
• Check the brake fluid level.