Page 183 of 327
Driving your vehicle
48
4
1 23456789
Lane change signals (B)
To signal a lane change, move the
turn signal lever slightly and hold it in
position. The lever will return to theOFF position when released.
If an indicator stays on and does not
flash or if it flashes abnormally, one
of the turn signal bulbs may be
burned out and will require replace-ment.
✽✽
NOTICE
If an indicator flash is abnormally
quick or slow, bulb may be burned
out or have a poor electrical con-
nection in the circuit.Front fog light (if equipped)
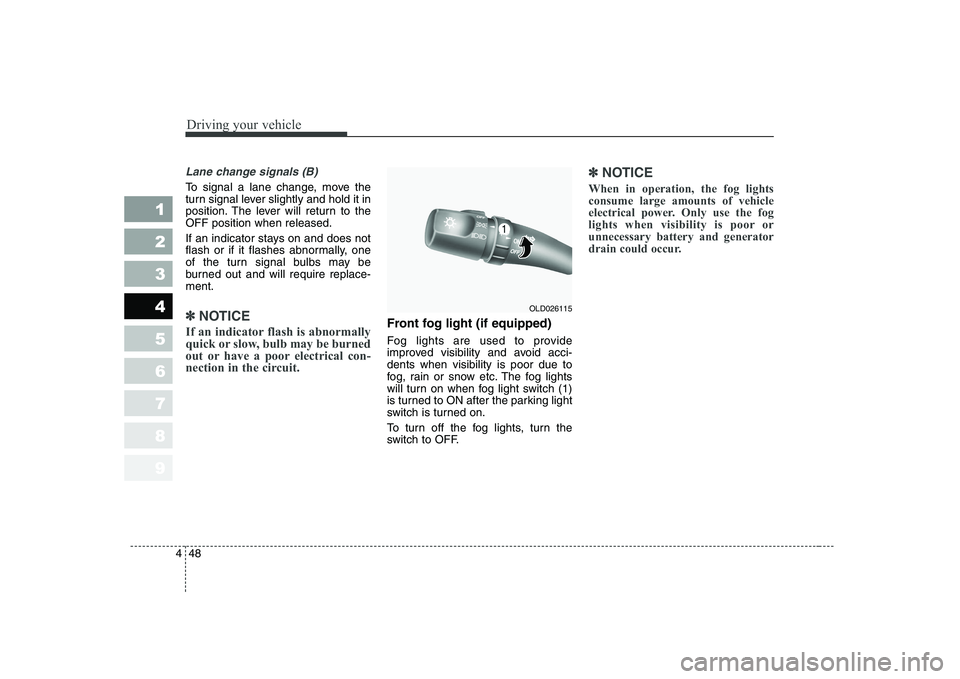
Fog lights are used to provide
improved visibility and avoid acci-dents when visibility is poor due to
fog, rain or snow etc. The fog lights
will turn on when fog light switch (1)
is turned to ON after the parking light
switch is turned on.
To turn off the fog lights, turn the
switch to OFF.
✽✽
NOTICE
When in operation, the fog lights consume large amounts of vehicle
electrical power. Only use the fog
lights when visibility is poor orunnecessary battery and generator
drain could occur.
OLD026115
Page 232 of 327
Driving tips
18
5
1 23456789
CAUTION
Failure to use an approved trail-
er wiring harness could result indamage to the vehicle electricalsystem and/or personal injury.
Following distance
Stay at least twice as far behind the
vehicle ahead as you would when
driving your vehicle without a trailer.
This can help you avoid situations
that require heavy braking and sud-
den turns.
Passing
You’ll need more passing distance
up ahead when you’re towing a trail-
er. And, because you’re a good deal
longer, you’ll need to go much farther
beyond the passed vehicle before
you can return to your lane.
Backing up
Hold the bottom of the steering
wheel with one hand. Then, to move
the trailer to the left, just move your
hand to the left. To move the trailer to
the right, move your hand to the
right. Always back up slowly and, if
possible, have someone guide you.
Making turns
When you’re turning with a trailer,
make wider turns than normal. Do
this so your trailer won’t strike soft
shoulders, curbs, road signs, trees,
or other objects. Avoid jerky or sud-
den maneuvers. Signal well in
advance.
Turn signals when towing a trailer
When you tow a trailer, your vehicle
has to have a different turn signal
flasher and extra wiring. The green
arrows on your instrument panel will
flash whenever you signal a turn or
lane change. Properly connected,
the trailer lights will also flash to alert
other drivers you’re about to turn,
change lanes, or stop.
When towing a trailer, the green
arrows on your instrument panel will
flash for turns even if the bulbs on
the trailer are burned out. Thus, you
may think drivers behind you are
seeing your signals when, in fact,
they are not. It’s important to check
occasionally to be sure the trailer
bulbs are still working. You must also check the lights every
time you disconnect and then recon-
nect the wires.
Do not connect a trailer lighting sys-
tem directly to your vehicle’s lighting
system. Use only an approved trailer
wiring harness.
Your Authorized Kia Dealer can
assist you in installing the wiring har-
ness.
Page 239 of 327
In case of an emergency
2
6
ROAD WARNING
Hazard warning flasher
The hazard warning flasher serves
as a warning to other drivers to exer-
cise extreme caution when
approaching, overtaking, or passing
your vehicle. It should be used when-
ever emergency repairs are being
made or when the vehicle is stopped
near the edge of a roadway.
Depress the flasher switch with the
ignition switch in any position. The
flasher switch is located in the center
console switch panel. All turn signal
lights will flash simultaneously. • The hazard warning flasher oper-
ates whether your vehicle is run-ning or not.
The turn signals do not work when the hazard flasher is on.
Care must be taken when using the hazard warning flasher while
the vehicle is being towed.
1 23456789
OLD026100
Page 249 of 327
In case of an emergency
12
6
1 23456789
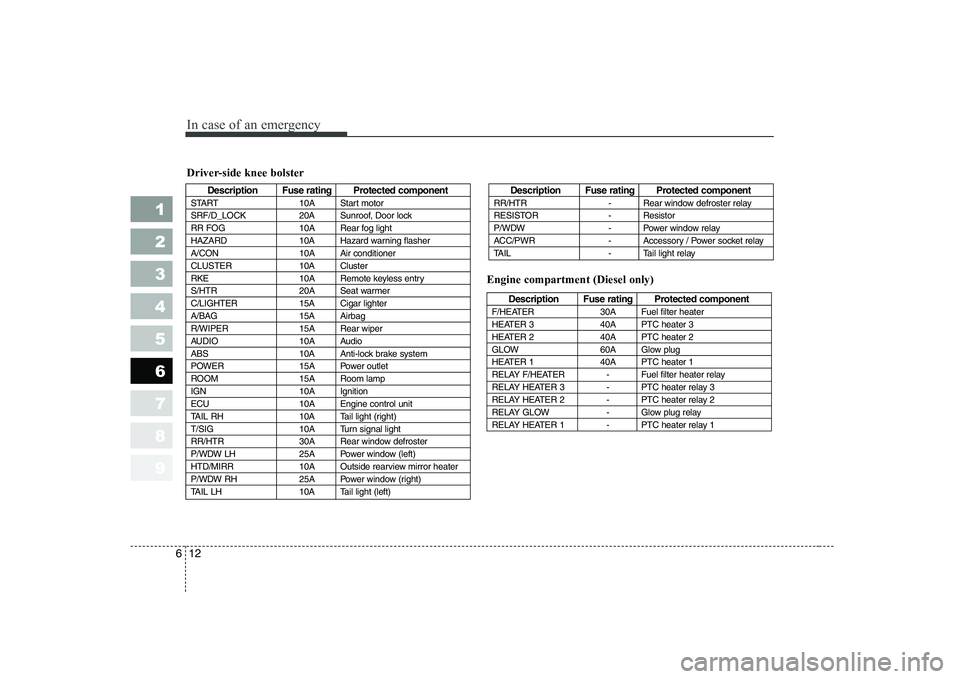
Driver-side knee bolster
Description Fuse rating Protected component
START 10A Start motor
SRF/D_LOCK 20A Sunroof, Door lock
RR FOG 10A Rear fog light
HAZARD 10A Hazard warning flasher
A/CON 10A Air conditioner
CLUSTER 10A Cluster
RKE 10A Remote keyless entry
S/HTR 20A Seat warmer
C/LIGHTER 15A Cigar lighter
A/BAG 15A Airbag
R/WIPER 15A Rear wiper
AUDIO 10A Audio
ABS 10A Anti-lock brake system
POWER 15A Power outlet
ROOM 15A Room lamp
IGN 10A Ignition
ECU 10A Engine control unit
TAIL RH 10A Tail light (right)
T/SIG 10A Turn signal light
RR/HTR 30A Rear window defroster
P/WDW LH 25A Power window (left)
HTD/MIRR 10A Outside rearview mirror heater
P/WDW RH 25A Power window (right)
TAIL LH 10A Tail light (left)Description Fuse rating Protected component
RR/HTR - Rear window defroster relay
RESISTOR - Resistor
P/WDW - Power window relay
ACC/PWR - Accessory / Power socket relay
TAIL - Tail light relay
Description Fuse rating Protected component
F/HEATER 30A Fuel filter heater
HEATER 3 40A PTC heater 3
HEATER 2 40A PTC heater 2
GLOW 60A Glow plug
HEATER 1 40A PTC heater 1
RELAY F/HEATER - Fuel filter heater relay
RELAY HEATER 3 - PTC heater relay 3
RELAY HEATER 2 - PTC heater relay 2
RELAY GLOW - Glow plug relay
RELAY HEATER 1 - PTC heater relay 1
Engine compartment (Diesel only)
Page 275 of 327
Maintenance
12
7
1 23456789
At least monthly:
Check coolant level in the engine
coolant reservoir.
Check the operation of all exterior lights, including the stoplights, turn
signals and hazard warning flash-
ers.
Check the inflation pressures of all tires including the spare.
At least twice a year
(i.e., every Spring and Fall) :
Check radiator, heater and air con- ditioning hoses for leaks or da-
mage.
Check windshield washer spray and wiper operation. Clean wiper
blades with clean cloth dampened
with washer fluid.
Check headlight alignment.
Check muffler, exhaust pipes, shields and clamps.
Check the lap/shoulder belts for wear and function.
Check for worn tires and loose wheel lug nuts.
At least once a year :
Clean body and door drain holes.
Lubricate door hinges and checks,and hood hinges.
Lubricate door and hood locks and latches.
Lubricate door rubber weather- strips.
Check the air conditioning system.
Check the power steering fluid level.
Inspect and lubricate automatic transaxle linkage and controls.
Clean battery and terminals.
Check the brake fluid level.
Page 307 of 327
Maintenance
44
7
1 23456789
BULB REPLACEMENT
Use only the bulbs of the specified
wattage.
✽✽ NOTICE
If you don’t have necessary tools,
the correct bulbs and the expertise,
consult an Authorized Kia Dealer. In
many cases, it is difficult to replacevehicle light bulbs because other
parts of the vehicle must be removed
before you can get to the bulb. Thisis especially true if you have to
remove the front bumper to get tothe bulb(s). Removing/installing the
front bumper or bumper hardware
can result in damage to the vehicle.
✽
✽ NOTICE
After heavy, driving rain or washing, headlight and taillight lenses could
appear frosty. This condition is
caused by the temperature differencebetween the lamp inside and outside.
This is similar to the condensation on
your windows inside your vehicleduring the rain and doesn’t indicate
a problem with your vehicle. If the
water leaks into the lamp bulb cir-
cuitry, have the vehicle checked by
an Authorized Kia Dealer.
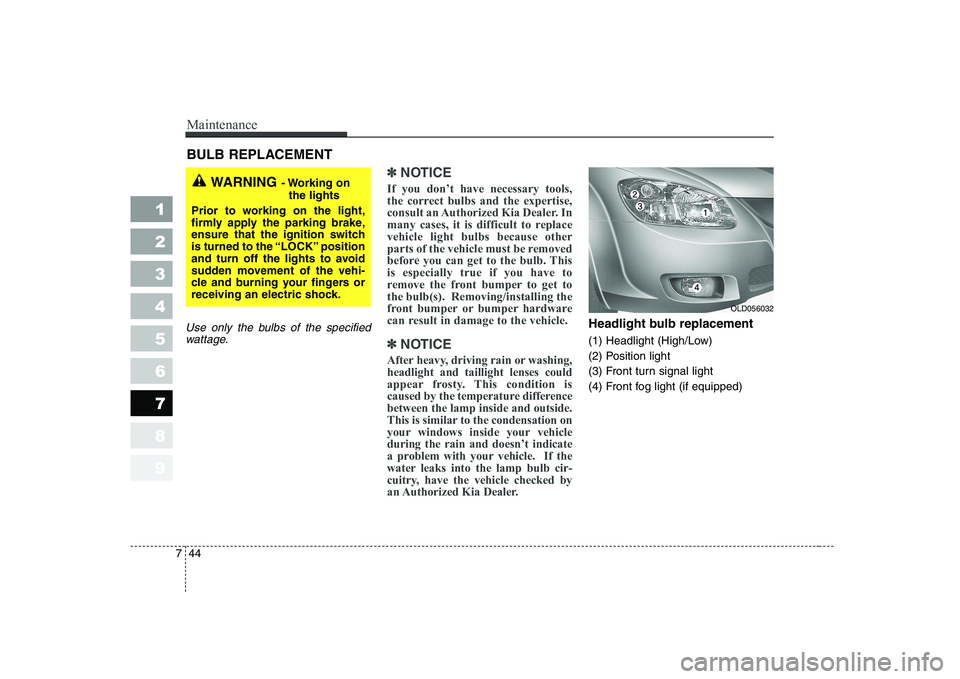
Headlight bulb replacement
(1) Headlight (High/Low)
(2) Position light
(3) Front turn signal light
(4) Front fog light (if equipped)
WARNING - Working on
the lights
Prior to working on the light,
firmly apply the parking brake,
ensure that the ignition switch
is turned to the “LOCK” position
and turn off the lights to avoid
sudden movement of the vehi-
cle and burning your fingers or
receiving an electric shock.
OLD056032
Page 309 of 327
Maintenance
46
7
1 23456789
6. Install a new headlight bulb and
snap the headlight bulb retaining
wire into position by aligning the
wire with the groove on the bulb.
7. Connect the headlight bulb socket- connector.
8. Install the headlight bulb cover by turning it clockwise.
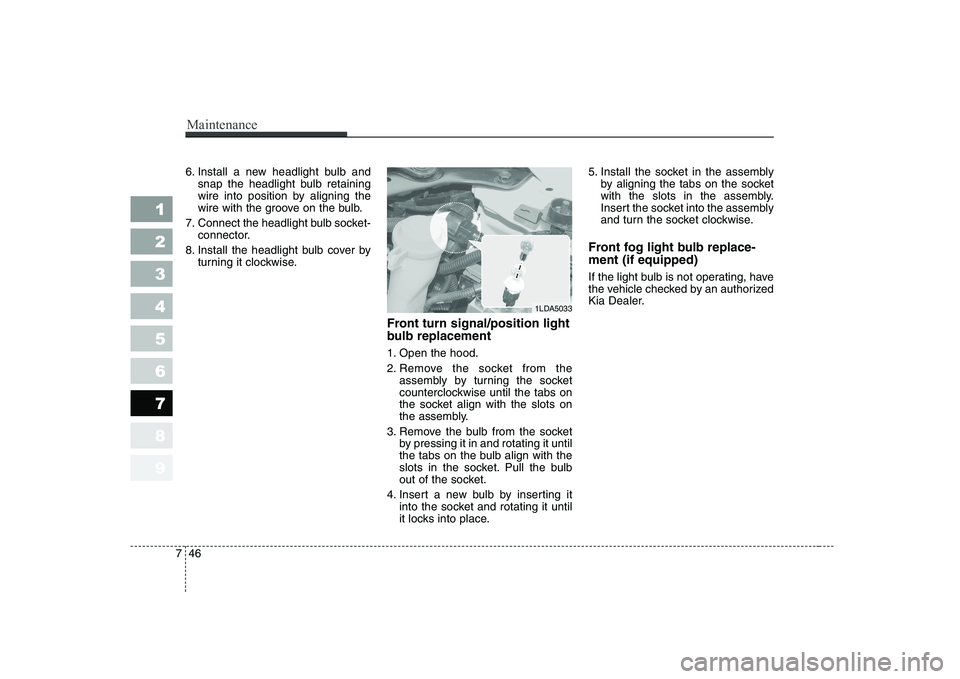
Front turn signal/position light
bulb replacement
1. Open the hood.
2. Remove the socket from theassembly by turning the socket
counterclockwise until the tabs on
the socket align with the slots on
the assembly.
3. Remove the bulb from the socket by pressing it in and rotating it until
the tabs on the bulb align with the
slots in the socket. Pull the bulb
out of the socket.
4. Insert a new bulb by inserting it into the socket and rotating it until
it locks into place. 5. Install the socket in the assembly
by aligning the tabs on the socket
with the slots in the assembly.
Insert the socket into the assembly
and turn the socket clockwise.
Front fog light bulb replace- ment (if equipped)
If the light bulb is not operating, have
the vehicle checked by an authorized
Kia Dealer.
1LDA5033
Page 311 of 327
Maintenance
48
7
1 23456789
License plate lights bulb replacement
1. Loosen the lens retaining screws
with a cross-tip screwdriver.
2. Remove the lens.
3. Remove the bulb by pulling it straight out.
4. Install a new bulb.
5. Reinstall the lens securely with the lens retaining screws. Rear combination light bulb replacement (1) Stop and tail light
(2) Rear turn signal light
(3) Back-up light
1. Open the trunk lid or rear hatch.
2. Remove the service cover by turn-
ing the plastic screw counterclock-
wise and removing the cover.
1LDA5043OLD056035OLD056034