Page 309 of 327

Maintenance
46
7
1 23456789
6. Install a new headlight bulb and
snap the headlight bulb retaining
wire into position by aligning the
wire with the groove on the bulb.
7. Connect the headlight bulb socket- connector.
8. Install the headlight bulb cover by turning it clockwise.
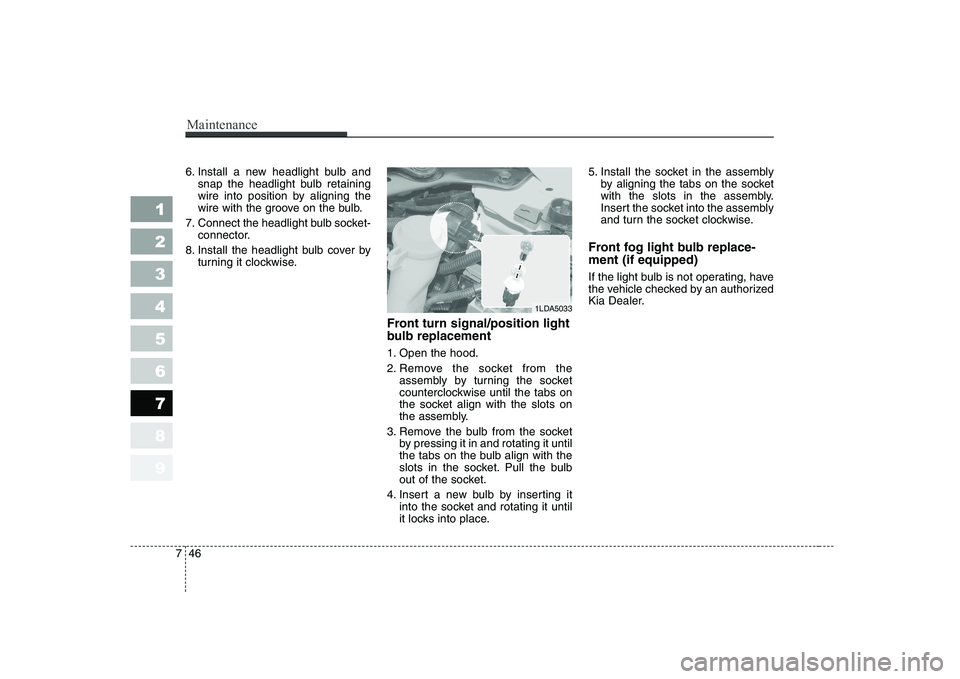
Front turn signal/position light
bulb replacement
1. Open the hood.
2. Remove the socket from theassembly by turning the socket
counterclockwise until the tabs on
the socket align with the slots on
the assembly.
3. Remove the bulb from the socket by pressing it in and rotating it until
the tabs on the bulb align with the
slots in the socket. Pull the bulb
out of the socket.
4. Insert a new bulb by inserting it into the socket and rotating it until
it locks into place. 5. Install the socket in the assembly
by aligning the tabs on the socket
with the slots in the assembly.
Insert the socket into the assembly
and turn the socket clockwise.
Front fog light bulb replace- ment (if equipped)
If the light bulb is not operating, have
the vehicle checked by an authorized
Kia Dealer.
1LDA5033
Page 311 of 327
Maintenance
48
7
1 23456789
License plate lights bulb replacement
1. Loosen the lens retaining screws
with a cross-tip screwdriver.
2. Remove the lens.
3. Remove the bulb by pulling it straight out.
4. Install a new bulb.
5. Reinstall the lens securely with the lens retaining screws. Rear combination light bulb replacement (1) Stop and tail light
(2) Rear turn signal light
(3) Back-up light
1. Open the trunk lid or rear hatch.
2. Remove the service cover by turn-
ing the plastic screw counterclock-
wise and removing the cover.
1LDA5043OLD056035OLD056034
Page 312 of 327
749
Maintenance
1 23456789
3. Remove the socket from theassembly by turning the socket
counterclockwise until the tabs on
the socket align with the slots on
the assembly. 4. Remove the bulb from the socket
by pressing it in and rotating it until
the tabs on the bulb align with the
slots in the socket. Pull the bulb
out of the socket.
5. Insert a new bulb by inserting it into the socket and rotating it until
it locks into place.
6. Install the socket in the assembly by aligning the tabs on the socket
with the slots in the assembly.
Push the socket into the assembly
and turn the socket clockwise.
7. Replace the service cover and tighten the screws. High mounted stop light bulb replacement
Ty p e A
If the light bulb is not operating, have
the vehicle checked by an authorized
Kia Dealer.
Ty p e B
1. Open the trunk lid.
OLD056037OLD056036
Type A
Page 313 of 327

Maintenance
50
7
1 23456789
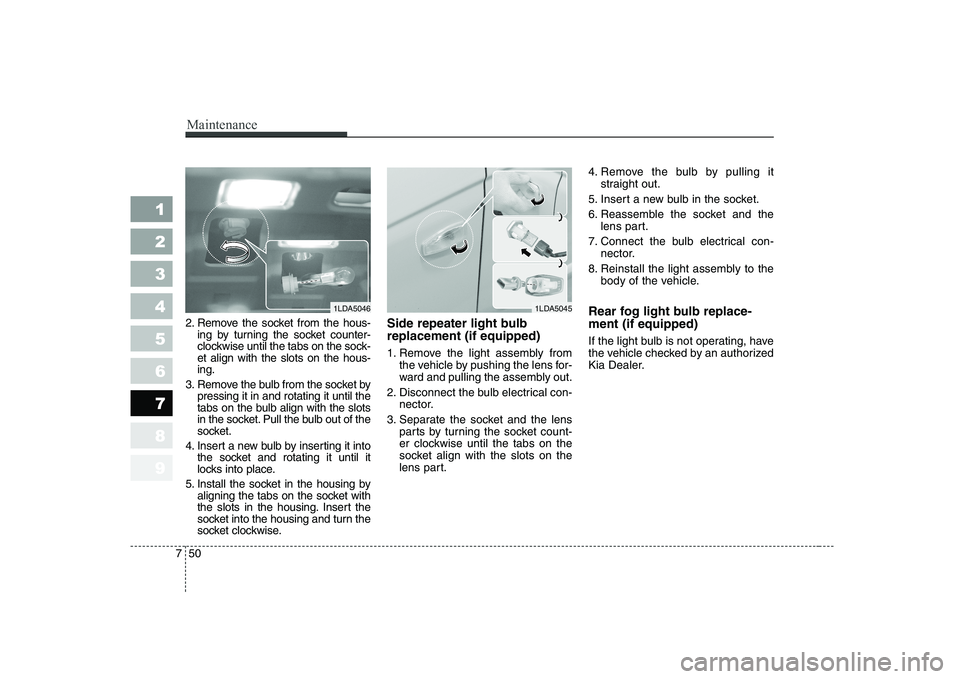
2. Remove the socket from the hous-
ing by turning the socket counter-
clockwise until the tabs on the sock-et align with the slots on the hous-ing.
3. Remove the bulb from the socket by pressing it in and rotating it until the
tabs on the bulb align with the slots
in the socket. Pull the bulb out of the
socket.
4. Insert a new bulb by inserting it into the socket and rotating it until it
locks into place.
5. Install the socket in the housing by aligning the tabs on the socket with
the slots in the housing. Insert the
socket into the housing and turn the
socket clockwise. Side repeater light bulb replacement (if equipped)
1. Remove the light assembly from
the vehicle by pushing the lens for-
ward and pulling the assembly out.
2. Disconnect the bulb electrical con- nector.
3. Separate the socket and the lens parts by turning the socket count-
er clockwise until the tabs on the
socket align with the slots on the
lens part. 4. Remove the bulb by pulling it
straight out.
5. Insert a new bulb in the socket.
6. Reassemble the socket and the lens part.
7. Connect the bulb electrical con- nector.
8. Reinstall the light assembly to the body of the vehicle.
Rear fog light bulb replace- ment (if equipped)
If the light bulb is not operating, have
the vehicle checked by an authorized
Kia Dealer.
1LDA50461LDA5045
Page 325 of 327

Index
2
9
1
2
3
4
5
6
7
8
9
Air cleaner . . . . . . . . . . . . . . . . . . . . . . . . . . . . . . . . 7-28
Airbags-supplemental restraint system . . . . . . . . . . 3-54
Antenna . . . . . . . . . . . . . . . . . . . . . . . . . . . . . . . . . 3-100
Audio system . . . . . . . . . . . . . . . . . . . . . . . . . . . . . 3-102
Automatic climate control system . . . . . . . . . . . . . . 4-64
Automatic transaxle . . . . . . . . . . . . . . . . . . . . . 4-8, 7-24
Battery . . . . . . . . . . . . . . . . . . . . . . . . . . . . . . . . . . . 7-34
Before driving. . . . . . . . . . . . . . . . . . . . . . . . . . . . . . . 5-6
Brake system . . . . . . . . . . . . . . . . . . . . . . . . . . . . . . 4-14
Brakes and clutch. . . . . . . . . . . . . . . . . . . . . . . . . . . 7-21
Bulb replacement . . . . . . . . . . . . . . . . . . . . . . . . . . . 7-44
Climate control air filter . . . . . . . . . . . . . . . . . . . . . 7-30
Cruise control . . . . . . . . . . . . . . . . . . . . . . . . . . . . . . 4-23
Defroster . . . . . . . . . . . . . . . . . . . . . . . . . . . . . . . . . . 4-53
Door locks. . . . . . . . . . . . . . . . . . . . . . . . . . . . . . . . . . 3-7 Electrical circuit protection . . . . . . . . . . . . . . . . . . . . 6-7
Emergency commodity. . . . . . . . . . . . . . . . . . . . . . . 6-25
Emergency starting . . . . . . . . . . . . . . . . . . . . . . . . . . 6-4
Emission control system. . . . . . . . . . . . . . . . . . . . . . . 5-4
Engine compartment. . . . . . . . . . . . . . . . . . . . . 2-4, 7-14
Engine cooling system . . . . . . . . . . . . . . . . . . . . . . . 7-18
Engine oil and oil filter . . . . . . . . . . . . . . . . . . . . . . 7-17
Exterior care. . . . . . . . . . . . . . . . . . . . . . . . . . . . . . . 7-51
Fuel filler lid . . . . . . . . . . . . . . . . . . . . . . . . . . . . . . . 3-79
Fuel filter . . . . . . . . . . . . . . . . . . . . . . . . . . . . . . . . . 7-27
Fuel requirements . . . . . . . . . . . . . . . . . . . . . . . . . . . 5-2
Gauges . . . . . . . . . . . . . . . . . . . . . . . . . . . . . . . . . . . 4-31
Hazard warning flasher . . . . . . . . . . . . . . . . . . . . . . 4-54
Hood . . . . . . . . . . . . . . . . . . . . . . . . . . . . . . . . . . . . . 3-77
How to use this manual . . . . . . . . . . . . . . . . . . . . . . . 1-2
A
B
C
D
F
E
G
H