Page 169 of 438
UNDERSTANDING YOUR INSTRUMENT PANEL
CONTENTS
�Instrument Panel Features.................170
�Instrument Cluster — Premium.............171
�Instrument Cluster Descriptions............172
�Electronic Vehicle Information Center (EVIC) —
If Equipped...........................183
▫Engine Oil Change Indicator System........184
▫EVIC Functions.......................185
▫Compass/Temperature/Audio............186
▫Average Fuel Economy.................186▫Distance To Empty (DTE)...............187
▫Elapsed Time........................187
▫Tire Pressure Monitor (TPM).............187
▫Personal Settings (Customer-Programmable
Features)...........................187
�Radio General Information................193
▫Radio Broadcast Signals.................193
▫Two Types Of Signals..................1944
Page 178 of 438

Vehicles equipped with Anti-Lock Brakes (ABS), are also
equipped with Electronic Brake Force Distribution (EBD).
In the event of an EBD failure, the Brake Warning Light
will turn on along with the ABS Light. Immediate repair
to the ABS system is required.
The operation of the Brake Warning light can be checked
by turning the ignition switch from the OFF position to
the ON position. The light should illuminate for approxi-
mately two seconds. The light should then turn off unless
the parking brake is applied or a brake fault is detected.
If the light does not illuminate, have the light inspected
by an authorized dealer.
The light also will turn on when the parking brake is
applied with the ignition switch in the ON position.
NOTE:This light shows only that the parking brake is
applied. It does not show the degree of brake application.15. Transmission Temperature Warning Light
During sustained high speed driving on hot
days, the automatic transaxle oil may become
too hot. If this happens, the transmission over-
heat indicator light will come on and the
vehicle will slow slightly until the automatic transaxle
cools down enough to allow a return to the requested
speed. If the high speed is maintained, the overheating
will reoccur as before in a cyclic fashion.
16. Security Alarm System Indicator Light — If
Equipped
This light will flash rapidly for several seconds when the
alarm system is arming. The light will begin to flash
slowly indicating that the system is armed.
176 UNDERSTANDING YOUR INSTRUMENT PANEL
Page 187 of 438
cluster. To reset the oil change indicator system (after
performing the scheduled maintenance) refer to the fol-
lowing procedure.
1. Turn the ignition switch to the ON position.Do not
start the engine.
2. Fully depress the accelerator pedal, slowly, three times
within 10 seconds.
3. Turn the ignition switch to the OFF/LOCK position.
NOTE:If the indicator message illuminates when you
start the vehicle, the oil change indicator system did not
reset. If necessary repeat this procedure.EVIC Functions
Press the EVIC button until one of the following func-
tions is displayed on the EVIC:
•Compass/Temperature/Audio
•Average Fuel Economy
EVIC Button
UNDERSTANDING YOUR INSTRUMENT PANEL 185
4
Page 233 of 438

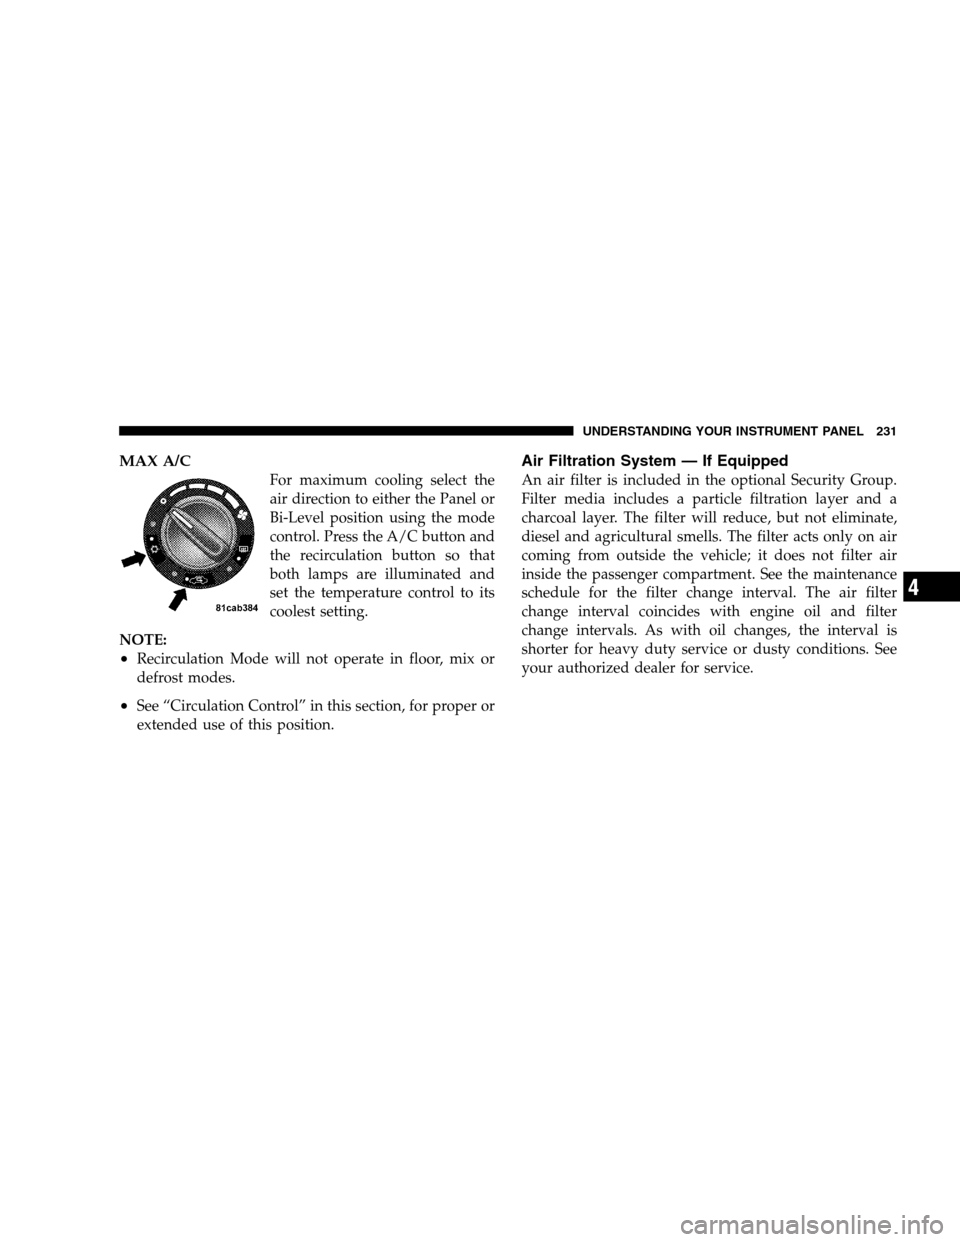
MAX A/C
For maximum cooling select the
air direction to either the Panel or
Bi-Level position using the mode
control. Press the A/C button and
the recirculation button so that
both lamps are illuminated and
set the temperature control to its
coolest setting.
NOTE:
•Recirculation Mode will not operate in floor, mix or
defrost modes.
•See “Circulation Control” in this section, for proper or
extended use of this position.
Air Filtration System — If Equipped
An air filter is included in the optional Security Group.
Filter media includes a particle filtration layer and a
charcoal layer. The filter will reduce, but not eliminate,
diesel and agricultural smells. The filter acts only on air
coming from outside the vehicle; it does not filter air
inside the passenger compartment. See the maintenance
schedule for the filter change interval. The air filter
change interval coincides with engine oil and filter
change intervals. As with oil changes, the interval is
shorter for heavy duty service or dusty conditions. See
your authorized dealer for service.
UNDERSTANDING YOUR INSTRUMENT PANEL 231
4
Page 335 of 438

the engine cooling system and turning off the A/C
removes this heat. You can also turn the Temperature
control to maximum heat, the Mode control to floor, and
the fan control to HIGH. This allows the heater core to act
as a supplement to the radiator and aids in removing heat
from the engine cooling system.
CAUTION!
Driving with a hot cooling system could damage
your vehicle. If the temperature gauge reads “H”,
pull over when safe and stop the vehicle with the
engine at idle. Turn the air conditioner OFF and wait
until the pointer drops back into the normal range.
After appropriate action has been taken, if the
pointer remains on the “H”, turn the engine OFF
immediately and call for service.
WARNING!
A hot engine cooling system is dangerous. You or
others could be badly burned by steam or boiling
coolant. You may want to call a service center if your
vehicle overheats. If you decide to look under the
hood yourself, refer to “Maintenance”, Section 7 of
this manual. Follow the warnings under the Cooling
System Pressure Cap paragraph.
AUTOMATIC TRANSAXLE OVERHEATING
During sustained high speed driving or trailer towing up
long grades on hot days, the automatic transaxle oil may
become too hot.
If this happens, the transmission overheat indi-
cator light will come on, and the vehicle will
slow slightly until the automatic transaxle cools
down enough to allow a return to the requested speed. If
the high speed is maintained, the overheating will reoccur,
as before, in a cyclic fashion.
WHAT TO DO IN EMERGENCIES 333
6
Page 355 of 438

The best time to check the engine oil level is about five
minutes after a fully warmed engine is shut off. Do not
check oil level before starting the engine after it has sat
overnight. Checking engine oil level when the engine is
cold will give you an incorrect reading.Checking the oil while the vehicle is on level ground and
only when the engine is hot, will improve the accuracy of
the oil level readings. Maintain the oil level between the
range markings on the dipstick. The range markings will
consist of a crosshatch zone that says SAFE or a cross-
hatch zone that says MIN at the low end of the range and
MAX at the high end of the range. Adding 1 qt (1L) of oil
when the reading is at the low end of the indicated range
will result in the oil level at the full end of the indicator
range.
CAUTION!
Do not overfill the engine. Overfilling the engine as
indicated by the range markings, as described above,
on the engine oil dipstick will cause oil aeration,
which can lead to loss of oil pressure and an increase
in oil temperature. This could damage your engine.
Engine Oil Dipstick
MAINTAINING YOUR VEHICLE 353
7
Page 356 of 438
Change Engine Oil
Refer to the “Maintenance Schedule” in Section 8 for
recommended engine oil change intervals.
Engine Oil Selection (Gasoline Engines)
For best performance and maximum protection for all
engines under all types of operating conditions, the
manufacturer recommends engine oils that are API Cer-
tified and meet the requirements of DaimlerChrysler
Material Standard MS-6395.
American Petroleum Institute (API) Engine Oil
Identification Symbol
This symbol means that the oil has
been certified by the American
Petroleum Institute (API). The
manufacturer only recommends
API Certified engine oils.
Engine Oil Viscosity (SAE Grade)
SAE 5W-20 engine oil is recommended for all operating
temperatures. This engine oil improves low temperature
starting and vehicle fuel economy. Your engine oil filler
cap also states the recommended engine oil viscosity
grade for your engine.
354 MAINTAINING YOUR VEHICLE
Page 373 of 438

Brake System
In order to assure brake system performance, all brake
system components should be inspected periodically.
Refer to “Maintenance Schedule” under Section 8.
WARNING!
Riding the brakes can lead to brake failure and
possibly an accident. Driving with your foot resting
or riding on the brake pedal can result in abnormally
high brake temperatures, excessive lining wear, and
possible brake damage. You would not have your full
braking capacity in an emergency.
Brake And Power Steering System Hoses
When servicing the vehicle for scheduled maintenance,
inspect the surface of the hoses and nylon tubing for
evidence of heat and mechanical damage. Hard andbrittle rubber, cracking, tears, cuts, abrasions, and exces-
sive swelling suggest deterioration of the rubber. Particu-
lar attention should be made to examining those hose
surfaces nearest to high heat sources, such as the exhaust
manifold.
Inspect all hose clamps and couplings to make sure they
are secure and no leaks are present.
Ensure nylon tubing in these areas has not melted or
collapsed.
NOTE:Often, fluids such as oil, power steering fluid,
and brake fluid are used during assembly plant opera-
tions to ease the assembly of hoses to couplings. There-
fore, oil wetness at the hose-coupling area is not neces-
sarily an indication of leakage. Actual dripping of hot
fluid when systems are under pressure (during vehicle
operation) should be noted before a hose is replaced
based on leakage.
MAINTAINING YOUR VEHICLE 371
7