2008 INFINITI QX56 parking brake
[x] Cancel search: parking brakePage 2730 of 4083
PB-8
< ON-VEHICLE REPAIR >
PARKING BRAKE CONTROL
11. Remove right and left rear cables retaining bolts and nuts, then remove right and left rear cables.
INSTALLATION
Installation is in the reverse order of removal.
CAUTION:
Do not reuse adjusting nut after removing it.
• Adjust parking brake. Refer to PB-5, "
On-Vehicle Service".
Revision: March 2010 2008 QX56
Page 2731 of 4083
PARKING BRAKE SHOEPB-9
< ON-VEHICLE REPAIR >
C
DE
G H
I
J
K L
M A
B
PB
N
O P
PARKING BRAKE SHOE
Removal and InstallationINFOID:0000000001604539
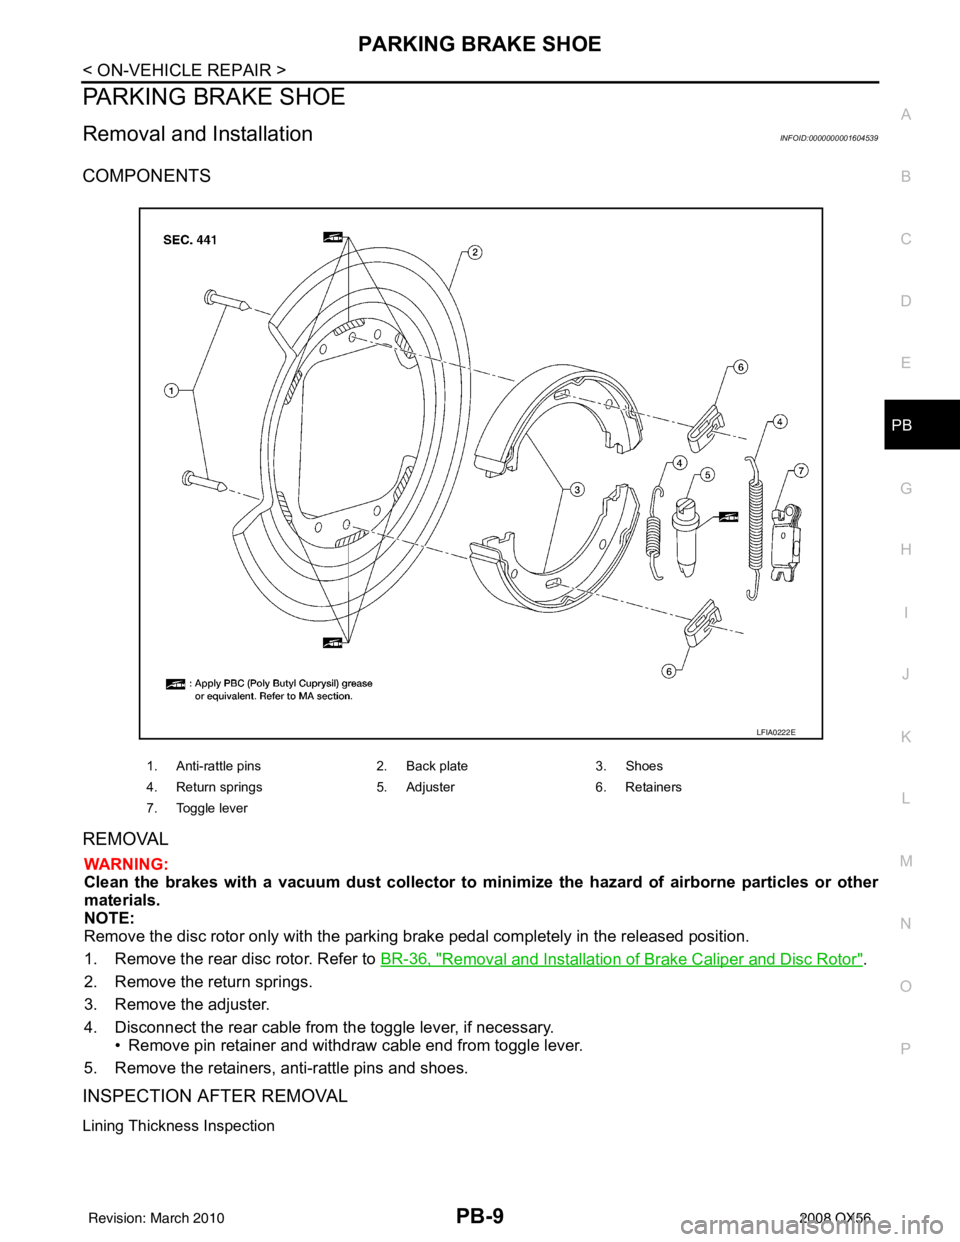
COMPONENTS
REMOVAL
WARNING:
Clean the brakes with a vacuum dust co llector to minimize the hazard of airborne particles or other
materials.
NOTE:
Remove the disc rotor only with the parking brake pedal completely in the released position.
1. Remove the rear disc rotor. Refer to BR-36, "
Removal and Installation of Brake Caliper and Disc Rotor".
2. Remove the return springs.
3. Remove the adjuster.
4. Disconnect the rear cable from the toggle lever, if necessary.
• Remove pin retainer and withdraw cable end from toggle lever.
5. Remove the retainers, anti-rattle pins and shoes.
INSPECTION AFTER REMOVAL
Lining Thickness Inspection
1. Anti-rattle pins 2. Back plate3. Shoes
4. Return springs 5. Adjuster6. Retainers
7. Toggle lever
LFIA0222E
Revision: March 2010 2008 QX56
Page 2732 of 4083
PB-10
< ON-VEHICLE REPAIR >
PARKING BRAKE SHOE
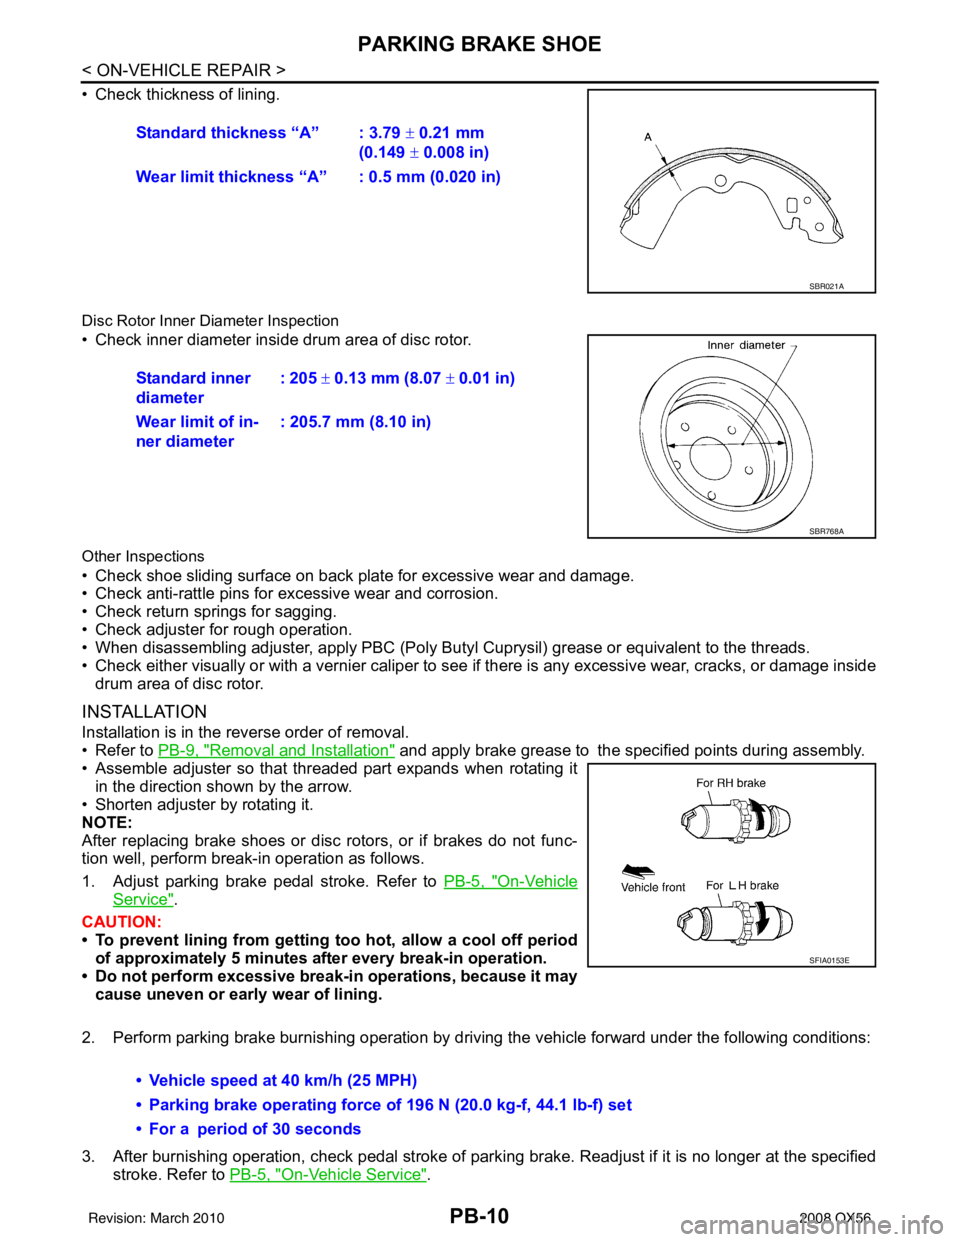
• Check thickness of lining.
Disc Rotor Inner Diameter Inspection
• Check inner diameter insi de drum area of disc rotor.
Other Inspections
• Check shoe sliding surface on back plate for excessive wear and damage.
• Check anti-rattle pins for excessive wear and corrosion.
• Check return springs for sagging.
• Check adjuster for rough operation.
• When disassembling adjuster, apply PBC (Poly Butyl Cuprysil) grease or equivalent to the threads.
• Check either visually or with a vernier caliper to see if there is any excessive wear, cracks, or damage inside
drum area of disc rotor.
INSTALLATION
Installation is in the reverse order of removal.
• Refer to PB-9, "
Removal and Installation" and apply brake grease to the specified points during assembly.
• Assemble adjuster so that threaded part expands when rotating it in the direction shown by the arrow.
• Shorten adjuster by rotating it.
NOTE:
After replacing brake shoes or disc rotors, or if brakes do not func-
tion well, perform break-in operation as follows.
1. Adjust parking brake pedal stroke. Refer to PB-5, "
On-Vehicle
Service".
CAUTION:
• To prevent lining from getting too hot, allow a cool off period
of approximately 5 minutes after every break-in operation.
• Do not perform excessive break-in operations, because it may
cause uneven or early wear of lining.
2. Perform parking brake burnishing operation by driving the vehicle forward under the following conditions:
3. After burnishing operation, check pedal stroke of parki ng brake. Readjust if it is no longer at the specified
stroke. Refer to PB-5, "
On-Vehicle Service".
Standard thickness “A” : 3.79
± 0.21 mm
(0.149 ± 0.008 in)
Wear limit thickness “A” : 0.5 mm (0.020 in)
SBR021A
Standard inner
diameter : 205
± 0.13 mm (8.07 ± 0.01 in)
Wear limit of in-
ner diameter : 205.7 mm (8.10 in)
SBR768A
SFIA0153E
• Vehicle speed at 40 km/h (25 MPH)
• Parking brake operating force of 196 N (20.0 kg-f, 44.1 lb-f) set
• For a period of 30 seconds
Revision: March 2010
2008 QX56
Page 2733 of 4083
SERVICE DATA AND SPECIFICATIONS (SDS)PB-11
< SERVICE DATA AND SPECIFICATIONS (SDS)
C
DE
G H
I
J
K L
M A
B
PB
N
O P
SERVICE DATA AND SPECIFICATIONS (SDS)
SERVICE DATA AND SPECIFICATIONS (SDS)
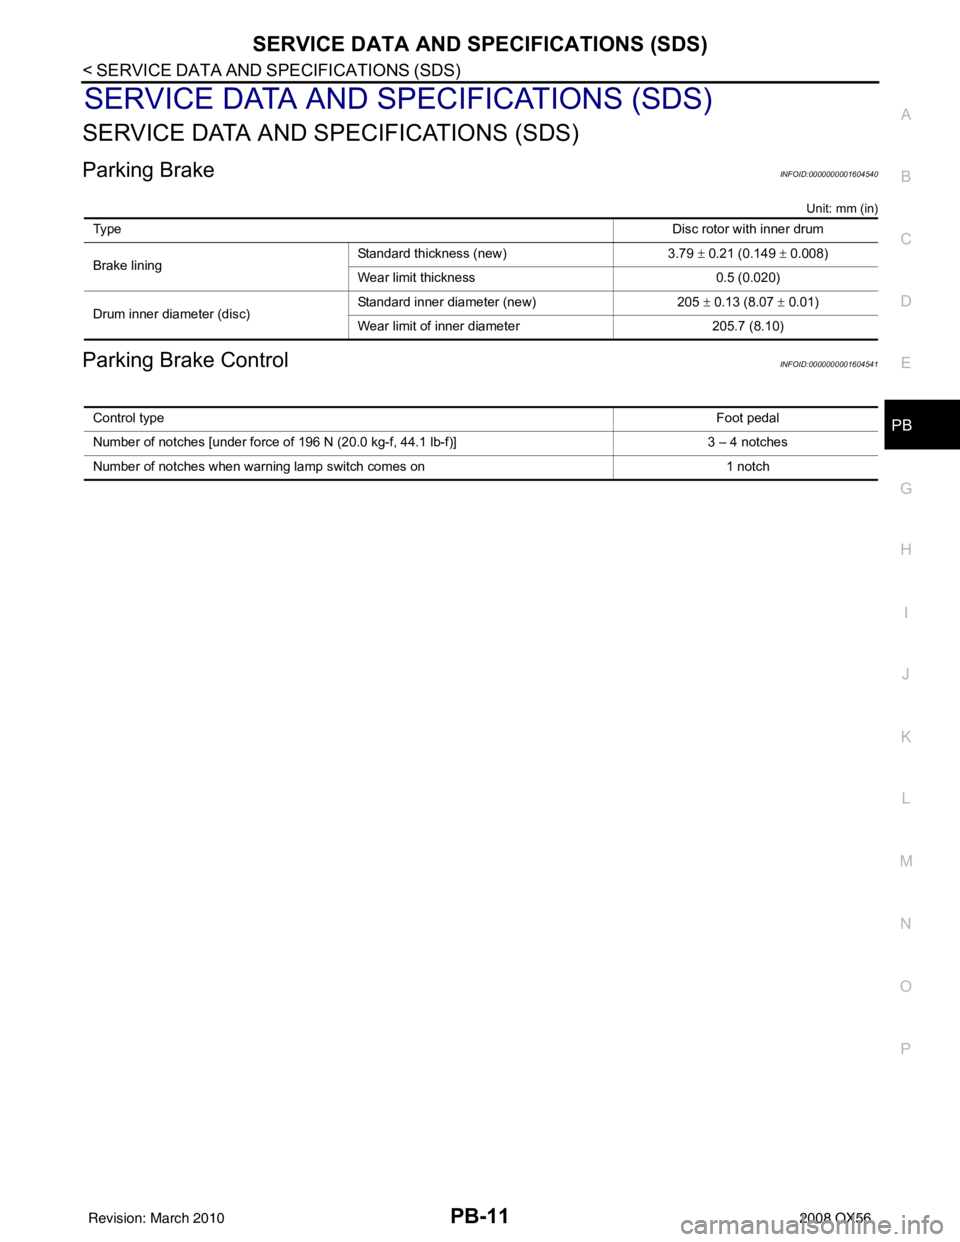
Parking BrakeINFOID:0000000001604540
Unit: mm (in)
Parking Brake ControlINFOID:0000000001604541
Ty p e Disc rotor with inner drum
Brake lining Standard thickness (new)
3.79 ± 0.21 (0.149 ± 0.008)
Wear limit thickness 0.5 (0.020)
Drum inner diameter (disc) Standard inner diameter (new)
205 ± 0.13 (8.07 ± 0.01)
Wear limit of inner diameter 205.7 (8.10)
Control type Foot pedal
Number of notches [under force of 196 N (20.0 kg-f, 44.1 lb-f)] 3 – 4 notches
Number of notches when warning lamp switch comes on 1 notch
Revision: March 2010 2008 QX56
Page 2809 of 4083

PG-42
< COMPONENT DIAGNOSIS >
HARNESS
A3 M6 W/10 : To E10A2 M92 B/6 : Power liftgate switch
A2 M7 B/5 : Passenger select unlock relay D1 M93 W/24 : Display unit
A3 M8 W/16 : To D2 A2 M95 W/6 : Rear power vent window switch
A2 M9 BR/24 : To D1 A2 M96 BR/6 : Pedal adjusting switch
A3 M10 Y/4 : To E29 C2 M98 W/16 : A/C and AV switch assembly
A3 M11 B/1 : Parking brake switch C3 M99 BR/2 : Foot lamp LH
C3 M12 GR/6 : Key switch and ignition knob switch F4 M100 BR/2 : Foot lamp RH
D3 M13 BR/2 : Front passenger air bag OFF indicator F4 M101 Y/2 : Driver air bag module
B3 M15 W/4 : Steering lock solenoid F4 M102 GR/8 : Combination switch (spiral cable)
A2 M16 GR/6 : ADP steering switch F4 M103 Y/2 : Driver air bag module
B2 M17 W/8 : Steering angle sensor E3 M104 W/4 : Aux jack
C2 M18 W/40 : BCM (body control module) F2 M105 Y/2 : Front passenger air bag module
C2 M19 W/15 : BCM (body control module) F2 M106 O/2 : Front passenger air bag module
C2 M20 B/15 : BCM (body control module) F3 M107 B/5 : Front blower relay
C3 M22 W/16 : Data link connector D5 M108 B/6 : Yaw rate/ side/ decel G sensor
B1 M23 W/12 : Combination meter A1 M109 BR/2 : Front tweeter LH
C1 M24 W/40 : Combination meter D2 M110 BR/2 : Center speaker
F2 M25 B/4 : Remote keyless entry receiver F2 M111 BR/2 : Front tweeter LH
B2 M26 W/6 : Ignition switch C2M112 BR/14 : BO SE speaker amp.
A2 M27 B/2 : Diode-3 C2 M113 BR/23 : BOSE speaker amp.
B2 M28 W/16 : Combination switch B3 M114 W/2 : Heated steering wheel
B2 M29 Y/6 : Combination switch (spiral cable) A2 M116 GR/8 : Sonar system OFF switch
B3 M30 GR/8 : Combination switch (spiral cable) B1 M118 BR/2 : Front sonar buzzer
G4 M31 SMJ : To E152 F2 M120 W/4 : Remote keyless entry receiver
C3 M32 W/4 : In-vehicle sensor F4 M122 W/4 : Variable blower control (front)
B3 M33 W/32 : Automatic drive position control unit C3 M123 W/2 : Tire pressure warning check connector
B3 M34 W/16 : Automatic drive position control unit D2 M124 GR/3 : AV control unit
C5 M35 Y/28 : Air bag diagnosis sensor unit D2 M125 B/1 : Satellite radio antenna
G4 M36 SMJ : To B149 C3 M129 V/1 : Satellite radio tuner
G3 M37 B/1 : Fuse block (J/B) D2 M139 B/2 : Diode-1
G3 M38 B/2 : Fuse block (J/B) D1 M140 B/2 : Diode-2
D3 M39 W/8 : Fuse block (J/B) C2 M141 GR/8 : 4WD shift switch
A3 M40 SMJ : To B69 E1 M142 B/6 : Mode door motor (front)
D2 M42 W/20 : AV control unit E3 M143 B/6 : Air mix door motor (passenger)
D2 M43 W/12 : AV control unit C1 M144 B/6 : Defroster door motor
D2 M44 W/32 : AV control unit E3 M146 GR/2 : Intake sensor
D3 M45 W/40 : AV control unit D3 M147B/6 : Air mix doo r motor (driver)
D2 M46 W/32 : AV control unit D2 M148 W/4 : Headlamp aiming switch
D2 M49 L/26 : A/C auto AMP D3 M149 W/4 : Clock
D2 M50 B/26 : A/C auto AMP B1 M150 W/2 : Ignition keyhole illumination
B3 M51 L/4 : Trailer tow relay 1 G4 M157 W/20 : To B161
B2 M52 W/2 : Combination switch (spiral cable) A3 M158 W/10 : To D3
D3 M53 B/3 : Front power socket LH Console sub-harness
E3 M54 B/3 : Front power socket RH (for cigarette
lighter) D4 M201 W/16 : To M56
D2 M55 W/4 : Hazard switch D4 M202 BR/24 : To M64
Revision: March 2010 2008 QX56
Page 3052 of 4083
REAR SUSPENSION MEMBERRSU-13
< REMOVAL AND INSTALLATION >
C
DF
G H
I
J
K L
M A
B
RSU
N
O P
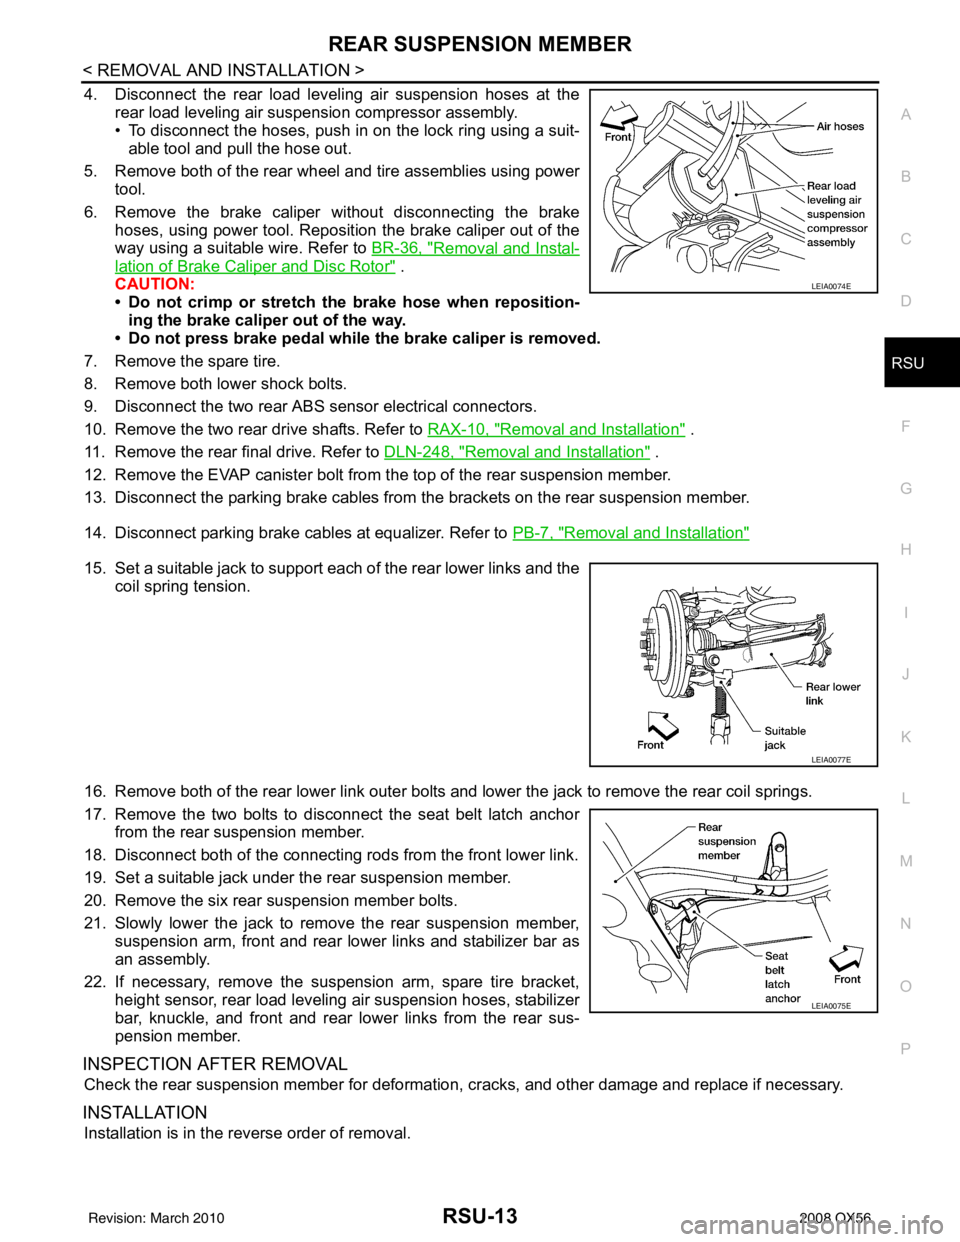
4. Disconnect the rear load leveling air suspension hoses at the rear load leveling air suspension compressor assembly.
• To disconnect the hoses, push in on the lock ring using a suit-able tool and pull the hose out.
5. Remove both of the rear wheel and tire assemblies using power tool.
6. Remove the brake caliper without disconnecting the brake hoses, using power tool. Reposition the brake caliper out of the
way using a suitable wire. Refer to BR-36, "
Removal and Instal-
lation of Brake Caliper and Disc Rotor" .
CAUTION:
• Do not crimp or stretch the brake hose when reposition- ing the brake caliper out of the way.
• Do not press brake pedal while the brake caliper is removed.
7. Remove the spare tire.
8. Remove both lower shock bolts.
9. Disconnect the two rear ABS sensor electrical connectors.
10. Remove the two rear drive shafts. Refer to RAX-10, "
Removal and Installation" .
11. Remove the rear final drive. Refer to DLN-248, "
Removal and Installation" .
12. Remove the EVAP canister bolt from the top of the rear suspension member.
13. Disconnect the parking brake cables from the brackets on the rear suspension member.
14. Disconnect parking brake cables at equalizer. Refer to PB-7, "
Removal and Installation"
15. Set a suitable jack to support each of the rear lower links and the
coil spring tension.
16. Remove both of the rear lower link outer bolts and lower the jack to remove the rear coil springs.
17. Remove the two bolts to disconnect the seat belt latch anchor from the rear suspension member.
18. Disconnect both of the connecting r ods from the front lower link.
19. Set a suitable jack under the rear suspension member.
20. Remove the six rear suspension member bolts.
21. Slowly lower the jack to remove the rear suspension member, suspension arm, front and rear lower links and stabilizer bar as
an assembly.
22. If necessary, remove the suspension arm, spare tire bracket, height sensor, rear load leveling air suspension hoses, stabilizer
bar, knuckle, and front and rear lower links from the rear sus-
pension member.
INSPECTION AFTER REMOVAL
Check the rear suspension member for deformation, cracks, and other damage and replace if necessary.
INSTALLATION
Installation is in the reverse order of removal.
LEIA0074E
LEIA0077E
LEIA0075E
Revision: March 2010 2008 QX56
Page 3506 of 4083
STEERING WHEELST-15
< ON-VEHICLE REPAIR >
C
DE
F
H I
J
K L
M A
B
ST
N
O P
ON-VEHICLE REPAIR
STEERING WHEEL
On-Vehicle Inspection and ServiceINFOID:0000000004920096
CHECKING CONDITION OF INSTALLATION
• Check installation condition of steering gear assembly, front suspension, axle and steering column.
• Check if movement exists when steering wheel is mo ved up and down, to the left and right and to the axial
direction.
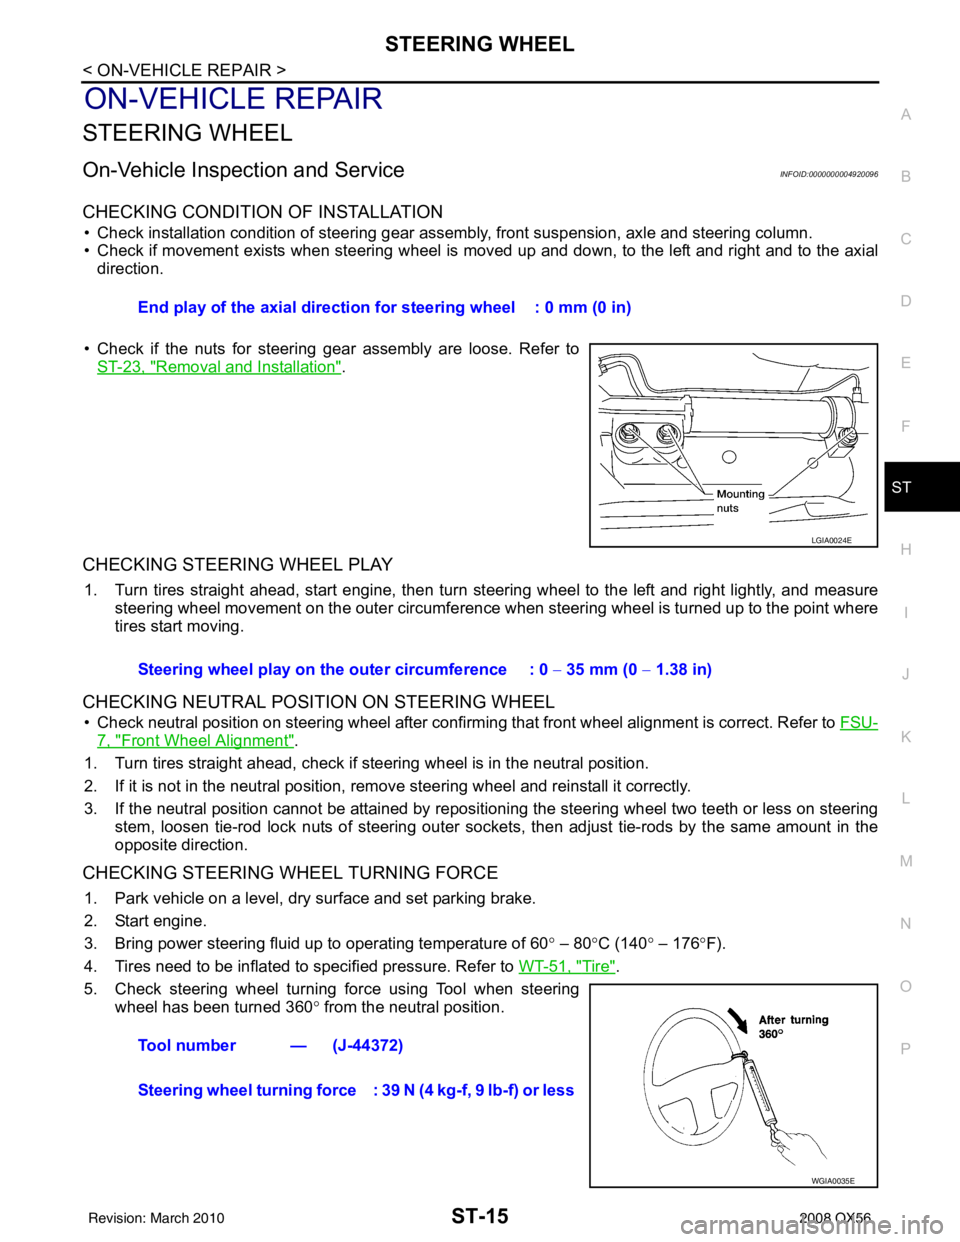
• Check if the nuts for steering gear assembly are loose. Refer to ST-23, "
Removal and Installation".
CHECKING STEERING WHEEL PLAY
1. Turn tires straight ahead, start engine, then turn steer ing wheel to the left and right lightly, and measure
steering wheel movement on the outer circumference when steering wheel is turned up to the point where
tires start moving.
CHECKING NEUTRAL POSITION ON STEERING WHEEL
• Check neutral position on steering wheel after confirming that front wheel alignment is correct. Refer to FSU-
7, "Front Wheel Alignment".
1. Turn tires straight ahead, check if steering wheel is in the neutral position.
2. If it is not in the neutral position, remo ve steering wheel and reinstall it correctly.
3. If the neutral position cannot be attained by repositi oning the steering wheel two teeth or less on steering
stem, loosen tie-rod lock nuts of steering outer socket s, then adjust tie-rods by the same amount in the
opposite direction.
CHECKING STEERING WHEEL TURNING FORCE
1. Park vehicle on a level, dry surface and set parking brake.
2. Start engine.
3. Bring power steering fluid up to operating temperature of 60 ° – 80 °C (140 ° – 176 °F).
4. Tires need to be inflated to specified pressure. Refer to WT-51, "
Tire".
5. Check steering wheel turning force using Tool when steering wheel has been turned 360 ° from the neutral position.
End play of the axial direction
for steering wheel : 0 mm (0 in)
LGIA0024E
Steering wheel play on the outer circumference : 0 − 35 mm (0 − 1.38 in)
Tool number — (J-44372)
Steering wheel turning force : 39 N (4 kg-f, 9 lb-f) or less
WGIA0035E
Revision: March 2010 2008 QX56
Page 3557 of 4083
TM-10
< FUNCTION DIAGNOSIS >
A/T CONTROL SYSTEM
FUNCTION OF CLUTCH AND BRAKE
CLUTCH AND BAND CHART
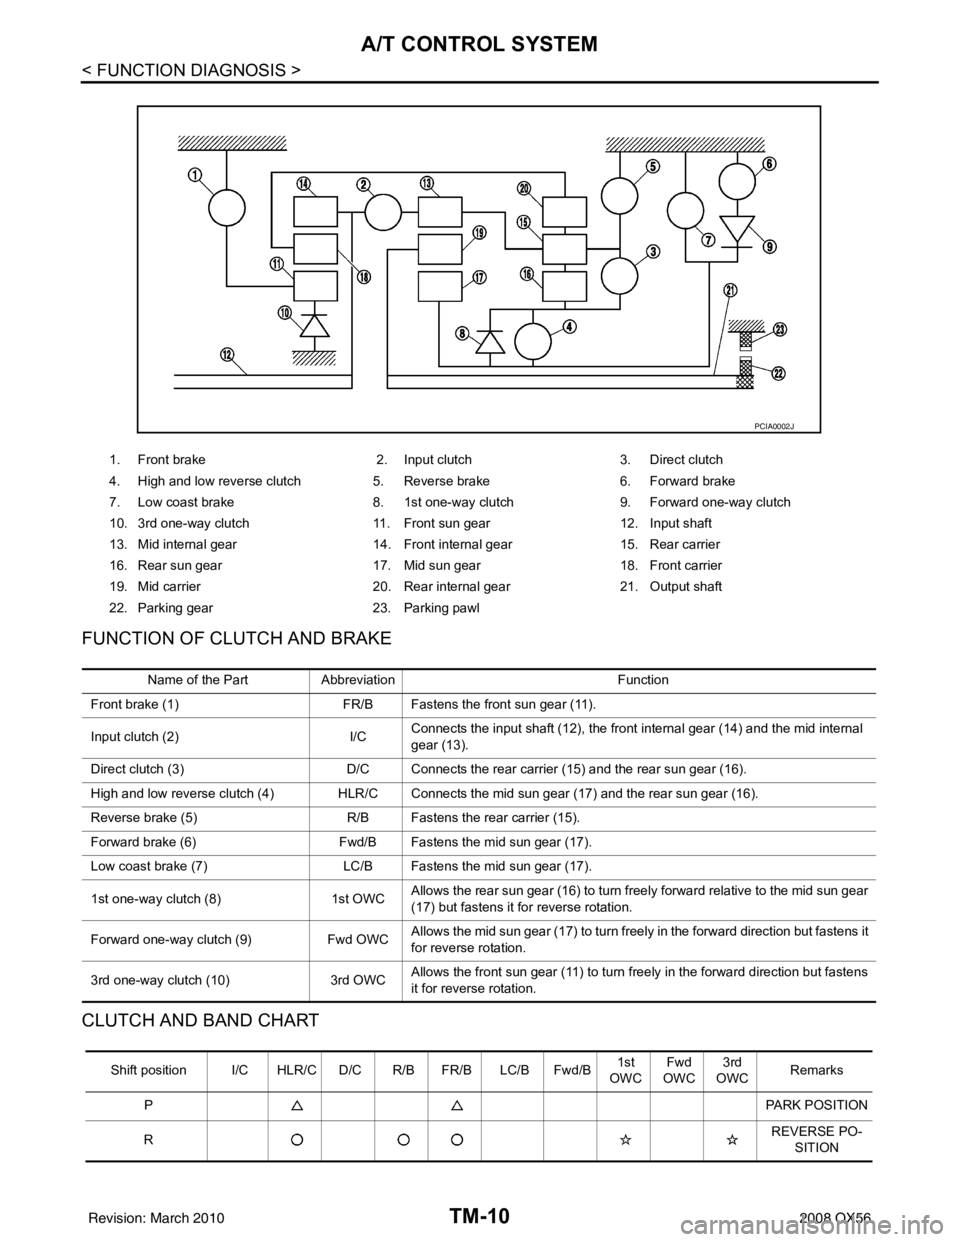
1. Front brake 2. Input clutch3. Direct clutch
4. High and low reverse clutch 5. Reverse brake6. Forward brake
7. Low coast brake 8. 1st one-way clutch9. Forward one-way clutch
10. 3rd one-way clutch 11. Front sun gear12. Input shaft
13. Mid internal gear 14. Front internal gear15. Rear carrier
16. Rear sun gear 17. Mid sun gear18. Front carrier
19. Mid carrier 20. Rear internal gear21. Output shaft
22. Parking gear 23. Parking pawl
PCIA0002J
Name of the PartAbbreviation Function
Front brake (1) FR/B Fastens the front sun gear (11).
Input clutch (2) I/CConnects the input shaft (12), the front internal gear (14) and the mid internal
gear (13).
Direct clutch (3) D/C Connects the rear carrier (15) and the rear sun gear (16).
High and low reverse clutch (4) HLR/C Connects the mid sun gear (17) and the rear sun gear (16).
Reverse brake (5) R/B Fastens the rear carrier (15).
Forward brake (6) Fwd/B Fastens the mid sun gear (17).
Low coast brake (7) LC/B Fastens the mid sun gear (17).
1st one-way clutch (8) 1st OWCAllows the rear sun gear (16) to turn freely forward relative to the mid sun gear
(17) but fastens it
for reverse rotation.
Forward one-way clutch (9) Fwd OWCAllows the mid sun gear (17) to turn freely in the forward direction but fastens it
for reverse rotation.
3rd one-way clutch (10) 3rd OWCAllows the front sun gear (11) to turn freely in the forward direction but fastens
it for reverse rotation.
Shift position I/C HLR/C D
/C R/B FR/B LC/B Fwd/B 1st
OWC Fwd
OWC 3rd
OWC Remarks
P PARK POSITION
R REVERSE PO-
SITION
Revision: March 2010 2008 QX56