Page 2029 of 4083

EXTERIOR LIGHTING SYSTEM SYMPTOMSEXL-101
< SYMPTOM DIAGNOSIS >
C
DE
F
G H
I
J
K
M A
B
EXL
N
O P
SYMPTOM DIAGNOSIS
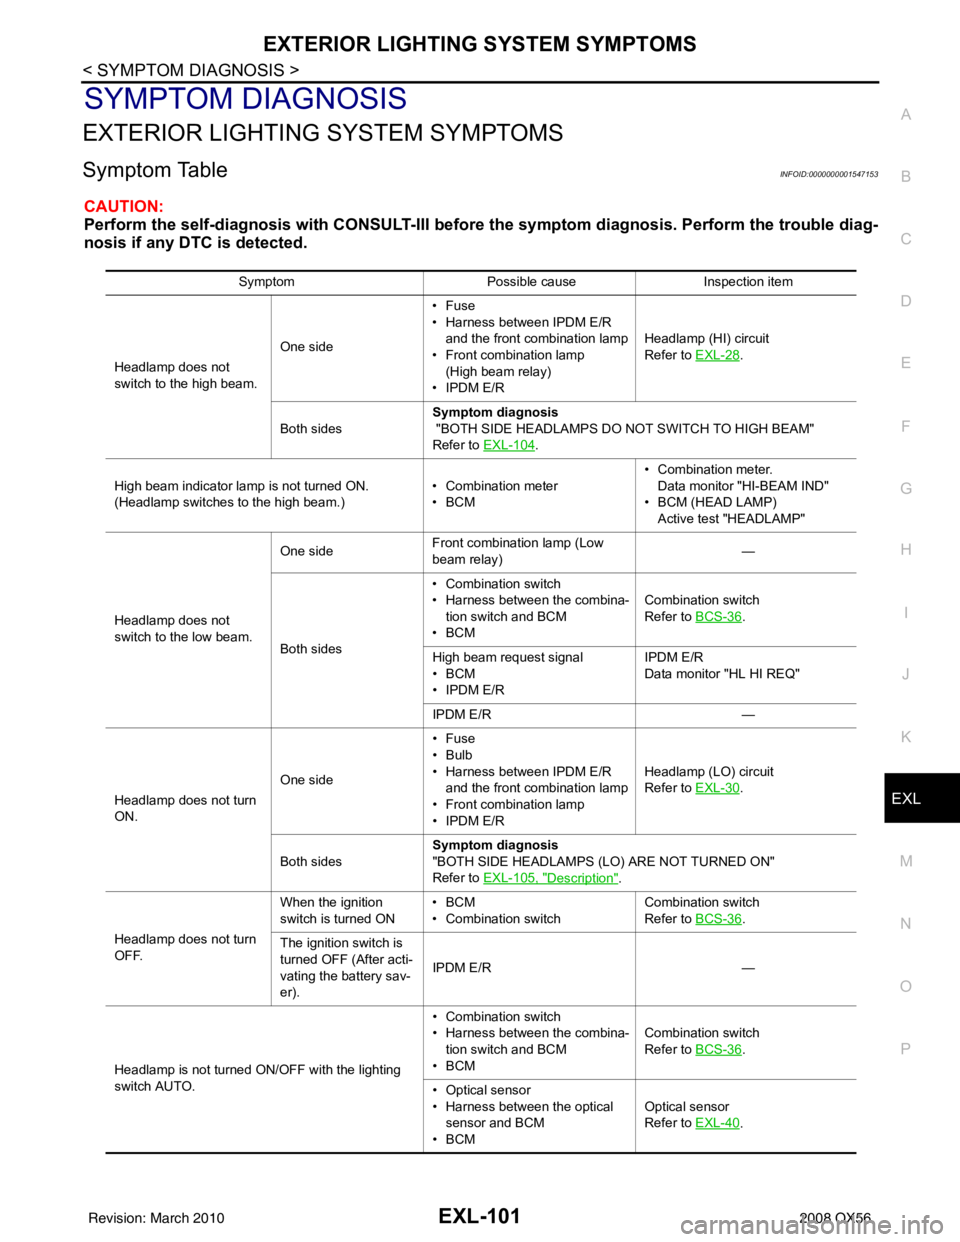
EXTERIOR LIGHTING SYSTEM SYMPTOMS
Symptom TableINFOID:0000000001547153
CAUTION:
Perform the self-diagnosis with CONS ULT-III before the symptom diagnosis. Perform the trouble diag-
nosis if any DTC is detected.
Symptom Possible causeInspection item
Headlamp does not
switch to the high beam. One side•Fuse
• Harness between IPDM E/R
and the front combination lamp
• Front combination lamp
(High beam relay)
• IPDM E/R Headlamp (HI) circuit
Refer to
EXL-28
.
Both sides Symptom diagnosis
"BOTH SIDE HEADLAMPS DO NOT SWITCH TO HIGH BEAM"
Refer to EXL-104
.
High beam indicator lamp is not turned ON.
(Headlamp switches to the high beam.) • Combination meter
•BCM• Combination meter.
Data monitor "HI-BEAM IND"
• BCM (HEAD LAMP) Active test "HEADLAMP"
Headlamp does not
switch to the low beam. One side
Front combination lamp (Low
beam relay)
—
Both sides • Combination switch
• Harness between the combina-
tion switch and BCM
•BCM Combination switch
Refer to
BCS-36
.
High beam request signal
•BCM
• IPDM E/R IPDM E/R
Data monitor "HL HI REQ"
IPDM E/R —
Headlamp does not turn
ON. One side•Fuse
•Bulb
• Harness between IPDM E/R
and the front combination lamp
• Front combination lamp
• IPDM E/R Headlamp (LO) circuit
Refer to
EXL-30
.
Both sides Symptom diagnosis
"BOTH SIDE HEADLAMPS (LO) ARE NOT TURNED ON"
Refer to EXL-105, "
Description".
Headlamp does not turn
OFF. When the ignition
switch is turned ON
•BCM
• Combination switch Combination switch
Refer to
BCS-36
.
The ignition switch is
turned OFF (After acti-
vating the battery sav-
er). IPDM E/R
—
Headlamp is not turned ON/OFF with the lighting
switch AUTO. • Combination switch
• Harness between the combina-
tion switch and BCM
•BCM Combination switch
Refer to
BCS-36
.
• Optical sensor
• Harness between the optical sensor and BCM
•BCM Optical sensor
Refer to
EXL-40
.
Revision: March 2010 2008 QX56
Page 2031 of 4083
NORMAL OPERATING CONDITIONEXL-103
< SYMPTOM DIAGNOSIS >
C
DE
F
G H
I
J
K
M A
B
EXL
N
O P
NORMAL OPERATING CONDITION
DescriptionINFOID:0000000001547154
XENON HEADLAMPS
The brightness and color of the light may vary slightly immediately after turning the headlamp ON. This condi-
tionwill remain until the xenon bulb becomes stable. This is normal.
• Illumination time lag may occur between right and left. This is normal.
AUTO LIGHT SYSTEM
The auto light system may not turn the headlamp ON/O FF immediately after passing a dark area or a bright
area (short tunnel, sky bridge, shadowed area etc.). This is normal.
Revision: March 2010 2008 QX56
Page 2032 of 4083

EXL-104
< SYMPTOM DIAGNOSIS >
BOTH SIDE HEADLAMPS DO NOT SWITCH TO HIGH BEAM
BOTH SIDE HEADLAMPS DO NOT SWITCH TO HIGH BEAM
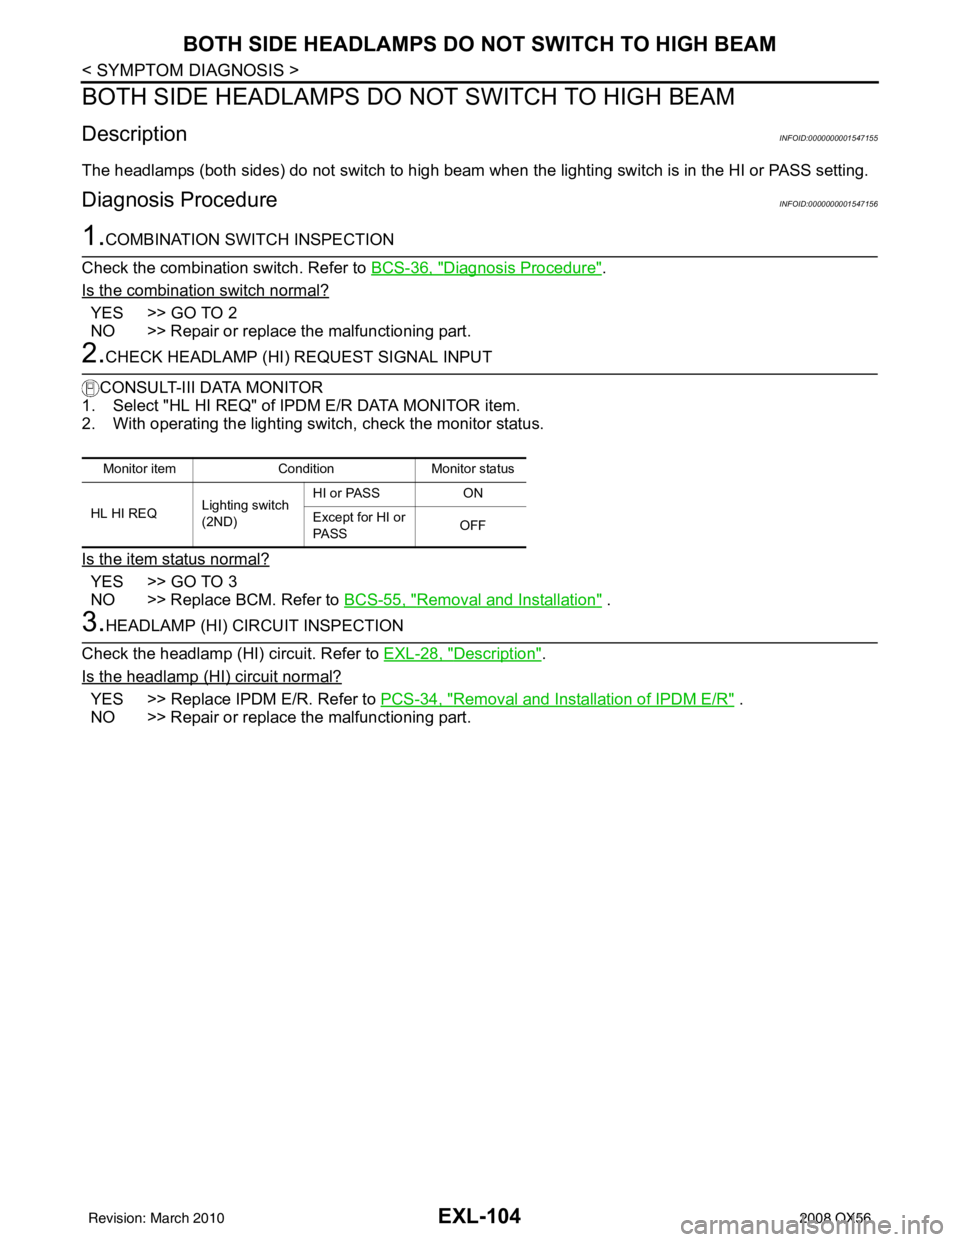
DescriptionINFOID:0000000001547155
The headlamps (both sides) do not switch to high beam when the lighting switch is in the HI or PASS setting.
Diagnosis ProcedureINFOID:0000000001547156
1.COMBINATION SWITCH INSPECTION
Check the combination switch. Refer to BCS-36, "
Diagnosis Procedure".
Is the combination switch normal?
YES >> GO TO 2
NO >> Repair or replace the malfunctioning part.
2.CHECK HEADLAMP (HI) REQUEST SIGNAL INPUT
CONSULT-III DATA MONITOR
1. Select "HL HI REQ" of IPDM E/R DATA MONITOR item.
2. With operating the lighting switch, check the monitor status.
Is the item status normal?
YES >> GO TO 3
NO >> Replace BCM. Refer to BCS-55, "
Removal and Installation" .
3.HEADLAMP (HI) CIRCUIT INSPECTION
Check the headlamp (HI) circuit. Refer to EXL-28, "
Description".
Is the headlamp (HI) circuit normal?
YES >> Replace IPDM E/R. Refer to PCS-34, "Removal and Installation of IPDM E/R" .
NO >> Repair or replace the malfunctioning part.
Monitor item ConditionMonitor status
HL HI REQ Lighting switch
(2ND) HI or PASS
ON
Except for HI or
PASS OFF
Revision: March 2010
2008 QX56
Page 2033 of 4083

BOTH SIDE HEADLAMPS (LO) ARE NOT TURNED ONEXL-105
< SYMPTOM DIAGNOSIS >
C
DE
F
G H
I
J
K
M A
B
EXL
N
O P
BOTH SIDE HEADLAMPS (L O) ARE NOT TURNED ON
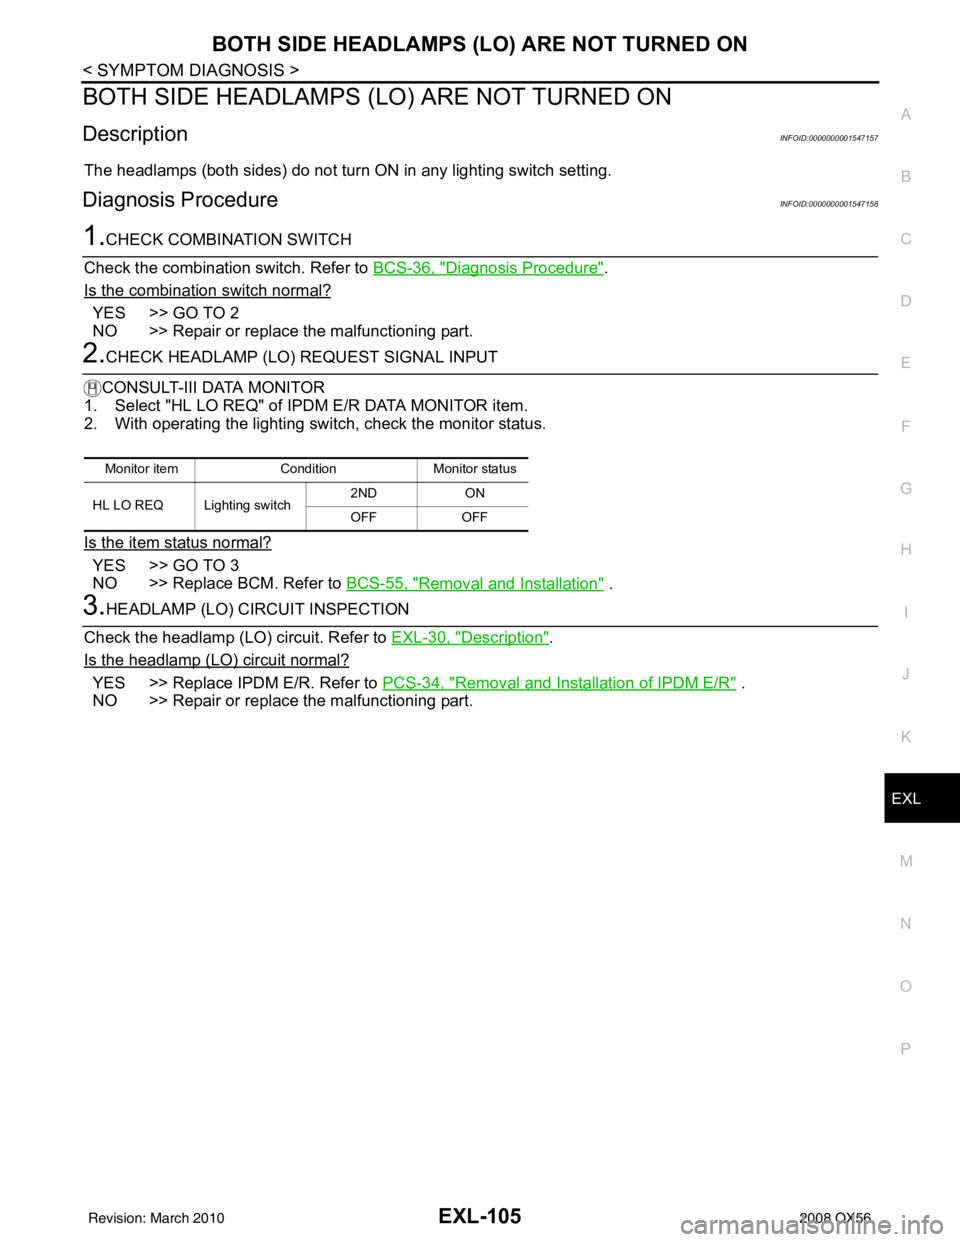
DescriptionINFOID:0000000001547157
The headlamps (both sides) do not turn ON in any lighting switch setting.
Diagnosis ProcedureINFOID:0000000001547158
1.CHECK COMBINATION SWITCH
Check the combination switch. Refer to BCS-36, "
Diagnosis Procedure".
Is the combination switch normal?
YES >> GO TO 2
NO >> Repair or replace the malfunctioning part.
2.CHECK HEADLAMP (LO) REQUEST SIGNAL INPUT
CONSULT-III DATA MONITOR
1. Select "HL LO REQ" of IP DM E/R DATA MONITOR item.
2. With operating the lighting switch, check the monitor status.
Is the item status normal?
YES >> GO TO 3
NO >> Replace BCM. Refer to BCS-55, "
Removal and Installation" .
3.HEADLAMP (LO) CIRCUIT INSPECTION
Check the headlamp (LO) circuit. Refer to EXL-30, "
Description".
Is the headlamp (LO) circuit normal?
YES >> Replace IPDM E/R. Refer to PCS-34, "Removal and Installation of IPDM E/R" .
NO >> Repair or replace the malfunctioning part.
Monitor item ConditionMonitor status
HL LO REQ Lighting switch 2ND
ON
OFF OFF
Revision: March 2010 2008 QX56
Page 2038 of 4083
EXL-110
< ON-VEHICLE REPAIR >
ADJUSTMENT AND INSPECTION
ON-VEHICLE REPAIR
ADJUSTMENT AND INSPECTION
HEADLAMP
HEADLAMP : Aiming AdjustmentINFOID:0000000001547282
NOTE:
• For details, refer to the regulations in your area.
• If vehicle front body has been repaired and /or the headlamp assembly has been replaced, check headlamp
aiming.
HEADLAMP AIMING
NOTE:
• Before performing aiming adjustment, check the following:
- Ensure all tires are inflated to correct pressure.
- Place vehicle and screen on level surface.
- Ensure there is no load in vehicle other than the driver (or equivalent weight placed in driver's position).
Coolant and engine oil filled to correct level, and fuel tank full.
- Confirm spare tire, jack and tools are properly stowed.
- Aim each headlamp individually and ensure other headlamp beam pattern is blocked from screen.
- Use adjusting screw to perform aiming adjustment
WKIA1859E
Revision: March 2010 2008 QX56
Page 2039 of 4083

ADJUSTMENT AND INSPECTIONEXL-111
< ON-VEHICLE REPAIR >
C
DE
F
G H
I
J
K
M A
B
EXL
N
O P
NOTE:
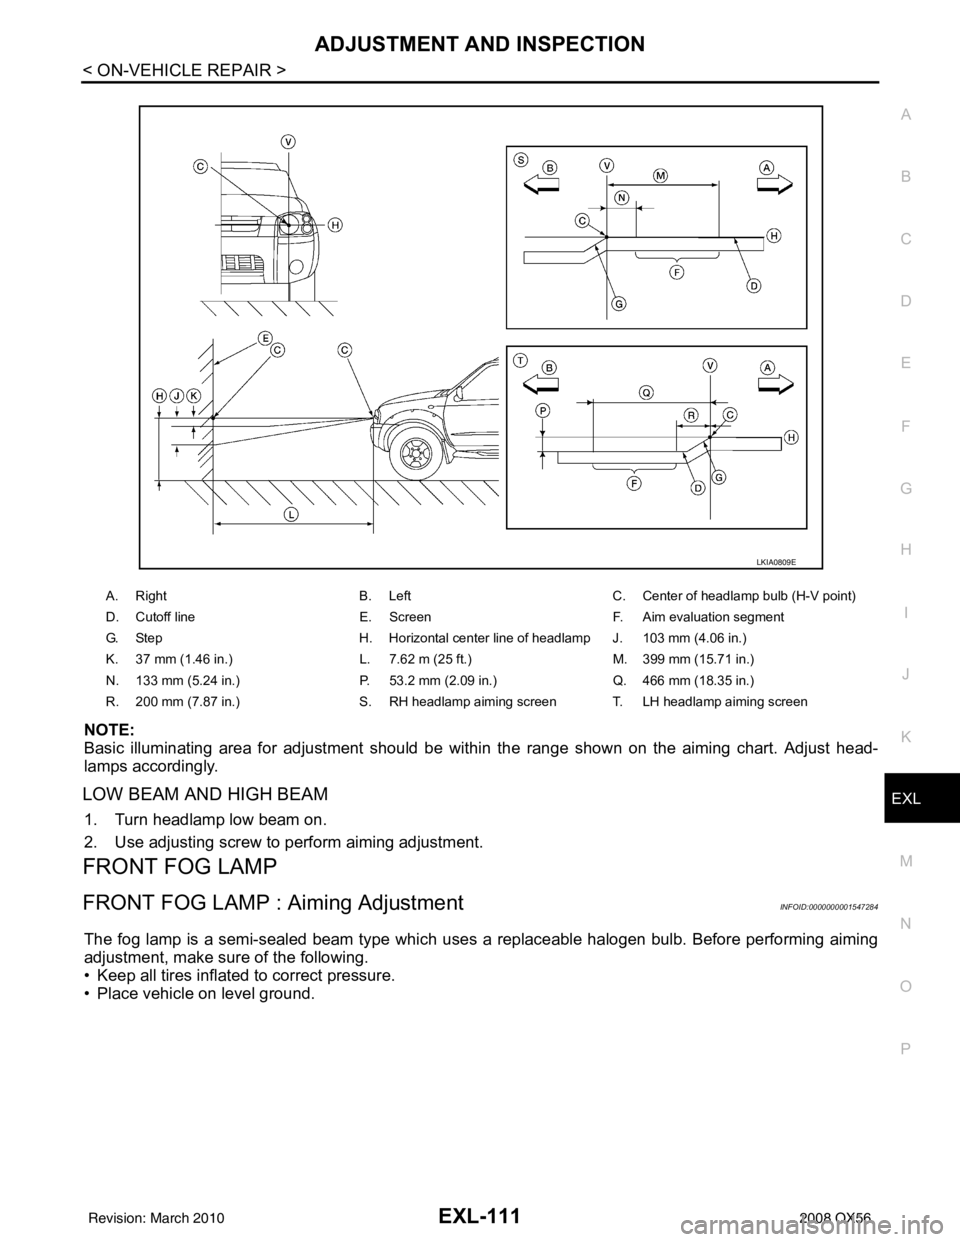
Basic illuminating area for adjustment should be within the range shown on the aiming chart. Adjust head-
lamps accordingly.
LOW BEAM AND HIGH BEAM
1. Turn headlamp low beam on.
2. Use adjusting screw to perform aiming adjustment.
FRONT FOG LAMP
FRONT FOG LAMP : Aiming AdjustmentINFOID:0000000001547284
The fog lamp is a semi-sealed beam type which uses a replaceable halogen bulb. Before performing aiming
adjustment, make sure of the following.
• Keep all tires inflated to correct pressure.
• Place vehicle on level ground.
A. Right B. LeftC. Center of headlamp bulb (H-V point)
D. Cutoff line E. ScreenF. Aim evaluation segment
G. Step H. Horizontal center line of headlamp J. 103 mm (4.06 in.)
K. 37 mm (1.46 in.) L. 7.62 m (25 ft.)M. 399 mm (15.71 in.)
N. 133 mm (5.24 in.) P. 53.2 mm (2.09 in.)Q. 466 mm (18.35 in.)
R. 200 mm (7.87 in.) S. RH headlamp aiming screen T. LH headlamp aiming screen
LKIA0809E
Revision: March 2010 2008 QX56
Page 2041 of 4083

HEADLAMPEXL-113
< REMOVAL AND INSTALLATION >
C
DE
F
G H
I
J
K
M A
B
EXL
N
O P
REMOVAL AND INSTALLATION
HEADLAMP
Bulb ReplacementINFOID:0000000001551508
CAUTION:
• Disconnect battery negative terminal before touc hing xenon bulb or headlamp wiring harness
assembly.
• Turn headlamp switch OFF before di sconnecting headlamp harness connector.
• Do not touch bulb by hand right after being turned off. Burning may result.
• Do not touch the glass of bulb directly by hand. Keep grease and other oily substances away from it.
• Do not turn xenon bulb ON when xenon bulb is removed fr om front combination lamp assembly.
• After installing the bu lb, be sure to install the bulb socket securely to ensure watertightness.
• Do not leave bulb out of front combination lamp assembly for a lo ng time because dust, moisture,
smoke, etc. may affect the performance of the lamp. When replacing bulb, be sure to replace it with a
new one.
HEADLAMP (OUTER SIDE), FOR LOW BEAM
Removal
1. Position fender protector aside.
2. Turn headlamp switch OFF.
3. Disconnect battery negative terminal.
4. Remove ballast.
5. Disconnect headlamp electrical connector.
6. Release bulb retaining spring and pull bulb straight out.
Installation
Installation is in the reverse order of removal.
HEADLAMP (INNER SIDE), FOR HIGH BEAM
Removal
1. Turn headlamp switch OFF.
2. Disconnect headlamp electrical connector.
3. Turn the bulb counterclockwise to remove it.
Installation
Installation is in the reverse order of removal.
FRONT PARKING LAMP (INNER OR OUTER)
Removal
1. Turn the bulb socket counterclockwise to unlock it.
2. Pull the bulb to remove it from the socket.
Installation
Installation is in the reverse order of removal.
SIDE MARKER LAMP (FRONT)
Removal
1. Position fender protector aside.
2. Turn the side marker lamp (front) bulb socket count erclockwise and remove side marker lamp (front) bulb
socket.
3. Pull to remove side marker lamp (front) from the side marker lamp (front) bulb socket.
Installation
Installation is in the reverse order of removal.
Revision: March 2010 2008 QX56
Page 2042 of 4083

EXL-114
< REMOVAL AND INSTALLATION >
HEADLAMP
Removal and Installation
INFOID:0000000001551509
FRONT COMBINATION LAMP ASSEMBLY
CAUTION:
• Disconnect battery negative terminal before t ouching xenon bulb or headlamp wiring harness
assembly.
• Turn headlamp switch OFF before disconnecting headlamp harness connector.
• Do not touch bulb by hand right after being turned off. Burning may result.
• Do not touch the glass of bulb directly by hand. Keep grease and other oily substances away from it.
• Do not turn xenon bulb ON wh en xenon bulb is removed from front combination lamp assembly.
• After installing the bulb, be sure to install the bulb socket securely to ensure watertightness.
• Do not leave bulb out of front combination lamp assembly for a long time because dust, moisture,
smoke, etc. may affect the performa nce of the lamp. When replacing bulb, be sure to replace it with a
new one.
Removal
1. Disconnect battery negative terminal.
2. Disconnect front combination lamp assembly.
3. Remove front fascia. Refer to EXT-13, "
Removal and Installation".
4. Remove front combination lamp assembly bolts.
5. Remove front combination lamp assembly.
Installation
Installation is in the reverse order of removal.
Disassembly and AssemblyINFOID:0000000001551510
FRONT COMBINATION LAMP ASSEMBLY
WKIA1860E
1. Parking lamp bulb (outer) 2. Headlamp bulb (high beam) 3. Headlamp assembly
BKIA0228E
Revision: March 2010 2008 QX56