2008 INFINITI QX56 wheel
[x] Cancel search: wheelPage 3992 of 4083

WT-46
< ON-VEHICLE REPAIR >
WHEEL AND TIRE ASSEMBLY
ON-VEHICLE REPAIR
WHEEL AND TIRE ASSEMBLY
AdjustmentINFOID:0000000006059785
BALANCING WHEELS (ADHESIVE WEIGHT TYPE)
Preparation Before Adjustment
Remove inner and outer balance weights from the road wheel using releasing agent, remove double-faced
adhesive tape from the road wheel.
CAUTION:
• Be careful not scratch the road wheel during removal.
• After removing double-faced adhesive tape, wipe clean traces of releasing agent from the road wheel.
Wheel Balance Adjustment
• If a balancer machine has an adhesive weight mode se tting, select the adhesive weight mode setting and
skip Step 2. below. If a balancer machine only has the clip-on (rim flange) weight mode setting, follow Step 2.
to calculate the correct size adhesive weight.
1. Set road wheel on balancer machine using the center hole as a guide. Start the balancer machine.
2. For tire balance machines that only have a clip-on (rim flange) weight mode setting, follow this step to cal- culate the correct size adhesive weight to use. When inner and outer imbalance values are shown on the
balancer machine indicator, multiply outer imbalance value by 5/3 (1.67) to determine balance weight that
should be used. Select the outer balance weight with a value closest to the calculated value above and
install in to the designated outer position of, or at the designated angle in relation to the road wheel.
a. Indicated imbalance value × 5/3 (1.67) = balance weight to be
installed.
Calculation example:
23 g (0.81 oz) × 5/3 (1.67) = 38.33 g (1.35 oz) ⇒ 40 g (1.41 oz)
balance weight (closer to calculated balance weight value)
NOTE:
Note that balance weight value must be closer to the calculated
balance weight value.
Example:
37.4 ⇒ 35 g (1.23 oz)
37.5 ⇒ 40 g (1.41 oz)
SMA054D
Revision: March 2010 2008 QX56
Page 3993 of 4083

WHEEL AND TIRE ASSEMBLYWT-47
< ON-VEHICLE REPAIR >
C
DF
G H
I
J
K L
M A
B
WT
N
O P
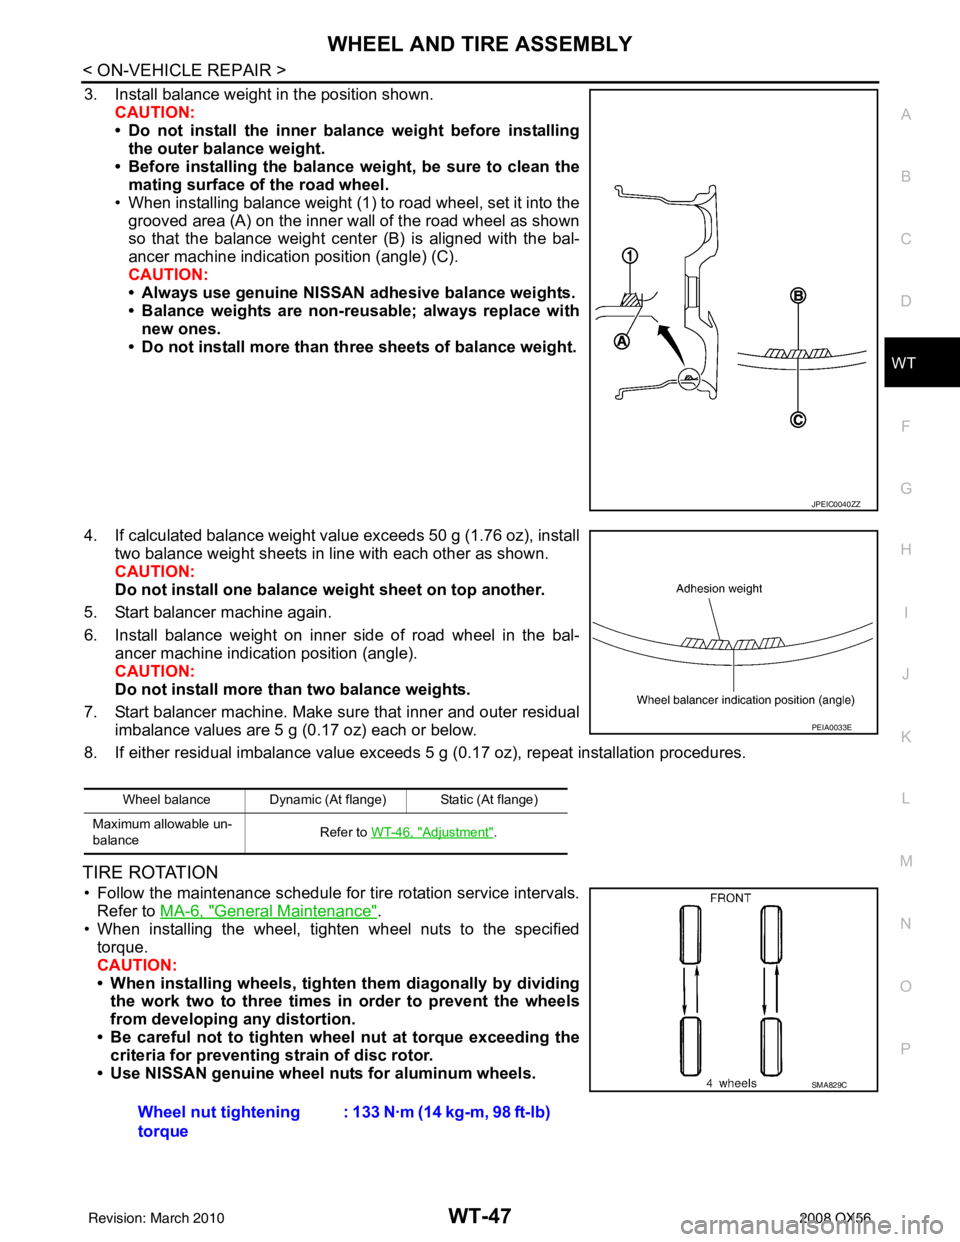
3. Install balance weight in the position shown. CAUTION:
• Do not install the inner bala nce weight before installing
the outer balance weight.
• Before installing the balance weight, be sure to clean the mating surface of the road wheel.
• When installing balance weight (1) to road wheel, set it into the grooved area (A) on the inner wall of the road wheel as shown
so that the balance weight cent er (B) is aligned with the bal-
ancer machine indication position (angle) (C).
CAUTION:
• Always use genuine NISSAN adhesive balance weights.
• Balance weights are non-re usable; always replace with
new ones.
• Do not install more than th ree sheets of balance weight.
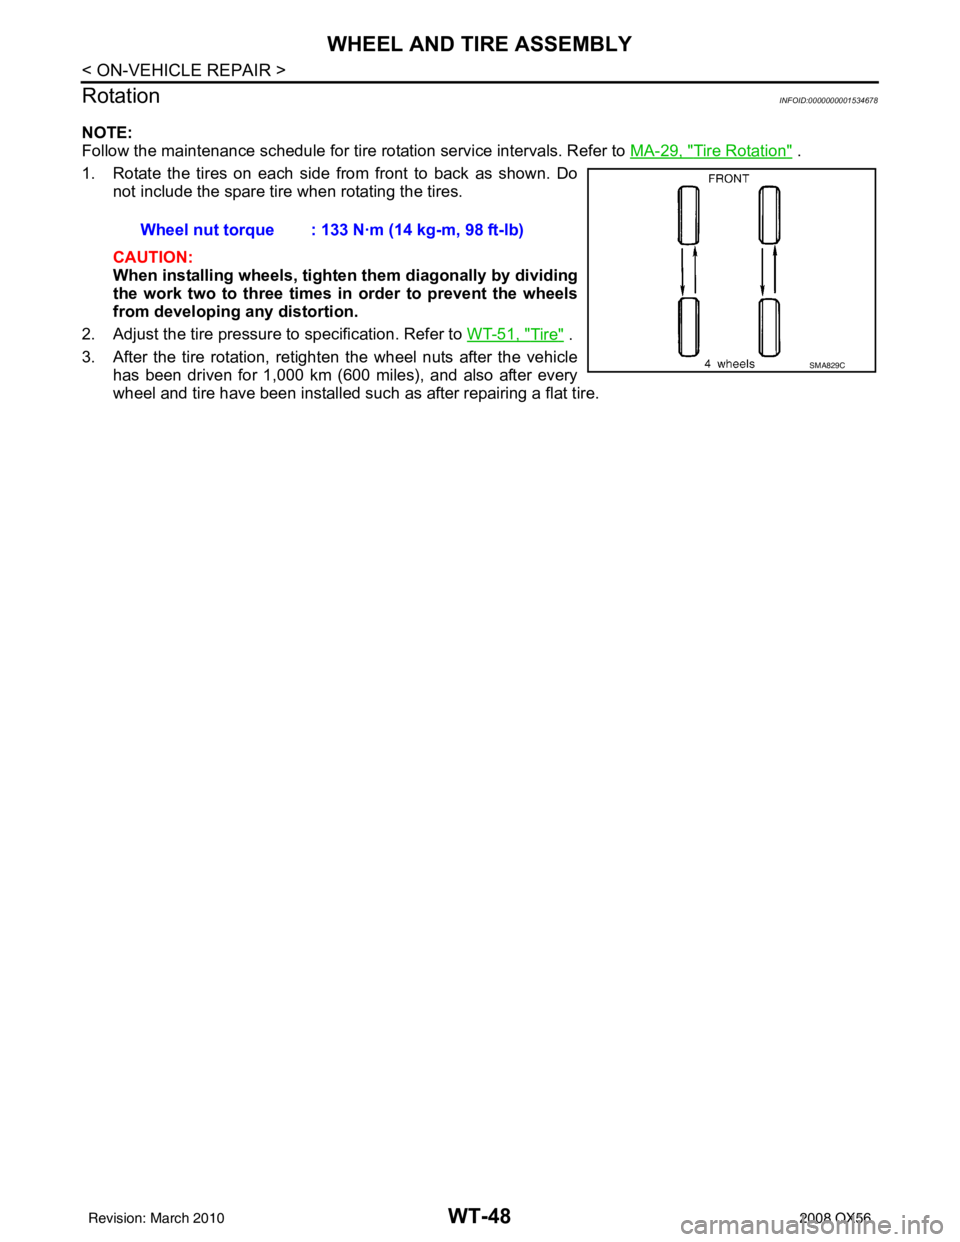
4. If calculated balance weight value exceeds 50 g (1.76 oz), install two balance weight sheets in line with each other as shown.
CAUTION:
Do not install one balance weight sheet on top another.
5. Start balancer machine again.
6. Install balance weight on inner side of road wheel in the bal- ancer machine indication position (angle).
CAUTION:
Do not install more than two balance weights.
7. Start balancer machine. Make sure that inner and outer residual imbalance values are 5 g (0.17 oz) each or below.
8. If either residual imbalance value exceeds 5 g (0.17 oz), repeat installation procedures.
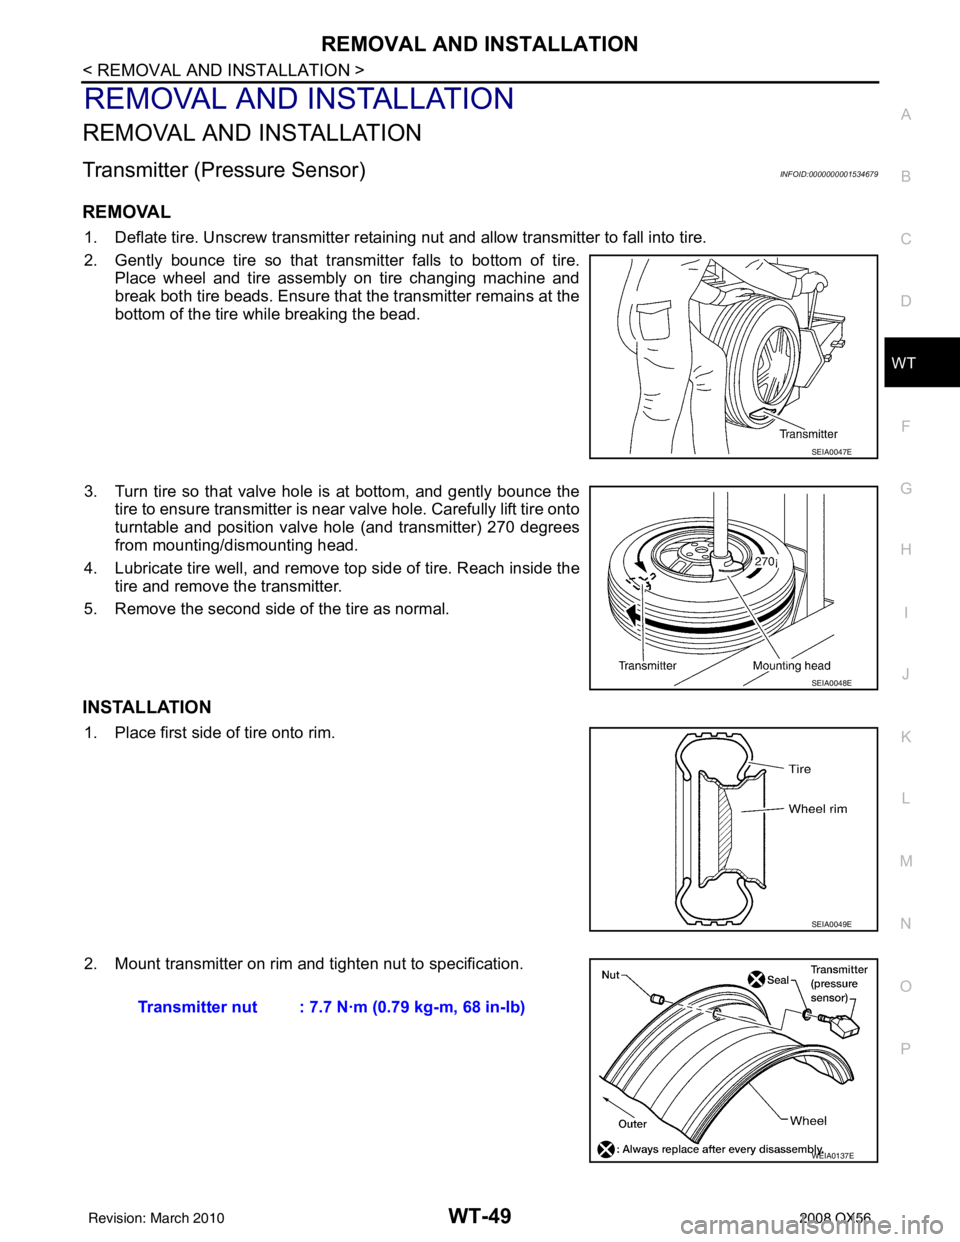
TIRE ROTATION
• Follow the maintenance schedule for tire rotation service intervals.
Refer to MA-6, "
General Maintenance".
• When installing the wheel, tighten wheel nuts to the specified torque.
CAUTION:
• When installing wheels, tighte n them diagonally by dividing
the work two to three times in order to prevent the wheels
from developing any distortion.
• Be careful not to tighten wh eel nut at torque exceeding the
criteria for preventing strain of disc rotor.
• Use NISSAN genuine wheel nuts for aluminum wheels.
JPEIC0040ZZ
Wheel balance Dynamic (At flange) Static (At flange)
Maximum allowable un-
balance Refer to WT-46, "
Adjustment".
PEIA0033E
Wheel nut tightening
torque: 133 N·m (14 kg-m, 98 ft-lb)
SMA829C
Revision: March 2010
2008 QX56
Page 3994 of 4083

WT-48
< ON-VEHICLE REPAIR >
WHEEL AND TIRE ASSEMBLY
Rotation
INFOID:0000000001534678
NOTE:
Follow the maintenance schedule for tire rotation service intervals. Refer to MA-29, "
Tire Rotation" .
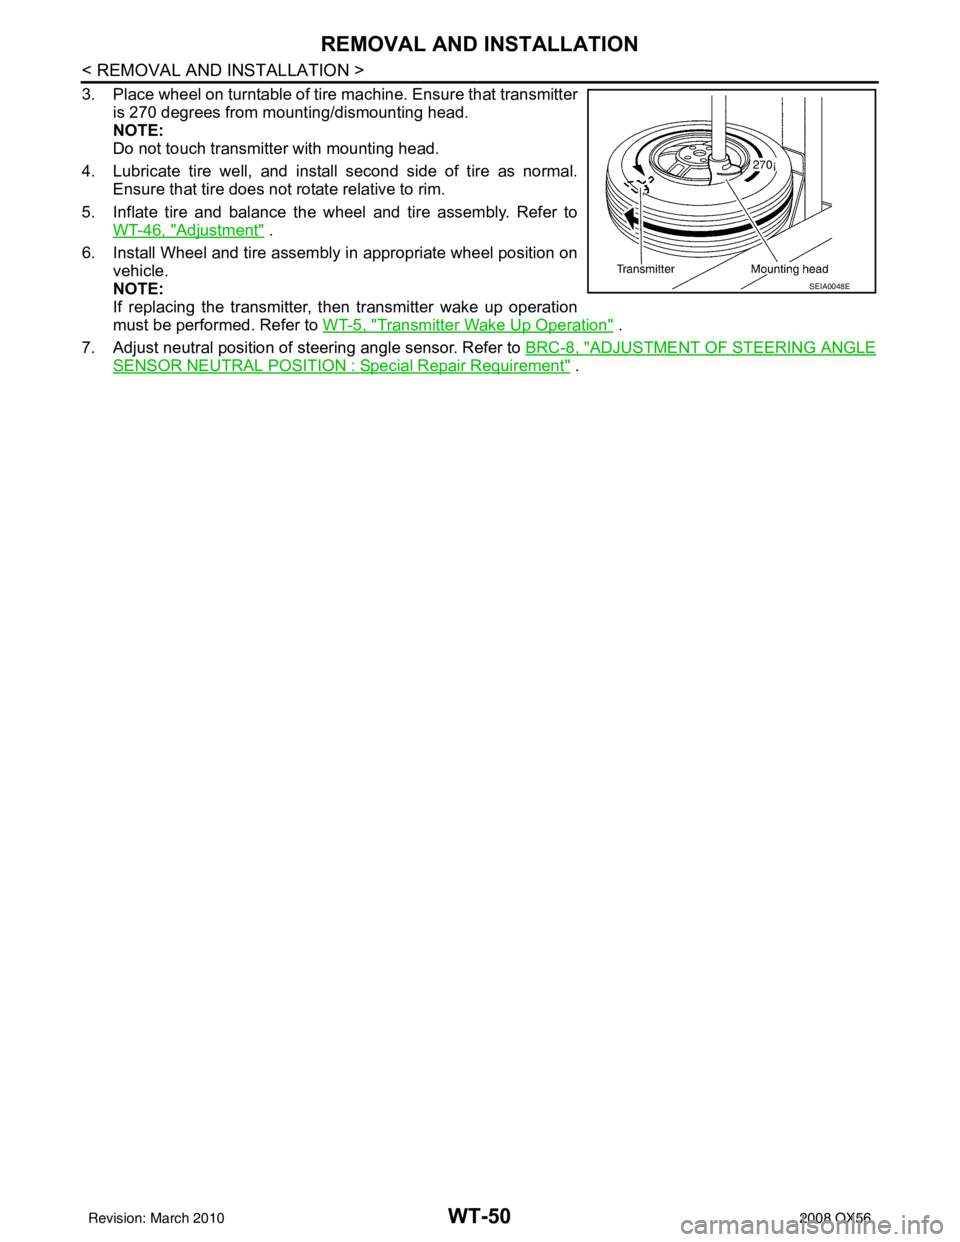
1. Rotate the tires on each side from front to back as shown. Do not include the spare tire when rotating the tires.
CAUTION:
When installing wheel s, tighten them diagonally by dividing
the work two to three times in order to prevent the wheels
from developing any distortion.
2. Adjust the tire pressure to specification. Refer to WT-51, "
Tire" .
3. After the tire rotation, retighten the wheel nuts after the vehicle has been driven for 1,000 km (600 miles), and also after every
wheel and tire have been installed such as after repairing a flat tire. Wheel nut torque : 133 N·m (14 kg-m, 98 ft-lb)
SMA829C
Revision: March 2010
2008 QX56
Page 3995 of 4083

REMOVAL AND INSTALLATIONWT-49
< REMOVAL AND INSTALLATION >
C
DF
G H
I
J
K L
M A
B
WT
N
O P
REMOVAL AND INSTALLATION
REMOVAL AND INSTALLATION
Transmitter (Pressure Sensor)INFOID:0000000001534679
REMOVAL
1. Deflate tire. Unscrew transmitter retaining nut and allow transmitter to fall into tire.
2. Gently bounce tire so that transmitter falls to bottom of tire. Place wheel and tire assembly on tire changing machine and
break both tire beads. Ensure that the transmitter remains at the
bottom of the tire while breaking the bead.
3. Turn tire so that valve hole is at bottom, and gently bounce the tire to ensure transmitter is near valve hole. Carefully lift tire onto
turntable and position valve hole (and transmitter) 270 degrees
from mounting/dismounting head.
4. Lubricate tire well, and remove top side of tire. Reach inside the tire and remove the transmitter.
5. Remove the second side of the tire as normal.
INSTALLATION
1. Place first side of tire onto rim.
2. Mount transmitter on rim and tighten nut to specification.
SEIA0047E
SEIA0048E
SEIA0049E
Transmitter nut : 7.7 N·m (0.79 kg-m, 68 in-lb)
WEIA0137E
Revision: March 2010 2008 QX56
Page 3996 of 4083

WT-50
< REMOVAL AND INSTALLATION >
REMOVAL AND INSTALLATION
3. Place wheel on turntable of tire machine. Ensure that transmitteris 270 degrees from mounting/dismounting head.
NOTE:
Do not touch transmitter with mounting head.
4. Lubricate tire well, and install second side of tire as normal. Ensure that tire does not rotate relative to rim.
5. Inflate tire and balance the wheel and tire assembly. Refer to WT-46, "
Adjustment" .
6. Install Wheel and tire assembly in appropriate wheel position on vehicle.
NOTE:
If replacing the transmitter, then transmitter wake up operation
must be performed. Refer to WT-5, "
Transmitter Wake Up Operation" .
7. Adjust neutral position of steering angle sensor. Refer to BRC-8, "
ADJUSTMENT OF STEERING ANGLE
SENSOR NEUTRAL POSITION : Special Repair Requirement" .
SEIA0048E
Revision: March 2010 2008 QX56
Page 3997 of 4083

SERVICE DATA AND SPECIFICATIONS (SDS)WT-51
< SERVICE DATA AND SPECIFICATIONS (SDS)
C
DF
G H
I
J
K L
M A
B
WT
N
O P
SERVICE DATA AND SPECIFICATIONS (SDS)
SERVICE DATA AND SPECIFICATIONS (SDS)
Road WheelINFOID:0000000001534670
TireINFOID:0000000001534671
Unit: kPa (kg/cm2, psi)
Wheel type Aluminum
Maximum radial runout limit Lateral mm (in)
0.3 (0.012) or less
Radial mm (in) 0.3 (0.012) or less
Maximum residual imbalance Dynamic (at rim flange)
Less than 5 g (0.18 oz) (per side)
Static (at rim flange) Less than 10 g (0.35 oz)
Tire size Air pressure
Conventional tire Spare tire
Full size spare tire —240 (2.4, 35)
P275/60R20 240 (2.4, 35)—
Revision: March 2010 2008 QX56
Page 3999 of 4083

WW-2
Reference Value .....................................................55
Terminal Layout ......................................................57
Physical Values ......................................................57
Wiring Diagram .......................................................62
Fail Safe .................................................................65
DTC Index ..............................................................67
SYMPTOM DIAGNOSIS .............................68
WIPER AND WASHER SYSTEM SYMPTOMS
...
68
Symptom Table ................................................... ...68
NORMAL OPERATING CONDITION ................71
Description ........................................................... ...71
FRONT WIPER DOES NOT OPERATE ............72
Description ........................................................... ...72
Diagnosis Procedure ..............................................72
PRECAUTION .............................................74
PRECAUTION ... .............................................. ...74
Precaution for Supplemental Restraint System
(SRS) "AIR BAG" and "SEAT BELT PRE-TEN-
SIONER" .............................................................. ...
74
Precaution Necessary for Steering Wheel Rota-
tion After Battery Disconnect ..................................
74
ON-VEHICLE REPAIR ................................76
FRONT WIPER ARM ...................................... ...76
Front Wiper Arms ................................................. ...76
FRONT WIPER DRIVE ASSEMBLY .................77
Wiper Motor and Linkage ..................................... ...77
FRONT WASHER TUBE ...................................78
Washer Tube Layout ............................................ ...78
FRONT WASHER NOZZLE ..............................79
Washer Nozzle Adjustment .................................. ...79
WASHER TANK ................................................80
Washer Fluid Reservoir ..........................................80
FRONT WASHER PUMP ..................................81
Washer Motor ...................................................... ...81
FRONT WIPER AND WASHER SWITCH .........82
Wiper and Washer Switch .................................... ...82
REAR WIPER AND WASHER SYSTEM ...........83
Rear Wiper Arm ................................................... ...83
Rear Wiper Motor ....................................................83
Rear Washer Nozzle Adjustment ............................84
Rear Washer Tube Layout ......................................85
Rear Washer Nozzle ...............................................85
Rear Wiper and Washer Switch ..............................85
Washer Fluid Reservoir ....................................... ...86
Washer Motor .........................................................86
Revision: March 2010 2008 QX56
Page 4071 of 4083

WW-74
< PRECAUTION >
PRECAUTION
PRECAUTION
PRECAUTION
Precaution for Supplemental Restraint System (SRS) "AIR BAG" and "SEAT BELT
PRE-TENSIONER"
INFOID:0000000004884200
The Supplemental Restraint System such as “A IR BAG” and “SEAT BELT PRE-TENSIONER”, used along
with a front seat belt, helps to reduce the risk or severity of injury to the driver and front passenger for certain
types of collision. This system includes seat belt switch inputs and dual stage front air bag modules. The SRS
system uses the seat belt switches to determine the front air bag deployment, and may only deploy one front
air bag, depending on the severity of a collision and w hether the front occupants are belted or unbelted.
Information necessary to service the system safely is included in the SR and SB section of this Service Man-
ual.
WARNING:
• To avoid rendering the SRS inopera tive, which could increase the risk of personal injury or death in
the event of a collision which would result in air bag inflation, all maintenance must be performed by
an authorized NISSAN/INFINITI dealer.
• Improper maintenance, including in correct removal and installation of the SRS, can lead to personal
injury caused by unintent ional activation of the system. For re moval of Spiral Cable and Air Bag
Module, see the SR section.
• Do not use electrical test equipmen t on any circuit related to the SRS unless instructed to in this
Service Manual. SRS wiring harn esses can be identified by yellow and/or orange harnesses or har-
ness connectors.
PRECAUTIONS WHEN USING POWER TOOLS (AIR OR ELECTRIC) AND HAMMERS
WARNING:
• When working near the Airbag Diagnosis Sensor Unit or other Airbag System sensors with the Igni-
tion ON or engine running, DO NOT use air or electri c power tools or strike near the sensor(s) with a
hammer. Heavy vibration could activate the sensor( s) and deploy the air bag(s), possibly causing
serious injury.
• When using air or electric power tools or hammers , always switch the Ignition OFF, disconnect the
battery, and wait at least 3 minu tes before performing any service.
Precaution Necessary for Steering W heel Rotation After Battery Disconnect
INFOID:0000000004884201
NOTE:
• This Procedure is applied only to models with Intelligent Key system and NATS (NISSAN ANTI-THEFT SYS-
TEM).
• Remove and install all control units after disconnecting both battery cables with the ignition knob in the
″LOCK ″ position.
• Always use CONSULT-III to perform self-diagnosis as a part of each function inspection after finishing work.
If DTC is detected, perform trouble diagnosis according to self-diagnostic results.
For models equipped with the Intelligent Key system and NATS, an electrically controlled steering lock mech-
anism is adopted on the key cylinder.
For this reason, if the battery is disconnected or if the battery is discharged, the steering wheel will lock and
steering wheel rotation will become impossible.
If steering wheel rotation is required when battery pow er is interrupted, follow the procedure below before
starting the repair operation.
OPERATION PROCEDURE
1. Connect both battery cables. NOTE:
Supply power using jumper cables if battery is discharged.
2. Use the Intelligent Key or mechanical key to turn the ignition switch to the ″ACC ″ position. At this time, the
steering lock will be released.
3. Disconnect both battery cables. The steering lock will remain released and the steering wheel can be rotated.
4. Perform the necessary repair operation.
Revision: March 2010 2008 QX56