2008 INFINITI QX56 change wheel
[x] Cancel search: change wheelPage 1535 of 4083
![INFINITI QX56 2008 Factory Service Manual EC-236
< COMPONENT DIAGNOSIS >[VK56DE]
P0444, P0445 EVAP CANISTER P
URGE VOLUME CONTROL SOLENOID
VALVE
P0444, P0445 EVAP CANISTER PURG E VOLUME CONTROL SOLENOID
VA LV E
DescriptionINFOID:000000000135 INFINITI QX56 2008 Factory Service Manual EC-236
< COMPONENT DIAGNOSIS >[VK56DE]
P0444, P0445 EVAP CANISTER P
URGE VOLUME CONTROL SOLENOID
VALVE
P0444, P0445 EVAP CANISTER PURG E VOLUME CONTROL SOLENOID
VA LV E
DescriptionINFOID:000000000135](/manual-img/42/57030/w960_57030-1534.png)
EC-236
< COMPONENT DIAGNOSIS >[VK56DE]
P0444, P0445 EVAP CANISTER P
URGE VOLUME CONTROL SOLENOID
VALVE
P0444, P0445 EVAP CANISTER PURG E VOLUME CONTROL SOLENOID
VA LV E
DescriptionINFOID:0000000001351588
SYSTEM DESCRIPTION
*1: ECM determines the start signal status by the signals of engine speed and battery voltage.
*2: This signal is sent to the ECM through CAN communication line.
This system controls flow rate of fuel vapor from the EVAP canister. The opening of the vapor by-pass pas-
sage in the EVAP canister purge volume control solenoid valve changes to control the flow rate. The EVAP
canister purge volume control solenoid valve repeats ON/O FF operation according to the signal sent from the
ECM. The opening of the valve varies for optimum engi ne control. The optimum value stored in the ECM is
determined by considering various engine conditions. When t he engine is operating, the flow rate of fuel vapor
from the EVAP canister is r egulated as the air flow changes.
COMPONENT DESCRIPTION
The EVAP canister purge volume control solenoid valve uses a ON/
OFF duty to control the flow rate of fuel vapor from the EVAP canis-
ter. The EVAP canister purge volume control solenoid valve is
moved by ON/OFF pulses from the ECM. The longer the ON pulse,
the greater the amount of fuel vapor that will flow through the valve.
On Board Diagnosis LogicINFOID:0000000001351590
Sensor Input signal to ECMECM functionActuator
Crankshaft position sensor (POS)
Camshaft position sensor (PHASE) Engine speed*
1
EVAP canister
purge flow controlEVAP canister purge vol-
ume control solenoid valve
Mass air flow sensor
Amount of intake air
Engine coolant temperature sensor Engine coolant temperature
Battery Battery voltage*
1
Throttle position sensor Throttle position
Accelerator pedal position sensor Accelerator pedal position
Air fuel ratio (A/F) sensor 1 Density of oxygen in exhaust gas
(Mixture ratio fe
edback signal)
Fuel tank temperature sensor Fuel temperature in fuel tank
Wheel sensor Vehicle speed*
2
PBIB2057E
DTC No. Trouble diagnosis name DTC detecting conditionPossible cause
P0444
0444 EVAP canister purge volume
control solenoid valve circuit
open An excessively low voltage signal is sent
to ECM through the valve • Harness or connectors
(The solenoid valve circuit is open or
shorted.)
• EVAP canister purge volume control so-
lenoid valve
P0445
0445 EVAP canister purge volume
control solenoid valve circuit
shorted An excessively high voltage signal is sent
to ECM through the valve • Harness or connectors
(The solenoid valve circuit is shorted.)
• EVAP canister purge volume control so-
lenoid valve
Revision: March 2010 2008 QX56
Page 2125 of 4083

FSU-8
< ON-VEHICLE MAINTENANCE >
ON-VEHICLE SERVICE
• Your alignment machine should be regularly calibrated in order to give correct information.
• Check with the manufacturer of your specific alignment machine for their recommended Service/Cali-
bration Schedule.
THE ALIGNMENT PROCESS
IMPORTANT: Use only the alignment specifications listed in this Service Manual. Refer to FSU-25,
"Wheelarch Height (Unladen*1)" .
1. When displaying the alignment settings, many alignment machines use “indicators”: (Green/red, plus or minus, Go/No Go). Do NOT use these indicators.
• The alignment specifications programmed into your alignment machine that operate these indicators may not be correct.
• This may result in an ERROR.
2. Some newer alignment machines are equipped with an optional “Rolling Compensation” method to “com- pensate” the sensors (alignment targets or head units). Do NOT use this “Rolling Compensation”
method.
• Use the “Jacking Compensation” method. After inst alling the alignment targets or head units, raise the
vehicle and rotate the wheels 1/2 turn both ways.
• See Instructions in the alignment machine you are using for more information.
CAMBER AND CASTER
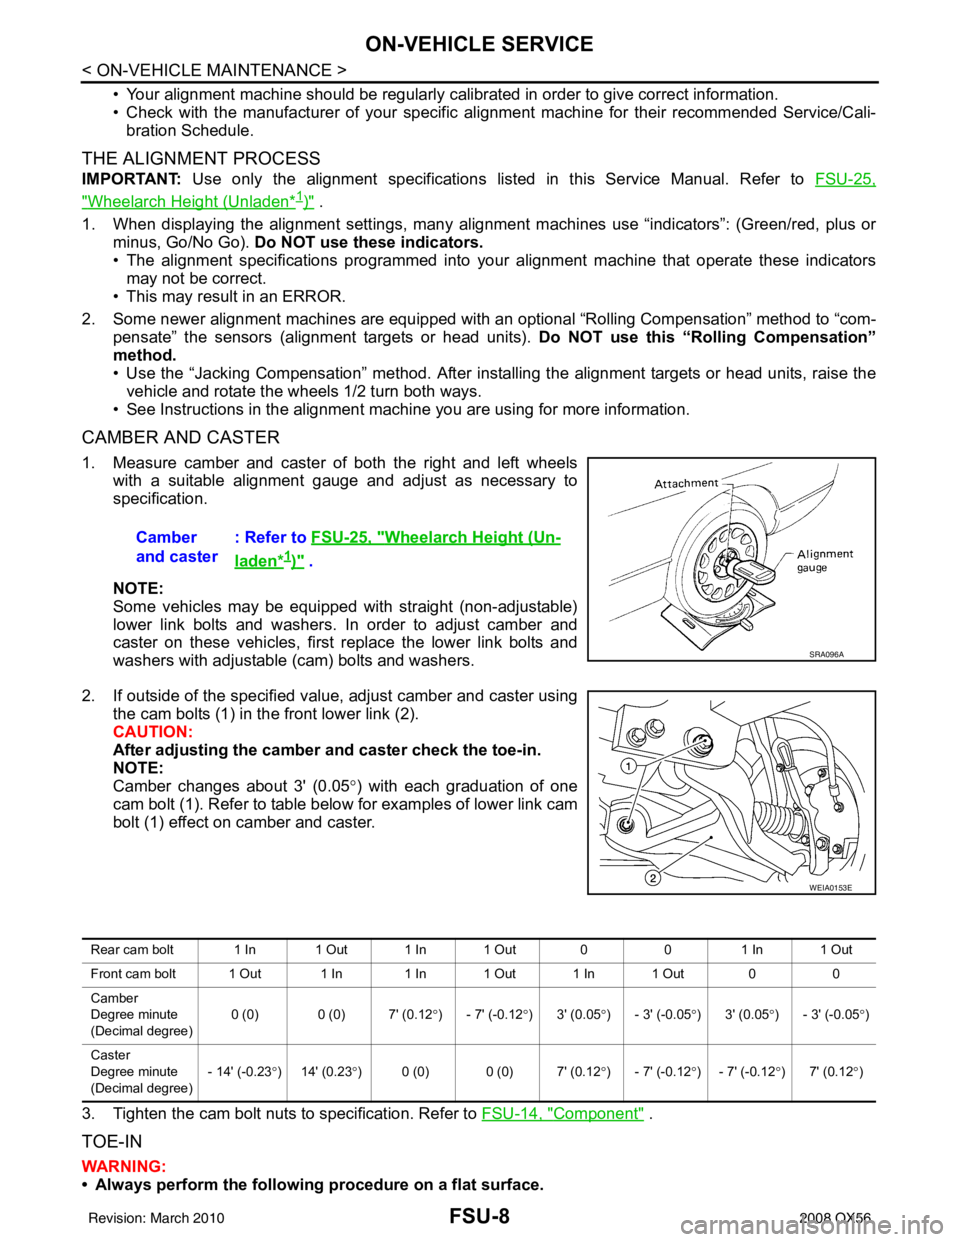
1. Measure camber and caster of both the right and left wheels
with a suitable alignment gauge and adjust as necessary to
specification.
NOTE:
Some vehicles may be equipped with straight (non-adjustable)
lower link bolts and washers. In order to adjust camber and
caster on these vehicles, first replace the lower link bolts and
washers with adjustable (cam) bolts and washers.
2. If outside of the specified value, adjust camber and caster using the cam bolts (1) in the front lower link (2).
CAUTION:
After adjusting the camber and caster check the toe-in.
NOTE:
Camber changes about 3' (0.05 °) with each graduation of one
cam bolt (1). Refer to table below for examples of lower link cam
bolt (1) effect on camber and caster.
3. Tighten the cam bolt nuts to specification. Refer to FSU-14, "
Component" .
TOE-IN
WARNING:
• Always perform the following procedure on a flat surface.
Camber
and caster
: Refer to
FSU-25, "
Wheelarch Height (Un-
laden*1)" .
SRA096A
WEIA0153E
Rear cam bolt 1 In 1 Out 1 In 1 Out 0 01 In 1 Out
Front cam bolt 1 Out 1 In 1 In 1 Out 1 In 1 Out 0 0
Camber
Degree minute
(Decimal degree) 0 (0) 0 (0) 7' (0.12
°) - 7' (-0.12 °)3' (0.05 °) - 3' (-0.05 °)3' (0.05 °) - 3' (-0.05 °)
Caster
Degree minute
(Decimal degree) - 14' (-0.23
°) 14' (0.23 °) 0 (0) 0 (0) 7' (0.12 °) - 7' (-0.12 °) - 7' (-0.12 °)7' (0.12 °)
Revision: March 2010 2008 QX56
Page 2604 of 4083

MA-6
< ON-VEHICLE MAINTENANCE >
GENERAL MAINTENANCE
ON-VEHICLE MAINTENANCE
GENERAL MAINTENANCE
General MaintenanceINFOID:0000000001606163
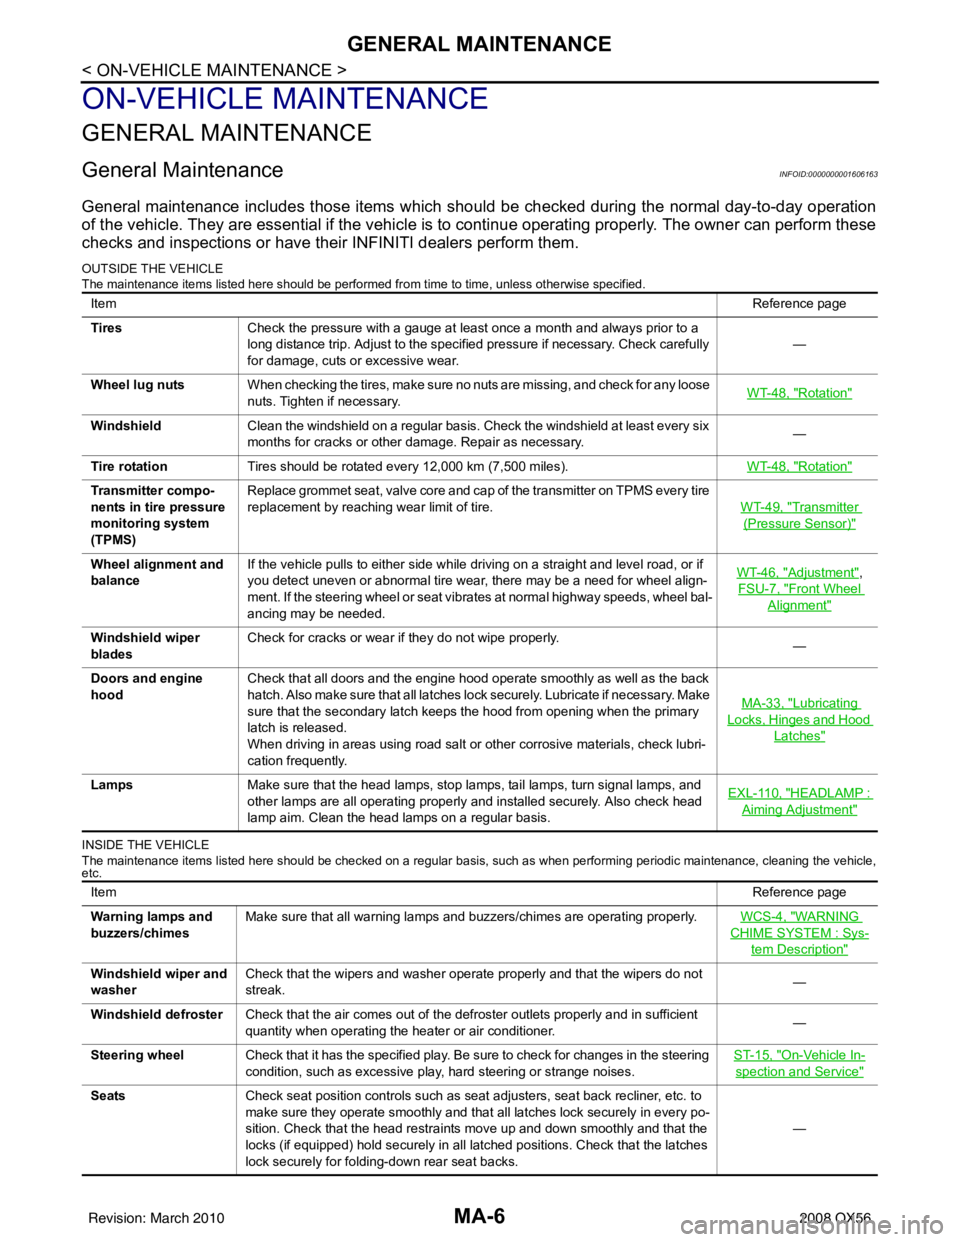
General maintenance includes those items which should be checked during the normal day-to-day operation
of the vehicle. They are essential if the vehicle is to continue operating properly. The owner can perform these
checks and inspections or have thei r INFINITI dealers perform them.
OUTSIDE THE VEHICLE
The maintenance items listed here should be performed fr om time to time, unless otherwise specified.
INSIDE THE VEHICLE
The maintenance items listed here should be checked on a regular basis, such as when performing periodic maintenance, cleaning the vehicle,
etc.
Item Reference page
Tires Check the pressure with a gauge at least once a month and always prior to a
long distance trip. Adjust to the specified pressure if necessary. Check carefully
for damage, cuts or excessive wear. —
Wheel lug nuts When checking the tires, make sure no nuts are missing, and check for any loose
nuts. Tighten if necessary. WT-48, "
Rotation"
Windshield
Clean the windshield on a regular basis. Check the windshield at least every six
months for cracks or other damage. Repair as necessary. —
Tire rotation Tires should be rotated every 12,000 km (7,500 miles). WT-48, "
Rotation"
Transmitter compo-
nents in tire pressure
monitoring system
(TPMS)Replace grommet seat, valve core and cap of the transmitter on TPMS every tire
replacement by reaching wear limit of tire.
WT-49, "
Transmitter
(Pressure Sensor)"
Wheel alignment and
balanceIf the vehicle pulls to either side while driving on a straight and level road, or if
you detect uneven or abnormal tire wear, there may be a need for wheel align-
ment. If the steering wheel or seat vibrates at normal highway speeds, wheel bal-
ancing may be needed. WT-46, "Adjustment",
FSU-7, "
Front Wheel
Alignment"
Windshield wiper
blades Check for cracks or wear if they do not wipe properly.
—
Doors and engine
hood Check that all doors and the engine hood operate smoothly as well as the back
hatch. Also make sure that all latches lock securely. Lubricate if necessary. Make
sure that the secondary latch keeps the hood from opening when the primary
latch is released.
When driving in areas using road salt or other corrosive materials, check lubri-
cation frequently. MA-33, "
Lubricating
Locks, Hinges and Hood
Latches"
Lamps
Make sure that the head lamps, stop lamps, tail lamps, turn signal lamps, and
other lamps are all operating properly and installed securely. Also check head
lamp aim. Clean the head lamps on a regular basis. EXL-110, "HEADLAMP :
Aiming Adjustment"
Item
Reference page
Warning lamps and
buzzers/chimes Make sure that all warning lamps and buzzers/chimes are operating properly.
WCS-4, "
WARNING
CHIME SYSTEM : Sys-
tem Description"
Windshield wiper and
washerCheck that the wipers and washer operate properly and that the wipers do not
streak.
—
Windshield defroster Check that the air comes out of the defroster outlets properly and in sufficient
quantity when operating the heater or air conditioner. —
Steering wheel Check that it has the specified play. Be sure to check for changes in the steering
condition, such as excessive play, hard steering or strange noises. ST-15, "
On-Vehicle In-
spection and Service"
Seats
Check seat position controls such as seat adjusters, seat back recliner, etc. to
make sure they operate smoothly and that all latches lock securely in every po-
sition. Check that the head restraints move up and down smoothly and that the
locks (if equipped) hold securely in all latched positions. Check that the latches
lock securely for folding-down rear seat backs. —
Revision: March 2010
2008 QX56
Page 3046 of 4083

REAR SUSPENSION ASSEMBLYRSU-7
< ON-VEHICLE MAINTENANCE >
C
DF
G H
I
J
K L
M A
B
RSU
N
O P
• If vehicle height is not within ± 10 mm (0.39 in) of the specification, perform the control unit initialization
procedure. Refer to SCS-7, "
CONSULT-III Function" .
GENERAL INFORMATION AND RECOMMENDATIONS
1. A Four-Wheel Thrust Alignment should be performed.
• This type of alignment is re commended for any NISSAN vehicle.
• The four-wheel “thrust” process helps ensure that the vehicle is properly aligned and the steering wheel
is centered.
• The alignment machine itself should be ca pable of accepting any NISSAN vehicle.
• The alignment machine should be checked to ensure that it is level.
2. Make sure the alignment machine is properly calibrated. • Your alignment machine should be regularly calibrated in order to give correct information.
• Check with the manufacturer of your specific a lignment machine for their recommended Service/Cali-
bration Schedule.
THE ALIGNMENT PROCESS
IMPORTANT: Use only the alignment specifications listed in this Service Manual. Refer to RSU-28, "Wheel
Alignment" .
1. When displaying the alignment settings, many alignm ent machines use “indicators”: (Green/red, plus or
minus, Go/No Go). Do NOT use these indicators.
• The alignment specifications programmed into your alignment machine that operate these indicators
may not be correct.
• This may result in an ERROR.
2. Some newer alignment machines are equipped with an optional “Rolling Compensation” method to “com-
pensate” the sensors (alignment targets or head units). Do NOT use this “Rolling Compensation”
method.
• Use the “Jacking Compensation” method. After installing the alignment targets or head units, raise the vehicle and rotate the wheels 1/2 turn both ways.
• See Instructions in the alignment machine you are using for more information.
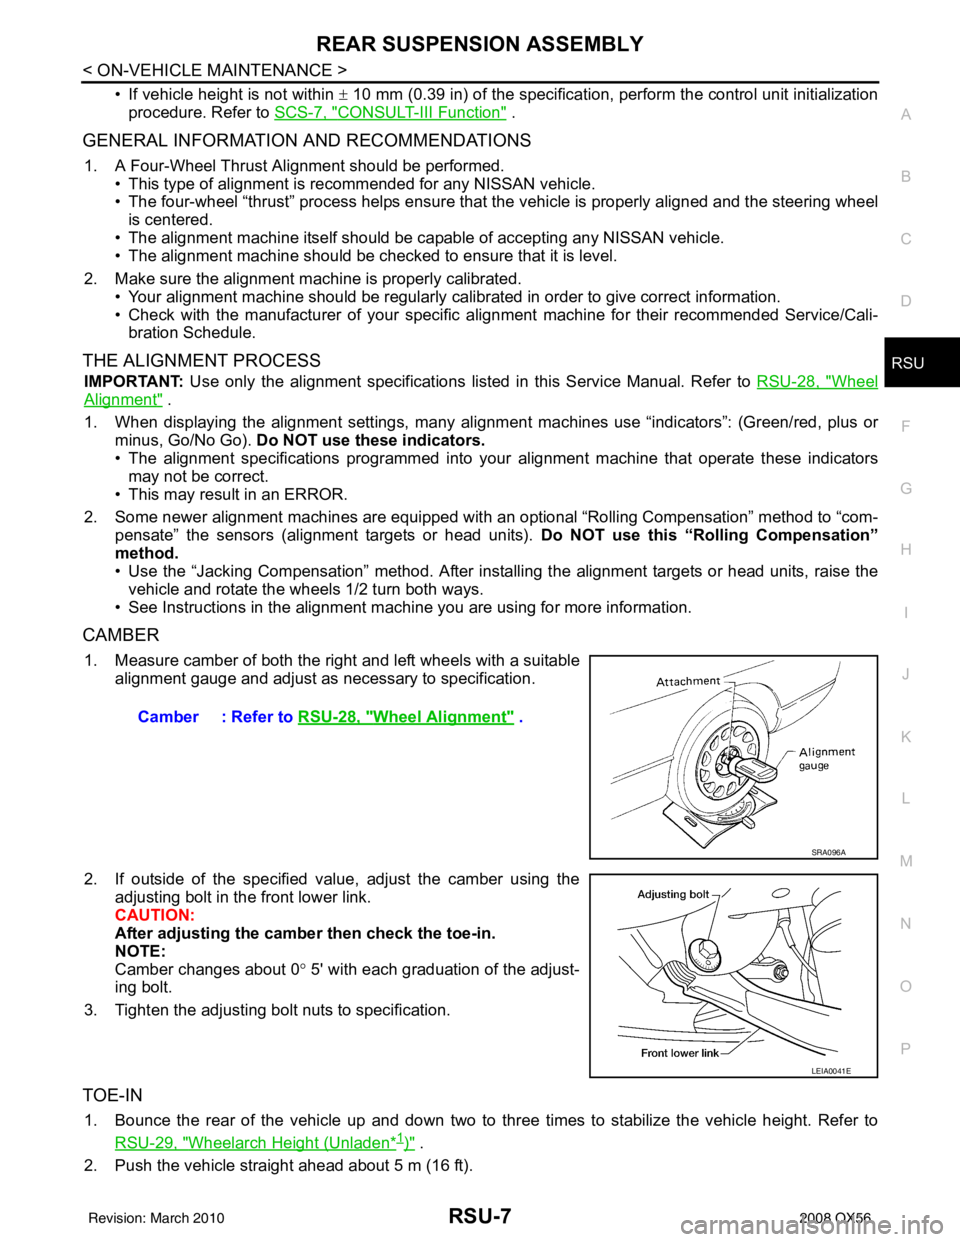
CAMBER
1. Measure camber of both the right and left wheels with a suitable alignment gauge and adjust as necessary to specification.
2. If outside of the specified value, adjust the camber using the adjusting bolt in the front lower link.
CAUTION:
After adjusting the camber then check the toe-in.
NOTE:
Camber changes about 0 ° 5' with each graduation of the adjust-
ing bolt.
3. Tighten the adjusting bolt nuts to specification.
TOE-IN
1. Bounce the rear of the vehicle up and down two to three times to stabilize the vehicle height. Refer to RSU-29, "
Wheelarch Height (Unladen*1)" .
2. Push the vehicle straight ahead about 5 m (16 ft). Camber : Refer to
RSU-28, "
Wheel Alignment" .
SRA096A
LEIA0041E
Revision: March 2010 2008 QX56
Page 3047 of 4083

RSU-8
< ON-VEHICLE MAINTENANCE >
REAR SUSPENSION ASSEMBLY
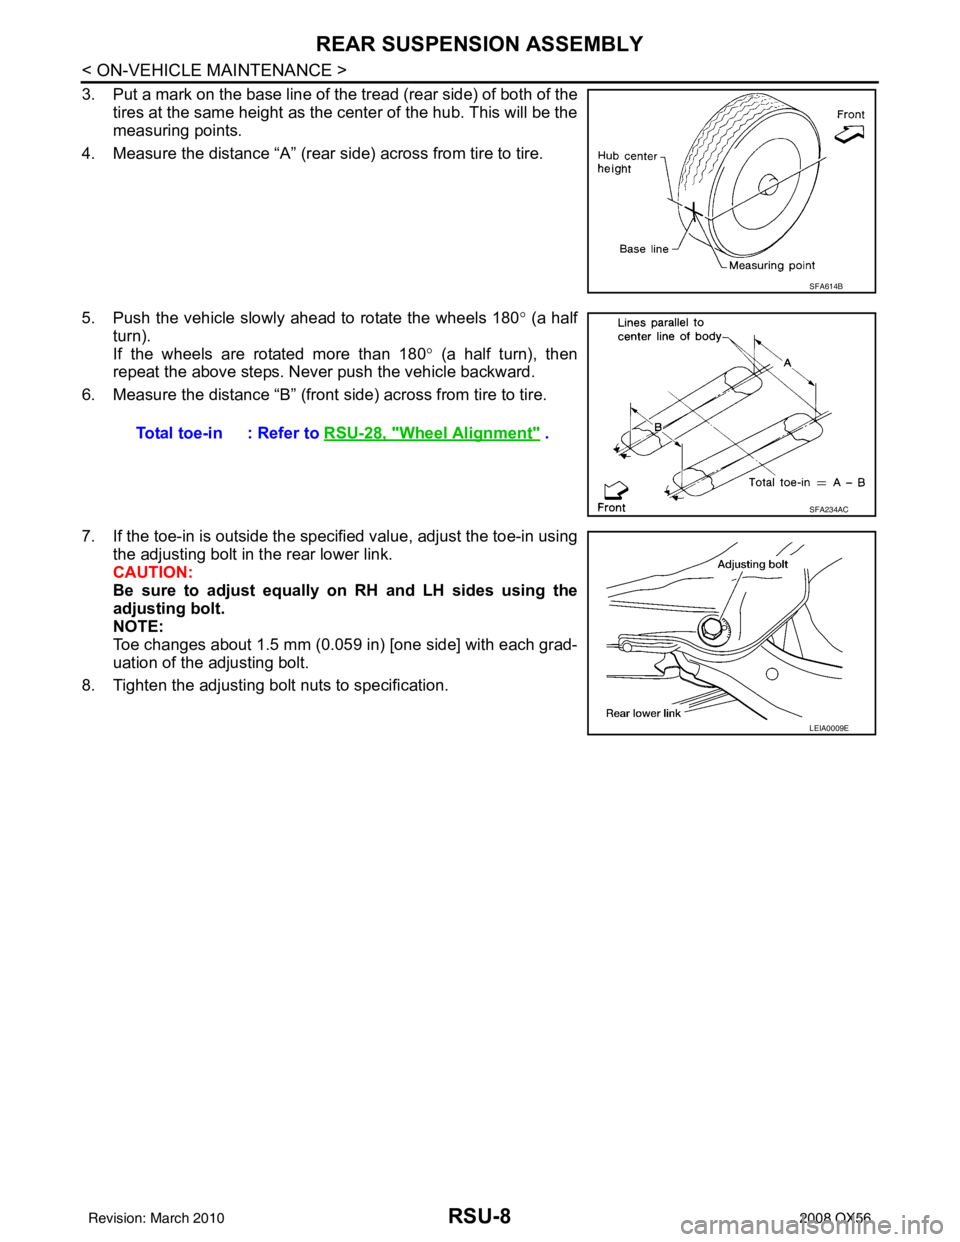
3. Put a mark on the base line of the tread (rear side) of both of the
tires at the same height as the center of the hub. This will be the
measuring points.
4. Measure the distance “A” (rear side) across from tire to tire.
5. Push the vehicle slowly ahead to rotate the wheels 180 ° (a half
turn).
If the wheels are rotated more than 180° (a half turn), then
repeat the above steps. Never push the vehicle backward.
6. Measure the distance “B” (front side) across from tire to tire.
7. If the toe-in is outside the specified value, adjust the toe-in using the adjusting bolt in the rear lower link.
CAUTION:
Be sure to adjust equally on RH and LH sides using the
adjusting bolt.
NOTE:
Toe changes about 1.5 mm (0.059 in) [one side] with each grad-
uation of the adjusting bolt.
8. Tighten the adjusting bolt nuts to specification.
SFA614B
Total toe-in : Refer to RSU-28, "Wheel Alignment" .
SFA234AC
LEIA0009E
Revision: March 2010 2008 QX56