2008 INFINITI QX56 Electrical
[x] Cancel search: ElectricalPage 3494 of 4083
PRECAUTIONSST-3
< PRECAUTION >
C
DE
F
H I
J
K L
M A
B
ST
N
O P
PRECAUTION
PRECAUTIONS
Precaution for Supplemental Restraint System (SRS) "AIR BAG" and "SEAT BELT
PRE-TENSIONER"
INFOID:0000000004884170
The Supplemental Restraint System such as “AIR BAG” and “SEAT BELT PRE-TENSIONER”, used along
with a front seat belt, helps to reduce the risk or severi ty of injury to the driver and front passenger for certain
types of collision. This system includes seat belt switch inputs and dual stage front air bag modules. The SRS
system uses the seat belt switches to determine the front air bag deployment, and may only deploy one front
air bag, depending on the severity of a collision and w hether the front occupants are belted or unbelted.
Information necessary to service the system safely is included in the SR and SB section of this Service Man-
ual.
WARNING:
• To avoid rendering the SRS inoper ative, which could increase the risk of personal injury or death in
the event of a collision which would result in air bag inflation, all maintenance must be performed by
an authorized NISSAN/INFINITI dealer.
• Improper maintenance, including in correct removal and installation of the SRS, can lead to personal
injury caused by unintentional act ivation of the system. For removal of Spiral Cable and Air Bag
Module, see the SR section.
• Do not use electrical test equipm ent on any circuit related to the SRS unless instructed to in this
Service Manual. SRS wiring harnesses can be identi fied by yellow and/or orange harnesses or har-
ness connectors.
PRECAUTIONS WHEN USING POWER TOOLS (AIR OR ELECTRIC) AND HAMMERS
WARNING:
• When working near the Airbag Diagnosis Sensor Un it or other Airbag System sensors with the Igni-
tion ON or engine running, DO NOT use air or el ectric power tools or strike near the sensor(s) with a
hammer. Heavy vibration could activate the sensor( s) and deploy the air bag(s), possibly causing
serious injury.
• When using air or electric power tools or hammers, always switch the Ignition OFF, disconnect the battery, and wait at least 3 minutes before performing any service.
Precaution Necessary for Steering Wheel Rotation After Battery Disconnect
INFOID:0000000004884171
NOTE:
• This Procedure is applied only to models with Intelligent Key system and NATS (NISSAN ANTI-THEFT SYS-
TEM).
• Remove and install all control units after disconnecti ng both battery cables with the ignition knob in the
″ LOCK ″ position.
• Always use CONSULT-III to perform self-diagnosis as a part of each function inspection after finishing work.
If DTC is detected, perform trouble diagnosis according to self-diagnostic results.
For models equipped with the Intelligent Key system and NATS , an electrically controlled steering lock mech-
anism is adopted on the key cylinder.
For this reason, if the battery is disconnected or if the battery is discharged, the steering wheel will lock and
steering wheel rotation will become impossible.
If steering wheel rotation is required when battery power is interrupted, follow the procedure below before
starting the repair operation.
OPERATION PROCEDURE
1. Connect both battery cables. NOTE:
Supply power using jumper cables if battery is discharged.
2. Use the Intelligent Key or mechanical key to turn the ignition switch to the ″ACC ″ position. At this time, the
steering lock will be released.
3. Disconnect both battery cables. The steering lock will remain released and the steering wheel can be
rotated.
4. Perform the necessary repair operation.
Revision: March 2010 2008 QX56
Page 3510 of 4083
TILT SYSTEMST-19
< REMOVAL AND INSTALLATION >
C
DE
F
H I
J
K L
M A
B
ST
N
O P
TILT SYSTEM
Removal and InstallationINFOID:0000000004920099
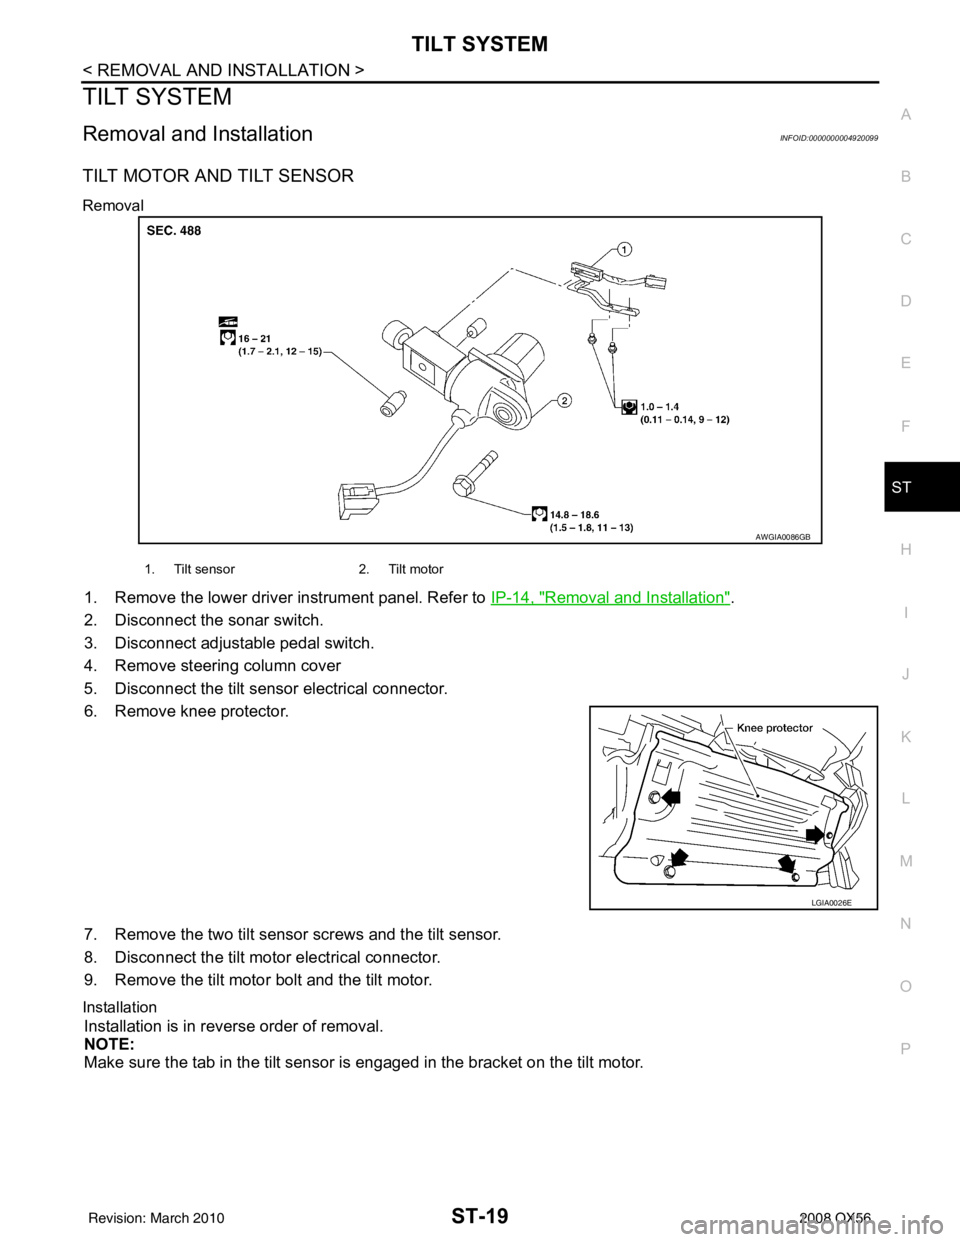
TILT MOTOR AND TILT SENSOR
Removal
1. Remove the lower driver instrument panel. Refer to IP-14, "Removal and Installation".
2. Disconnect the sonar switch.
3. Disconnect adjustable pedal switch.
4. Remove steering column cover
5. Disconnect the tilt sensor electrical connector.
6. Remove knee protector.
7. Remove the two tilt sensor screws and the tilt sensor.
8. Disconnect the tilt motor electrical connector.
9. Remove the tilt motor bolt and the tilt motor.
Installation
Installation is in reverse order of removal.
NOTE:
Make sure the tab in the tilt sensor is engaged in the bracket on the tilt motor.
AWGIA0086GB
1. Tilt sensor 2. Tilt motor
LGIA0026E
Revision: March 2010 2008 QX56
Page 3517 of 4083
ST-26
< REMOVAL AND INSTALLATION >
POWER STEERING OIL PUMP
POWER STEERING OIL PUMP
Removal and InstallationINFOID:0000000004920102
REMOVAL
1. Drain power steering fluid from reservoir tank.
2. Remove engine room cover. Refer to EM-24, "
Removal and Installation".
3. Remove air duct assembly. Refer to EM-25, "
Removal and Installation".
4. Remove power steering reservoir tank.
5. Remove serpentine drive belt belt from auto tensioner and power steering pump. Refer to EM-13,
"Removal and Installation".
6. Disconnect pressure sensor electrical connector.
7. Remove high pressure and low pressure piping from power steering oil pump. Refer to ST-27
.
8. Remove bolts, then remove power steering pump.
INSTALLATION
Installation is in the reverse order of removal. Refer to ST-27 for tightening torque.
• After installation, bleed air. Refer to ST-13, "
Air Bleeding Hydraulic System".
NOTE:
Belt tension is automatic and requires no adjustment.
Revision: March 2010 2008 QX56
Page 3531 of 4083
STR-2
< PRECAUTION >
PRECAUTIONS
PRECAUTION
PRECAUTIONS
Precaution for Supplemental Restraint System (SRS) "AIR BAG" and "SEAT BELT
PRE-TENSIONER"
INFOID:0000000004857581
The Supplemental Restraint System such as “A IR BAG” and “SEAT BELT PRE-TENSIONER”, used along
with a front seat belt, helps to reduce the risk or severity of injury to the driver and front passenger for certain
types of collision. This system includes seat belt switch inputs and dual stage front air bag modules. The SRS
system uses the seat belt switches to determine the front air bag deployment, and may only deploy one front
air bag, depending on the severity of a collision and w hether the front occupants are belted or unbelted.
Information necessary to service the system safely is included in the SR and SB section of this Service Man-
ual.
WARNING:
• To avoid rendering the SRS inopera tive, which could increase the risk of personal injury or death in
the event of a collision which would result in air bag inflation, all maintenance must be performed by
an authorized NISSAN/INFINITI dealer.
• Improper maintenance, including in correct removal and installation of the SRS, can lead to personal
injury caused by unintent ional activation of the system. For re moval of Spiral Cable and Air Bag
Module, see the SR section.
• Do not use electrical test equipmen t on any circuit related to the SRS unless instructed to in this
Service Manual. SRS wiring harn esses can be identified by yellow and/or orange harnesses or har-
ness connectors.
PRECAUTIONS WHEN USING POWER TOOLS (AIR OR ELECTRIC) AND HAMMERS
WARNING:
• When working near the Airbag Diagnosis Sensor Unit or other Airbag System sensors with the Igni-
tion ON or engine running, DO NOT use air or electri c power tools or strike near the sensor(s) with a
hammer. Heavy vibration could activate the sensor( s) and deploy the air bag(s), possibly causing
serious injury.
• When using air or electric power tools or hammers , always switch the Ignition OFF, disconnect the
battery, and wait at least 3 minu tes before performing any service.
Precaution Necessary for Steering W heel Rotation After Battery Disconnect
INFOID:0000000004857584
NOTE:
• This Procedure is applied only to models with Intelligent Key system and NATS (NISSAN ANTI-THEFT SYS-
TEM).
• Remove and install all control units after disconnecting both battery cables with the ignition knob in the
″LOCK ″ position.
• Always use CONSULT-III to perform self-diagnosis as a part of each function inspection after finishing work.
If DTC is detected, perform trouble diagnosis according to self-diagnostic results.
For models equipped with the Intelligent Key system and NATS, an electrically controlled steering lock mech-
anism is adopted on the key cylinder.
For this reason, if the battery is disconnected or if the battery is discharged, the steering wheel will lock and
steering wheel rotation will become impossible.
If steering wheel rotation is required when battery pow er is interrupted, follow the procedure below before
starting the repair operation.
OPERATION PROCEDURE
1. Connect both battery cables. NOTE:
Supply power using jumper cables if battery is discharged.
2. Use the Intelligent Key or mechanical key to turn the ignition switch to the ″ACC ″ position. At this time, the
steering lock will be released.
3. Disconnect both battery cables. The steering lock will remain released and the steering wheel can be rotated.
4. Perform the necessary repair operation.
Revision: March 2010 2008 QX56
Page 3532 of 4083

PRECAUTIONSSTR-3
< PRECAUTION >
C
DE
F
G H
I
J
K L
M A
STR
NP
O
5. When the repair work is completed, return the ignition switch to the
″LOCK ″ position before connecting
the battery cables. (At this time, the steering lock mechanism will engage.)
6. Perform a self-diagnosis check of al l control units using CONSULT-III.
Precaution for Power Generation Variable Voltage Control SystemINFOID:0000000001538874
CAUTION:
For this model, the battery current sensor that is installed to the negative battery cable measures the
charging/discharging current of the battery and performs various engine controls. If an electrical com-
ponent is connected directly to the negative battery terminal, the current flowing through that compo-
nent will not be measured by the battery current sensor. This condition may cause a malfunction of
the engine control system and battery discharge m ay occur. Do not connect an electrical component
or ground wire directly to the battery terminal.
Revision: March 2010 2008 QX56
Page 3579 of 4083
TM-32
< FUNCTION DIAGNOSIS >
DIAGNOSIS SYSTEM (TCM)
DIAGNOSIS SYSTEM (TCM)
CONSULT-III Function (TRANSMISSION)INFOID:0000000001604007
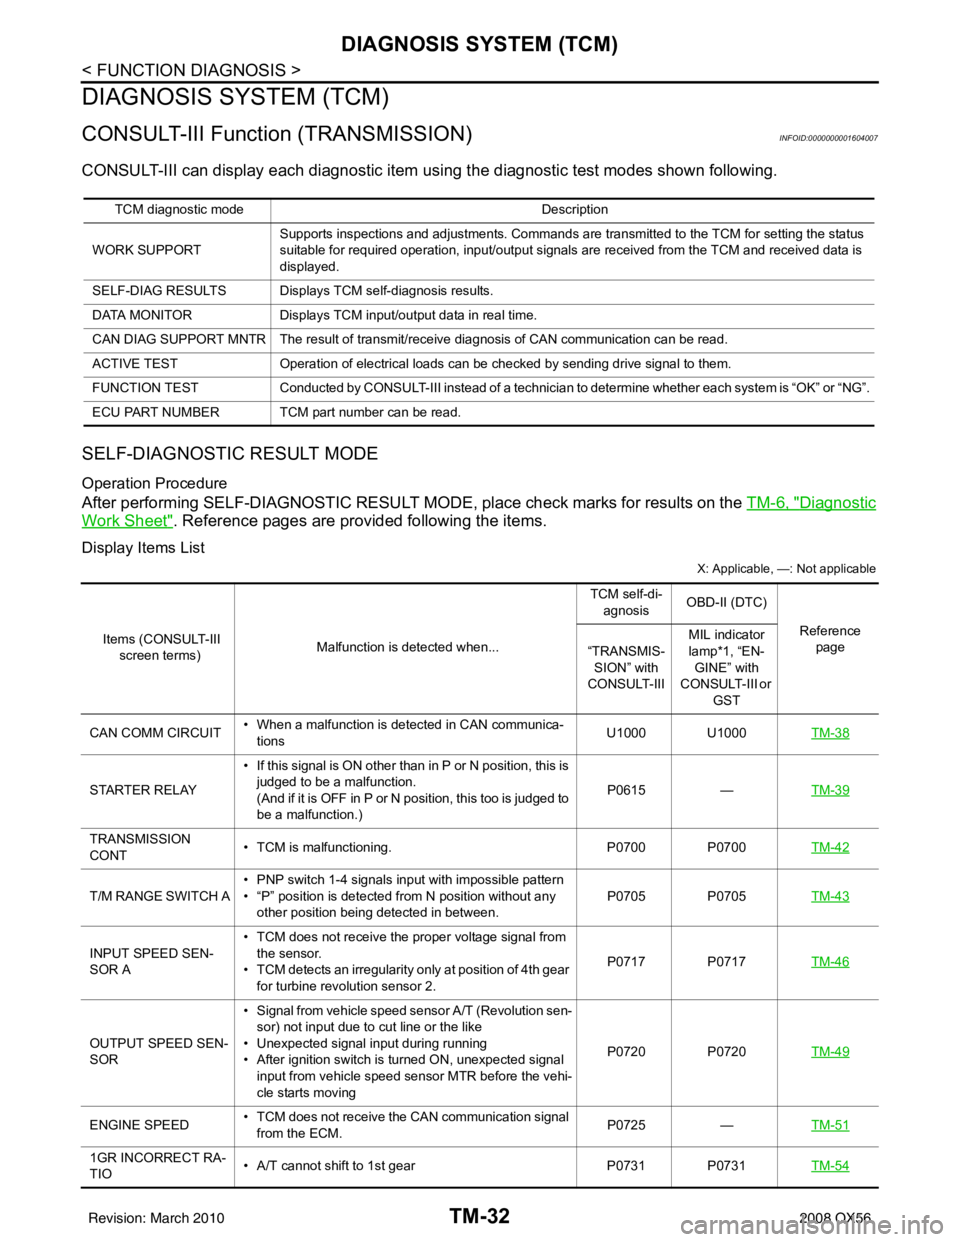
CONSULT-III can display each diagnostic item us ing the diagnostic test modes shown following.
SELF-DIAGNOSTIC RESULT MODE
Operation Procedure
After performing SELF-DIAGNOSTIC RESULT MO DE, place check marks for results on the TM-6, "Diagnostic
Work Sheet". Reference pages are provided following the items.
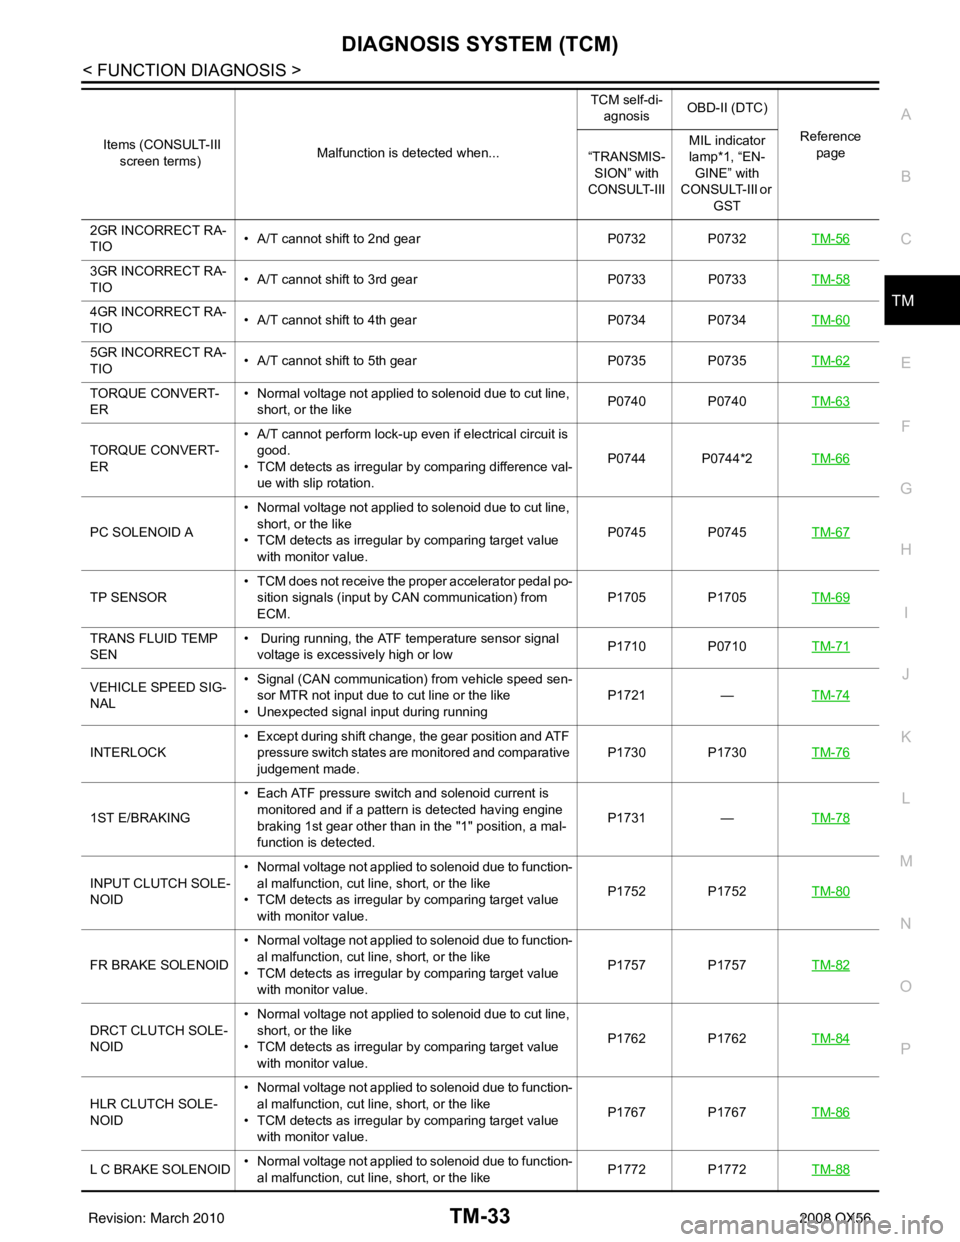
Display Items List
X: Applicable, —: Not applicable
TCM diagnostic mode Description
WORK SUPPORT Supports inspections and adjustments. Commands are transmitted to the TCM for setting the status
suitable for required operation, input/output signals are received from the TCM and received data is
displayed.
SELF-DIAG RESULTS Displays TCM self-diagnosis results.
DATA MONITOR Displays TCM input/output data in real time.
CAN DIAG SUPPORT MNTR The result of transmit/receive diagnosis of CAN communication can be read.
ACTIVE TEST Operation of electrical loads can be checked by sending drive signal to them.
FUNCTION TEST Conducted by CONSULT-III instead of a technici an to determine whether each system is “OK” or “NG”.
ECU PART NUMBER TCM part number can be read.
Items (CONSULT-III screen terms) Malfunction is detected when... TCM self-di-
agnosis OBD-II (DTC)
Reference page
“TRANSMIS-
SION” with
CONSULT-III MIL indicator
lamp*1, “EN-
GINE” with
CONSULT-III or GST
CAN COMM CIRCUIT • When a malfunction is detected in CAN communica-
tions U1000 U1000
TM-38
STARTER RELAY• If this signal is ON other than in P or N position, this is
judged to be a malfunction.
(And if it is OFF in P or N position, this too is judged to
be a malfunction.) P0615
—TM-39
TRANSMISSION
CONT • TCM is malfunctioning.
P0700 P0700TM-42
T/M RANGE SWITCH A• PNP switch 1-4 signals input with impossible pattern
• “P” position is detected from N position without any
other position being detected in between. P0705 P0705
TM-43
INPUT SPEED SEN-
SOR A• TCM does not receive the proper voltage signal from
the sensor.
• TCM detects an irregularity only at position of 4th gear
for turbine revolution sensor 2. P0717 P0717
TM-46
OUTPUT SPEED SEN-
SOR• Signal from vehicle speed sensor A/T (Revolution sen-
sor) not input due to cut line or the like
• Unexpected signal input during running
• After ignition switch is turned ON, unexpected signal
input from vehicle speed sensor MTR before the vehi-
cle starts moving P0720 P0720
TM-49
ENGINE SPEED• TCM does not receive the CAN communication signal
from the ECM. P0725
—TM-51
1GR INCORRECT RA-
TIO • A/T cannot shift to 1st gear
P0731 P0731TM-54
Revision: March 2010 2008 QX56
Page 3580 of 4083
DIAGNOSIS SYSTEM (TCM)TM-33
< FUNCTION DIAGNOSIS >
CEF
G H
I
J
K L
M A
B
TM
N
O P
2GR INCORRECT RA-
TIO • A/T cannot shift to 2nd gear
P0732 P0732TM-56
3GR INCORRECT RA-
TIO• A/T cannot shift to 3rd gear
P0733 P0733TM-58
4GR INCORRECT RA-
TIO• A/T cannot shift to 4th gear
P0734 P0734TM-60
5GR INCORRECT RA-
TIO• A/T cannot shift to 5th gear
P0735 P0735TM-62
TORQUE CONVERT-
ER• Normal voltage not applied to solenoid due to cut line,
short, or the like P0740 P0740
TM-63
TORQUE CONVERT-
ER• A/T cannot perform lock-up even if electrical circuit is
good.
• TCM detects as irregular by comparing difference val- ue with slip rotation. P0744 P0744*2
TM-66
PC SOLENOID A• Normal voltage not applied to solenoid due to cut line,
short, or the like
• TCM detects as irregular by comparing target value with monitor value. P0745 P0745
TM-67
TP SENSOR• TCM does not receive the proper accelerator pedal po-
sition signals (input by CAN communication) from
ECM. P1705 P1705
TM-69
TRANS FLUID TEMP
SEN• During running, the ATF temperature sensor signal
voltage is excessively high or low P1710 P0710
TM-71
VEHICLE SPEED SIG-
NAL• Signal (CAN communication) from vehicle speed sen-
sor MTR not input due to cut line or the like
• Unexpected signal input during running P1721
—TM-74
INTERLOCK • Except during shift change, the gear position and ATF
pressure switch states are monitored and comparative
judgement made. P1730 P1730
TM-76
1ST E/BRAKING• Each ATF pressure switch and solenoid current is
monitored and if a pattern is detected having engine
braking 1st gear other than in the "1" position, a mal-
function is detected. P1731
—TM-78
INPUT CLUTCH SOLE-
NOID • Normal voltage not applied to solenoid due to function-
al malfunction, cut line, short, or the like
• TCM detects as irregular by comparing target value with monitor value. P1752 P1752
TM-80
FR BRAKE SOLENOID• Normal voltage not applied to solenoid due to function-
al malfunction, cut line, short, or the like
• TCM detects as irregular by comparing target value with monitor value. P1757 P1757
TM-82
DRCT CLUTCH SOLE-
NOID• Normal voltage not applied to solenoid due to cut line,
short, or the like
• TCM detects as irregular by comparing target value with monitor value. P1762 P1762
TM-84
HLR CLUTCH SOLE-
NOID• Normal voltage not applied to solenoid due to function-
al malfunction, cut line, short, or the like
• TCM detects as irregular by comparing target value with monitor value. P1767 P1767
TM-86
L C BRAKE SOLENOID• Normal voltage not applied to solenoid due to function-
al malfunction, cut line, short, or the like P1772 P1772
TM-88
Items (CONSULT-III
screen terms) Malfunction is detected when... TCM self-di-
agnosis OBD-II (DTC)
Reference page
“TRANSMIS-
SION” with
CONSULT-III MIL indicator
lamp*1, “EN-
GINE” with
CONSULT-III or
GST
Revision: March 2010 2008 QX56
Page 3600 of 4083
P0731 1GR INCORRECT RATIOTM-53
< COMPONENT DIAGNOSIS >
CEF
G H
I
J
K L
M A
B
TM
N
O P
P0731 1GR INCORRECT RATIO
DescriptionINFOID:0000000001604050
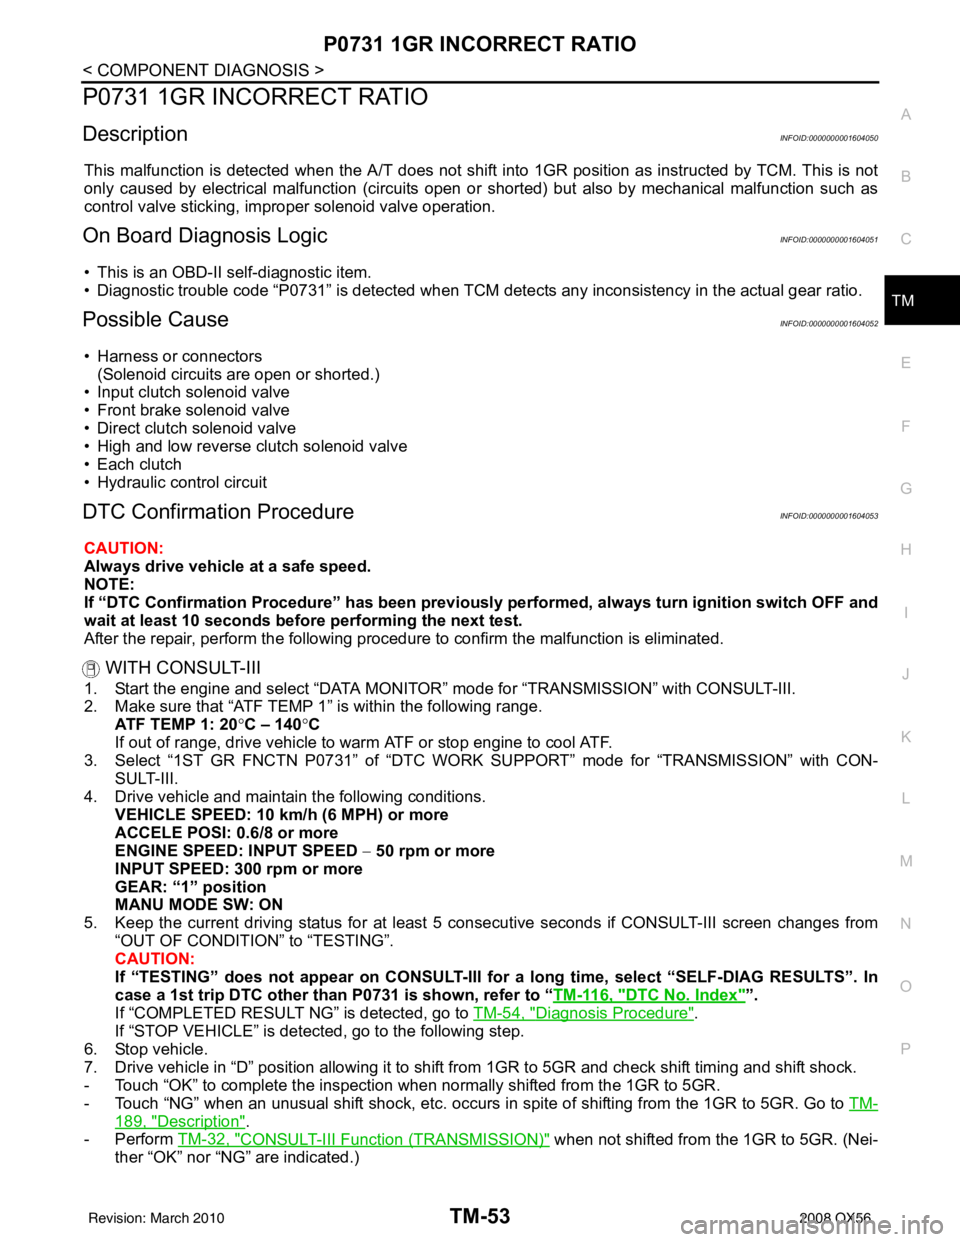
This malfunction is detected when the A/T does not shift into 1GR position as instructed by TCM. This is not
only caused by electrical malfunction (circuits open or shorted) but also by mechanical malfunction such as
control valve sticking, improper solenoid valve operation.
On Board Diagnosis LogicINFOID:0000000001604051
• This is an OBD-II self-diagnostic item.
• Diagnostic trouble code “P0731” is detected when TCM detec ts any inconsistency in the actual gear ratio.
Possible CauseINFOID:0000000001604052
• Harness or connectors
(Solenoid circuits are open or shorted.)
• Input clutch solenoid valve
• Front brake solenoid valve
• Direct clutch solenoid valve
• High and low reverse clutch solenoid valve
• Each clutch
• Hydraulic control circuit
DTC Confirmation ProcedureINFOID:0000000001604053
CAUTION:
Always drive vehicle at a safe speed.
NOTE:
If “DTC Confirmation Procedure” has been previously performed, always turn ignition switch OFF and
wait at least 10 seconds before performing the next test.
After the repair, perform the following procedure to confirm the malfunction is eliminated.
WITH CONSULT-III
1. Start the engine and select “DATA MONITOR” mode for “TRANSMISSION” with CONSULT-III.
2. Make sure that “ATF TEMP 1” is within the following range. ATF TEMP 1: 20 °C – 140 °C
If out of range, drive vehicle to warm ATF or stop engine to cool ATF.
3. Select “1ST GR FNCTN P0731” of “DTC WO RK SUPPORT” mode for “TRANSMISSION” with CON-
SULT-III.
4. Drive vehicle and maintain the following conditions.
VEHICLE SPEED: 10 km/h (6 MPH) or more
ACCELE POSI: 0.6/8 or more
ENGINE SPEED: INPUT SPEED − 50 rpm or more
INPUT SPEED: 300 rpm or more
GEAR: “1” position
MANU MODE SW: ON
5. Keep the current driving status for at least 5 consecutive seconds if CONSULT-III screen changes from “OUT OF CONDITION” to “TESTING”.
CAUTION:
If “TESTING” does not appear on CONSULT-III for a long time, select “SELF-DIAG RESULTS”. In
case a 1st trip DTC other than P0731 is shown, refer to “ TM-116, "
DTC No. Index"”.
If “COMPLETED RESULT NG” is detected, go to TM-54, "
Diagnosis Procedure".
If “STOP VEHICLE” is detec ted, go to the following step.
6. Stop vehicle.
7. Drive vehicle in “D” position allowing it to shift from 1GR to 5GR and check shift timing and shift shock.
- Touch “OK” to complete the inspection when normally shifted from the 1GR to 5GR.
- Touch “NG” when an unusual shift shock, etc. occurs in spite of shifting from the 1GR to 5GR. Go to TM-
189, "Description".
-Perform TM-32, "
CONSULT-III Functi on (TRANSMISSION)" when not shifted from the 1GR to 5GR. (Nei-
ther “OK” nor “NG” are indicated.)
Revision: March 2010 2008 QX56