Page 3730 of 4083

A/T FLUID COOLERTM-183
< ON-VEHICLE MAINTENANCE >
CEF
G H
I
J
K L
M A
B
TM
N
O P
13. Flush each steel line from the cooler side back toward the A/T by spraying Transmission Cooler Cleaner in a continuous stream for 5 seconds.
14. Blow compressed air regulated to 490 - 883 kPa (5 - 9 kg/cm
2 ,71 - 128 psi) through each steel line from
the cooler side back toward the A/T for 10 seconds to force out any remaining fluid.
15. Ensure all debris is removed from the steel cooler lines.
16. Ensure all debris is removed from the banjo bolts and fittings.
17. Perform A/T fluid cooler diagnosis procedure.
A/T FLUID COOLER DIAGNOSIS PROCEDURE
NOTE:
Insufficient cleaning of the cooler inlet hose exte rior may lead to inaccurate debris identification.
1. Position a drain pan under the A/T inlet and outlet fluid cooler tube to cooler hose connection.
2. Clean the exterior and tip of the cooler inlet hose.
3. Put a different color matching mark on each cooler tube to cooler hose connection to aid in assembly. CAUTION:
Use paint to make the matching mark. Do not damage the tubes or hose.
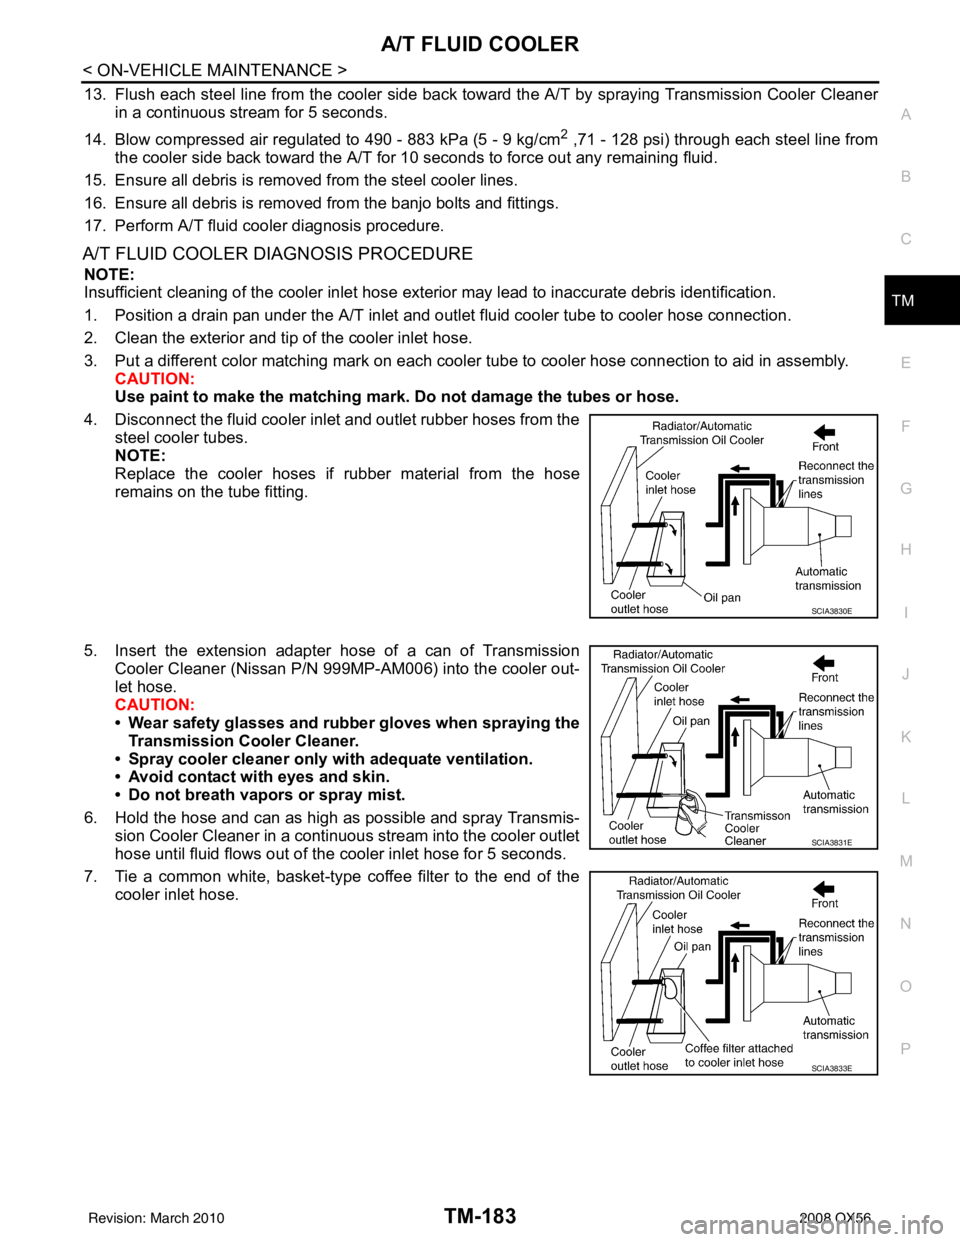
4. Disconnect the fluid cooler inle t and outlet rubber hoses from the
steel cooler tubes.
NOTE:
Replace the cooler hoses if rubber material from the hose
remains on the tube fitting.
5. Insert the extension adapter hose of a can of Transmission Cooler Cleaner (Nissan P/N 999MP-AM006) into the cooler out-
let hose.
CAUTION:
• Wear safety glasses and rubber gloves when spraying the
Transmission Cooler Cleaner.
• Spray cooler cleaner only with adequate ventilation.
• Avoid contact with eyes and skin.
• Do not breath vapors or spray mist.
6. Hold the hose and can as high as possible and spray Transmis- sion Cooler Cleaner in a continuous stream into the cooler outlet
hose until fluid flows out of the cooler inlet hose for 5 seconds.
7. Tie a common white, basket-type coffee filter to the end of the cooler inlet hose.
SCIA3830E
SCIA3831E
SCIA3833E
Revision: March 2010 2008 QX56
Page 3746 of 4083

OIL PANTM-199
< ON-VEHICLE REPAIR >
CEF
G H
I
J
K L
M A
B
TM
N
O P
OIL PAN
Oil PanINFOID:0000000004917434
REMOVAL AND INSTALLATION
Removal
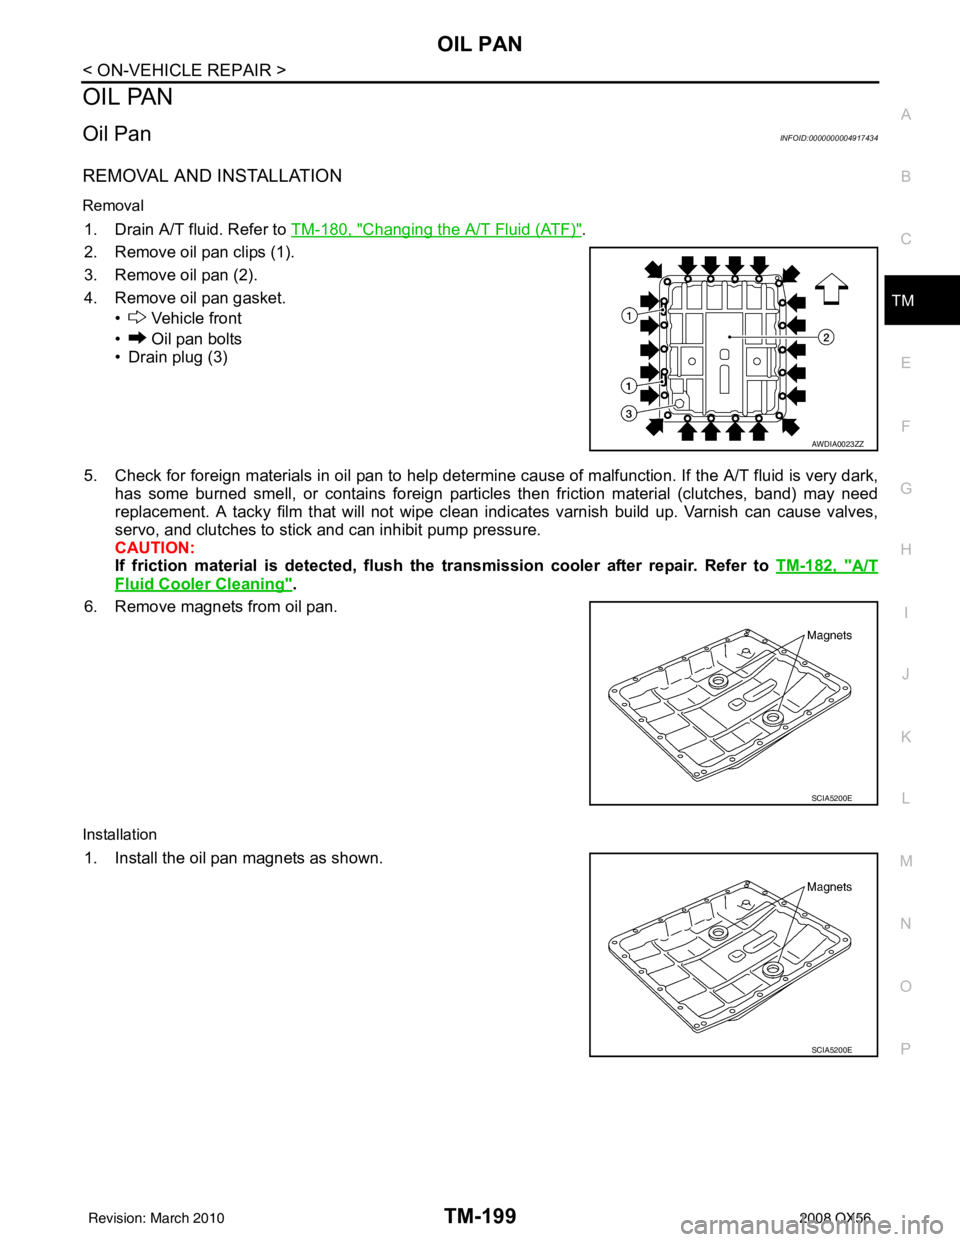
1. Drain A/T fluid. Refer to TM-180, "Changing the A/T Fluid (ATF)".
2. Remove oil pan clips (1).
3. Remove oil pan (2).
4. Remove oil pan gasket. • Vehicle front
• Oil pan bolts
• Drain plug (3)
5. Check for foreign materials in oil pan to help determi ne cause of malfunction. If the A/T fluid is very dark,
has some burned smell, or contains foreign particles then friction material (clutches, band) may need
replacement. A tacky film that will not wipe clean indicates varnish build up. Varnish can cause valves,
servo, and clutches to stick and can inhibit pump pressure.
CAUTION:
If friction material is detected, flush th e transmission cooler after repair. Refer to TM-182, "
A/T
Fluid Cooler Cleaning".
6. Remove magnets from oil pan.
Installation
1. Install the oil pan magnets as shown.
AWDIA0023ZZ
SCIA5200E
SCIA5200E
Revision: March 2010 2008 QX56
Page 3747 of 4083

TM-200
< ON-VEHICLE REPAIR >
OIL PAN
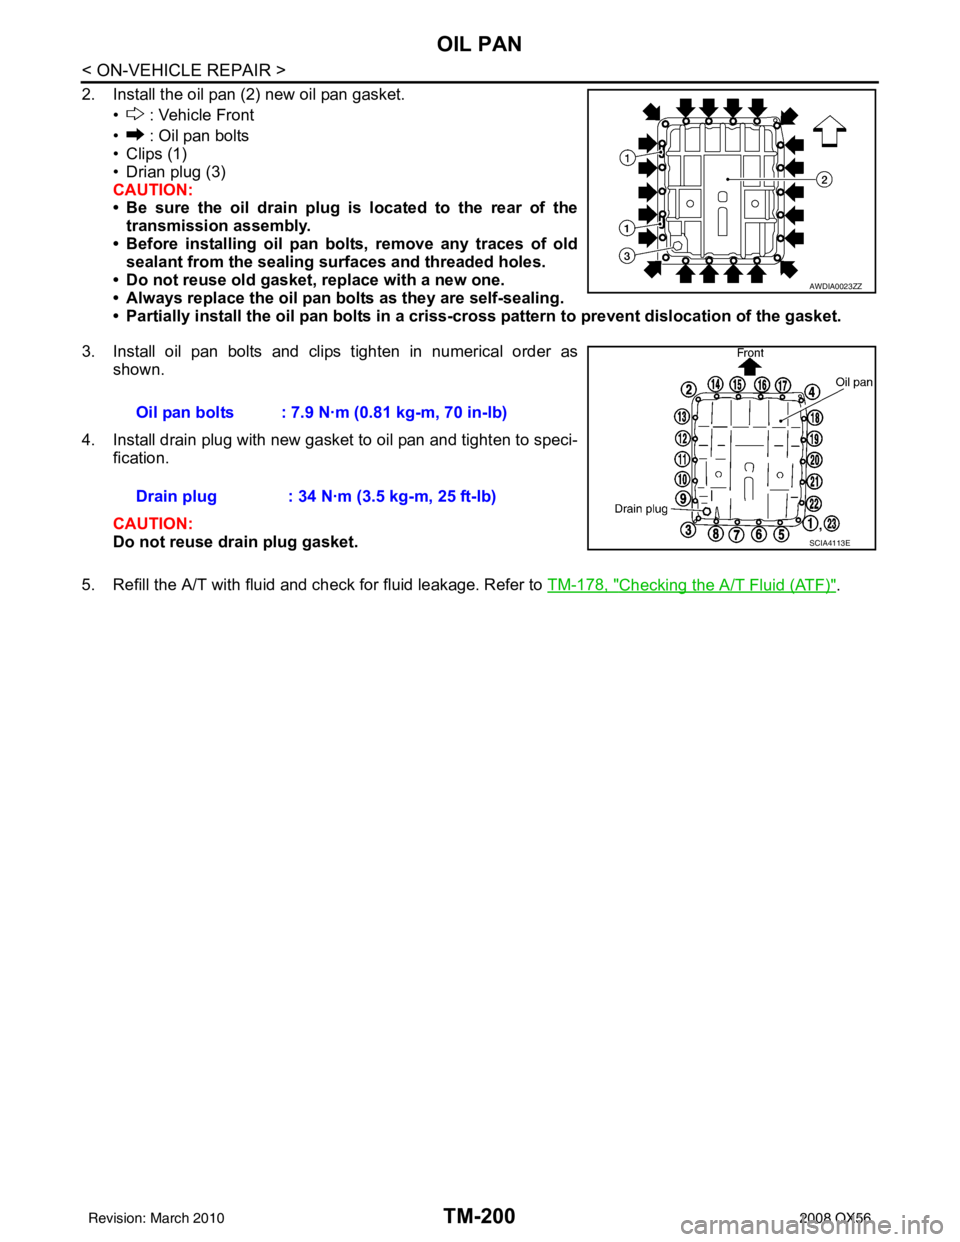
2. Install the oil pan (2) new oil pan gasket.• : Vehicle Front
• : Oil pan bolts
• Clips (1)
• Drian plug (3)
CAUTION:
• Be sure the oil drain plug is located to the rear of thetransmission assembly.
• Before installing oil pan bolts, remove any traces of old sealant from the sealing su rfaces and threaded holes.
• Do not reuse old gasket, replace with a new one.
• Always replace the oil pan bolts as they are self-sealing.
• Partially install the oil pan bolts in a criss-cross pattern to prevent dislocation of the gasket.
3. Install oil pan bolts and clips tighten in numerical order as shown.
4. Install drain plug with new gasket to oil pan and tighten to speci- fication.
CAUTION:
Do not reuse drain plug gasket.
5. Refill the A/T with fluid and check for fluid leakage. Refer to TM-178, "
Checking the A/T Fluid (ATF)".
AWDIA0023ZZ
Oil pan bolts : 7.9 N·m (0.81 kg-m, 70 in-lb)
Drain plug : 34 N·m (3.5 kg-m, 25 ft-lb)
SCIA4113E
Revision: March 2010 2008 QX56
Page 3748 of 4083
CONTROL VALVE WITH TCMTM-201
< ON-VEHICLE REPAIR >
CEF
G H
I
J
K L
M A
B
TM
N
O P
CONTROL VALVE WITH TCM
Control Valve with TCM and A/T Fluid Temperature Sensor 2INFOID:0000000006211127
COMPONENTS
CONTROL VALVE WITH TCM REMOVAL AND INSTALLATION
Removal
1. Disconnect negative battery terminal.
2. Drain A/T fluid. Refer to TM-180, "
Changing the A/T Fluid (ATF)".
3. Disconnect A/T assembly harness connector.
1. Transmission 2. Snap ring3. Sub-harness
4. Control valve with TCM 5. Bracket6. A/T fluid temperature sensor 2
7. Oil pan gasket 8. Brackets9. Oil pan bolt
10. Oil pan 11. Magnet12. Drain plug
13. Drain plug gasket 14. Terminal cord assembly 15. O-ring
16. O-ring 17. Plug
A/T fluid temperature sensor 2 (A) can be changed to plug (B), depending on vehicles.
JSDIA1425GB
Revision: March 2010 2008 QX56
Page 3750 of 4083
CONTROL VALVE WITH TCMTM-203
< ON-VEHICLE REPAIR >
CEF
G H
I
J
K L
M A
B
TM
N
O P
10. Remove bolts (A), (B) and (C) from control valve with TCM.
11. Remove control valve with TCM from transmission case. CAUTION:
When removing, be careful with the manual valve notch and
manual plate height. Remove it vertically.
12. Remove the A/T fluid temperature sensor 2 or plug as shown below.
a. A/T fluid temperature sensor 2
i. Remove A/T fluid temperature sensor 2 with bracket from con- trol valve with TCM.
ii. Remove bracket from A/T fluid temperature sensor 2.
b. Plug
: Front
Bolt symbol Length mm (in) Number of bolts
A 42 (1.65) 5
B 55 (2.17) 6
C 40 (1.57) 1
SCIA8074E
SCIA5142E
SCIA5253E
SCIA5264E
Revision: March 2010 2008 QX56
Page 3752 of 4083
CONTROL VALVE WITH TCMTM-205
< ON-VEHICLE REPAIR >
CEF
G H
I
J
K L
M A
B
TM
N
O P
15. Remove A/T assembly harness connector from control valve with TCM using suitable tool.
16. Disconnect TCM connector (1) and transmission range switch connector. (2)
CAUTION:
Do not damage connectors.
Installation
CAUTION:
• If the A/T fluid temperature sensor 2 has flaws, replace it with a plug.
• After completing installation, check A/T fluid leakage and fluid level. Refer to TM-178, "
Checking the
A/T Fluid (ATF)".
1. Connect TCM connector (1) and transmission range switch con- nector. (2)
2. Install A/T assembly harness connector to control valve with TCM.
SCIA5448E
JSDIA1317ZZ
JSDIA1317ZZ
SCIA5450E
Revision: March 2010 2008 QX56
Page 3756 of 4083

CONTROL VALVE WITH TCMTM-209
< ON-VEHICLE REPAIR >
CEF
G H
I
J
K L
M A
B
TM
N
O P
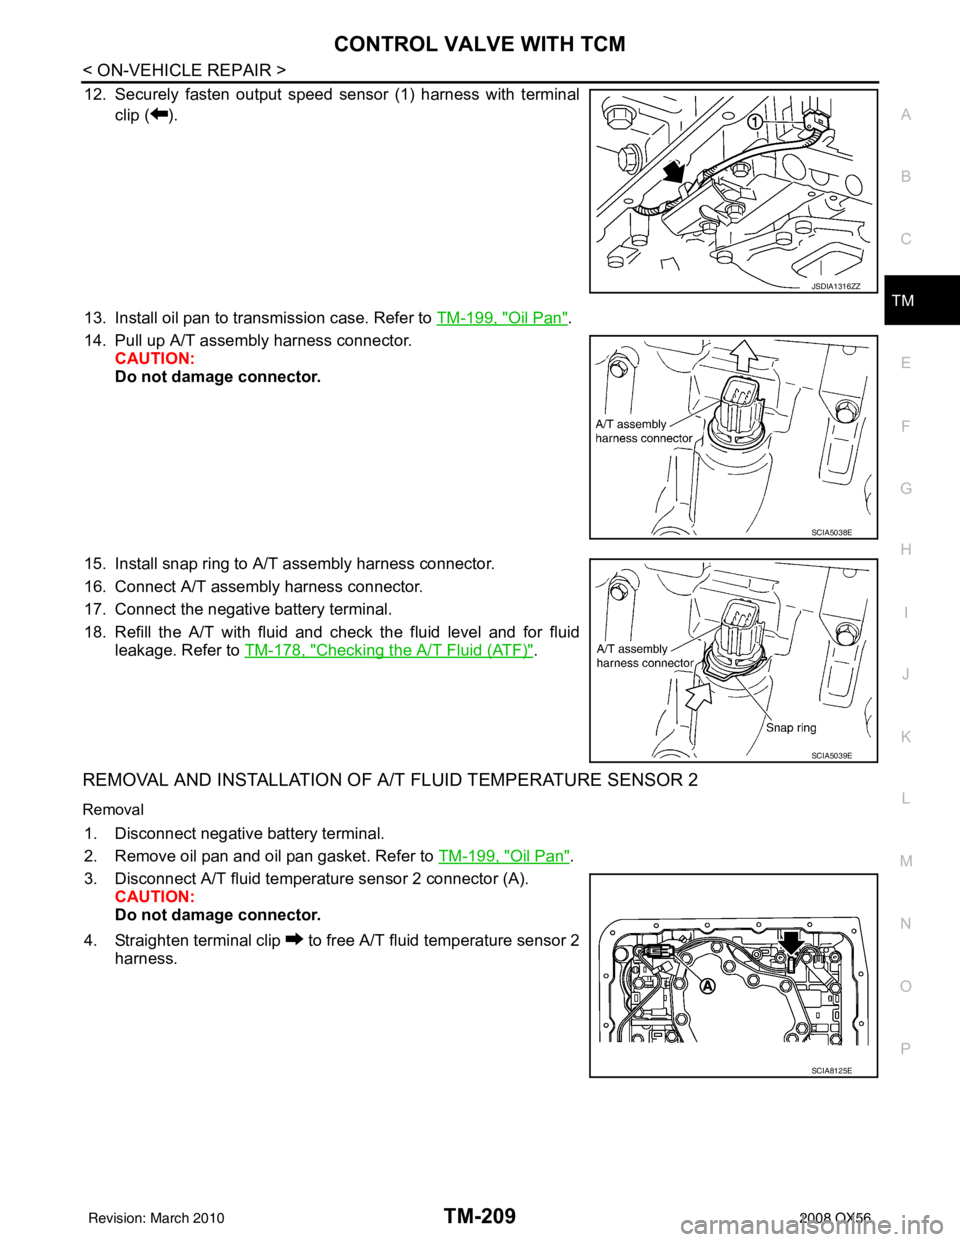
12. Securely fasten output speed sensor (1) harness with terminal clip ( ).
13. Install oil pan to transmission case. Refer to TM-199, "
Oil Pan".
14. Pull up A/T assembly harness connector. CAUTION:
Do not damage connector.
15. Install snap ring to A/T assembly harness connector.
16. Connect A/T assembly harness connector.
17. Connect the negative battery terminal.
18. Refill the A/T with fluid and check the fluid level and for fluid leakage. Refer to TM-178, "
Checking the A/T Fluid (ATF)".
REMOVAL AND INSTALLATION OF A/T FLUID TEMPERATURE SENSOR 2
Removal
1. Disconnect negative battery terminal.
2. Remove oil pan and oil pan gasket. Refer to TM-199, "
Oil Pan".
3. Disconnect A/T fluid temperat ure sensor 2 connector (A).
CAUTION:
Do not damage connector.
4. Straighten terminal clip to free A/T fluid temperature sensor 2 harness.
JSDIA1316ZZ
SCIA5038E
SCIA5039E
SCIA8125E
Revision: March 2010 2008 QX56
Page 3758 of 4083
CONTROL VALVE WITH TCMTM-211
< ON-VEHICLE REPAIR >
CEF
G H
I
J
K L
M A
B
TM
N
O P
3. Connect A/T fluid temperature sensor 2 connector (A).
4. Securely fasten A/T fluid temperature sensor 2 harness with ter- minal clip ( ).
5. Install oil pan to transmission case. Refer to TM-199, "
Oil Pan".
6. Connect the negative battery terminal.
7. Refill the A/T with fluid and check the fluid level and for fluid leakage. Refer to TM-178, "
Checking the A/T
Fluid (ATF)".
REMOVAL AND INSTALLATION OF PLUG
Removal
1. Disconnect negative battery terminal.
2. Remove oil pan and oil pan gasket. Refer to TM-199, "
Oil Pan".
3. Remove plug (1) with bracket (2) from control valve with TCM.
4. Remove bracket (1) from plug (2).
5. Remove O-ring (1) from plug (2).
Installation
CAUTION:
SCIA8125E
: Bolt
JSDIA1311ZZ
JSDIA1312ZZ
JSDIA1313ZZ
Revision: March 2010 2008 QX56