2008 INFINITI FX35 brake rotor
[x] Cancel search: brake rotorPage 2776 of 3924
![INFINITI FX35 2008 Service Manual
FRONT WHEEL HUB AND KNUCKLEFAX-11
< SERVICE INFORMATION > [AWD]
C
EF
G H
I
J
K L
M A
B
FA X
N
O P
FRONT WHEEL HUB AND KNUCKLE
On-Vehicle InspectionINFOID:0000000001327513
Make sure the mounting condi INFINITI FX35 2008 Service Manual
FRONT WHEEL HUB AND KNUCKLEFAX-11
< SERVICE INFORMATION > [AWD]
C
EF
G H
I
J
K L
M A
B
FA X
N
O P
FRONT WHEEL HUB AND KNUCKLE
On-Vehicle InspectionINFOID:0000000001327513
Make sure the mounting condi](/manual-img/42/57017/w960_57017-2775.png)
FRONT WHEEL HUB AND KNUCKLEFAX-11
< SERVICE INFORMATION > [AWD]
C
EF
G H
I
J
K L
M A
B
FA X
N
O P
FRONT WHEEL HUB AND KNUCKLE
On-Vehicle InspectionINFOID:0000000001327513
Make sure the mounting conditions (looseness, ba ck lash) of each component and component status (wear,
damage) are normal.
WHEEL BEARING INSPECTION
Move wheel hub in the axial direction by hand. Che ck that there is no looseness of front wheel bearing.
Rotate wheel hub and make sure there is no unusual noise or other irregular conditions. If there are any irregular conditions, replace wheel hub and bearing assembly.
Removal and InstallationINFOID:0000000001327514
COMPONENTS
REMOVAL
1. Remove tires from vehicle with power tool.
2. Remove brake caliper with power tool. Hang it in a place where it will not interfere with work. Refer to BR-
19, "Removal and Installation of Brake Caliper Assembly".
NOTE:
Avoid depressing brake pedal while brake caliper is removed.
3. Put alignment marks on disc rotor and wheel hub and bearing assembly, then remove disc rotor.
4. Remove wheel sensor from steering knuckle. Refer to BRC-52
CAUTION:
Do not pull on wheel sensor harness.
Axial end play : 0.05 mm (0.002 in) or less
1. Cotter pin 2. Washer 3. Disc rotor
4. Wheel hub and bearing assembly 5. Splash guard 6. Steering knuckle
Refer to
GI-8, "
Component", for the symbols in the figure.
PDIA1217E
SDIA1480E
3AA93ABC3ACD3AC03ACA3AC03AC63AC53A913A773A893A873A873A8E3A773A983AC73AC93AC03AC3
3A893A873A873A8F3A773A9D3AAF3A8A3A8C3A863A9D3AAF3A8B3A8C
Page 2777 of 3924
![INFINITI FX35 2008 Service Manual
FAX-12
< SERVICE INFORMATION >[AWD]
FRONT WHEEL HUB AND KNUCKLE
5. Remove cotter pin, then remove lock nut from drive shaft.
6. Remove steering outer socket and cotter pin
at steering knuckle, then INFINITI FX35 2008 Service Manual
FAX-12
< SERVICE INFORMATION >[AWD]
FRONT WHEEL HUB AND KNUCKLE
5. Remove cotter pin, then remove lock nut from drive shaft.
6. Remove steering outer socket and cotter pin
at steering knuckle, then](/manual-img/42/57017/w960_57017-2776.png)
FAX-12
< SERVICE INFORMATION >[AWD]
FRONT WHEEL HUB AND KNUCKLE
5. Remove cotter pin, then remove lock nut from drive shaft.
6. Remove steering outer socket and cotter pin
at steering knuckle, then loosen mounting nut.
7. Use a ball joint remover (SST) to remove steering outer socket from steering knuckle. Be careful not to damage ball joint boot.
CAUTION:
To prevent damage to threads and to prevent ball joint
remover (SST) from coming off suddenly, temporarily
tighten mounting nut.
8. Using a puller (suitable tool), remove wheel hub and bearing assembly from drive shaft. NOTE:
When removing wheel hub and bearing assembly, do not apply an excessive angle to drive shaft joint.
Also be careful not to excessively extend slide joint.
Do not hang over drive shaft with out support.
9. Remove wheel hub and bearing assembly fixing bolt.
10. Remove splash guard and wheel hub and bearing assembly from steering knuckle.
11. Remove strut assembly and steering knuckle fixing bolts and nuts.
12. Remove transverse link and steering knuckle fixing bolt and nut.
13. Remove steering knuckle from vehicle.
INSPECTION AFTER REMOVAL
Check for deformity, cracks and damage on each parts, replace if necessary.
Ball Joint Inspection
Check for boot breakage, axial looseness, and torque of transverse link and steering outer socket ball joint.
Refer to FSU-13
, PS-17.
INSTALLATION
CAUTION:
Be sure to replace the new differential side oil seal every removal of drive shaft. Refer to FFD-12
.
Refer to "Removal and Installation"for tightening torque. Install in the reverse order of removal. NOTE:
Refer to component parts location and do not reuse non-reusable parts.
To assemble disc rotor and wheel hub and bearing assembly, align the marks.
(When not using the alignment mark, refer to BR-19, "
Removal
and Installation of Brake Caliper Assembly".)
SGIA0488E
SDIA1480E
3AA93ABC3ACD3AC03ACA3AC03AC63AC53A913A773A893A873A873A8E3A773A983AC73AC93AC03AC3
3A893A873A873A8F3A773A9D3AAF3A8A3A8C3A863A9D3AAF3A8B3A8C
Page 2852 of 3924
FSU-8
< SERVICE INFORMATION >
FRONT SUSPENSION ASSEMBLY
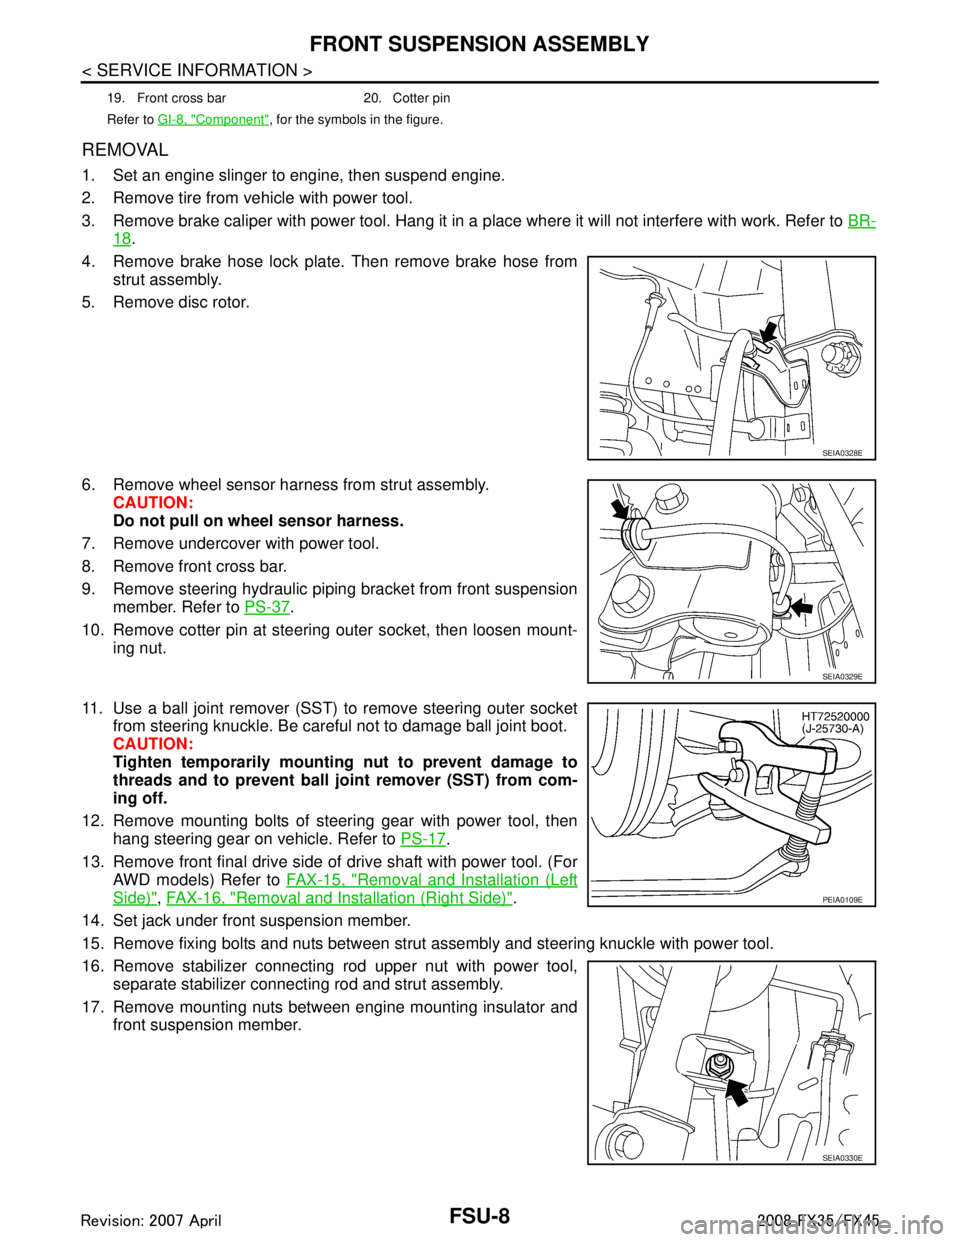
REMOVAL
1. Set an engine slinger to engine, then suspend engine.
2. Remove tire from vehicle with power tool.
3. Remove brake caliper with power tool. Hang it in a place where it will not interfere with work. Refer to BR-
18.
4. Remove brake hose lock plate. Then remove brake hose from strut assembly.
5. Remove disc rotor.
6. Remove wheel sensor harness from strut assembly. CAUTION:
Do not pull on wheel sensor harness.
7. Remove undercover with power tool.
8. Remove front cross bar.
9. Remove steering hydraulic piping bracket from front suspension member. Refer to PS-37
.
10. Remove cotter pin at steering outer socket, then loosen mount- ing nut.
11. Use a ball joint remover (SST) to remove steering outer socket from steering knuckle. Be careful not to damage ball joint boot.
CAUTION:
Tighten temporarily mounting nut to prevent damage to
threads and to prevent ball jo int remover (SST) from com-
ing off.
12. Remove mounting bolts of steering gear with power tool, then hang steering gear on vehicle. Refer to PS-17
.
13. Remove front final drive side of drive shaft with power tool. (For AWD models) Refer to FAX-15, "
Removal and Installation (Left
Side)", FAX-16, "Removal and Installation (Right Side)".
14. Set jack under front suspension member.
15. Remove fixing bolts and nuts between strut assembly and steering knuckle with power tool.
16. Remove stabilizer connecting rod upper nut with power tool, separate stabilizer connecting rod and strut assembly.
17. Remove mounting nuts between engine mounting insulator and front suspension member.
19. Front cross bar 20. Cotter pin
Refer to GI-8, "
Component", for the symbols in the figure.
SEIA0328E
SEIA0329E
PEIA0109E
SEIA0330E
3AA93ABC3ACD3AC03ACA3AC03AC63AC53A913A773A893A873A873A8E3A773A983AC73AC93AC03AC3
3A893A873A873A8F3A773A9D3AAF3A8A3A8C3A863A9D3AAF3A8B3A8C
Page 3323 of 3924
MA-6
< SERVICE INFORMATION >
PERIODIC MAINTENANCE
NOTE:
(1) After 60,000 miles (96,000 km) or 48 months, inspect every 15,000 miles (24,000 km) or 12 months. Replace the drive belts if found
damaged or if the auto belt tensioner reading (only for VK45DE engine) reaches the maximum limit.
(2) If operating mainly in dusty conditions, more frequent maintenance may be required.
(3) Maintenance-free item. For service procedures, refer to FL section.
(4) After 60,000 miles (96,000 km) or 48 months, replace every 30,000 miles (48,000 km) or 24 months.
(5) If valve noise increases, inspect valve clearance.
* Maintenance items and intervals with “*” are recommended by INFINITI for reliable vehicle operation. The owner need not perfo rm
such maintenance in order to maintain the emission warranty or manufacturer recall liability. Other maintenance items and inter vals are
required.
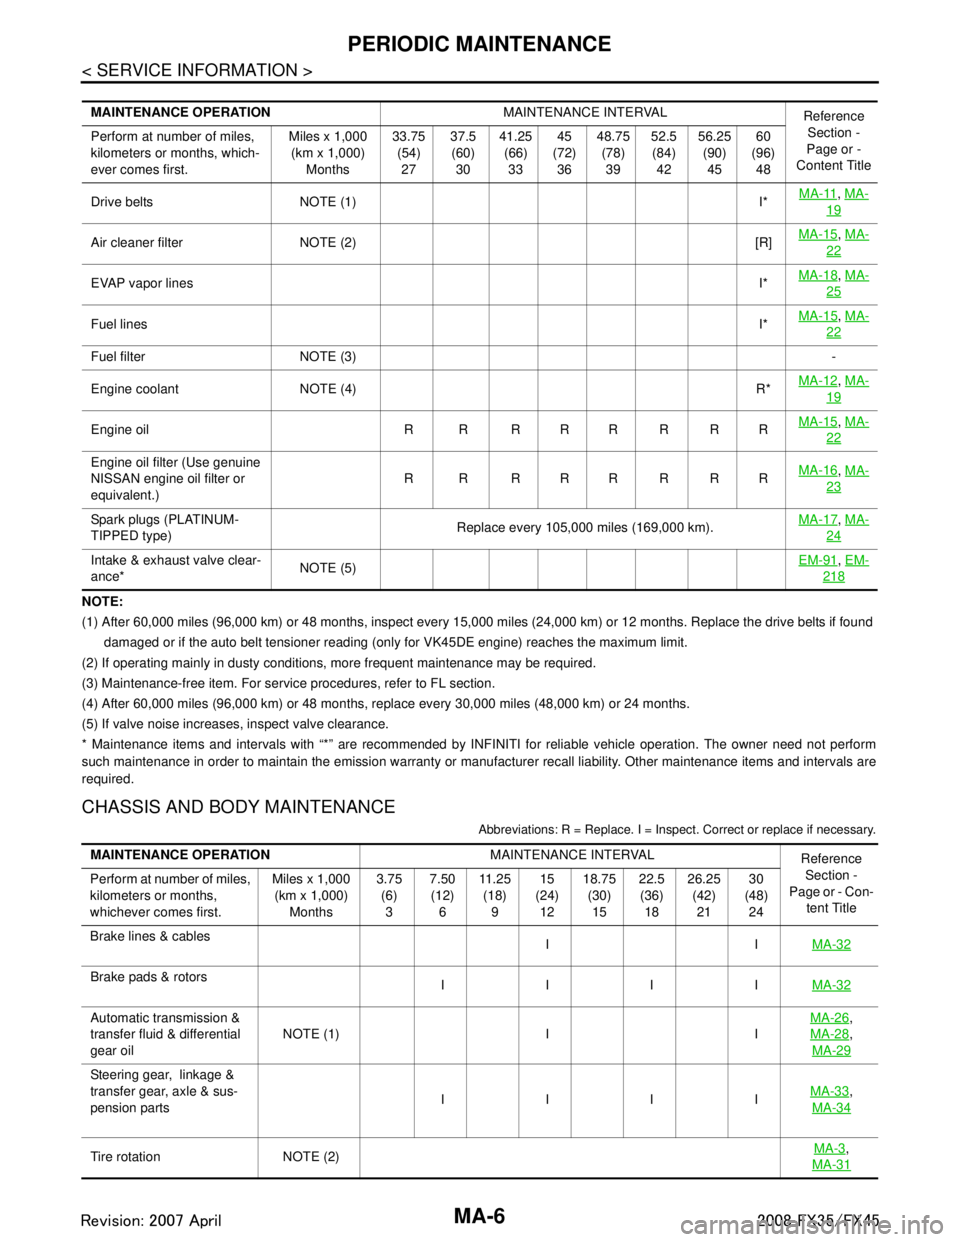
CHASSIS AND BODY MAINTENANCE
Abbreviations: R = Replace. I = Inspec t. Correct or replace if necessary.
MAINTENANCE OPERATION MAINTENANCE INTERVAL
Reference
Section -
Page or -
Content Title
Perform at number of miles,
kilometers or months, which-
ever comes first. Miles x 1,000
(km x 1,000) Months 33.75
(54)27 37.5
(60) 30 41.25
(66)33 45
(72) 36 48.75
(78)39 52.5
(84) 42 56.25
(90)45 60
(96) 48
Drive belts NOTE (1) I* MA-11
,
MA-
19
Air cleaner filter NOTE (2) [R] MA-15,
MA-
22
EVAP vapor lines I*MA-18,
MA-
25
Fuel lines I*MA-15,
MA-
22
Fuel filter NOTE (3) -
Engine coolant NOTE (4) R* MA-12
,
MA-
19
Engine oil R R R R R R R R MA-15,
MA-
22
Engine oil filter (Use genuine
NISSAN engine oil filter or
equivalent.) R R RRRRRR
MA-16,
MA-
23
Spark plugs (PLATINUM-
TIPPED type) Replace every 105,000 miles (169,000 km).MA-17,
MA-
24
Intake & exhaust valve clear-
ance* NOTE (5) EM-91,
EM-
218
MAINTENANCE OPERATION MAINTENANCE INTERVAL
Reference
Section -
Page or - Con-
tent Title
Perform at number of miles,
kilometers or months,
whichever comes first. Miles x 1,000
(km x 1,000) Months 3.75
(6)3 7.50
(12) 6 11 . 2 5
(18) 9 15
(24) 12 18.75
(30)15 22.5
(36) 18 26.25
(42)21 30
(48) 24
Brake lines & cables IIMA-32
Brake pads & rotors
IIII MA-32
Automatic transmission &
transfer fluid & differential
gear oilNOTE (1) I I MA-26,
MA-28
,
MA-29
Steering gear, linkage &
transfer gear, axle & sus-
pension parts IIII
MA-33
,
MA-34
Tire rotation NOTE (2) MA-3,
MA-31
3AA93ABC3ACD3AC03ACA3AC03AC63AC53A913A773A893A873A873A8E3A773A983AC73AC93AC03AC3
3A893A873A873A8F3A773A9D3AAF3A8A3A8C3A863A9D3AAF3A8B3A8C
Page 3324 of 3924
PERIODIC MAINTENANCEMA-7
< SERVICE INFORMATION >
C
DE
F
G H
I
J
K
M A
B
MA
N
O P
NOTE:
(1) If towing a trailer, using a camper or a car-top carrier, or driving on rough or muddy roads, change (not just inspect) fl uid (A/T, trans-
fer)/oil at every 30,000 miles (48,000 km) or 24 months. Using automatic transmission fluid other than Genuine Nissan Matic J
ATF will cause deterioration in driveability and automatic transmission durability, and may damage the automatic transmis-
sion, which is not covered by the INFINITI new vehicle limited warranty.
(2) Refer to “Tire rotation” under the “GENERAL MAINTENANCE” heading earlier in this section.
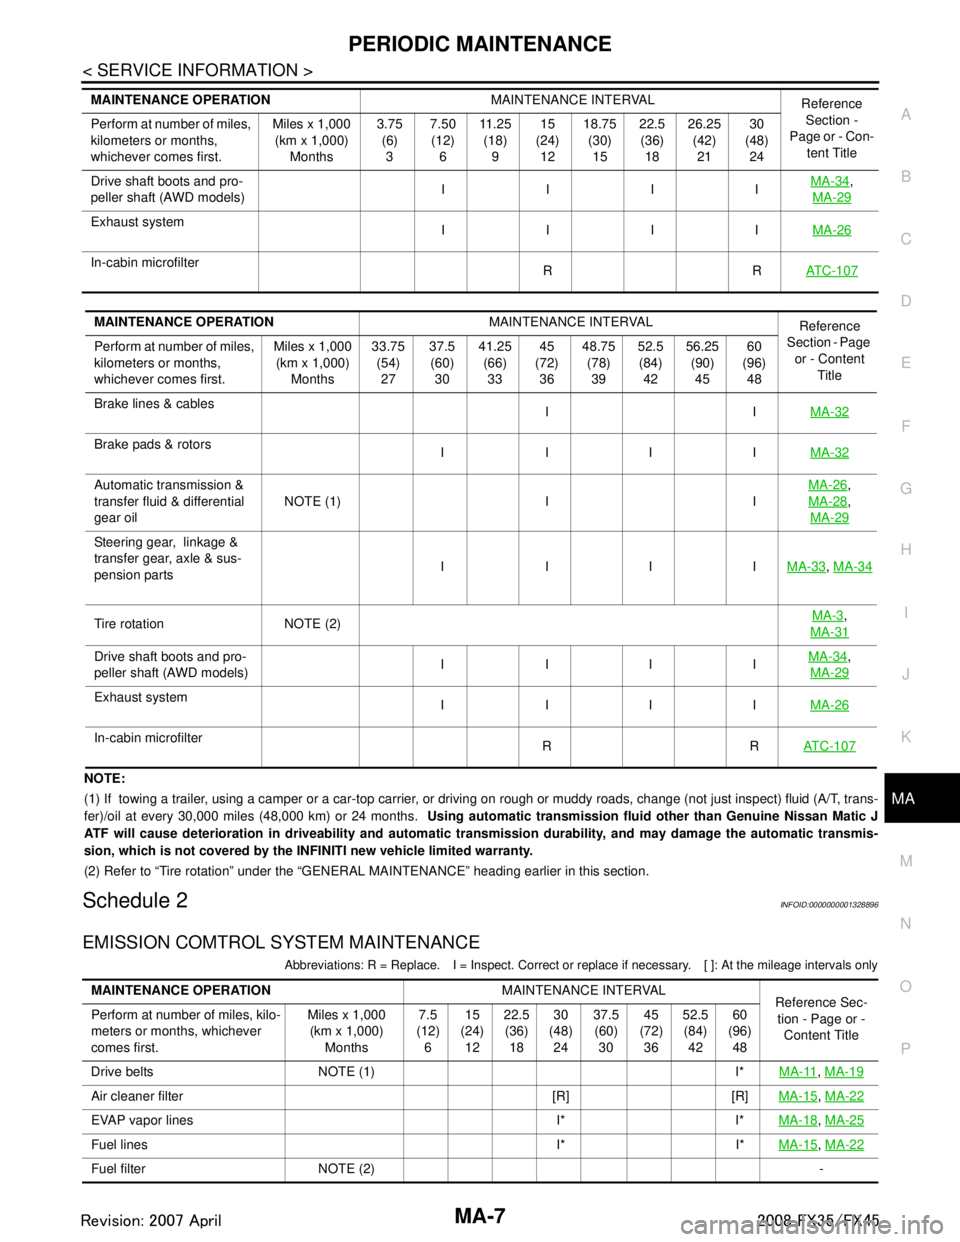
Schedule 2INFOID:0000000001328896
EMISSION COMTROL SYSTEM MAINTENANCE
Abbreviations: R = Replace. I = Inspect. Correct or r eplace if necessary. [ ]: At the mileage intervals only
Drive shaft boots and pro-
peller shaft (AWD models) IIII
MA-34,
MA-29
Exhaust system IIII MA-26
In-cabin microfilter
RRAT C - 1 0 7
MAINTENANCE OPERATION MAINTENANCE INTERVAL
Reference
Section -
Page or - Con- tent Title
Perform at number of miles,
kilometers or months,
whichever comes first. Miles x 1,000
(km x 1,000)
Months 3.75
(6)
3 7.50
(12)
6 11 . 2 5
(18)
9 15
(24)
12 18.75
(30)
15 22.5
(36)
18 26.25
(42)
21 30
(48)
24
MAINTENANCE OPERATION MAINTENANCE INTERVAL
Reference
Section - Page
or - Content Title
Perform at number of miles,
kilometers or months,
whichever comes first. Miles x 1,000
(km x 1,000) Months 33.75
(54)27 37.5
(60) 30 41.25
(66)33 45
(72) 36 48.75
(78)39 52.5
(84) 42 56.25
(90)45 60
(96) 48
Brake lines & cables IIMA-32
Brake pads & rotors
IIII MA-32
Automatic transmission &
transfer fluid & differential
gear oilNOTE (1) I I
MA-26,
MA-28
,
MA-29
Steering gear, linkage &
transfer gear, axle & sus-
pension parts IIII
MA-33
, MA-34
Tire rotation NOTE (2) MA-3,
MA-31
Drive shaft boots and pro-
peller shaft (AWD models) IIII MA-34,
MA-29
Exhaust system IIII MA-26
In-cabin microfilter
RRAT C - 1 0 7
MAINTENANCE OPERATION MAINTENANCE INTERVAL
Reference Sec-
tion - Page or - Content Title
Perform at number of miles, kilo-
meters or months, whichever
comes first. Miles x 1,000
(km x 1,000) Months 7.5
(12) 6 15
(24) 12 22.5
(36) 18 30
(48) 24 37.5
(60) 30 45
(72) 36 52.5
(84) 42 60
(96) 48
Drive belts NOTE (1) I* MA-11
, MA-19
Air cleaner filter [R] [R] MA-15, MA-22
EVAP vapor lines I* I* MA-18, MA-25
Fuel lines I* I* MA-15, MA-22
Fuel filter NOTE (2) -
3AA93ABC3ACD3AC03ACA3AC03AC63AC53A913A773A893A873A873A8E3A773A983AC73AC93AC03AC3
3A893A873A873A8F3A773A9D3AAF3A8A3A8C3A863A9D3AAF3A8B3A8C
Page 3325 of 3924
MA-8
< SERVICE INFORMATION >
PERIODIC MAINTENANCE
NOTE:
(1) After 60,000 miles (96,000 km) or 48 months, inspect every 15,000 miles (24,000 km) or 12 months. Replace the drive belts if found
damaged or if the auto belt tensioner reading (only for VK45DE engine) reaches the maximum limit.
(2) Maintenance-free item. For service procedures, refer to FL section.
(3) After 60,000 miles (96,000 km) or 48 months, replace every 30,000 miles (48,000 km) or 24 months.
(4) If valve noise increases, inspect valve clearance.
* Maintenance items and intervals with “*” are recommended by INFINITI for reliable vehicle operation. The owner need not perfo rm
such maintenance in order to maintain the emission warranty or manufacturer recall liability. Other maintenance items and inter vals are
required
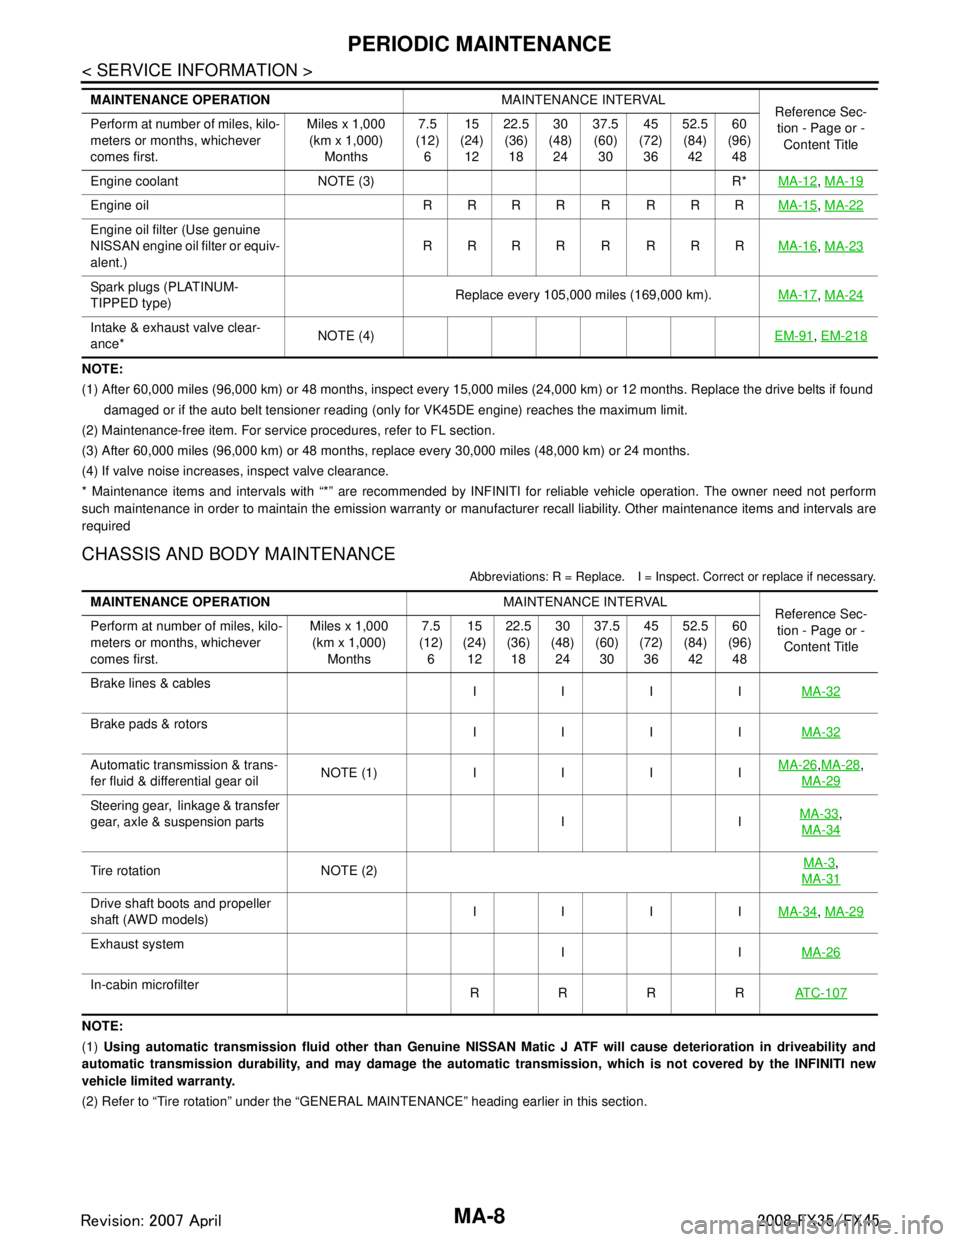
CHASSIS AND BODY MAINTENANCE
Abbreviations: R = Replace. I = Inspec t. Correct or replace if necessary.
NOTE:
(1) Using automatic transmission fluid other than Genuine NISSAN Matic J ATF will cause deterioration in driveability and
automatic transmission durability, and may damage the automatic transmission, which is not covered by the INFINITI new
vehicle limited warranty.
(2) Refer to “Tire rotation” under the “GENERAL MAINTENANCE” heading earlier in this section.
Engine coolant NOTE (3) R*
MA-12
, MA-19
Engine oil R R R R R R R R MA-15, MA-22
Engine oil filter (Use genuine
NISSAN engine oil filter or equiv-
alent.) RRRR R RRR
MA-16
, MA-23
Spark plugs (PLATINUM-
TIPPED type) Replace every 105,000 miles (169,000 km).
MA-17, MA-24
Intake & exhaust valve clear-
ance* NOTE (4)
EM-91, EM-218
MAINTENANCE OPERATION MAINTENANCE INTERVAL
Reference Sec-
tion - Page or -
Content Title
Perform at number of miles, kilo-
meters or months, whichever
comes first. Miles x 1,000
(km x 1,000)
Months 7.5
(12)
6 15
(24)
12 22.5
(36)
18 30
(48)
24 37.5
(60)
30 45
(72)
36 52.5
(84)
42 60
(96)
48
MAINTENANCE OPERATION MAINTENANCE INTERVAL
Reference Sec-
tion - Page or - Content Title
Perform at number of miles, kilo-
meters or months, whichever
comes first. Miles x 1,000
(km x 1,000) Months 7.5
(12) 6 15
(24) 12 22.5
(36) 18 30
(48) 24 37.5
(60) 30 45
(72) 36 52.5
(84) 42 60
(96) 48
Brake lines & cables IIIIMA-32
Brake pads & rotors
IIIIMA-32
Automatic transmission & trans-
fer fluid & differential gear oilNOTE (1) IIII MA-26,
MA-28,
MA-29
Steering gear, linkage & transfer
gear, axle & suspension parts I I MA-33,
MA-34
Tire rotation NOTE (2) MA-3,
MA-31
Drive shaft boots and propeller
shaft (AWD models) IIII
MA-34, MA-29
Exhaust system
IIMA-26
In-cabin microfilter
RRRRAT C - 1 0 7
3AA93ABC3ACD3AC03ACA3AC03AC63AC53A913A773A893A873A873A8E3A773A983AC73AC93AC03AC3
3A893A873A873A8F3A773A9D3AAF3A8A3A8C3A863A9D3AAF3A8B3A8C
Page 3349 of 3924
MA-32
< SERVICE INFORMATION >
CHASSIS AND BODY MAINTENANCE
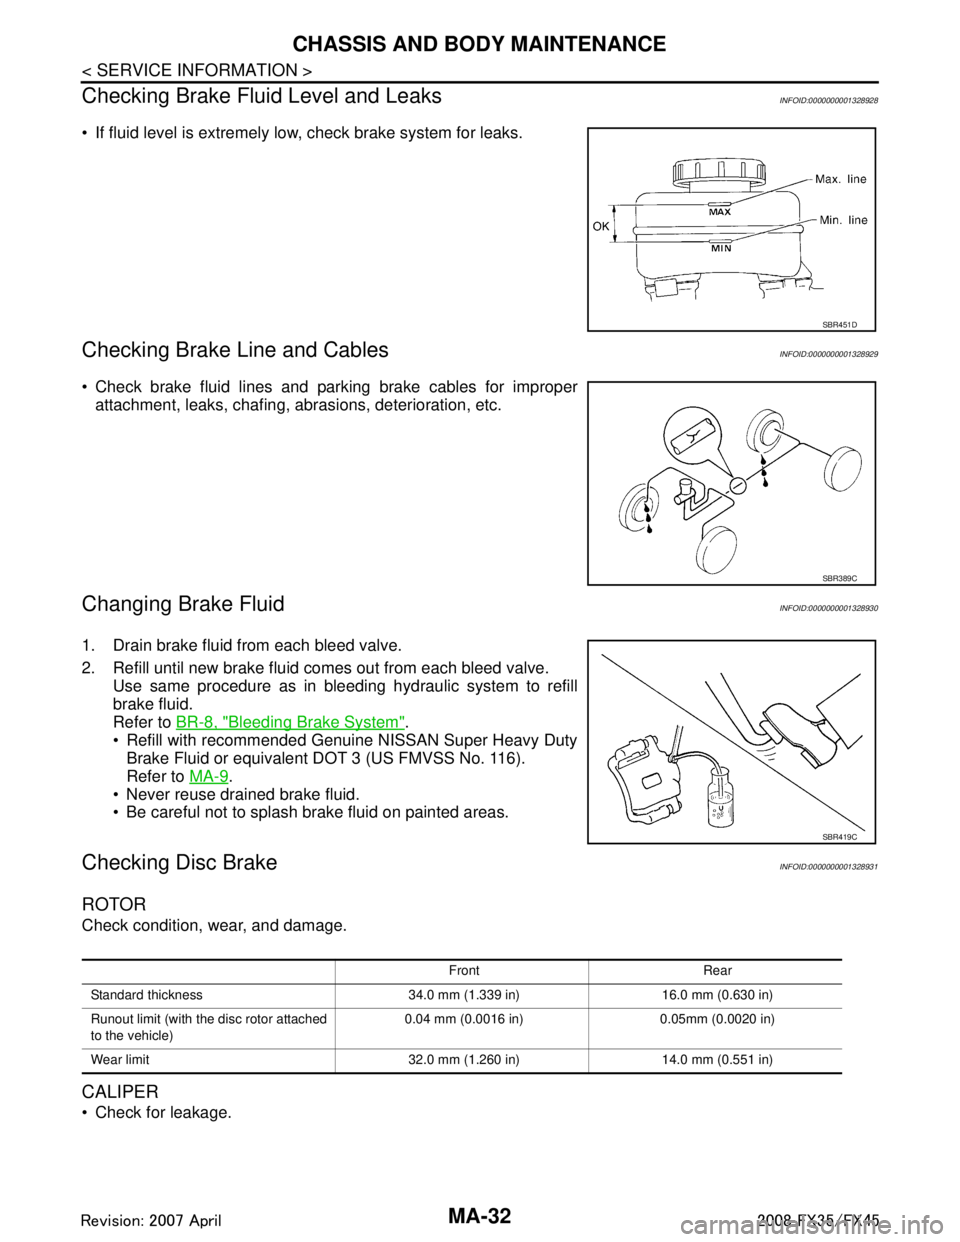
Checking Brake Fluid Level and Leaks
INFOID:0000000001328928
If fluid level is extremely low, check brake system for leaks.
Checking Brake Line and CablesINFOID:0000000001328929
Check brake fluid lines and parking brake cables for improper
attachment, leaks, chafing, abrasions, deterioration, etc.
Changing Brake FluidINFOID:0000000001328930
1. Drain brake fluid from each bleed valve.
2. Refill until new brake fluid comes out from each bleed valve.
Use same procedure as in bleeding hydraulic system to refill
brake fluid.
Refer to BR-8, "
Bleeding Brake System".
Refill with recommended Genuine NISSAN Super Heavy Duty Brake Fluid or equivalent DOT 3 (US FMVSS No. 116).
Refer to MA-9
.
Never reuse drained brake fluid.
Be careful not to splash brake fluid on painted areas.
Checking Disc BrakeINFOID:0000000001328931
ROTOR
Check condition, wear, and damage.
CALIPER
Check for leakage.
SBR451D
SBR389C
SBR419C
Front Rear
Standard thickness 34.0 mm (1.339 in) 16.0 mm (0.630 in)
Runout limit (with the disc rotor attached
to the vehicle) 0.04 mm (0.0016 in) 0.05mm (0.0020 in)
Wear limit 32.0 mm (1.260 in) 14.0 mm (0.551 in)
3AA93ABC3ACD3AC03ACA3AC03AC63AC53A913A773A893A873A873A8E3A773A983AC73AC93AC03AC3
3A893A873A873A8F3A773A9D3AAF3A8A3A8C3A863A9D3AAF3A8B3A8C
Page 3358 of 3924
PARKING BRAKE SYSTEMPB-3
< SERVICE INFORMATION >
C
DE
G H
I
J
K L
M A
B
PB
N
O P
PARKING BRAKE SYSTEM
On-Vehicle InspectionINFOID:0000000001327646
PEDAL STROKE
• When parking brake pedal is operated with a force of 200 N (20.4 kg, 44.9 lb), make sure the parking brake
pedal stroke is within the specified number of notches . (Check it by listening and counting the ratchet clicks.)
Make sure that brake warning lamp comes on when parking brake pedal is depressed with in one notch.
INSPECT COMPONENTS
Make sure the components are installed properly (check for looseness, backlash, etc.).
Check parking brake pedal assembly for bend, damage and cracks, and replace if necessary.
Check cable for wear and damage, and replace if necessary.
Check parking brake switch for malfunction, and replace if necessary.
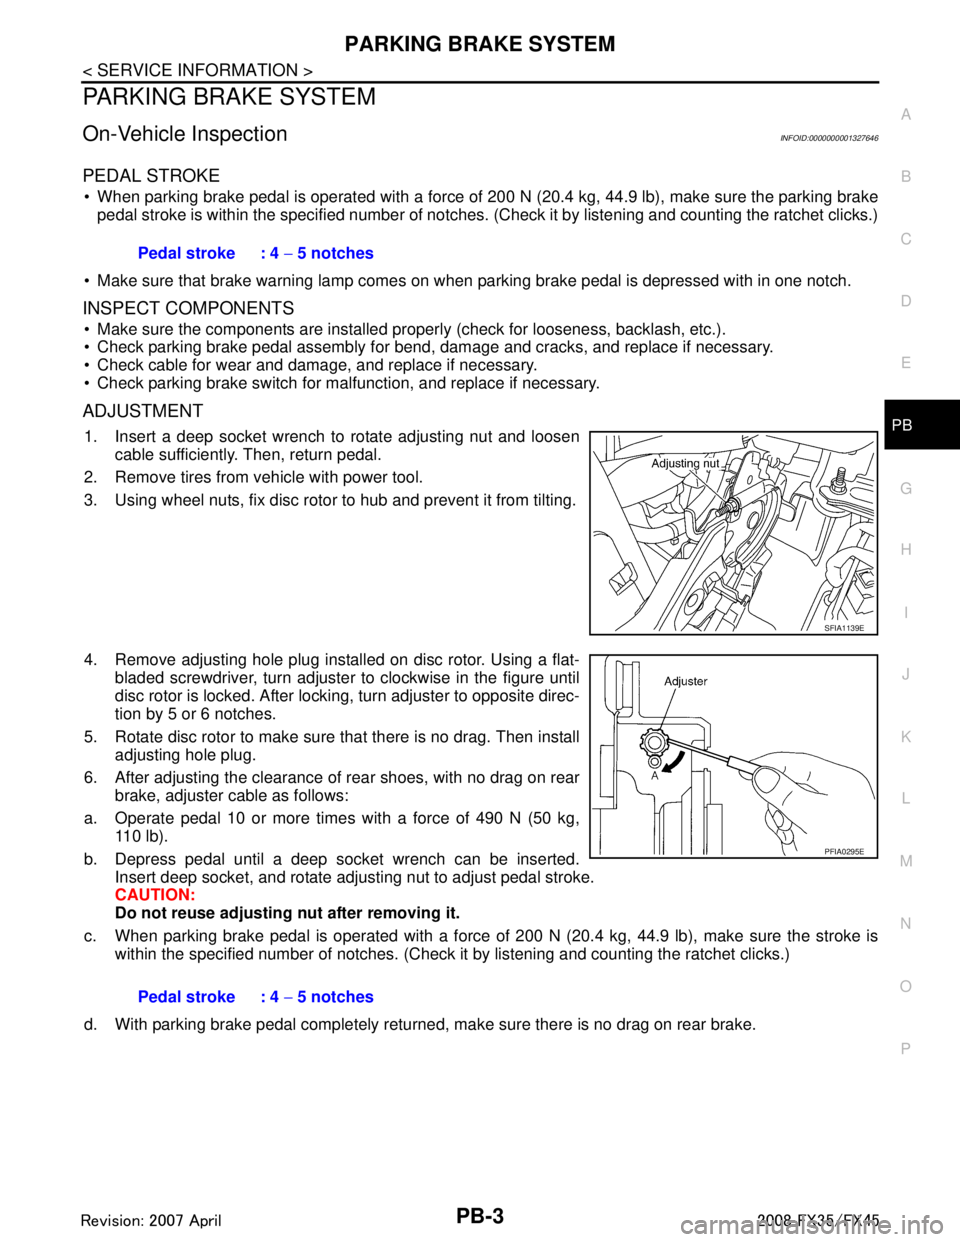
ADJUSTMENT
1. Insert a deep socket wrench to rotate adjusting nut and loosen cable sufficiently. Then, return pedal.
2. Remove tires from vehicle with power tool.
3. Using wheel nuts, fix disc rotor to hub and prevent it from tilting.
4. Remove adjusting hole plug installed on disc rotor. Using a flat- bladed screwdriver, turn adjuster to clockwise in the figure until
disc rotor is locked. After locking, turn adjuster to opposite direc-
tion by 5 or 6 notches.
5. Rotate disc rotor to make sure that there is no drag. Then install adjusting hole plug.
6. After adjusting the clearance of rear shoes, with no drag on rear brake, adjuster cable as follows:
a. Operate pedal 10 or more times with a force of 490 N (50 kg, 110 lb).
b. Depress pedal until a deep socket wrench can be inserted. Insert deep socket, and rotate adjusting nut to adjust pedal stroke.
CAUTION:
Do not reuse adjusting nut after removing it.
c. When parking brake pedal is operated with a force of 200 N (20.4 kg, 44.9 lb), make sure the stroke is
within the specified number of notches. (Check it by listening and counting the ratchet clicks.)
d. With parking brake pedal completely returned, make sure there is no drag on rear brake. Pedal stroke : 4
− 5 notches
SFIA1139E
Pedal stroke : 4 − 5 notches
PFIA0295E
3AA93ABC3ACD3AC03ACA3AC03AC63AC53A913A773A893A873A873A8E3A773A983AC73AC93AC03AC3
3A893A873A873A8F3A773A9D3AAF3A8A3A8C3A863A9D3AAF3A8B3A8C