2008 INFINITI FX35 brakes
[x] Cancel search: brakesPage 1064 of 3924
![INFINITI FX35 2008 Service Manual
TROUBLE DIAGNOSIS FOR SYMPTOMSBRC-49
< SERVICE INFORMATION > [VDC/TCS/ABS]
C
D
E
G H
I
J
K L
M A
B
BRC
N
O P
TROUBLE DIAGNOSIS FOR SYMPTOMS
Excessive ABS Function Operation FrequencyINFOID:000000000 INFINITI FX35 2008 Service Manual
TROUBLE DIAGNOSIS FOR SYMPTOMSBRC-49
< SERVICE INFORMATION > [VDC/TCS/ABS]
C
D
E
G H
I
J
K L
M A
B
BRC
N
O P
TROUBLE DIAGNOSIS FOR SYMPTOMS
Excessive ABS Function Operation FrequencyINFOID:000000000](/manual-img/42/57017/w960_57017-1063.png)
TROUBLE DIAGNOSIS FOR SYMPTOMSBRC-49
< SERVICE INFORMATION > [VDC/TCS/ABS]
C
D
E
G H
I
J
K L
M A
B
BRC
N
O P
TROUBLE DIAGNOSIS FOR SYMPTOMS
Excessive ABS Function Operation FrequencyINFOID:0000000001327692
1.CHECK FRONT AND REAR AXLE
Make sure there is no excessive looseness in the front and rear axles.
OK or NG
OK >> GO TO 2.
NG >> Check front or rear axle system.
2.CHECK WHEEL SENSOR
Perform following inspection for wheel sensor:
Sensor mount and damage inspection
Sensor rotor mount and damage inspection
Sensor connector connection inspection
Sensor harness inspection
OK or NG
OK >> GO TO 3.
NG >> Replace sensor or sensor rotor.
3.CHECK ABS WARNING LAMP DISPLAY
Make sure warning lamp turns off approximately 2 seconds after the ignition switch is turned ON or when driv-
ing.
OK or NG
OK >> Normal
NG >> Perform self-diagnosis. Refer to BRC-26, "
Self-Diagnosis".
Unexpected Pedal ReactionINFOID:0000000001327693
1.CHECK BRAKE PEDAL STROKE
Check brake pedal stroke.
Is the stroke too long?
YES >> Bleed air from brake piping. Check brake pedal, brake booster, and master cylinder mount for play, looseness, and brakesystem for fluid leaks, etc. If any malfunctions are found, make repair.
NO >> GO TO 2.
2.CHECK FUNCTION
Disconnect ABS actuator and electric unit (control unit) c onnector E56 and make sure that braking force is suf-
ficient when ABS in not operating. After the inspection, reconnect connector.
OK or NG
OK >> CHECK WHEEL SENSOR. Refer to BRC-49, "Excessive ABS Function Operation Frequency".
NG >> Check brake system.
The Braking Distance Is LongINFOID:0000000001327694
CAUTION:
On slippery road surfaces, the st opping distance might be longer wi th the ABS operating than when
the ABS is not operating.
1.CHECK FUNCTION
Disconnect ABS actuator and electric unit (control unit) connector E56 to deactivate ABS. In this condition,
check stopping distance. After inspection, connect connector.
OK or NG
OK >> Bleed air from brake piping. Check brake system.
NG >> CHECK WHEEL SENSOR. Refer to BRC-49, "
Excessive ABS Function Operation Frequency".
3AA93ABC3ACD3AC03ACA3AC03AC63AC53A913A773A893A873A873A8E3A773A983AC73AC93AC03AC3
3A893A873A873A8F3A773A9D3AAF3A8A3A8C3A863A9D3AAF3A8B3A8C
Page 1079 of 3924
![INFINITI FX35 2008 Service Manual
CO-8
< SERVICE INFORMATION >[VQ35DE]
OVERHEATING CAUSE ANALYSIS
Except cool-
ing system
parts mal-
function— Overload on engine
Abusive driving
High engine rpm under no
load
Driving in low gear f INFINITI FX35 2008 Service Manual
CO-8
< SERVICE INFORMATION >[VQ35DE]
OVERHEATING CAUSE ANALYSIS
Except cool-
ing system
parts mal-
function— Overload on engine
Abusive driving
High engine rpm under no
load
Driving in low gear f](/manual-img/42/57017/w960_57017-1078.png)
CO-8
< SERVICE INFORMATION >[VQ35DE]
OVERHEATING CAUSE ANALYSIS
Except cool-
ing system
parts mal-
function— Overload on engine
Abusive driving
High engine rpm under no
load
Driving in low gear for ex-
tended time
Driving at extremely high
speed
Powertrain sy stem malfunc-
tion
—
Installed improper size
wheels and tires
Dragging brakes
Improper ignition timing
Blocked or restricted air
flow Blocked bumper —
—
Blocked radiator grille
Installed car brassiere
Mud contamination or paper
clogging
Blocked radiator —
Blocked condenser Blocked air flow
Installed large fog lamp
Symptom Check items
3AA93ABC3ACD3AC03ACA3AC03AC63AC53A913A773A893A873A873A8E3A773A983AC73AC93AC03AC3
3A893A873A873A8F3A773A9D3AAF3A8A3A8C3A863A9D3AAF3A8B3A8C
Page 1106 of 3924
![INFINITI FX35 2008 Service Manual
OVERHEATING CAUSE ANALYSISCO-35
< SERVICE INFORMATION > [VK45DE]
C
D
E
F
G H
I
J
K L
M A
CO
NP
O
Except cool-
ing system
parts mal-
function — Overload on engine
Abusive driving
High engine rpm un INFINITI FX35 2008 Service Manual
OVERHEATING CAUSE ANALYSISCO-35
< SERVICE INFORMATION > [VK45DE]
C
D
E
F
G H
I
J
K L
M A
CO
NP
O
Except cool-
ing system
parts mal-
function — Overload on engine
Abusive driving
High engine rpm un](/manual-img/42/57017/w960_57017-1105.png)
OVERHEATING CAUSE ANALYSISCO-35
< SERVICE INFORMATION > [VK45DE]
C
D
E
F
G H
I
J
K L
M A
CO
NP
O
Except cool-
ing system
parts mal-
function — Overload on engine
Abusive driving
High engine rpm under no
load
Driving in low gear for ex-
tended time
Driving at extremely high
speed
Powertrain system malfunc-
tion
—
Installed improper size
wheels and tires
Dragging brakes
Improper ignition timing
Blocked or restricted air
flow Blocked bumper —
—
Blocked radiator grille
Installed car brassiere
Mud contamination or paper
clogging
Blocked radiator —
Blocked condenser Blocked air flow
Installed large fog lamp
Symptom Check items
3AA93ABC3ACD3AC03ACA3AC03AC63AC53A913A773A893A873A873A8E3A773A983AC73AC93AC03AC3
3A893A873A873A8F3A773A9D3AAF3A8A3A8C3A863A9D3AAF3A8B3A8C
Page 3321 of 3924

MA-4
< SERVICE INFORMATION >
GENERAL MAINTENANCE
UNDER THE HOOD AND VEHICLE
The maintenance items listed here should be checked periodically (e.g. each time you check the engine oil or refuel).
Accelerator pedalCheck the pedal for smooth operation and make sure the pedal does not catch
or require uneven effort. Keep the floor mats away from the pedal. —
Brakes Check that the brake does not pull the vehicle to one side when applied. —
Brake pedal and
booster Check the pedal for smooth operation and make sure it has the proper distance
under it when depressed fully. Check the brake booster function. Be sure to
keep the floor mats away from the pedal. BR-5
,
BR-14
Parking brake Check that the pedal has the proper travel and make sure that the vehicle is
held securely on a fairly steep hill when only the parking brake is applied. PB-3
Automatic transmis-
sion "Park" mecha-
nismCheck that the lock release button on the selector lever operates properly and
smoothly. On a fairly steep hill check that the vehicle is held securely with the
selector lever in the P (Park) position without applying any brakes.
—
Item
Reference page
Item Reference page
Windshield washer
fluid Check that there is adequate fluid in the tank. —
Engine coolant level Check the coolant level when the engine is cold. MA-12
, MA-19
Radiator and hoses Check the front of the radiator and clean off any dirt, insects, leaves, etc., that
may have accumulated. Make sure the hoses have no cracks, deformation, de-
terioration or loose connections. —
Brake fluid level Make sure that the brake fluid level is between the “MAX” and “MIN” lines on the
reservoir. MA-32
Battery Check the fluid level in each cell. It should be between the “MAX” and “MIN”
lines. Vehicles operated in high temperatures or under severe conditions re-
quire frequent checks of the battery fluid level. SC-4
Engine drive belts
Make sure that no belt is frayed, worn, cracked or oily. MA-11, MA-19
Engine oil level Check the level on the oil level gauge after parking the vehicle on a level spot
and turning off the engine. MA-15,
MA-22
Power steering fluid
level and lines Check the level on the dipstick with the engine off. Check the lines for improper
attachment, leaks, cracks, etc.
MA-33
Exhaust system
Make sure there are no loose supports, cracks or holes. If the sound of the ex-
haust seems unusual or there is a smell of exhaust fumes, immediately locate
the trouble and correct it. MA-26
Underbody
The underbody is frequently exposed to corrosive substances such as those
used on icy roads or to control dust. It is very important to remove these sub-
stances, otherwise rust will form on the floor pan, frame, fuel lines and around
the exhaust system. At the end of winter, the underbody should be thoroughly
flushed with plain water, being careful to clean those areas where mud and dirt
can easily accumulate. —
Fluid leaks Check under the vehicle for fuel, oil, water or other fluid leaks after the vehicle
has been parked for a while. Water dripping from the air conditioner after use is
normal. If you should notice any leaks or gasoline fumes are evident, check for
the cause and correct it immediately. —
3AA93ABC3ACD3AC03ACA3AC03AC63AC53A913A773A893A873A873A8E3A773A983AC73AC93AC03AC3
3A893A873A873A8F3A773A9D3AAF3A8A3A8C3A863A9D3AAF3A8B3A8C
Page 3356 of 3924

PB-1
BRAKES
C
DE
G H
I
J
K L
M
SECTION PB
A
B
PB
N
O P
CONTENTS
PARKING BRAKE SYSTEM
SERVICE INFORMATION .. ..........................2
PREPARATION .............................................. .....2
Commercial Service Tool .................................... ......2
PARKING BRAKE SYSTEM ...............................3
On-Vehicle Inspection ......................................... ......3
PARKING BRAKE CONTROL ............................4
Component .......................................................... ......4
Removal and Installation ..................................... .....4
PARKING BRAKE SHOE ..................................6
Component ...............................................................6
Removal and Installation ..........................................6
SERVICE DATA AND SPECIFICATIONS
(SDS) ..................................................................
9
Parking Drum Brake .................................................9
Parking Brake Control ..............................................9
3AA93ABC3ACD3AC03ACA3AC03AC63AC53A913A773A893A873A873A8E3A773A983AC73AC93AC03AC3
3A893A873A873A8F3A773A9D3AAF3A8A3A8C3A863A9D3AAF3A8B3A8C
Page 3361 of 3924

PB-6
< SERVICE INFORMATION >
PARKING BRAKE SHOE
PARKING BRAKE SHOE
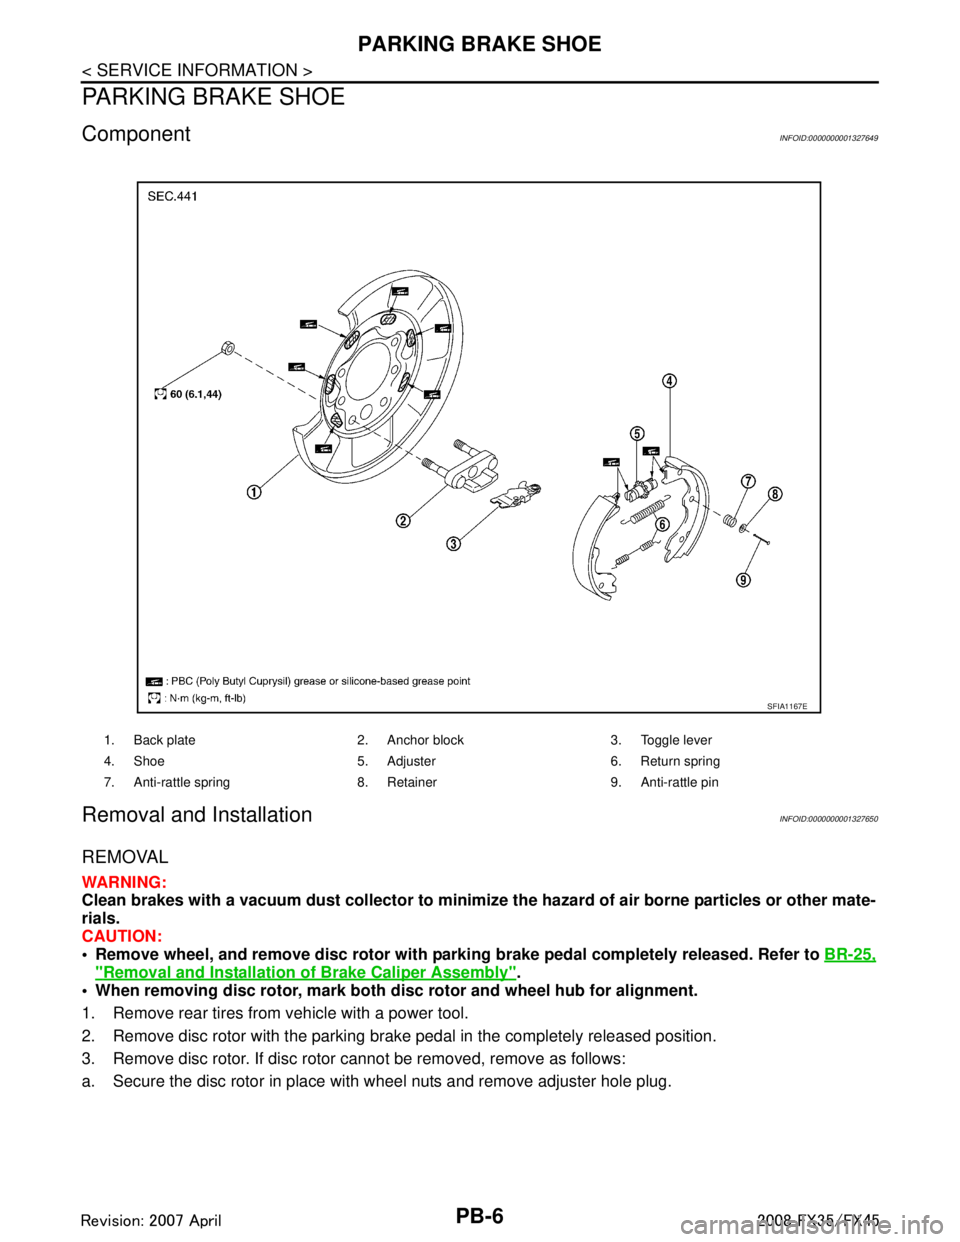
ComponentINFOID:0000000001327649
Removal and InstallationINFOID:0000000001327650
REMOVAL
WARNING:
Clean brakes with a vacuum dust collector to minimize the hazard of air borne particles or other mate-
rials.
CAUTION:
• Remove wheel, and remove disc rotor with parki ng brake pedal completely released. Refer to BR-25,
"Removal and Installation of Brake Caliper Assembly".
When removing disc rotor, mark both disc rotor and wheel hub for alignment.
1. Remove rear tires from vehicle with a power tool.
2. Remove disc rotor with the parking brake pedal in the completely released position.
3. Remove disc rotor. If disc rotor cannot be removed, remove as follows:
a. Secure the disc rotor in place with wheel nuts and remove adjuster hole plug.
1. Back plate 2. Anchor block 3. Toggle lever
4. Shoe 5. Adjuster 6. Return spring
7. Anti-rattle spring 8. Retainer 9. Anti-rattle pin
SFIA1167E
3AA93ABC3ACD3AC03ACA3AC03AC63AC53A913A773A893A873A873A8E3A773A983AC73AC93AC03AC3
3A893A873A873A8F3A773A9D3AAF3A8A3A8C3A863A9D3AAF3A8B3A8C
Page 3363 of 3924

PB-8
< SERVICE INFORMATION >
PARKING BRAKE SHOE
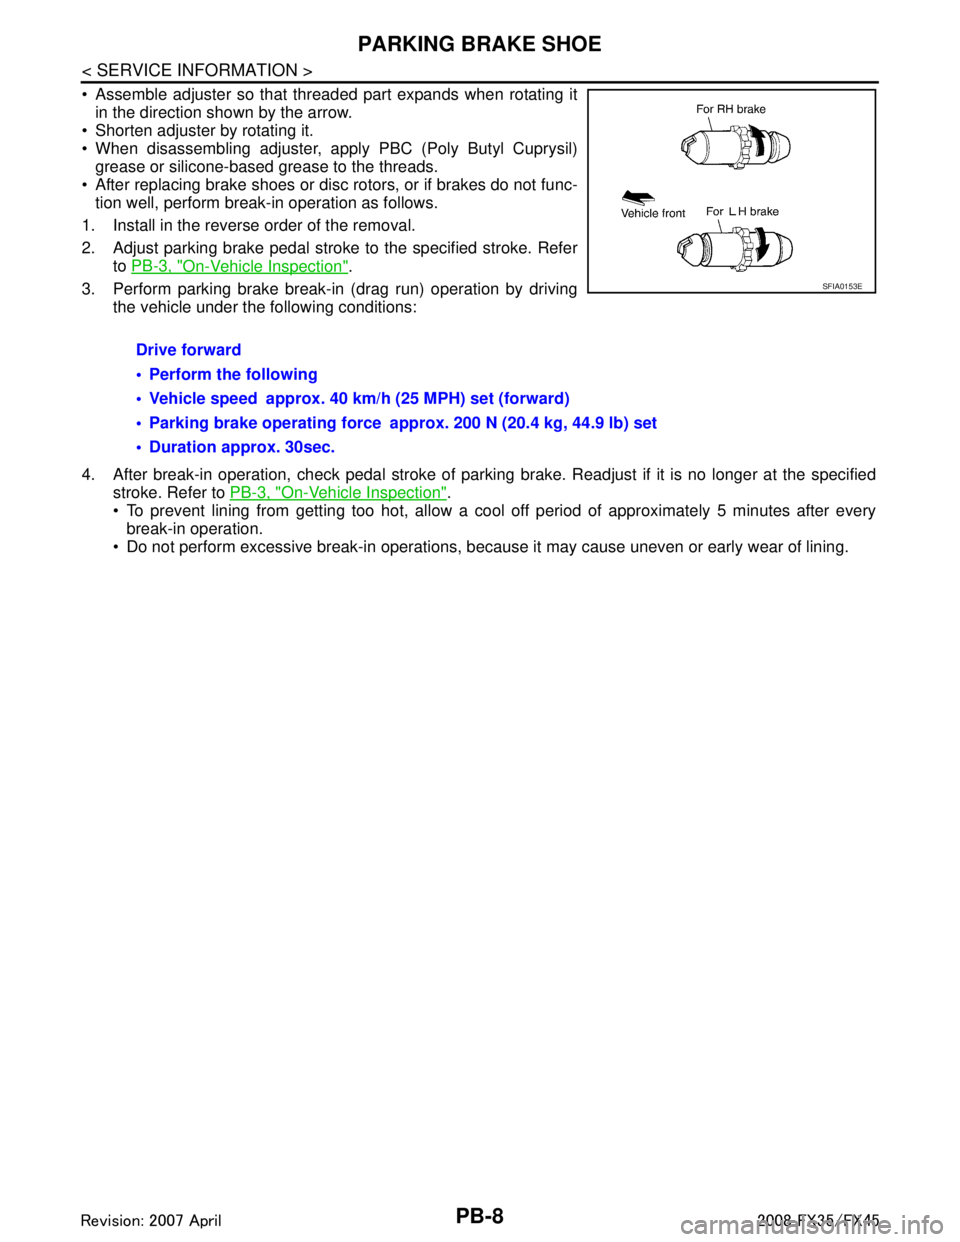
Assemble adjuster so that threaded part expands when rotating itin the direction shown by the arrow.
Shorten adjuster by rotating it.
When disassembling adjuster, apply PBC (Poly Butyl Cuprysil)
grease or silicone-based grease to the threads.
After replacing brake shoes or disc rotors, or if brakes do not func-
tion well, perform break-in operation as follows.
1. Install in the reverse order of the removal.
2. Adjust parking brake pedal stroke to the specified stroke. Refer to PB-3, "
On-Vehicle Inspection".
3. Perform parking brake break-in (drag run) operation by driving the vehicle under the following conditions:
4. After break-in operation, check pedal stroke of parking brake. Readjust if it is no longer at the specified
stroke. Refer to PB-3, "
On-Vehicle Inspection".
To prevent lining from getting too hot, allow a cool off period of approximately 5 minutes after every
break-in operation.
Do not perform excessive break-in operations, becaus e it may cause uneven or early wear of lining.
Drive forward
Perform the following
Vehicle speed approx. 40 km/h (25 MPH) set (forward)
Parking brake operating force approx. 200 N (20.4 kg, 44.9 lb) set
Duration approx. 30sec.
SFIA0153E
3AA93ABC3ACD3AC03ACA3AC03AC63AC53A913A773A893A873A873A8E3A773A983AC73AC93AC03AC3
3A893A873A873A8F3A773A9D3AAF3A8A3A8C3A863A9D3AAF3A8B3A8C
Page 3461 of 3924

PS-6
< SERVICE INFORMATION >
NOISE, VIBRATION AND HARSHNESS (NVH) TROUBLESHOOTING
NOISE, VIBRATION AND HARSHNESS (NVH) TROUBLESHOOTING
NVH Troubleshooting ChartINFOID:0000000001327708
Use chart below to help you find the cause of the symp tom. If necessary, repair or replace these parts.
×: ApplicableReference page
PS-7PS-7PS-19PS-19PS-19PS-7PS-9PS-9
EM-14
,
EM-170PS-9PS-12PS-17PS-12PS-12PS-17
NVH in PR section
NVH in RFD section
NVH in FAX, RAX, FSU, RSU section NVH in WT section
NVH in WT section
NVH in FAX section
NVH in BR section
Possible cause and suspected parts
Fluid level
Air in hydraulic system
Outer socket ball joint swinging force
Outer socket ball joint rotating torque
Outer socket ball joint end play
Steering fluid leakage
Steering wheel play
Steering gear rack sliding force
Drive belt looseness
Improper steering wheel
Improper installation or looseness of tilt lock lever
Mounting rubber deterioration
Steering column deformation or damage
Improper installation or looseness of steering column
Steering linkage looseness
PROPELLER SHAFT
DIFFERENTIAL
AXLE and SUSPENSION
TIRES
ROAD WHEEL
DRIVE SHAFT
BRAKES
Symptom STEERING Noise
× × ××××× × × ×××××× ×
Shake ××× × ×××× ×
Vibration ××××× × ×× ×
Shimmy ××× × ××× ×
Judder ××××××
3AA93ABC3ACD3AC03ACA3AC03AC63AC53A913A773A893A873A873A8E3A773A983AC73AC93AC03AC3
3A893A873A873A8F3A773A9D3AAF3A8A3A8C3A863A9D3AAF3A8B3A8C