2008 INFINITI FX35 key
[x] Cancel search: keyPage 932 of 3924

BL-198
< SERVICE INFORMATION >
IVIS (INFINITI VEHICLE IMMOBILIZER SYSTEM-NATS)
“LOCK MODE” displayed on CONSULT-III screen
1.CONFIRM SELF-DIAGNOSTIC RESULTS
Confirm SELF-DIAGNOSTIC RESULTS “LOCK MO DE” is displayed on CONSULT-III screen.
Does CONSULT-III screen disp lay as shown in figure?
YES >> GO TO 2.
NO >> Refer to BL-195, "
Trouble Diagnosis Symptom Chart".
2.ESCAPE FROM LOCK MODE
1. Turn ignition switch OFF.
2. Turn ignition switch ON with registered key. (Do not start engine.) Wait 5 seconds.
3. Return the key to OFF position. Wait 5 seconds.
4. Repeat steps 2 and 3 twice (total of three cycles).
5. Start the engine.
Does engine start?
YES >> System is OK (Now system is escaped from “LOCK MODE”).
NO >> GO TO 3.
3.PERFORM INITIALIZATION WITH CONSULT-III
Perform initialization with CONSULT-III.
For initialization, refer to “CONSULT -III Operation Manual NATS-IVIS/NVIS”.
NOTE:
If the initialization is not completed or malf unction, CONSULT-III shows the message on the screen.
Can the system be initialized?
YES >> System is OK.
NO >> GO TO 4.
4.PERFORM INITIALIZATION WITH CONSULT-III AGAIN
1. Replace BCM.
2. Perform initialization with CONSULT-III. For initialization, refer to “CONSULT -III Operation Manual NATS-IVIS/NVIS”.
NOTE:
If the initialization is not completed or malf unctions, CONSULT-III shows the message on the screen.
Can the system be initialized?
YES >> System is OK. BCM is malfunctioning. Replace BCM.
Perform initialization with CONSULT-III.
For initialization, refer to “CONSULT -III Operation Manual NATS-IVIS/NVIS”.
NO >> ECM is malfunctioning. Replace ECM.
Perform initialization or re-communicating function.
- For initialization, refer to “CONSULT -III Operation Manual NATS-IVIS/NVIS”.
- For re-communicating function, refer to BL-187, "
ECM Re-Communicating Function".
Diagnosis Procedure 5INFOID:0000000001327938
Self-diagnostic results:
“CHAIN OF IMMU-KEY” is displayed on CONSULT-III screen
1.CONFIRM SELF-DIAGNOSTIC RESULTS
Confirm self-diagnostic results “CHAIN OF IM MU-KEY” is displayed on CONSULT-III screen.
Does CONSULT-III screen display as shown?
YES >> GO TO 2.
NO >> Refer to BL-195, "
Trouble Diagnosis Symptom Chart".
2.CHECK NATS ANTENNA AMP. INSTALLATION
Check NATS antenna amp. installation. Refer to BL-201, "
Removal and Installation NATS Antenna Amp".
OK or NG
OK >> GO TO 3.
3AA93ABC3ACD3AC03ACA3AC03AC63AC53A913A773A893A873A873A8E3A773A983AC73AC93AC03AC3
3A893A873A873A8F3A773A9D3AAF3A8A3A8C3A863A9D3AAF3A8B3A8C
Page 933 of 3924

IVIS (INFINITI VEHICLE IMMOBILIZER SYSTEM-NATS)
BL-199
< SERVICE INFORMATION >
C
D E
F
G H
J
K L
M A
B
BL
N
O P
NG >> Reinstall NATS antenna amp. correctly.
3.CHECK KEY ID CHIP
Start engine with another registered ignition key or mechanical key.
Does the engine start?
YES >> Ignition key or mechanical key ID chip is malfunctioning. Replace the ignition key or mechanical key.
Perform initialization with CONSULT-III.
For initialization, refer to “CONSULT -III Operation Manual NATS–IVIS/NVIS”.
NO >> GO TO 4.
4.CHECK POWER SUPPLY FOR NATS ANTENNA AMP.
Check voltage between NATS antenna amp. connector M25 terminal 1 (L/R) and ground with CONSULT-III or
tester.
OK or NG
OK >> GO TO 5.
NG >> Check harness for open or short between NATS antenna amp. and fuse.
5.CHECK NATS ANTENNA AMP. SIGNAL LINE- 1
Check voltage between NATS antenna amp. connector M25 terminal 2 (G/B) and ground with analogue tester.
OK or NG
OK >> GO TO 6.
NG >> Check harness for open or short between NATS antenna amp. and BCM.
NOTE:
If harness is OK, replace BCM, perform initialization
with CONSULT-III. For initialization, refer to “CONSULT-III Operation Manual NATS–IVIS/NVIS”.
6.CHECK NATS ANTENNA AMP. SIGNAL LINE- 2
Check voltage between NATS antenna amp. connector M 25 terminal 4 (BR) and ground with analogue tester.
OK or NG
OK >> GO TO 7.
NG >> Check harness for open or short between NATS antenna amp. and BCM.
NOTE:
If harness is OK, replace BCM, perform initialization
with CONSULT-III. For initialization, refer to “CONSULT-III Operation Manual NATS–IVIS/NVIS”.
1 (L/R) – Ground : Battery voltage
PIIA6145E
Before inserting mechani
cal key in ignition knob
Voltage: 0V
Just after inserting mechanical key in ignition knob : Pointer of tester should move.
PIIA6146E
Before inserting mechani cal key in ignition knob
Voltage: 0V
Just after inserting mechanical key in ignition knob : Pointer of tester should move.
PIIA6147E
3AA93ABC3ACD3AC03ACA3AC03AC63AC53A913A773A893A873A873A8E3A773A983AC73AC93AC03AC3
3A893A873A873A8F3A773A9D3AAF3A8A3A8C3A863A9D3AAF3A8B3A8C
Page 1128 of 3924

DI-2
CONSULT-III Function (BCM) ................................60
Trouble Diagnosis ...................................................61
Symptom Chart .......................................................61
Power Supply and Ground Circuit Inspection .........61
Combination Meter Buzzer Circuit Inspection .........62
Front Door Switch (Driver Side) Signal Inspection ...63
Key Switch Signal Inspection (Without Intelligent
Key) ..................................................................... ...
64
Key Switch and Ignition Knob Switch Signal In-
spection (With Intelligent Key, When Mechanical
Key Is Used) ........................................................ ...
65
Lighting Switch Signal Inspection ...........................66
Seat Belt Buckle Switch (Driver Side) Signal In-
spection ............................................................... ...
66
Component Inspection ............................................67
LANE DEPARTURE WARNING SYSTEM ........69
Precaution for Lane Departure Warning (LDW)
system ................................................................. ...
69
System Description .................................................69
Action Test ..............................................................71
Camera Aiming Adjustment ....................................71
Component Parts and Harness Connector Loca-
tion ..........................................................................
76
Schematic ...............................................................77
Wiring Diagram - LDW - .........................................78
Terminal and Reference Value for LDW Camera
Unit .........................................................................
81
CONSULT-III Function (LDW) ................................81
Trouble Diagnosis ...................................................83
Preliminary Check ..................................................84
Power Supply and Ground Circuit Inspection .........84
DTC [C1B00] CAMERA UNIT MALF ......................85
DTC [C1B01] CAM AIMING INCMP .......................85
DTC [C1B02] VHCL SPD DATA MALF ..................85
DTC [C1B03] ABNRML TEMP DETECT ................86
DTC [U1000] CAN COMM CIRCUIT ......................86
DTC [U1010] CONTROL UNIT (CAN) ....................86
LDW Chime Circuit Inspection ................................86
LDW Switch Circuit Inspection ...............................88
LDW Indicator Lamp Circuit Inspection ..................90
Turn Signal Input Inspection ................................ ...91
Electrical Component Inspection ............................91
Removal and Installation for LDW Camera Unit .....91
Removal and Installation for LDW Chime ............ ...91
Removal and Installation for LDW Switch ...............92
CAN COMMUNICATION ...................................93
System Description .............................................. ...93
CAN Communication Unit .......................................93
COMPASS .........................................................94
Precaution for Compass ...................................... ...94
System Description .................................................94
Troubleshooting ......................................................94
Zone Variation Setting Procedure ...........................95
Calibration Procedure .............................................95
Wiring Diagram - COMPAS - ..................................97
Removal and Installation of Compass ....................97
CLOCK ..............................................................98
Wiring Diagram - CLOCK - .................................. ...98
Removal and Installation of Clock ...........................98
REAR VIEW MONITOR ....................................100
System Description .............................................. .100
Component Parts and Harness Connector Loca-
tion ........................................................................
101
Schematic .............................................................102
Wiring Diagram - R/VIEW - ...................................103
Terminal and Reference Value for Rear View
Camera Control Unit .............................................
106
CONSULT-III Function (REARVIEW CAMERA) ...106
Side Distance Guideline Correction ......................107
Power Supply and Ground Circuit Inspection .......108
Rear View Is Not Displayed with the A/T Selector
Lever in R-Position ................................................
108
The Rear View Image Is Distorted ........................112
Removal and Installation of Rear View Camera
Control Unit .......................................................... .
113
Removal and Installation of Rear View Camera ...113
3AA93ABC3ACD3AC03ACA3AC03AC63AC53A913A773A893A873A873A8E3A773A983AC73AC93AC03AC3
3A893A873A873A8F3A773A9D3AAF3A8A3A8C3A863A9D3AAF3A8B3A8C
Page 1134 of 3924

DI-8
< SERVICE INFORMATION >
COMBINATION METERS
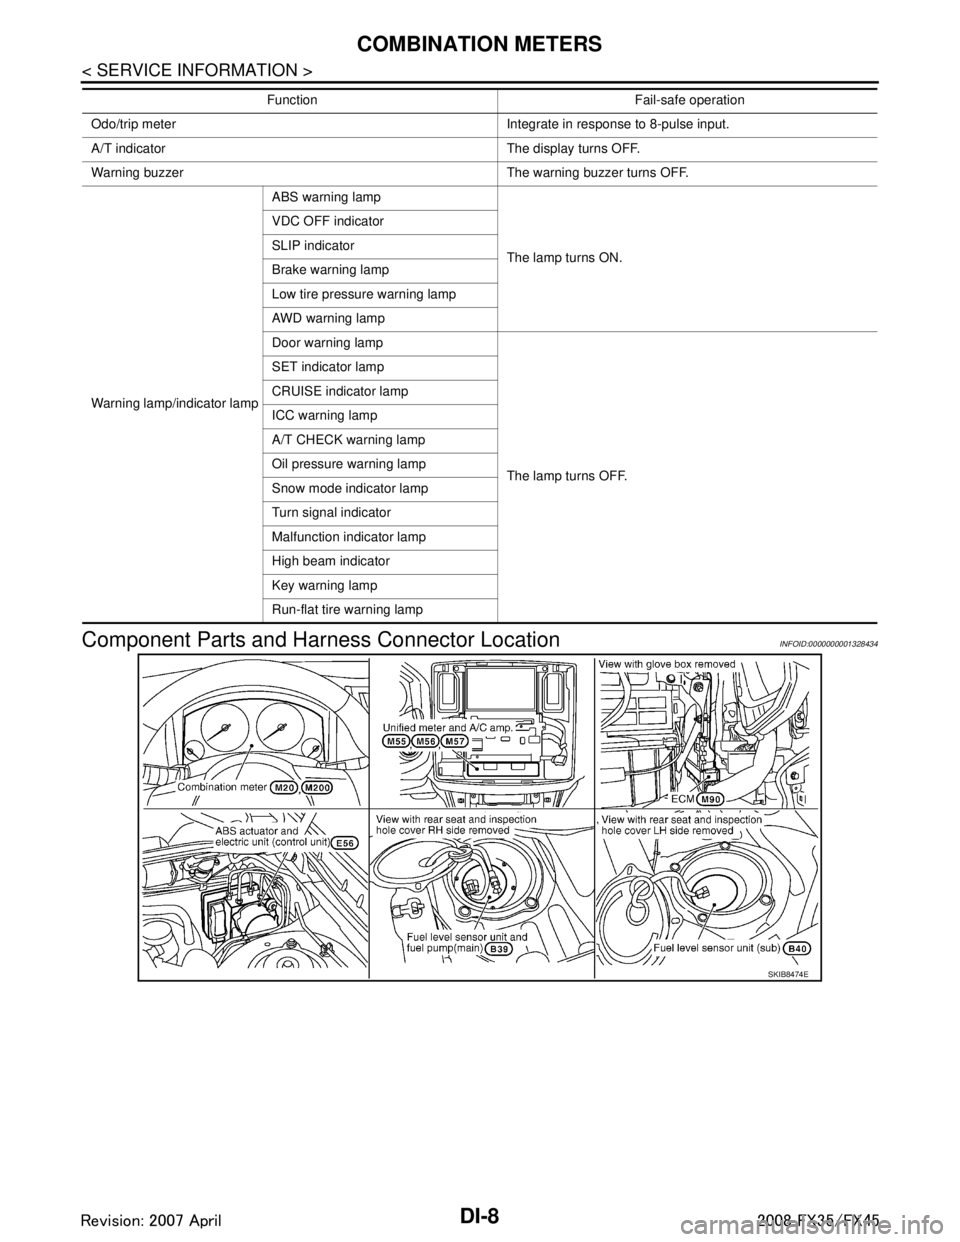
Component Parts and Harn ess Connector Location
INFOID:0000000001328434
Odo/trip meter Integrate in response to 8-pulse input.
A/T indicator The display turns OFF.
Warning buzzer The warning buzzer turns OFF.
Warning lamp/indicator lamp ABS warning lamp
The lamp turns ON.
VDC OFF indicator
SLIP indicator
Brake warning lamp
Low tire pressure warning lamp
AWD warning lamp
Door warning lamp
The lamp turns OFF.
SET indicator lamp
CRUISE indicator lamp
ICC warning lamp
A/T CHECK warning lamp
Oil pressure warning lamp
Snow mode indicator lamp
Turn signal indicator
Malfunction indicator lamp
High beam indicator
Key warning lamp
Run-flat tire warning lamp
Function Fail-safe operation
SKIB8474E
3AA93ABC3ACD3AC03ACA3AC03AC63AC53A913A773A893A873A873A8E3A773A983AC73AC93AC03AC3
3A893A873A873A8F3A773A9D3AAF3A8A3A8C3A863A9D3AAF3A8B3A8C
Page 1152 of 3924

DI-26
< SERVICE INFORMATION >
UNIFIED METER AND A/C AMP
UNIFIED METER AND A/C AMP
System DescriptionINFOID:0000000001328456
For the unified meter and A/C amp., the signal required for controlling the combination meter are integrated
in the A/C auto amp.
The unified meter and A/C amp. corresponds to a CONS ULT-III function (self-diagnosis results, CAN diag-
nosis support monitor, data monitor).
COMBINATION METER CONTROL FUNCTION
Unified meter and A/C amp. receives necessary information for combination meter from each unit by CAN communication.
Unified meter and A/C amp. transmits a signals with communication line (TX, RX) between unified meter and A/C amp. and combination meter.
Input/output signals between unified meter and A/C amp. and combination meter.
NOTE:
Combination meter performs fail-safe operation when unified meter and A/C amp. communication is malfunctioning. Refer to DI-5, "
Sys-
tem Description".
A/C AUTO AMP. FUNCTION
Unified meter and A/C amp. controls each operation for A/C auto amp. Regarding A/C control, refer to AT C -
24, "Description of Air Conditioner LAN Control System" in ATC section.
OTHER FUNCTIONS
Drive Computer Function
The signals required for the distance to empty (DTE) display are centralized in the unified meter and A/C
amp., converted into data, and transmitted to the disp lay unit (without NAVI) and display control unit (with
NAVI) using CAN communication.
Signal Buffer Function
Unified meter and A/C amp. transmits each signal to other units with CAN communication.
Unit Input Output
Unified meter and A/C amp. Seat belt buckle switch signal (Driver's side)
Parking brake signal
Illumination control nighttime required signal
Refuel status signal
Low-fuel warning lamp condition signal
Combination meter receive error signal
Delivery destination data signal
Combination meter specifications signal Vehicle speed signal (8-pulse)
Engine speed signal
Engine coolant temperature signal
Fuel level sensor signal (resistance value)
Malfunction indicator lamp signal
ABS warning lamp signal
Low tire pressure warning lamp signal
Run-flat tire wa
rning lamp signal
Brake warning lamp signal
A/T CHECK warning lamp signal
ICC warning lamp signal
Oil pressure switch signal
Door switch signal
AWD warning lamp signal
Key warning lamp signal
VDC OFF indicator lamp signal
SLIP indicator lamp signal
CRUISE indicator lamp signal
SET indicator lamp signal
High beam request signal
Turn indicator signal
Snow mode switch signal
ICC system display signal
Shift position indicator signal
Manual mode indicator signal
Manual mode gear position signal
CAN communication condition signal of A/T
Position lights request signal
Buzzer output signal
3AA93ABC3ACD3AC03ACA3AC03AC63AC53A913A773A893A873A873A8E3A773A983AC73AC93AC03AC3
3A893A873A873A8F3A773A9D3AAF3A8A3A8C3A863A9D3AAF3A8B3A8C
Page 1155 of 3924

UNIFIED METER AND A/C AMPDI-29
< SERVICE INFORMATION >
C
DE
F
G H
I
J
L
M A
B
DI
N
O P
NOTE:
Monitored item that does not match the vehicle is deleted from the display automatically.
*1: It dose not change when fastening or unfastening the passenger seat belt.
*2: Monitor keeps indicating “off” when brake warning lamp is on by the parking brake operation or low brake fluid level.
Power Supply and Gro und Circuit InspectionINFOID:0000000001328459
1.CHECK FUSE
Check for blown unified meter and A/C amp. fuses.
OK or NG
OK >> GO TO 2.
NG >> Be sure to eliminate cause of malfunction before installing new fuse. Refer to PG-3, "
Schematic".
2.CHECK POWER SUPPLY CIRCUIT
OIL W/L [On/Off] X Indicates [On/Off] condition of oil pressure warning lamp.
VDC/TCS IND [On/Off] X Indicates [On/Off] condition of VDC OFF indicator lamp.
ABS W/L [On/Off] X Indicates [On/Off] condition of ABS warning lamp.
SLIP IND [On/Off] X Indicates [On/Off] condition of SLIP indicator lamp.
BRAKE W/L [On/Off]
*2X Indicates [On/Off] condition of brake warning lamp.
KEY G W/L [On/Off] X Indicates [On/Off] condition of key warning lamp (green).
KEY R W/L [On/Off] X Indicates [On/Off] condition of key warning lamp (red).
KEY KNOB W/L [On/Off] X Indicates [On/Off] condition of key knob warning lamp.
M RANGE SW [On/Off] X X Indicates [On/Off] condition of manual mode range switch.
NM RANGE SW [On/Off] X X Indicates [On/Off] condition of except for manual mode range
switch.
AT SFT UP SW [On/Off] X X Indicates [On/Off] condition of A/T shift-up switch.
AT SFT DWN SW [On/Off] X X Indicates [On/Off] condition of A/T shift-down switch.
BRAKE SW [On/Off] X Indicates [On/Off] condition of brake switch (stop lamp switch).
AT-M IND [On/Off] X X Indicates [On/Off] condition of A/T manual mode indicator.
AT-M GEAR [5-1] X X Indicates [5-1] condition of A/T manual mode gear position.
P RANGE IND [On/Off] X X Indicates [On/Off] condition of A/T shift P range indicator.
R RANGE IND [On/Off] X X Indicates [On/Off] condition of A/T shift R range indicator.
N RANGE IND [On/Off] X X Indicates [On/Off] condition of A/T shift N range indicator.
D RANGE IND [On/Off] X X Indicates [On/Off] condition of A/T shift D range indicator.
AT CHECK W/L X Indicates [On/Off] cond ition of AT CHECK warning lamp.
CRUISE IND [On/Off] X Indicates [On/Off] condition of CRUISE indicator lamp.
SET IND [On/Off] X Indicates [On/Off] condition of SET indicator lamp.
CRUISE W/L [On/Off] X Indicates [On/Of f] condition of ICC warning lamp.
4WD LOCK SW [On/Off] X This item is not used for this model. “off” is always displayed.
4WD LOCK IND [On/Off] X This item is not used for this model. “off” is always displayed.
4WD W/L [On/Off] X Indicates [On/Off] condition of AWD warning lamp.
RR COMB STATE [OK/NG] X Indicates [OK/NG] condition of rear combination lamp circuit. Display item [Unit]
MAIN
SIGNALS SELECTION
FROM MENU Contents
Power source Fuse No.
Battery power supply 19 ACC power supply 10, 11
Ignition power supply 12
3AA93ABC3ACD3AC03ACA3AC03AC63AC53A913A773A893A873A873A8E3A773A983AC73AC93AC03AC3
3A893A873A873A8F3A773A9D3AAF3A8A3A8C3A863A9D3AAF3A8B3A8C
Page 1177 of 3924

WARNING CHIMEDI-51
< SERVICE INFORMATION >
C
DE
F
G H
I
J
L
M A
B
DI
N
O P
WARNING CHIME
System DescriptionINFOID:0000000001328473
Buzzer for warning chime system is installed in the combination meter.
The buzzer sounds when the combination meter receives buzzer output signal from each unit through uni- fied meter and A/C amp.
POWER SUPPLY AND CIRCUIT
Power is supplied at all times
through 50A fusible link (letter M, located in the fuse and fusible link block)
to BCM terminal 55,
through 15A fuse [No. 22, located in the fuse block (J/B)]
to key switch and ignition knob switch terminal 3 (with Intelligent Key), and
to key switch terminal 2 (without Intelligent Key), and
to BCM terminal 42,
through 10A fuse [No. 38, located in the fuse and fusible link block (with Intelligent Key)]
to key switch and ignition knob switch terminal 1,
through 10A fuse [No. 19, located in the fuse block (J/B)]
to unified meter and A/C amp. terminal 21, and
to combination meter terminal 8.
When ignition switch is in ON or START position, power is supplied
through 15A fuse [No. 1, located in the fuse block (J/B)]
to BCM terminal 38,
through 10A fuse [No. 12, located in the fuse block (J/B)]
to unified meter and A/C amp. terminal 22,
through 10A fuse [No. 14, located in the fuse block (J/B)]
to combination meter terminal 7.
Ground is supplied
to BCM terminals 49 and 52,
to unified meter and A/C amp. terminals 29 and 30, and
to combination meter terminals 5, 6 and 15
through grounds M35, M45 and M85.
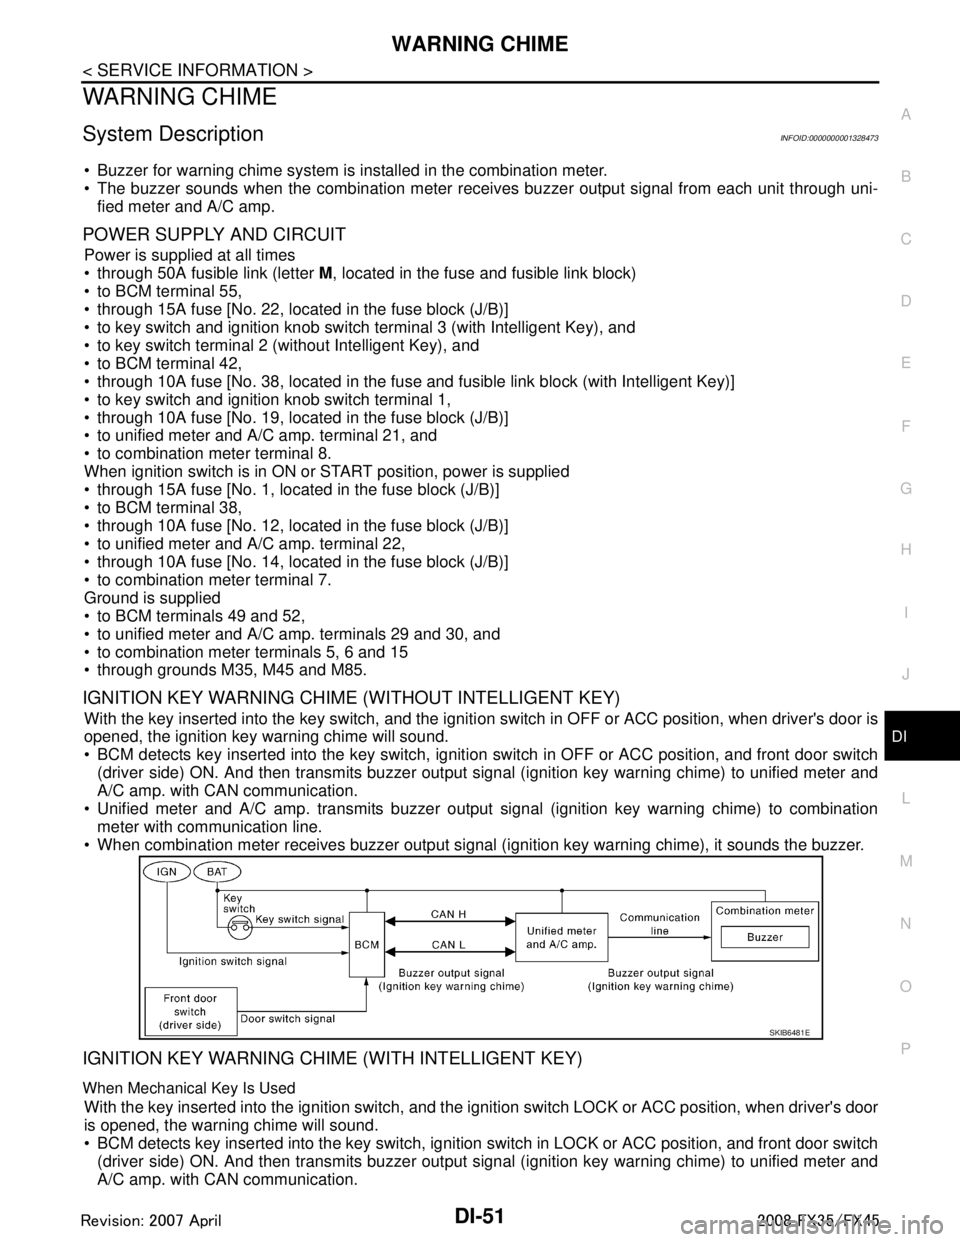
IGNITION KEY WARNING CHIME (WITHOUT INTELLIGENT KEY)
With the key inserted into the key switch, and the igniti on switch in OFF or ACC position, when driver's door is
opened, the ignition key warning chime will sound.
BCM detects key inserted into the key switch, igniti on switch in OFF or ACC position, and front door switch
(driver side) ON. And then transmits buzzer output signal (ignition key warning chime) to unified meter and
A/C amp. with CAN communication.
Unified meter and A/C amp. transmits buzzer output signal (ignition key warning chime) to combination
meter with communication line.
When combination meter receives buzzer output signal (ignition key warning chime), it sounds the buzzer.
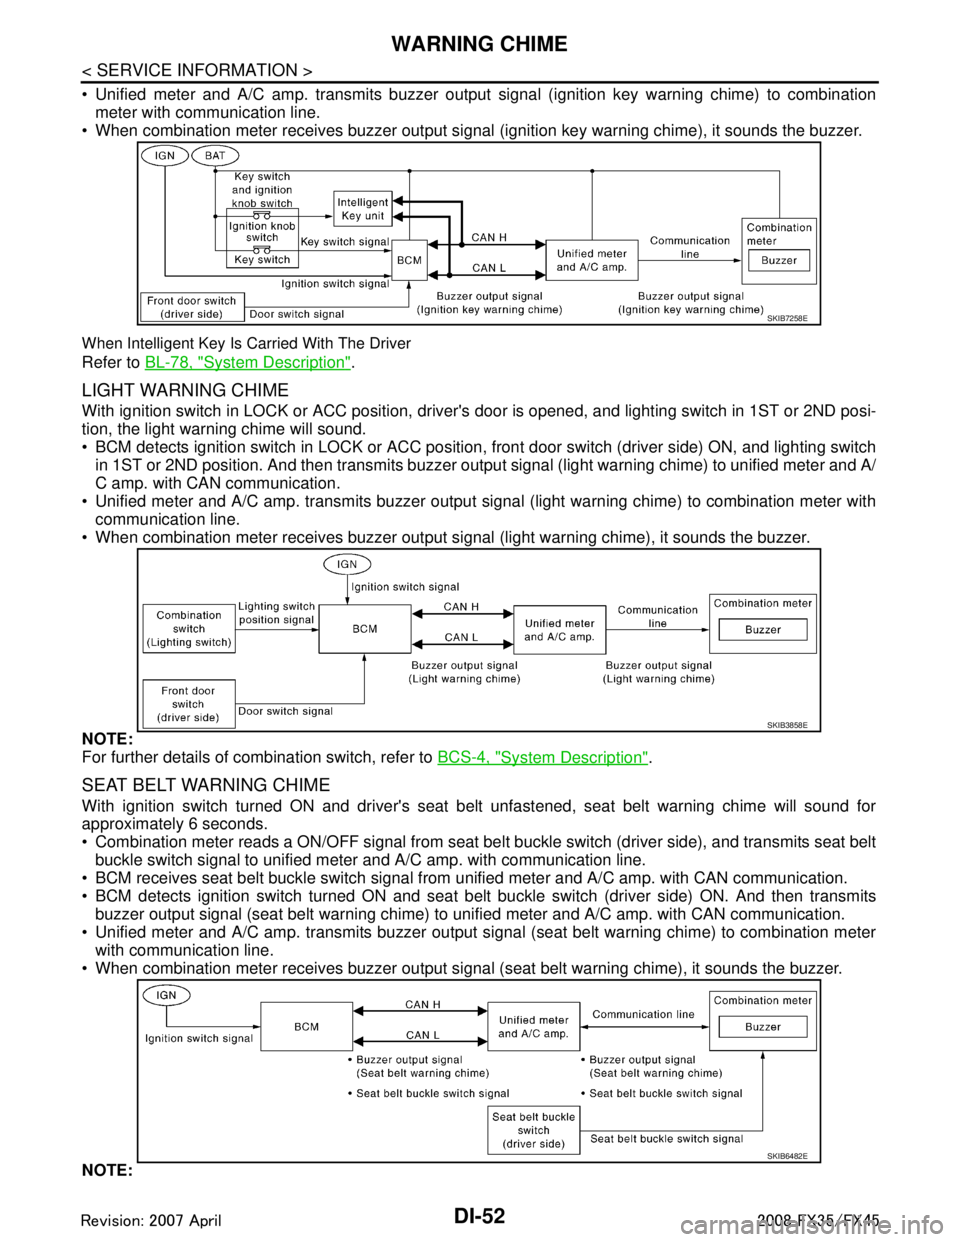
IGNITION KEY WARNING CHIME (WITH INTELLIGENT KEY)
When Mechanical Key Is Used
With the key inserted into the ignition switch, and the i gnition switch LOCK or ACC position, when driver's door
is opened, the warning chime will sound.
BCM detects key inserted into the key switch, ignition switch in LOCK or ACC position, and front door switch
(driver side) ON. And then transmits buzzer output signal (ignition key warning chime) to unified meter and
A/C amp. with CAN communication.
SKIB6481E
3AA93ABC3ACD3AC03ACA3AC03AC63AC53A913A773A893A873A873A8E3A773A983AC73AC93AC03AC3
3A893A873A873A8F3A773A9D3AAF3A8A3A8C3A863A9D3AAF3A8B3A8C
Page 1178 of 3924

DI-52
< SERVICE INFORMATION >
WARNING CHIME
Unified meter and A/C amp. transmits buzzer output signal (ignition key warning chime) to combinationmeter with communication line.
When combination meter receives buzzer output signal (ignition key warning chime), it sounds the buzzer.
When Intelligent Key Is Carried With The Driver
Refer to BL-78, "System Description".
LIGHT WARNING CHIME
With ignition switch in LOCK or ACC position, driver 's door is opened, and lighting switch in 1ST or 2ND posi-
tion, the light warning chime will sound.
BCM detects ignition switch in LOCK or ACC position, front door switch (driver side) ON, and lighting switch
in 1ST or 2ND position. And then transmits buzzer output signal (light warning chime) to unified meter and A/
C amp. with CAN communication.
Unified meter and A/C amp. transmits buzzer output signal (light warning chime) to combination meter with
communication line.
When combination meter receives buzzer output signal (light warning chime), it sounds the buzzer.
NOTE:
For further details of combination switch, refer to BCS-4, "
System Description".
SEAT BELT WARNING CHIME
With ignition switch turned ON and driver's seat belt unfastened, seat belt warning chime will sound for
approximately 6 seconds.
Combination meter reads a ON/OFF signal from seat bel t buckle switch (driver side), and transmits seat belt
buckle switch signal to unified meter and A/C amp. with communication line.
BCM receives seat belt buckle switch signal from unified meter and A/C amp. with CAN communication.
BCM detects ignition switch turned ON and seat bel t buckle switch (driver side) ON. And then transmits
buzzer output signal (seat belt warning chime) to unified meter and A/C amp. with CAN communication.
Unified meter and A/C amp. transmits buzzer output signal (seat belt warning chime) to combination meter with communication line.
When combination meter receives buzzer output signal (seat belt warning chime), it sounds the buzzer.
NOTE:
SKIB7258E
SKIB3858E
SKIB6482E
3AA93ABC3ACD3AC03ACA3AC03AC63AC53A913A773A893A873A873A8E3A773A983AC73AC93AC03AC3
3A893A873A873A8F3A773A9D3AAF3A8A3A8C3A863A9D3AAF3A8B3A8C